


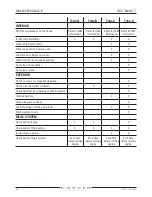


82
3327 • P2 6/06
OPERATING AND MANEUVERING
SECTION 6
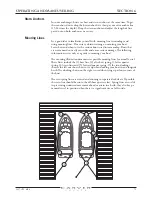
Do not overtrim your boat. When adjusting the trim tabs, press their
control switches for only one-half second at a time, then allow the boat
to respond. Continue to adjust the trim tabs in this manner until the boat
is at the desired trim angle. Over-trimming can cause the bow to veer
and may lead to loss of control. Always reset the trim tabs to the “BOW
UP” position before advancing throttles to achieve plane. Accelerating
the boat to planing speed while the trim tabs are lowered can cause a
loss of control.
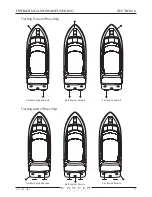
When the seas are at any angle to the boat’s stern, put the trim tabs in
the full “BOW UP” position. Do not change the trim tabs’ position until the
seas are
no longer at the stern.
5. Use the trim tabs individually to make beam-to-beam adjustments. If the
majority of your passengers are sitting on the port side, you may find that the
starboard side of your boat is riding higher than the port side. Use the “BOW
DOWN” side of the starboard trim tab switch to adjust the trim.
If your passengers decide to shift to the other side of the boat, level the
boat by pressing the “BOW UP” side of the starboard trim tab switch for a
few seconds. This undoes your previous adjustment. Then, use the “BOW
DOWN” side of the port trim tab switch to adjust the trim.
6. The trim tab switches can be used together to bring the bow of the boat to
a lower attitude. This adjustment is often used when running into choppy
seas. Bringing the bow down uses the sharper part of the boat’s “V” hull to
break through waves. Use the “BOW DOWN” side of both trim tab switches
simultaneously to adjust the trim. Be careful when making bow down
adjustments. Excessive bow down trim can cause considerable bow spray
which hampers visibility and reduces control of your boat.
Summary of Contents for 380 SPORT
Page 1: ...HIN CDR _________________ 380 Sport Owner s Guide 2007 Version 1 ...
Page 2: ......
Page 4: ......
Page 6: ......
Page 8: ......
Page 28: ......
Page 40: ...28 3327 P2 6 06 DC ELECTRICAL SYSTEM SECTION 2 DC SCHEMATIC 3327 324 002 5 12 7 05 ...
Page 54: ...42 3327 P2 6 06 AC ELECTRICAL SYSTEMS SECTION 3 AC SCHEMATIC 3327 300 015 2 9 04 ...
Page 108: ......
Page 122: ......
Page 124: ...112 3327 P2 6 06 WARRANTY AND PARTS SECTION 9 Hatches ...
Page 129: ...3327 P2 6 06 117 WARRANTY AND PARTS SECTION 9 Bill of Material ...
Page 130: ......
Page 131: ...3327 P2 6 06 119 WARRANTY AND PARTS SECTION 9 Carver Limited Warranty ...