background image

LOCATION 
 

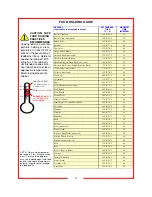
For proper operation and maximum performance, locate the 
unit in an ambient air temperature of 70ºF (21ºC).   
 
Avoid placement in areas near exhaust fans or where there 
are active air movements.   
 
For safe operation and maximum performance, locate the 
unit at least 2” from any wall or combustible material. 
 
Unit must be on a solid level surface. 

INSTALLATION and STARTUP 

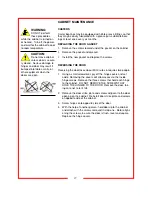
GROUNDING INSTRUCTIONS


This appliance is equipped with a cord having a grounding 
wire with a grounding plug which must be plugged into an 
outlet that is properly installed and grounded.  In the event of 
an electrical short circuit, grounding reduces the risk of elec-
tric shock by providing an escape wire for the electric current.   
 

WARNING—Improper use of the grounding can result in 
a risk of electric shock.

  Consult a qualified electrician or 

service agent if the grounding instructions are not completely 
understood, or if doubt exists as to whether the appliance is 
properly grounded. 


If necessary, contact a licensed 
electrician to install an appropriate 
20 amp electrical circuit with correct 
NEMA receptacle.   
 

DO NOT use an extension cord. 

Installation procedures must be  
performed by a qualified technician 
with full knowledge of all applicable 
electrical codes.  Failure could   
result in personal injury and proper-
ty damage. 


Damage to unit due to being      
connected to the wrong voltage or 
phase is 

NOT 

covered by warranty. 
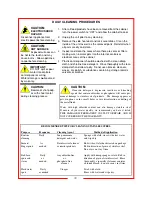
START-UP 

 
1.  Prior to use, thoroughly clean the interior of the unit, per 

the instructions in this manual. 

2.  Plug the power cord of the cabinet into a grounded outlet 

with a electrical service according to the electrical infor-
mation provided at right. 

3.  Set POWER switch to the “ON” position. 

4.  Do not load product into the cabinet.  Allow the heat to 

remove any residual oils which may adhere to inside met-
al surfaces.  A slight emission of smoke is common dur-
ing the first few hours of operation. 

T

he ground prong of the power 

cord is part of a system designed to 
protect you from electric shock in 
the event of internal damage. 


DO NOT cut off the large round 
ground prong or twist a blade to fit 
an existing receptacle. 

CAUTION:


Electrical Shock Hazard 


Unit is not waterproof, to avoid   
electrical shock, keep unit and 
counter from being submerged in 
water.  Do not operate if unit has 
been in contact with water. 

IMPORTANT:  

Power cord is 10' long  

IMPORTANT: 
Not under warranty 

WARNING: 

Risk of personal injury 

WARNING: 

Risk of personal injury 

MODELS 

HL7-5 
HL7-8 

MODELS 

HL7-14 
HL7-18 

HL7-1812 

International voltage: 
220 volts, 2100 watts, 9.5 Amps, 50 Hz, 1 
Ph, plug cap per specific country require-
ments / standards 

International voltage: 
220 volts, 1100 watts, 5 Amps, 50 Hz, 1 Ph, 
plug cap per specific country requirements / 
standards 

Summary of Contents for HL7-14

Page 1: ...S 2 FEATURES SPECIFICATIONS 3 UNPACKING INSPECTION FREIGHT DAMAGE 4 INSTALLATION STARTUP 5 CONTROL PANEL LAYOUT 6 NORMAL OPERATION 7 FOOD HOLDING GUIDE 8 REGULAR CLEANING PROCEDURES 9 CABINET MAINTENA...

Page 2: ...rounded outlet 3 Use this appliance only for its intended purpose as described in the manual a This equipment is specifically designed to hold pre cooked food at temperature b This equipment is intend...

Page 3: ...97 5 127 438 199 MODELS HL7 5 HL7 8 Cabinets with Adjustable Universal Slides for 12 x20 Pans 18 x 26 Trays and Gastronorm Pans NSF ANSI 4 Features Benefits Precision engineered heat ducts with blower...

Page 4: ...REIGHT DAMAGE CLAIM PROCEDURE NOTE For your protection please note that equipment in this shipment was carefully inspected and packaged by skilled personnel before leaving the factory Upon acceptance...

Page 5: ...esult in personal injury and proper ty damage Damage to unit due to being connected to the wrong voltage or phase is NOT covered by warranty START UP 1 Prior to use thoroughly clean the interior of th...

Page 6: ...panel layout Power Switch Temperature setting dial turn clockwise to increase temperature and counter clockwise to decrease temperature Temperature dial shows actual cabinet temperature Power indicati...

Page 7: ...g rotate the HEAT dial to the desired set point It will take approximately 30 minutes for the cabinet to preheat to your setting Once cabinet reaches temperature setting power indicating light will go...

Page 8: ...Pastries 165 F 74 C 30 Pizza uncovered 180 F 82 C 15 Pizza boxed 180 F 82 C 60 Poppers Deep Fried uncovered 190 F 88 C 25 Poultry Whole bone in 175 F 79 C 60 Poultry Cut up bone in 175 F 79 C 60 Ribs...

Page 9: ...in direction of grain of stainless steel Do not use on vinyl trim Stubborn Daily Any chloride free Apply with damp sponge or cloth Rub in spots and as or direction of grain of stainless steel Rinse st...

Page 10: ...T REMOVE THE SCREWS THAT HOLD THE HINGES TO THE DOOR Remove the door tak ing care not to let it fall 2 Remove the door strike plate and screws adjacent to the door opening on the cabinet Reinstall doo...

Page 11: ...HL7 SERIES WITH ANALOG CONTROL 120 VOLT 2100 WATT 17 5 AMP 1 PH 60 HZ or 120 VOLT 1100 WATT 9 2 AMP 1 PH 60HZ 12 WIRING DIAGRAM...

Page 12: ...limit trip defective Call service technician Takes too long to get to temperature Improper voltage Call service technician to verify incoming voltage matches cabinet specifications Unit is hot but low...

Page 13: ...CARTER HOFFMANN to be defective CARTER HOFFMANN neither makes nor assumes and does not authorize any other person to make or assume any obligation or liability in connection with its products other th...

Reviews: