background image

52C,P

SERIES

24

The Manufacturer reserves the right to discontinue, or 
change at any time, specifications or designs without 
notice and without incurring obligations.

■  

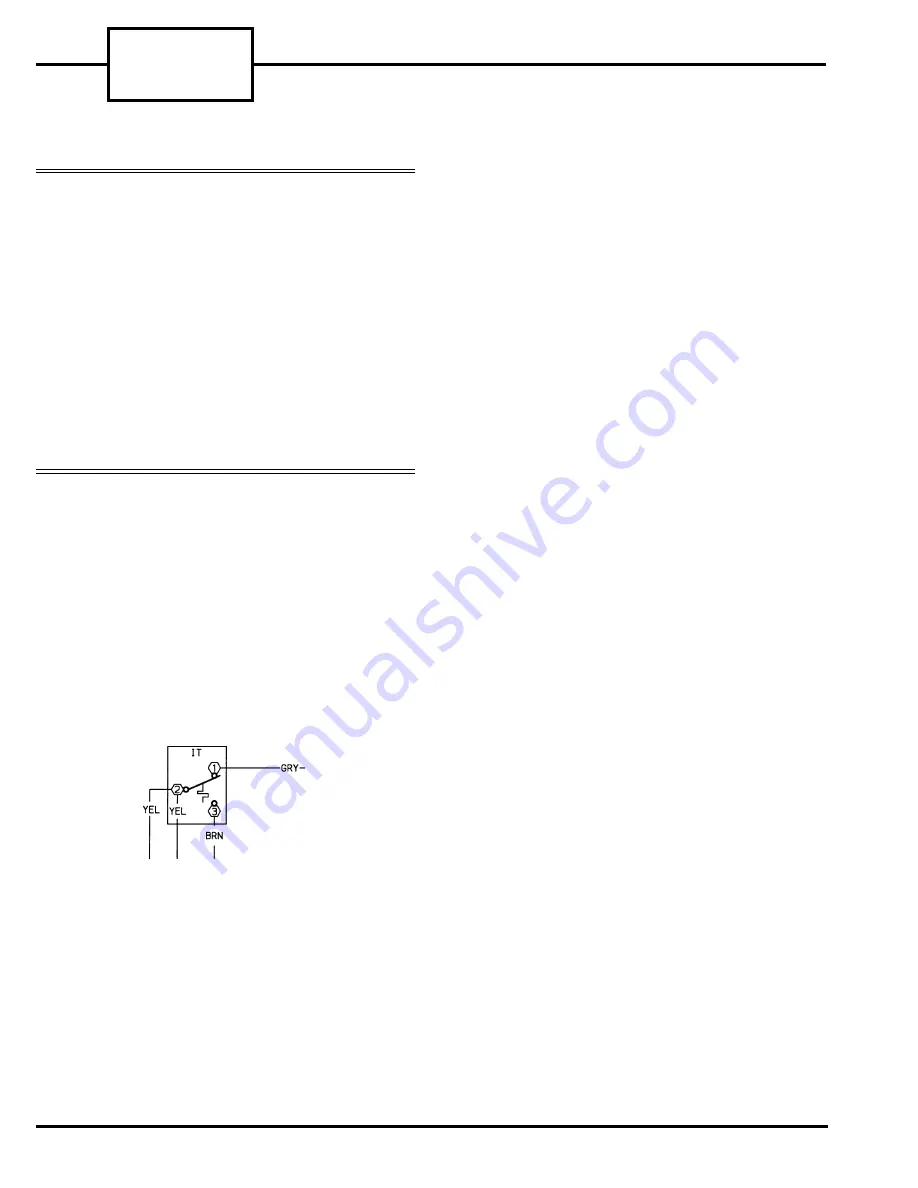
INDOOR THERMOSTAT (Heat/Cool and Cool Only 

Units) (Figure 46) —

 The thermostat maintains the 

selected temperature by cycling the compressor on and 
off during cooling operation and the electric heater 
during heating operation. The thermostat DOES 
NOT switch from heating to cooling, or cooling 
to heating. 
If the switch is in the CYCLE position, 
then the fan will be cycled off when the thermostat 
satisfies.
To verify the operation of the thermostat switch, a con-
tinuity test may be performed as follows:

1. Turn off unit power as described in UNIT

 DISASSEMBLY section.

2. Remove wire leads from thermostat. Note their 

locations to ease re-assembly.

3. Place one of the leads of the continuity tester on 

the terminal marked 2, and the other lead on 
either the terminal marked 1 or the terminal 
marked 3.

4. Adjust the thermostat up or down to verify the 

contacts of the switch open and close. When veri-
fying continuity of a closed switch, the ohm read-
ing should be 0 ohms. An open switch will show 
OL on the meter.

5. When testing is complete, reconnect the leads.

■  

INDOOR THERMOSTAT (Heat Pump Units) 

(Figure 47) —

 The heat pump indoor thermostat uses a 

two-stage switch for the heating mode. The first stage 
engages the compressor and reversing valve, and the 
unit operates in normal heat pump mode. The indoor 
thermostat maintains the selected temperature by 
cycling the compressor on and off in cooling mode. In 
the heating mode, the indoor thermostat will cycle the 
compressor or the heater, depending on the difference 
between the actual room temperature and the thermo-
stat temperature setting.
When the room temperature is more than 4 F cooler 
than the indoor thermostat setting, the second heating 
stage of the indoor thermostat engages the electric 
heat strip. This design feature allows the user to rap-
idly warm the room with the electric heat strip by 
turning the thermostat to its highest setting. When 
room temperatures approach the desired temperature, 
the user may adjust the thermostat to a personal 
comfort setting, which allows for normal heat pump 
operation.
NOTE: For outdoor coil temperatures below approxi-
mately 25 F, the outdoor frost thermostat prevents 
heat pump mode operation and immediately engages 
the electric heat strip upon a call for heating. The elec-
tric heat strip is NEVER energized at the same time 
as the compressor.
To verify operation of the heat pump indoor thermo-
stat switch, a continuity test may be performed as 
follows:

1. Turn off unit power as described in UNIT

 DISASSEMBLY section.

2. Remove wire leads from thermostat. Note their 

locations to ease re-assembly.

3. To test stage A, place one lead of the continuity 

tester on the terminal marked 2, and the other 
lead on either the terminal marked 1 or the termi-
nal marked 3.

4. Adjust the thermostat up or down to verify the 

contacts of the switch open and close. When veri-
fying continuity of the closed switch, the reading 
on the meter should be 0 ohms. An open switch 
will show OL on the meter.

5. To test stage B contacts, place one lead of the con-

tinuity tester on contact 5 and the other lead on 
either contact 4 or contact 6.

6. Adjust the thermostat up or down to verify the 

contacts of the switch open and close as in Step 4.

7. When testing is complete, reconnect the leads.

Consider the following safety issues:
• Prior to performing any service or maintenance on 

electrical equipment you must Disconnect All 
Power.

• New and unfamiliar tasks should be performed 

under the supervision of an experienced service 
technician.

• Personal protective equipment, such as safety 

glasses and work gloves, should be worn.

• The floor around the work area should be clean and 

free of debris.

• Make sure tools are the correct tools for job, and 

that they are working properly and in good 
condition.

• The 52C,P unit may weigh up to 150 pounds. Use a 

lifting device or ask for assistance if the unit must 
be moved.

FIGURE 46 — INDOOR THERMOSTAT (IT)

CONTACTS, ALL 52CE, PE MODELS

LEGEND (Figures 46-48)

COMP —

Compressor

HTR

Heater

IF

Indoor Fan

IT

Indoor Thermostat

OFT

Outdoor Frost Thermostat

OL

Overload

PLS

Primary LImit Switch

SLS

Secondary Limit Switch

Summary of Contents for P

Page 1: ...THOUT LATERAL DUCT ACCESSORY 5 ACCESSING OUTDOOR AIR SECTION COMPONENTS 5 GENERAL CLEANING 9 12 CLEANING AND SAFETY 9 TOOLS NEEDED 10 MONTHLY CLEANING 10 SEASONAL CLEANING 11 Page COMPRESSOR 13 17 COMPRESSOR TROUBLESHOOTING 14 BASIC HERMETIC COMPRESSOR ELECTRICAL MEASUREMENTS 14 COMPRESSOR REPLACEMENT 15 HEATERS 18 19 COMMON CAUSES OF HEATER FAILURE 18 HEATER REMOVAL 18 OPERATING CONTROLS 20 27 DE...

Page 2: ...dures The following units are covered in this manual 52CE 60 Hz cooling with electric heat units 52CQ 60 Hz cooling with electric heat and heat pump units 52PE 60 Hz cooling with electric heat units 52PQ 60 Hz cooling with electric heat and heat pump units 52PC 60 Hz cooling only units Knowing which model is being serviced will help deter mine if the unit is performing at optimum levels The model ...

Page 3: ...ocedures 3 Remove screw from access cover and remove access cover 4 Pull out the plug assembly and disconnect See Figure 5 IMPORTANT Follow manufacturer s instruc tions when disassembling and re assembling a unit for cleaning maintenance or part replace ment When disassembling wiring it is strongly recommended that numbered stickers be attached to identify leads and terminals to aid in the re asse...

Page 4: ...safety precautions to avoid personal injury when lifting and moving the chassis The unit basepan may have water in it Tilt the unit back slightly when removing it from the sleeve to drain some of the water into the sleeve CONDUIT ACCESS PANEL MOLEX PLUGS FIGURE 5 PLUG ASSEMBLY ON HARDWIRE UNITS REMOVABLE FILTER LOCATION OF REMOVED FILTER LOCKING SCREW NOTE 2nd LOCKING SCREW IS LOCATED BEHIND 2nd F...

Page 5: ...sembly screws using a 5 16 in nut driver See Figure 9 4 Gently pull the deck grille up and away from the unit 5 Reassemble by reversing steps above ACCESSING THE HEATER ASSEMBLY Once the discharge deck assembly is removed the Heater Assembly should now be accessible See Figure 10 1 Using pliers carefully remove all wires connected to the heater assembly Label each wire for ease of re assembly 2 Ge...

Page 6: ...ve condenser fan hub clamp See Figure 18 e Pull condenser fan off fan motor shaft f Remove bottom half of condenser orifice 3 Reassemble by reversing steps above REMOVE THE AIR DISCHARGE GRILLE 1 Remove the front panel from the unit reference Remove Front Panel section 2 Flip the panel front panel over to the backside Remove the 2 screws on each end of the air dis charge grille and remove grille S...

Page 7: ... ORIFICE PLASTIC GUSSET CONDENSER ORIFICE CAPTIVE SCREWS 2 CAPTIVE SCREWS 2 FIGURE 12 GUSSET REMOVAL FIGURE 13 LOCATION OF CAPTIVE SCREWS ON CONDENSER ORIFICE FIGURE 14 PRYING CONDENSER ORIFICE AWAY FROM TUBE SHEET FIGURE 15 REMOVING TOP OF CONDENSER ORIFICE ...

Page 8: ... SCREW SCREW DISCHARGE GRILLE FRONT PANEL BACK VIEW CONTROL DOOR HINGE PINS FIGURE 16 LOCATION OF OUTDOOR COIL TUBE SHEET SCREWS FIGURE 17 REMOVING OUTDOOR COIL FROM CONDENSER FAN FIGURE 18 REMOVING CONDENSER FAN HUB CLAMP FIGURE 19 LOCATION OF SCREWS ON DISCHARGE GRILLE ...

Page 9: ...nly trained and qualified service personnel should perform installation and service procedures on these units Untrained personnel may perform basic mainte nance tasks such as cleaning and replacing filters Refer to General Disassembly section of this manual for proper procedures to disconnect power to 52C P units Consider the following safety issues before beginning New and unfamiliar tasks should...

Page 10: ...all amount of mild dish detergent If detergent is used remove detergent residue with a gentle clean water stream Allow the filter to air dry REPLACING THE OUTDOOR AIR VENT FILTER If vent filter requires replacement 1 Open vent door to access vent filter 2 Remove vent door from hinges 3 Using needle nose pliers remove vent cable from vent door 4 Using a small flat head screwdriver pry the filter fr...

Page 11: ...basepan and drain passages by rinsing with clean water Be sure all debris is removed from the drain valve See Figure 26 7 Thoroughly clean outdoor fan assembly and all other mechanical components located in outdoor coil area Be sure to remove all dirt and debris 8 Clean wall sleeve CLEANING THE INDOOR FAN AND FAN SCROLL Dried debris and build up on the blower wheel and fan scroll can reduce the ef...

Page 12: ...52C P SERIES 12 DRAIN VALVE FIGURE 24 VACUUMING EVAPORATOR COIL FIGURE 25 CLEANING COILS FIGURE 23 PTAC EXTERIOR SURFACES FIGURE 26 BASEPAN SECTION ...

Page 13: ...ttached to the motor bearing The pump bearing provides a thrust surface for the shaft and the rolling piston Compressed gas is separated from the suction gas by the vane Discharge gas pres sure and the vane spring keep the vane in contact with the rolling piston DISCHARGE MUFFLER DISCHARGE VALVE CYLINDER PISTON SUCTION MUFFLER ACCUMULATOR SUCTION INLET DISCHARGE TUBE VANE OIL TUBE SHELL STATOR ECC...

Page 14: ...otor windings The second test requires checking the electrical resistance of each of the electrical motor windings to ground These tests may be accomplished by performing the following steps 1 DISCONNECT ALL POWER TO THE UNIT 2 Remove the unit chassis from the sleeve as detailed in the UNIT DISASSEMBLY section 3 Open the control box as detailed in the UNIT DISASSEMBLY section then locate label and...

Page 15: ...ABLE GASES IN SYSTEM X X SYSTEM REFRIGERANT OVERCHARGED X X DISCHARGE LINE RESTRICTED X X CAPILLARY TUBE OR STRAINER RESTRICTED OR PLUGGED X X X FAN BLADE OR MOTOR DEFECTIVE X X FAN BLADE OR BLOWER WHEEL STUCK X X SYSTEM REFRIGERANT UNDERCHARGED X X EVAPORATOR AIRFLOW RECIRCULATION X UNIT OVERSIZED FOR APPLICATION X COMPRESSOR REQUIRES START ASSIST X X NO POWER TO UNIT X LOW VOLTAGE TO UNIT X X X ...

Page 16: ...mpressor mounting bolts and remove the compressor 9 For all units Remove and replace the strainer and capillary tubes from the system See Figure 32 for strainer and capillary tube location 10 For Heat Cool Units Use an in line filter drier P N P504 80845 The filter drier can be installed in any location in suction line See Figure 33A for general installation location For Heat Pump Units Use an in ...

Page 17: ...he top of each process tube to ensure the system is sealed leave the pinch off tool in place until after the brazing pro cess is complete 17 Reassemble the unit by reversing steps 1 9 18 Connect the compressor wires and energize the unit to verify operation REFRIGERANT CHARGING Every mechanical refrigeration system that is opened for servicing must be accurately charged before it is returned to se...

Page 18: ...tion COMMON CAUSES OF HEATER FAILURE Heater failure may result from broken heater coils primary limit switch failure or an open secondary limit switch These conditions are generally caused by low or no airflow HEATER REMOVAL Before working on the heater read the instructions thoroughly and gather the necessary tools for the job Review all safety information on the unit and in the product literatur...

Page 19: ...rm at its optimum efficiency See Figure 36 for approximate resistance for heaters at 75 F Before checking the heater coil resistance be sure all power to unit is off To check resistance set the volt ohmmeter selector switch to the lowest ohms value Next connect the volt ohmmeter leads to each side of the heater coil at the studs that hold the limit switches in place Incorrect readings can be obtai...

Page 20: ...p under these conditions The outdoor frost thermostat has a manual override to place the unit in electric heat mode operation only The override switch is located behind the front panel on the front side of the unit control box door The reversing valve allows for operation in reverse cycle heat pump mode The valve is located in the piping sys tem and is controlled by the reversing valve solenoid co...

Page 21: ...1 TYPICAL WIRING FOR MULTIPLE 52C PTAC UNITS CONNECTED TO 1 WALL THERMOSTAT All units must be connected to same ground source To accomplish this be sure to connect all units back to the same breaker box NOTES 1 Do not daisy chain R 24 VAC 2 Maximum of 4 PTAC units can be con nected to one single wall thermostat ...

Page 22: ...CONTROLS OUTSIDE OR VENT AIR Slide the vent lever to the fully open position for outside air or fully closed position for vented air FAN CYCLE The fan cycle switch allows the fan to operate in 2 modes CON Fan runs continuously circulating air even when the temperature setting has been satisfied This helps to maintain the room temperature closer to the thermostat setting CYC Fan cycles on and off w...

Page 23: ... operating in reverse cycle the outdoor coil may begin to frost As frost accumulates on the outdoor coil the unit may switch into defrost mode The defrost mode is activated when the outdoor frost thermostat sensor detects a temperature below 20 F on the coil At this point the thermostat deenergizes the compressor and activates the electric heat The unit will remain in electric heat mode until the ...

Page 24: ... to its highest setting When room temperatures approach the desired temperature the user may adjust the thermostat to a personal comfort setting which allows for normal heat pump operation NOTE For outdoor coil temperatures below approxi mately 25 F the outdoor frost thermostat prevents heat pump mode operation and immediately engages the electric heat strip upon a call for heating The elec tric h...

Page 25: ... start capacitor may bulge or blow out A run capacitor may bulge or leak In these instances the capacitor must be replaced with one recommended by the manu facturer If there are no visual signs of capacitor fail ure testing of the capacitor resistance may be done with a volt ohmmeter as detailed below 1 Turn off unit power as described in UNIT DISASSEMBLY section but do not unplug the service cord...

Page 26: ...e leads ELECTRICAL COMPONENTS REMOVAL AND REPLACEMENT INDOOR THERMOSTAT To remove the indoor thermostat perform the following steps 1 Turn off unit power as described in UNIT DISASSEMBLY section 2 Remove front panel 3 Remove thermostat knob to expose 2 Phillips head mounting screws 4 Open the control box as described in the UNIT DISASSEMBLY section of this manual 5 Carefully remove the thermostat ...

Page 27: ...urn off unit power as described in UNIT DISASSEMBLY section 2 Open the control box as described in UNIT DISASSEMBLY section of this manual 3 Remove the 3 wires from the fan cycle switch See Figure 52 for location noting location of wires for re assembly 4 Push the snaps of the switch housing toward the switch with a pair of pliers or small screwdriver Gently push the switch out of the housing 5 Re...

Page 28: ...and will not close until the motor cools See Figure 55 for typical motor winding resistance measurements The resistance values in the table are approximate Values that are within 10 of those listed are acceptable If the motor in your model is not listed find a motor of similar horsepower and voltage on the chart and compare it to the resistance measurements of your motor 5 Measure the resistance o...

Page 29: ...UCK X BROKEN MOTOR WIRE X X X X MOTOR WINDING GROUNDED X X OPEN MOTOR WINDING X X X X UNIT 52C P BTUH 7 000 9 000 12 000 15 000 CARRIER MOTOR PART NUMBER HC37GE237 HC37GE238 MANUFACTURER S PART NUMBER 5KCP29ECA299A 5KCP29ECA301 MOTOR VOLTAGE 208 230 208 230 MOTOR HORSEPOWER 075 125 MOTOR SPEEDS 2 2 RESISTANCE OHMS BLACK TO WHITE WIRE 101 4 90 RESISTANCE OHMS BLACK TO BROWN WIRE 45 8 71 RESISTANCE ...

Page 30: ...e rotary switch Refer to the unit wiring schematic which is attached to the front panel of the control box See Figure 56 7 Carefully pull fan motor leads through the parti tion hole located in the back of the control box 8 Remove the top gussets as detailed in Remove the Gussets section 9 Remove the top half of the condenser orifice as detailed in Detach the Condenser Orifice From the Condenser Co...

Page 31: ... 52CQ TYPICAL WIRING SCHEMATIC FOR STANDARD HEAT PUMP UNITS WIRING DIAGRAMS Refer to Figures 57 61 for Typical Wiring Schematics NOTE Figures 57 61 should not be substituted for the schematic located on control box ...

Page 32: ...52C P SERIES 32 FIGURE 58 52CQ TYPICAL WIRING SCHEMATIC FOR WALL THERMOSTAT CONTROL HEAT PUMP UNITS ...

Page 33: ...33 FIGURE 59 52CE TYPICAL WIRING SCHEMATIC FOR STANDARD HEAT COOL UNITS ...

Page 34: ...52C P SERIES 34 FIGURE 60 52CE TYPICAL WIRING SCHEMATIC FOR WALL THERMOSTAT CONTROL HEAT COOL UNITS ...

Page 35: ...35 FIGURE 61 52PC TYPICAL WIRING SCHEMATIC FOR STANDARD COOLING ONLY UNITS ...

Page 36: ...t to the outdoor coil to be evaporated In second stage a vortex pump will suck condensate water into the con denser airstream where it will be blown onto the outdoor coil for evaporation 6 At what temperature will the outdoor defrost thermostat switch the unit heat pumps only into defrost emergency heat mode When the outdoor coil temperature falls below 20 F outdoor ambient temperature of approxim...

Page 37: ... 30A Field Installed Fuse Kit 30 amp for electrical subbase Electrical Connections 52C P 11SI HARDWIRE KIT 1PK Permanent power connection to the unit includes 36 of flexible conduit and unit mounted connector 230 208V and 265V 1 per pack 52C P 19SI CONDUIT INTF 4PK Interface kit for field supplied conduit to provide permanent power connection 230 208V and 265V to the unit Kit includes Molex connec...

Page 38: ......

Page 39: ......

Page 40: ...acturer reserves the right to discontinue or change at any time specifications or designs without notice and without incurring obligations PC 132 Catalog No 535 20019 Printed in U S A Form 52C P 1SM Pg 40 1 02 Replaces New Book 1 4 Tab 9a 11a ...

Reviews: