background image

T H E   P R O C E S S O R   O P E R A T E S

THESE CONTACTS

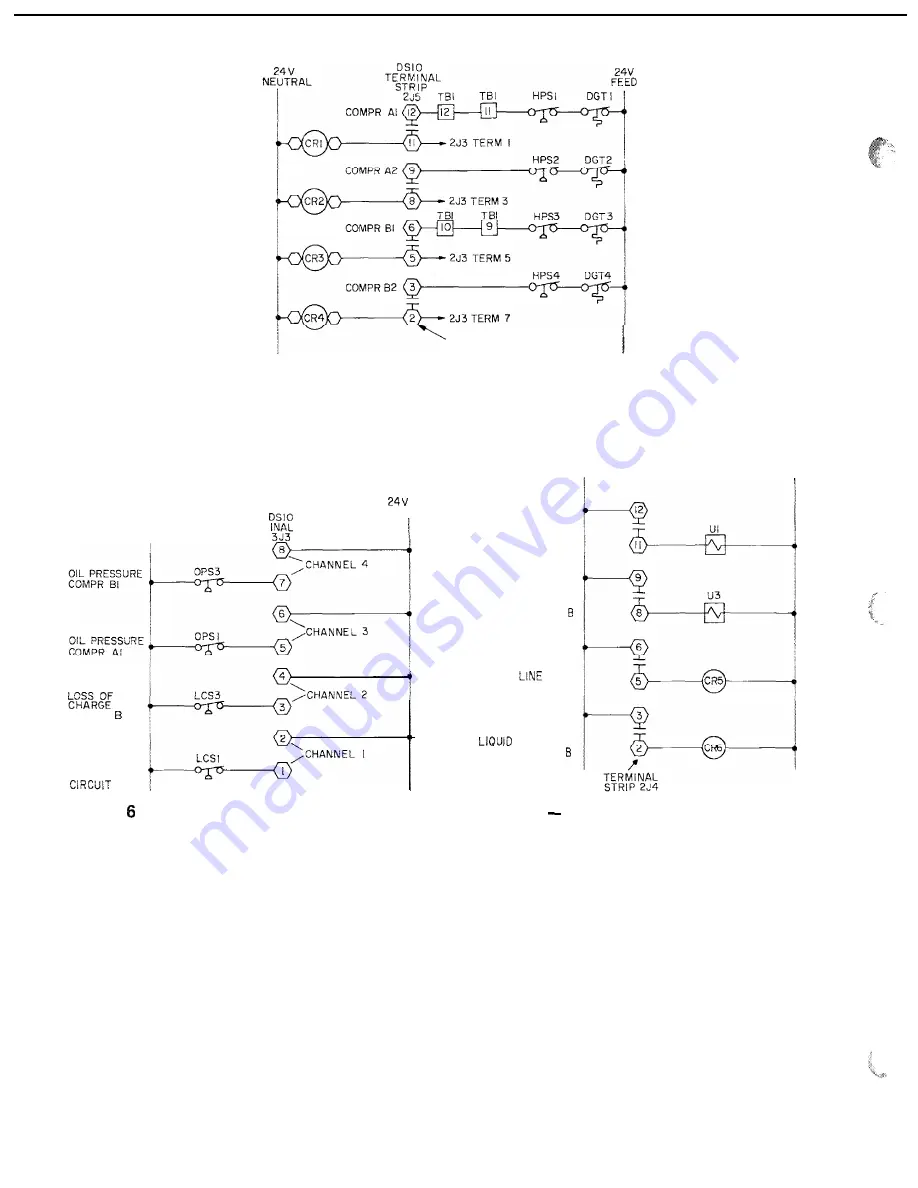
Fig. 5 

 Compressor 24-V Control Circuit Wiring

(Simplified)

24V FEED

24V NEUTRAL

2 4 v

F E E D

TERM 

 STRIP

N E U T R A L

CIRCUIT 

LOSS OF
C H A R G E

  A

Fig. 


 Pressure Feedback Circuit Wiring

(Simplified)

U N L O A D E R   C K T .   A

UNLOADER CKT. 

LIQUID 
SOLENOID CKT. A

 LINE

SOLENOID CKT. 

Fig. 7 

 Auxiliary Components 24-V Control

Circuit Wiring (Simplified)

1 6

Summary of Contents for HS070-160

Page 1: ...ervice mechanics should install start up and service this equipment When working on the equipment observe precautions in the literature tags stickers and labels attached to the equipment and any other safety precautions that apply l Follow all safety codes 0 Wear safety glasses and work gloves l Use care in handling rigging and setting bulky equipment l Use care in handling elcetronic components E...

Page 2: ...0 second time period the EXV driver module senses this and the processor module immediately shuts down all compressors in the affected refrigeration circuit If a shutdown occurs due to loss of cftarse or low oil pressure the EXV driver module communicates this to the processor module and the processor module locks the compressors off in the affected refrigeration circuit The proper fault code s wi...

Page 3: ...or the other control functions The control monitors the superheat and the rate of change of superheat to control the position of the valve The valve stroke is very large this results in very accurate control of the superheat The electronic expansion valve is also used to limit the maximum saturated suction temperature to 55 F 12 8 C to keep from overloading the compressor during high cooler water ...

Page 4: ...B The liquid line solenoid valve remains closed for 10 seconds after the initial compressor on that refrigeration circuit starts This permits a pump out cycle at start up to minimize refrigerant floodback to the compressor If the compressor in that refrigeration circuit has run in the 15 minutes before the call for cooling the pumpout cycle is bypassed After pumpout the liquid line solenoid valve ...

Page 5: ... FAILURE Unit will restart automatically when power is restored BLOWN FUSE IN POWER FEED DISCONNECT Replace fuse Restart is automatic LOW WATER TEMPERATURE CUTOUT Move RUN STANDBY switch to STANDBY then back to RUN Restart is automatic AUXILIARY INTERLOCK Automatic restart after condition is corrected OPEN CONTROL CIRCUIT FUSE Replace fuse Unit will restart automatically FREEZE PROTECTION Unit wil...

Page 6: ...ing the function name key will advance the display through all subfunctions within a function and then back to the first To move to another function either depress the function name key for the desired function display will show the first subfunction or Access a particular subfunction by using the subfunction number and the function name key KEYBOARD ENTRY DISPLAY R E S E T R S T R R S P DEMAND Tt...

Page 7: ... LCSA X LCSB X OILA X OILB X OUTPUTS SLDA X SLDB X UNLA X UNLB X EXVAO X EXVAC X EXVBO X EXVBC X COMP CA1 X CA2 X CBI X CB2 X X ALARMS ALARM X ALARM X ALARM X MODE MODE X STAG ES X STAGE q 4 El r c 0 c 0 0 c cl 4 ill c SET POlNT If unit is in dual set point mode the set point currently in effect is displayed 0 t El 4 Leaving water temperature System temperatures Cooler leaving water temp Cooler en...

Page 8: ...mber or for zero Field configuration entry codes Number of unloaders enter number Reset type none 1 return water 2 space or outside air Load shed enable disable 1 enable Ftuid type water 1 brine Pulldown enable disable 1 enable FACT CFG COMP X F F D C F G UNLS X RSTP X LDSH X FLD X PLDN X Sunday flag LL rTime periods 2 8 same elements as period I q 4 SET POINT COMMENT DISPLAY SET POINT c w s o x c...

Page 9: ...hut off Circuit B shut off Stop reset Reset Method M a n u a l M a n u a l M a n u a l M a n u a l M a n u a l M a n u a l M a n u a l M a n u a l m a n u a l Auto M a n u a l M a n u a l M a n u a l M a n u a l Auto Auto Auto Auto Auto Auto Auto Probable Cause High pressure switch trip or high discharge gas temp switch trip on when it is not supposed to be on Wiring error between electronic contr...

Page 10: ... Table 6 shows the order of the readouts TEST FLJNCTlOh The test operates the Quick Test diagnostic program When the unit is in STANDBY mode the test subfunctions will energize the solenoid valves unloaders electronic expansion valves and com pressors The solenoids and unloaders will energize for 3 minutes The expansion valve will travel to fully open in one test and to fully closed in the next Th...

Page 11: ...d water pump is turned on The schedule function can be programmed ngle set point or dual set pntnt operation for inactive si SET POINT FUNCTION Set points are entered through the keyboard Set points can be changed within the upper and lower limits which are fixed The ranges are listed below Chilled Water Set Point Water 40 to 70 F 4 4 to 21 C Brine Special Order Units 15 to 70 F 9 4 to 21 C Rc set...

Page 12: ...le this mode shuts down the unit in the same manner as Unit Standby If the schedule is holding the machine off when it is needed set the schedule for inactive mode until the schedule can be properly reprogrammed See the Sched ule Function section of the Installation Start Up and Service Instructions The override feature can also be used to temporarily place the unit in occupied mode Enter c l SCHD...

Page 13: ...e compressors are operating the leaving water temperature thermistor will indicate no temperature change But the temperature of the entering water will drop rapidly and the entering water thermistor will detect this When the entering water temperature drops to 5 F 2 8 C below the leaving water temperature alf the compressors will stop and code no 61 will be displayed To correct use manual reset me...

Page 14: ...does not necessarily mean that a thermistor is accurate To determine accuracy the reading must be compared with a measure ment of the actual temperature to which the thermistor probe is exposed Quick Test The Quick Test feature allows the service technician to individually test all the inputs and outputs of the control system The test function operates the Quick Test diagnostic program When the un...

Page 15: ...ponds to that resistance this temperature should appear in the Quick Test display Loss of charge and oil pressure switch tests show LOW if the switch is open and NRM or SAFE if the switch is closed The input channel can be tested by disconnecting the switch and using a jumper to simulate a closed or open circuit See Fig 5 Note that the switch is read by the processor period ically not continuously...

Page 16: ...24V NEUTRAL 2 4 v F E E D 1 DSlO TERM I STRIP 24v N E U T R A L LC R F CIRCUIT B LOSS OF C H A R G E CiRCUtT A Fig 6 Pressure Feedback Circuit Wiring Simplified U N L O A D E R C K T A UNLOADER CKT B LIQUID LINE SOLENOID CKT A LIQUID LINE SOLENOID CKT B Fig 7 Auxiliary Components 24 V Control Circuit Wiring Simplified 16 ...

Page 17: ... 14213 6 13825 5 13449 2 13084 2 12730 1 12386 6 120533 11730 0 11416 l 11111 5 10815 8 10528 7 10250 0 9979 3 9716 5 9461 3 9213 4 8972 6 8738 6 8511 4 8290 6 59 0 661 0 61 0 620 63 0 644 0 65 0 66 0 67 0 68 0 69 0 70 0 71 0 T2 0 73 13 74 0 75 0 76 0 77 0 76 0 79 0 80 0 87 0 82 0 83 0 84 0 85 0 E6 0 87 0 88 O 89 0 90 0 91 0 92 0 93 0 94 0 95 0 96 0 97 0 98 0 99 0 100 0 101 0 102 0 103 0 104 0 105...

Page 18: ...63 20 079 19 058 I a 094 17 184 16 325 15 515 14 749 14 026 13 342 12 696 12 085 11 506 10 959 10 441 9 9495 9 485 9 0445 8 627 a 237 7 8555 T E M P E R A T U R E C 16 17 la 19 20 21 22 23 24 25 26 27 28 29 30 31 32 33 34 35 36 37 38 39 40 41 42 43 44 45 46 47 48 49 50 57 52 53 54 55 56 57 58 59 60 61 62 63 64 65 66 67 68 69 70 V O L T A G E 3 38739 3 3366 3 2853 3 23369 3 18154 3 12913 3 07641 3 ...

Page 19: ... recheck Press to reach the EXV A Close Quick Test If a problem still exists replace the EXV driv er If the voltage reading is correct the expansion valve should be checked Next text EXVB Connect the positive test lead to pin 7 and the negative to pin 8 9 IO 1 l in succes sion during the EXVB Quick Test Step 2 Check EXV Wiring Check wiring to elec tronic expansion valves from terminal strip on EXV...

Page 20: ...If EXV plug was disconnected during this process reconnect it after the cover is removed 4 Enter appropriate EXV Quick Test step for EVXA or EXVB in the outputs subfunction of the test function p p j q Press ENTR to initiate test With cover lifted off the EXV valve body observe operation of valve motor and lead screw The motor should turn in the clockwise direction and the lead screw should move d...

Page 21: ...rete steps of n otjc rn arc obtained The large number of steps and long st cdkt r csults in very itccurate control of refrigerant flow B e c a u s e tht EXVs art wntmEItd hy rtw processor module it is possible to track vaIvc pr sition During initial start up EXV is fully cloxcd After start up v rIkc position is tracked by processor by constantly thsct ving amount of valve movement The processor ke...

Page 22: ...8 are located in lead compressor in each circuit in a suction passage between motor and cylinders above oil pump SENSOR REPLACEMENT TI T2 T5 T6 T7 T8 Compressor and Cooler Sensors are installed directly in refrigerant or water circuit Relieve all refrigerant pressure or drain water before removing Proceed as follows refer to Fig I I I Remove and discard original sensor and coupling I IMPORTANT Do ...

Page 23: ... See Fig 9 The proper addresses are PSI0 Processor Module 00 DSIC Relay Module 32 I 610 IiXV Driver Module 50 If a modules indicate a communication failure check the COM hq l tg on the PSI0 module for proper seating lf r good connection is assured and the condition per sists replacr the PSI0 module Xf only a ITS 10 module indicates a communication failure check the COhlM plug on that module for pr...

Page 24: ...re powered up and powered off by a signal from the microprocessor The relays switch the circuit to which they are connected No power is supplied to these connections by the DSIO module S E N S O R B U S C O N N E C T O R INPUTS 24 VAC CHANNEL I J3 PINS I 2 3 I 18 2 3 8 4 586 4 788 2 4 6 88 ARE GROUND C1 PSI0 DSIO DSIO HSIO RELAY EXV DRIVER Fig 13 Sensor Bus Wiring COMMON Is CHANNEL fMoN MON MON 1 ...

Page 25: ...lve to neutral in a repeating sequence to drive the valves in incremental steps S E N S O R B U S C O N N E C T O R RED STATUS LIGHT iREEN C O M M U N I C A T I O N LtGHT STEPPER MOTOR 2 J4 STEPPER MOTOR I I 2 4 6EiBARE GROUND C Keyboard Display Module HSIO Fig 17 he onlv function of the HSIO is to allow the operator I cr municate with the processor It is used to enter confiyt ra tions and set poi...

Page 26: ...or short Replace compressor if necessary Compressor loses oil Seized compressor Reolace comPressor Loss of charge control 1 Repair leak Compressor cycles off on toss of charge Compressor shuts down on high pressure control erratic in action I Low refrigerant charge Add refrigerant High pressure control Replace control erratic in action Expansion valve relay contacts Check cooler and Frosted suctio...

Page 27: ......

Page 28: ...s the right to discontinue or change at any time specifications or designs without notice and without incurring obligations I Book 2 PC111 Catalog No 533 030 Printed in U S A Form30HR HS 1T Pg 28 l 89 Replaces New T a b 5c ...

Reviews: