background image

Step 4—Outdoor Fan

Keep the condenser fan free from all obstructions to ensure
proper cooling operation. Never place articles on top of the
unit. Damage to unit may result.

1. Remove 6 screws holding outdoor grille and motor to top

cover.

2. Turn motor/grille assembly upside down on top cover to

expose fan blade.

3. Inspect the fan blades for cracks or bends.

4. If fan needs to be removed, loosen setscrew and slide fan off

motor shaft.

5. When replacing fan blade, position blade so that the hub is 1/8

in. away from the motor end (1/8 in. of motor shaft will be
visible). (See Fig. 23)

6. Ensure that setscrew engages the flat area on the motor shaft

when tightening.

7. Replace grille.

Step 5—Electrical Controls and Wiring

Inspect and check the electrical controls and wiring annually. Be
sure to turn off the electrical power to the unit.

Remove access panel to locate all the electrical controls and
wiring. Check all electrical connections for tightness. Tighten all
screw connections. If any smoky or burned connections are
noticed, disassemble the connection, clean all the parts, restrip the
wire end and reassemble the connection properly and securely.

After inspecting the electrical controls and wiring, replace all the
panels. Start the unit, and observe at least one complete cooling
cycle to ensure proper operation. If discrepancies are observed in
operating cycle, or if a suspected malfunction has occurred, check
each electrical component with the proper electrical instrumenta-
tion. Refer to the unit wiring label when making these checkouts.

Step 6—Refrigerant Circuit

Inspect all refrigerant tubing connections and the unit base for oil
accumulation annually. Detecting oil generally indicates a refrig-
erant leak.

If oil is detected or if low performance is suspected, leak-test all
refrigerant tubing using an electronic leak detector, or liquid-soap
solution. If a refrigerant leak is detected, refer to Check for
Refrigerant Leaks section.

If no refrigerant leaks are found and low performance is suspected,
refer to Checking and Adjusting Refrigerant Charge section.

Step 7—Indoor Airflow

The heating and/or cooling airflow does not require checking
unless improper performance is suspected. If a problem exists, be
sure that all supply- and return-air grilles are open and free from
obstructions, and that the air filter is clean. 
When necessary, refer
to Indoor Airflow and Airflow Adjustments section to check the
system airflow.

Step 8—Metering Devices–TXV & Accurater Piston

This unit uses 2 types of metering devices. The outdoor metering
device is a fixed orifice and is contained in the brass hex-body in
the liquid line feeding the outdoor coils. The indoor metering
device is a TXV type device.

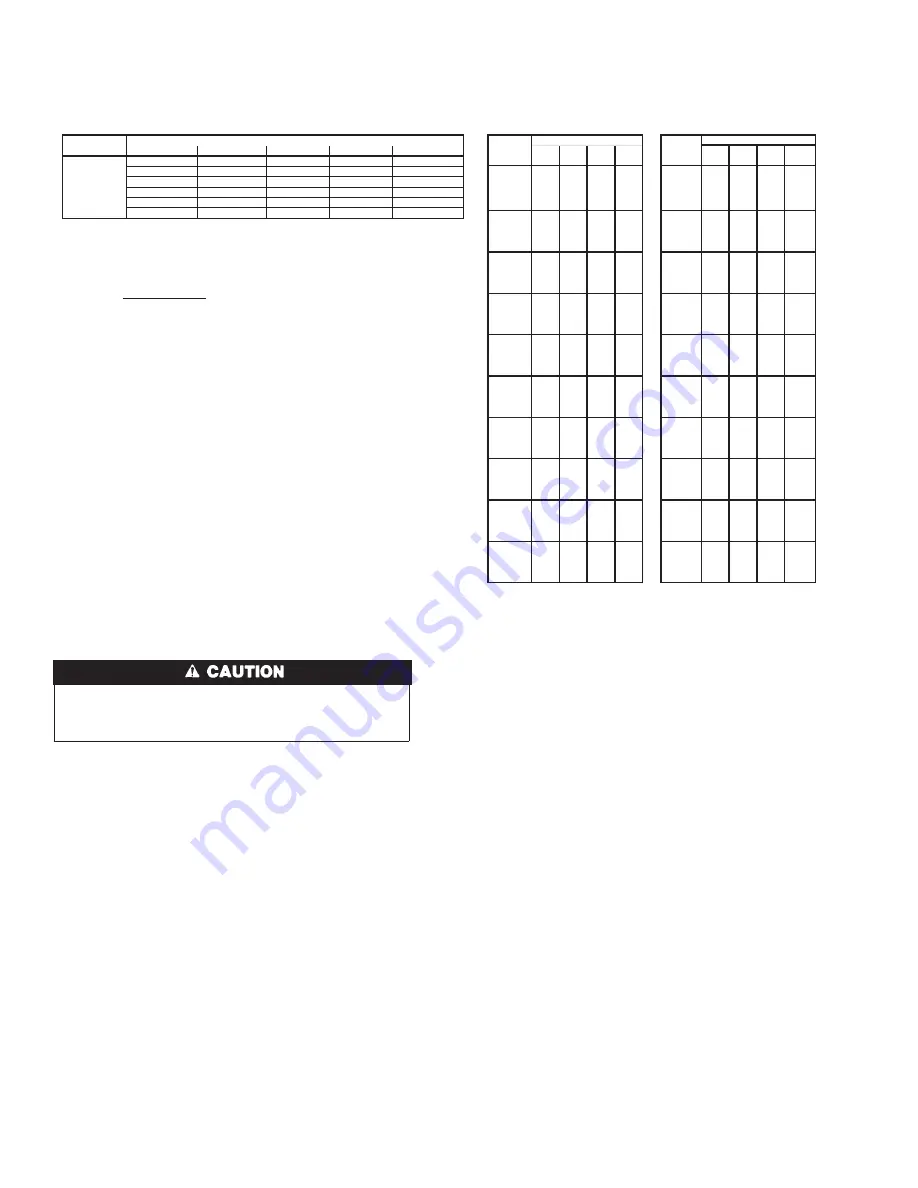
Fig. 27—Cooling Charging Table-Subcooling

C03027

(psig)

5

10

15

20

(kPa)

3

6

8

11

189

61

56

51

46

1303

13

13

11

8

203

66

61

56

51

1399

13

16

13

10

10.3 (5.7)

9.8 (5.4)

9.4 (5.2)

9 (5)

8.6 (4.7)

210

68

63

58

53

1448

13

17

14

11

NA

NA

NA

NA

NA

217

70

65

60

55

1496

13

18

15

13

17.6 (9.8)

16.8 (9.3)

16.5 (9.2)

15.4 (8.6)

14.3 (7.9)

224

72

67

62

57

1544

13

19

16

14

NA

NA

NA

NA

NA

231

74

69

64

59

1593

13

20

18

15

17.5 (9.7)

16.9 (9.4)

16.6 (9.2)

15.7 (8.7)

14.8 (8.2)

238

76

71

66

61

1641

13

21

19

16

13.7 (7.6)

13 (7.2)

13 (7.2)

14.5 (8.1)

11.5 (6.4)

245

77

72

67

62

1689

13

22

20

17

252

79

74

69

64

1737

13

23

21

18

260

81

76

71

66

1792

13

25

22

19

268

83

78

73

68

1848

13

26

23

20

276

85

80

75

70

1903

13

27

24

21

284

87

82

77

72

1958

13

28

25

22

292

89

84

79

74

2013

13

29

26

23

300

91

86

81

76

2068

13

30

27

24

309

93

88

83

78

2130

13

31

28

26

318

95

90

85

80

2192

13

32

29

27

327

97

92

87

82

2254

13

33

31

28

336

99

94

89

84

2316

13

34

32

29

345

101

96

91

86

2378

13

35

33

30

354

103

98

93

88

2440

13

36

34

31

364

105

100

95

90

2509

13

38

35

32

374

107

102

97

92

2578

13

39

36

33

384

108

103

98

93

2647

13

40

37

34

394

110

105

100

95

2716

13

41

38

35

404

112

107

102

97

2785

13

42

39

36

414

114

109

104

99

2854

13

43

40

37

424

116

111

106

101

2923

13

44

41

38

434

118

113

108

103

2992

13

45

42

39

444

119

114

109

104

3061

13

46

43

40

454

121

116

111

106

3130

13

47

44

41

464

123

118

113

108

3199

13

48

45

42

474

124

119

114

109

3268

13

48

46

43

484

126

121

116

111

3337

13

49

47

44

494

127

122

117

112

3406

13

50

47

45

504

129

124

119

114

3475

13

51

48

46

514

131

126

121

116

3544

13

52

49

46

524

132

127

122

117

3612

13

53

50

47

534

134

129

124

119

3681

13

54

51

48

Required Liquid Line Temperature for 

Required Subcooling  Deg F  (Deg C) 

Model Size

a Specific Subcooling (R-410A)

Charging Procedure

7- Read across from the Pressure reading to obtain the Liquid line temperature for a 
required Subcooling

6- Find the Pressure Value  in the table corresponding to the the measured Pressure of 
the Compressor Discharge line.

5- Interpolate if the Outdoor ambient temperature lies in between the table values. 
Extrapolate if the temperature lies beyond the table range.

1- Measure Discharge line pressure by attaching a gauge to the service port. 

2- Measure the Liquid line temperature by attaching a temperature sensing device to it. 

3- Insulate the temperature sensing device so that the Outdoor Ambient doesn’t affect 
the reading.

4- Refer to the required Subcooling in the table based on the model size and the 
Outdoor Ambient temperature.

8- Add Charge if the measured temperature is higher than the table value.

9- Add Charge using the service connection on the Suction line of the Compressor.

024
030
036
042
048
060

Outdoor Ambient Temperature

75 (24)                    82 (28)                  85 (29)                95 (35)                105 (41)

Pressure

Pressure

196

1351

Required Subcooling (Deg F)

Required Subcooling (Deg C)

63

58

53

48

13

15

12

9

24

Summary of Contents for 50XZ024

Page 1: ...FRIGERANT CHARGE 20 NO CHARGE 20 LOW CHARGE COOLING 20 TO USE COOLING CHARGING CHARTS 20 INDOOR AIRFLOW AND AIRFLOW ADJUST MENTS 20 Defrost Control 20 Quiet Shift 20 Defrost 20 MAINTENANCE 22 Air Filter 23 Indoor Blower and Motor 23 Outdoor Coil Indoor Coil and Condensate Drain Pan 23 Outdoor Fan 24 Electrical Controls and Wiring 24 Refrigerant Circuit 24 Indoor Airflow 24 Metering Devices TXV Acc...

Page 2: ...d units can be converted to downflow vertical discharge configurations for rooftop applications RECEIVING AND INSTALLATION Step 1 Check Equipment IDENTIFY UNIT The unit model number and serial number are stamped on the unit identification plate Check this information against shipping pa pers INSPECT SHIPMENT Inspect for shipping damage while unit is still on shipping pallet If unit appears to be d...

Page 3: ...use and at monthly intervals all rigging brackets and straps should be visually inspected for any damage evidence of wear structural deformation or cracks Particular attention should be paid to excessive wear at hoist hooking points and load support areas Brackets or straps showing any kind of wear in these areas must not be used and should be discarded Fig 2 50XZ024 036 Unit Dimensions UNIT ELECT...

Page 4: ...g holds in the composite unit base 4 Thread lifting bracket strapping around bottom perimeter of unit as follows a Open lever of tension buckle ratchet type b Feed strapping through tension buckle as shown in Fig 8 c Pull strapping through tension buckle unit taut Fig 3 50XZ 042 060 Unit Dimensions UNIT ELECTRICAL CHARACTERISTICS UNIT WEIGHT UNIT HEIGHT IN MM A CENTER OF GRAVITY IN MM lb kg X Y Z ...

Page 5: ...stall a 90 degree turn in the return ductwork between the unit and the conditioned space If a 90 degree elbow cannot be installed then a grille of sufficient strength and density should be installed to prevent objects from falling into the conditioned space Units with electric heaters require 90 degree elbow in supply duct 1 All units should have field supplied filters or accessory filter rack ins...

Page 6: ...also be used when required by code for hurricane or seismic conditions This bracket is available through Micrometl C00076 Gasket around outer edge Insulated deck pan Gasket around duct S A R A HVACunit base Gasketing outer flange Flashing field supplied Roofing mater ial field supplied Cant strip field supplied Provided with roofcurb Roof Duct wo rk field supplied Insulation field supplied Roofcur...

Page 7: ...reductions Abrupt change in duct size adversely affects air performance Step 6 Provide for Condensate Disposal NOTE Ensure that condensate water disposal methods comply with local codes restrictions and practices The 50XZ units dispose of condensate through a 3 4 in NPT female fitting that exits on the compressor end of the unit Condensate water can be drained directly onto the roof in rooftop ins...

Page 8: ...ce with NEC ANSI NFPA latest edition and local electrical codes governing such wiring In Canada all electrical connec tions must be in accordance with CSA standard C22 1 Canadian Electrical Code Part 1 and applicable local codes Refer to unit wiring diagram 2 Use only copper conductor for connections between field supplied electrical disconnect switch and unit DO NOT USE ALUMINUM WIRE 3 Be sure th...

Page 9: ...ee the caution label on the transformer or Fig 19 Transformer is factory wired for 230 v operation If supply voltage is 208 v rewire transformer primary as described in Special Procedures for 208 v Operation section EASY SELECT 50XZ EASY SELECT CONFIGURATION TAPS FOR 50XZ Easy Select taps are used by the installer to configure a system The ECM motor uses the selected taps to modify its operation t...

Page 10: ...airflow also marked is approved For increased comfort select the narrowest kW range matching the heater size for example 0 10 for 10 kW heater This airflow must be greater than the minimum for CFM for electric heater application with the size system installed for safe and continuous operation See Tables 4A 4B 4C 5 6 for airflow delivery and minimum CFM Note that airflow marked is the airflow which...

Page 11: ...53 16 9 83 0 0 9 6 8 3 8 5 0 5 4 7 2 7 5 10 0 11 3 15 0 18 1 20 8 26 30 36 1 41 7 54 2 62 5 28 8 28 8 51 4 54 9 61 3 66 3 74 0 80 9 96 5 107 0 35 35 70 70 80 80 90 90 100 110 208 230 3 60 187 253 12 2 77 0 1 6 6 8 3 8 5 0 7 5 10 0 11 3 15 0 10 4 12 0 20 8 24 1 31 3 36 1 23 7 23 7 36 7 38 7 49 7 53 7 62 7 68 8 30 30 50 50 60 60 70 80 042 208 230 1 60 187 253 22 4 105 0 0 9 6 8 3 8 5 0 5 4 7 2 7 5 1...

Page 12: ...ounted 5 amp automotive fuse placed in series with the trans former SEC2 and the R circuit The C circuit of the transformer is referenced to chassis ground through a printed circuit run at SEC1 connected to metal standoff marked with ground symbol h BASIC UNIT CONFIGURATION The following basic configuration of the indoor motor will provide ARI rated performance of the System This BASIC CONFIGURATI...

Page 13: ...Fig 14 Wiring Schematics 50XZ Single Phase C03005 13 ...

Page 14: ...Fig 15 Wiring Schematics 50XZ Three Phase 1 3 2 14 C03006 ...

Page 15: ...humidifying comfort See Fig 20 22 1 AUX HEAT kW CFM Select the narrowest heater range to match size of electric heater installed skip this step if no heater is installed 2 AC HP Size Factory selected to match system size installed please verify 3 SYSTEM TYPE Select system type HP COMFORT for heat pump system or AC for air conditioner system Fig 16 High and Control Voltage Wiring Connections C01028...

Page 16: ...nd AUX2 terminals are not always energized during blower operations as described above When using an electronic air cleaner with the unit use Airflow Sensor P N KEAAC0101AAA The airflow sensor turns on elec tronic air cleaner when the blower is operating d HUMIDIFIER HUMIDISTAT CONNECTIONS Easy Select Board terminals HUM1 and HUM2 are provided for direct connection to the low voltage control of a ...

Page 17: ...r super dehumidify mode the motor delivers reduced airflow to maximize the humidity removal of the system while minimizing over cooling e ELECTRIC HEATING MODE 1 Thermostat closes circuit R to W W1 or W2 The unit delivers the selected electric heat airflow There are no on or off delays f HEAT PUMP HEATING MODE 1 Thermostat closes circuits R to G and R to Y Y2 The unit delivers selected heat pump h...

Page 18: ...roper drainage d Make sure that on the 060 size only the 2 wire ties fastened to the outdoor coils and reversing valve accumulator have been removed e Make sure that all tools and miscellaneous loose parts have been removed 5 Compressors are internally spring mounted Do not loosen or remove compressor hold down bolts 6 Each unit system has 2 Schrader type ports one low side Schrader fitting locate...

Page 19: ...1 Place room thermostat SYSTEM switch or MODE control in OFF position Observe that blower motor starts when FAN mode is placed in FAN ON position and shuts down within 60 sec 030 060 size or 30 sec 024 size when FAN MODE switch is placed in AUTO position 2 Place system switch or MODE control in HEAT position Set control above room temperature Observe that compressor outdoor fan and indoor blower m...

Page 20: ...lem causing the inaccurate readings is a refrigerant leak refer to Check for Refrigerant Leaks section INDOOR AIRFLOW AND AIRFLOW ADJUSTMENTS For heating and cooling operation the recommended airflow is 350 to 450 cfm for each 12 000 Btuh of rated cooling capacity For units with optional electric heat the airflow must not be reduced below the levels stated in Table 2 Tables 4A 4B show both heating...

Page 21: ...OMFORT 720 660 790 745 685 890 850 785 030 COOLING 1010 920 825 1105 1030 930 1255 1160 1050 COOLING DEHUMIDIFY 890 845 795 890 865 825 1010 980 925 HEAT PUMP COMFORT 945 850 765 1020 965 895 1140 1105 995 036 COOLING 1110 1025 970 1235 1175 1115 1400 1355 1280 COOLING DEHUMIDIFY 990 960 910 990 975 940 1125 1110 1085 HEAT PUMP COMFORT 1035 975 910 1160 1080 1020 1305 1275 1220 Heat Pump Efficienc...

Page 22: ...er to the unit before performing any maintenance or service on this unit 2 Use extreme caution when removing panels and parts As with any mechanical equipment personal injury can result from sharp edges 3 Never place anything combustible either on or in contact with the unit Errors made when reconnecting wires may cause improper and dangerous operation Label all wires prior to disconnect ing when ...

Page 23: ...re easily cleaned when dry therefore inspect and clean the coils either before or after each cooling season Remove all obstructions including weeds and shrubs that interfere with the airflow through the condenser coil Straighten bent fins with a fin comb If coated with dirt or lint clean the coils with a vacuum cleaner using the soft brush attachment Be careful not to bend the fins If coated with ...

Page 24: ...evice is a TXV type device Fig 27 Cooling Charging Table Subcooling C03027 psig 5 10 15 20 kPa 3 6 8 11 189 61 56 51 46 1303 13 13 11 8 203 66 61 56 51 1399 13 16 13 10 10 3 5 7 9 8 5 4 9 4 5 2 9 5 8 6 4 7 210 68 63 58 53 1448 13 17 14 11 NA NA NA NA NA 217 70 65 60 55 1496 13 18 15 13 17 6 9 8 16 8 9 3 16 5 9 2 15 4 8 6 14 3 7 9 224 72 67 62 57 1544 13 19 16 14 NA NA NA NA NA 231 74 69 64 59 1593...

Page 25: ...switch 3 Apply ohm meter leads across switch You should have continuity on a good switch NOTE Because these switches are attached to refrigeration system under pressure it is not advisable to remove this device for troubleshooting unless you are reasonably certain that a problem exists If switch must be removed remove and recover all system charge so that pressure gauges read 0 psi Never open syst...

Page 26: ...y risk exposure of compressor oil to the roof take appropriate precautions to protect roofing Proce dures which risk oil leakage include but are not limited to compressor replacement repairing refrigerant leaks replacing refrigerant components such as filter drier pressure switch me tering device coil accumulator or reversing valve Synthetic Roof Precautionary Procedure 1 Cover extended roof worki...

Page 27: ...door coil on the bottom circuit and as close to the coil as possible TROUBLESHOOTING Refer to the Cooling and Heating Troubleshooting Chart Table 7 for troubleshooting information START UP CHECKLIST Fig 30 Defrost Thermostat C99029 FEEDER TUBE STUB TUBE DEFROST THERMOSTAT 27 ...

Page 28: ... side with 520 psig low side retard Use hoses with 750 psig service pressure rating Leak detectors should be designed to detect HFC refrigerant Puron as with other HFCs is only compatible with POE oils Vacuum pumps will not remove moisture from oil Only use factory specified liquid line filter driers with rated working pressures no less than 600 psig Do not install a suction line filter drier in l...

Page 29: ...es 3 Complete wiring and install outdoor temperature sensor according to Installation Instructions 1 Configuration Taps See Installation Instructions for detailed description Option 5 Variable Speed Motors set to ON Option 7 Super Dehumidify set to ON Option 12 Heaters during Defrost setting 2 is suggested for all heaters Option 16 Heat pump systems set to ON for warmer heat below 40 F Option 17 S...

Page 30: ...reversing the 3 phase power leads to the unit Compressor cycles other than normally satisfying thermostat Refrigerant overcharge or undercharge Recover refrigerant evacuate system and recharge to capacities shown on nameplate Defective compressor Replace and determine cause Insufficient line voltage Determine cause and correct Blocked outdoor coil Determine cause and correct Defective run start ca...

Page 31: ...e or low side restricted Remove source of restriction Cool Insufficient coil airflow Increase air quantity Check filter replace if necessary Cool Temperature too low in conditioned area Reset thermostat Cool Outdoor ambient below 40 F Install low ambient kit Filter drier restricted Replace Compressor runs but outdoor fan does not NC normally closed contacts on defrost board open Check condition of...

Page 32: ...____DB ___________WB HEAT PUMP SUPPLY AIR ___________ GAS HEAT SUPPLY AIR ___________ ELECTRIC HEAT SUPPLY AIR ___________ PRESSURES GAS INLET PRESSURE ___________IN WG GAS MANIFOLD PRESSURE ___________IN WG REFRIGERANT SUCTION ___________PSIG SUCTION LINE TEMP ___________ REFRIGERANT DISCHARGE ___________PSIG DISCHARGE TEMP ___________ VERIFY REFRIGERANT CHARGE USING CHARGING CHARTS GAS HEAT TEMP...

Reviews: