background image

14

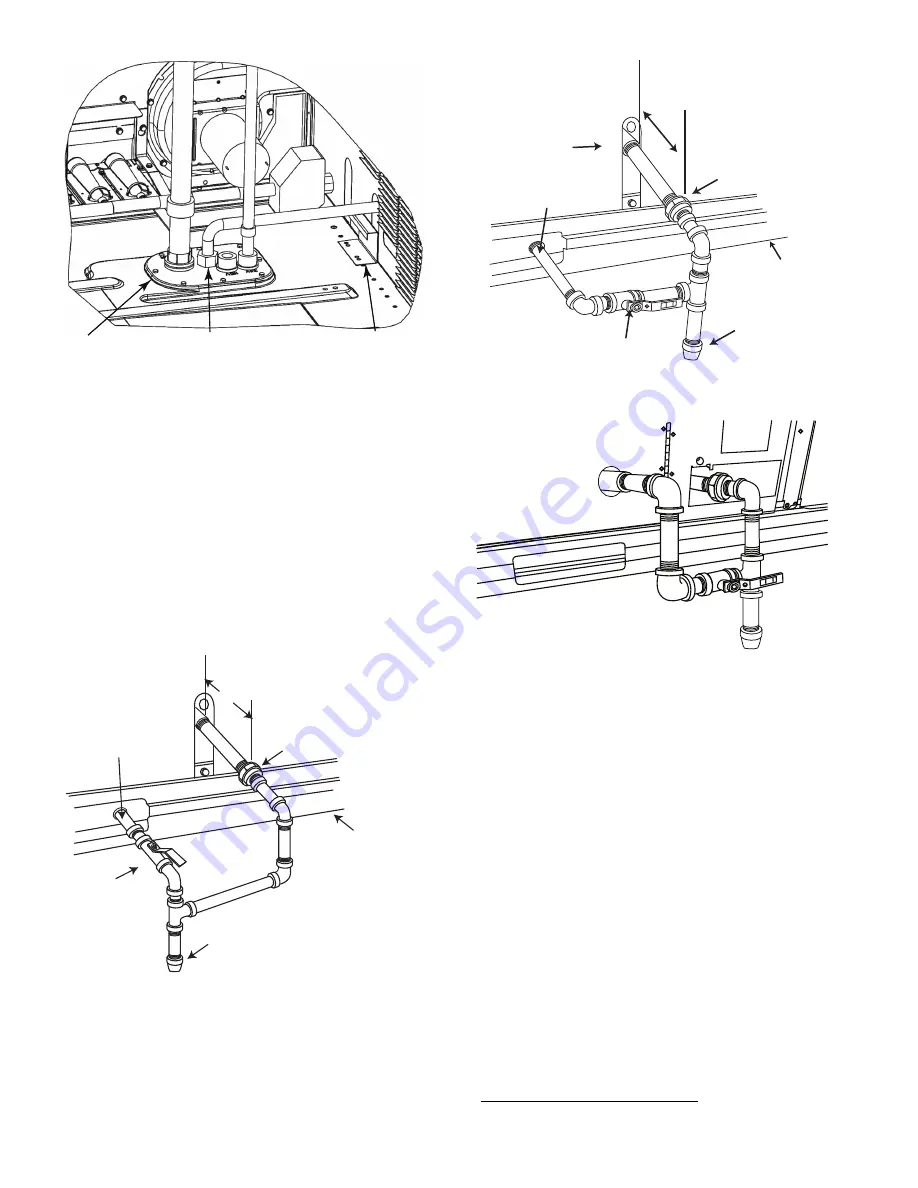
Fig. 18 — Gas Line Piping for 3 to 6 Ton Units

Other hardware required to complete the installation of the gas

supply line includes a manual shutoff valve, a sediment trap

(drip leg) and a ground-joint union. A pressure regulator valve

may also be required (to convert gas pressure from pounds to

inches of pressure). The manual shutoff valve must be located

within 6 ft (1.83 m) of the unit. The union, located in the final

leg entering the unit, must be located at least 9-in. (230 mm)

away from the access panel to permit the panel to be removed

for service. If a regulator valve is installed, it must be located a

minimum of 4 ft (1220 mm) away from the unit’s flue outlet.

Some municipal codes require that the manual shutoff valve be

located upstream of the sediment trap. See Fig. 19 and 20 for

typical piping arrangements for gas piping that has been routed

through the sidewall of the curb. See Fig. 21 for typical piping

arrangement when thru-base is used. Ensure that all piping

does not block access to the unit’s main control box or limit the

required working space in front of the control box.

Fig. 19 — Gas Piping, Typical Curb Sidewall Piping 

(Example 1)

Fig. 20 — Gas Piping, Typical Curb Sidewall Piping 

(Example 2)

Fig. 21 — Gas Piping, Typical Thru-Base 

Connections

When installing the gas supply line, observe local codes per-

taining to gas pipe installations. Refer to the NFPA 54/ANSI

Z223.1 NFGC latest edition (in Canada, CAN/CSA B149.1).

In the absence of local building codes, adhere to the following

pertinent recommendations:

• Avoid low spots in long runs of pipe. Grade all pipe 

1

/

4

 in.

per every 15 ft (7 mm per every 5 m) to prevent traps.

Grade all horizontal runs downward to risers. Use risers to

connect to heating section and to meter.

• Protect all segments of piping system against physical and

thermal damage. Support all piping with appropriate

straps, hangers, etc. Use a minimum of one hanger every

6 ft (1.8 m). For pipe sizes larger than 

1

/

2

-in., follow

recommendations of national codes.

• Apply joint compound (pipe dope) sparingly and only to

male threads of joint when making pipe connections. Use

only pipe dope that is resistant to action of liquefied petro-

leum gases as specified by local and/or national codes. If

using PTFE (Teflon

1

) tape, ensure the material is Double

Density type and is labeled for use on gas lines. Apply tape

per manufacturer’s instructions.

• Pressure-test all gas piping in accordance with local and

national plumbing and gas codes before connecting piping

to unit.

BRASS FITTING
FOR GAS PIPING

SUPPORT
BRACKET

EMBOSSMENT

9

 (229mm) MIN

UNION 

S

HUT OFF

VALVE

DRIP
LEG

THRU-CURB ADAPTER

UNIT BA

S

E RAIL

1. Teflon is a registered trademark of DuPont.

S

HUT OFF

VALVE

UNION

9

 (229mm) MIN


UNIT BA

S

E RAIL

BURNER
ACCESS
PANEL

THRU-CURB ADAPTER

DRIP
LEG

Summary of Contents for 48FC 04

Page 1: ...troller Factory Option 40 SystemVu Controller Factory Option 40 Controller Options 40 LOW AMBIENT Smoke Detectors 40 Step 14 Adjust Factory Installed Options 41 SMOKE DETECTORS ECONOMI ER IV OCCUPANCY...

Page 2: ...sult in personal injury Sheet metal parts may have sharp edges or burrs Use care and wear appropriate protective clothing safety glasses and gloves when handling parts and servicing air conditioning e...

Page 3: ...Zer system2 Coil Options Outdoor Indoor Hail Guard A Al Cu Al Cu B Precoat Al Cu Al Cu C E coat Al Cu Al Cu D E coat Al Cu E coat Al Cu E Cu Cu Al Cu F Cu Cu Cu Cu M Al Cu Al Cu Louvered Hail Guard N...

Page 4: ...4 Fig 2 Unit Dimensional Drawing...

Page 5: ...5 Fig 2 Unit Dimensional Drawing cont...

Page 6: ...6 Fig 2 Unit Dimensional Drawing cont...

Page 7: ...ll dictate different se quences for the steps of unit installation For example on curb mounted units some accessories must be installed on the unit before the unit is placed on the curb Review the fol...

Page 8: ...NSULATED PANELS 25 4 1 THK POLYURETHANE FOAM 44 5 1 3 4 DENSITY 3 DIMENSIONS IN ARE IN MILLIMETERS 4 ROOFCURB 18 GAGE STEEL 5 ATTACH DUCTWORK TO CURB FLANGES OF DUCT REST ON CURB 6 SERVICE CLEARANCE 4...

Page 9: ...is used on a vertical unit the return should be ducted through the roof deck to comply with applicable fire codes A minimum clearance is not required around ductwork Step 6 Rig and Place Unit Keep uni...

Page 10: ...und duct openings must be tight Secure with screws as shown in Fig 8 Cover seams with foil duct tape Field supplied flanges should be attached to horizontal duct openings and all ductwork should be se...

Page 11: ...to not damage any wiring or cut tie wraps securing any wiring Fig 10 Economizer and Two Position Damper Hood Parts Location 3 Carefully lift the hood assembly with metal tray through the filter access...

Page 12: ...g must be accordance with local building codes and with applicable national codes In U S A re fer to NFPA 54 ANSI Z223 1 National Fuel Gas Code NFGC In Canada installation must be accordance with the...

Page 13: ...s of connector lock nuts before connecting gas piping Install a 1 2 in NPT street elbow on the thru base gas fitting Attach a 1 2 in pipe nipple with minimum length of 16 in 406 mm field supplied to t...

Page 14: ...s supply line observe local codes per taining to gas pipe installations Refer to the NFPA 54 ANSI Z223 1 NFGC latest edition in Canada CAN CSA B149 1 In the absence of local building codes adhere to t...

Page 15: ...protect against freeze up If drain line is installed downstream from the exter nal trap pitch the line away from the unit at 1 in per 10 ft 25 mm per 3 m of run Do not use a pipe size smaller than the...

Page 16: ...g 25 Connect field power supply conductors to LINE side terminals when the switch enclosure cover is removed to attach the handle Field Install the NFD Shaft and Handle 1 Remove the Control Box access...

Page 17: ...pressure lugs on the power terminal block or at factory installed option non fused disconnect Voltage to compressor terminals during operation must be within voltage range indicated on unit nameplate...

Page 18: ...screw heads is exposed Press the gasket over the screw heads 3 Slip the backing plate over the screw heads at the keyhole slots and align with the gasket tighten the two screws until snug do not over...

Page 19: ...and conduit may be attached to the connectors on the base pan Pull correctly rated high voltage and low voltage through appropriate conduits Connect the power conduit to the internal disconnect if uni...

Page 20: ...able for single phase 3 voltage code models The Humidi MiZer dehumidification system requires a field supplied and field installed space relative humidity control de vice This device may be a separate...

Page 21: ...ilt into the corner post see Fig 35 to the 24 v barrier located on the left side of the control box The raceway provides the UL required clearance between high voltage and low voltage wiring 3 The The...

Page 22: ...22 Fig 40 Typical Control Wiring Diagram Electro Mechanical with W7212 48FC 04 06 208 230 3 60 Unit Shown...

Page 23: ...23 Fig 41 Typical Electro Mechanical with W7220 Control Wiring Diagram 48FC 07 208 230 3 60 Unit Shown...

Page 24: ...24 T Fig 42 Typical 48FC 04 07 Power Wiring Diagram 208 230V Unit Shown...

Page 25: ...mum position If the over temperature limit opens prior to the start of the indoor fan blower the IGC will shut down the burners and the control will shorten the 45 second delay to 5 seconds less than...

Page 26: ...the user interface for the system The W7220 economizer module provides the basic inputs and outputs to provide simple economizer control When used with the optional sensors the economizer module provi...

Page 27: ...Operating Temperature 40 F to 150 F 40 C to 65 C Exception of display operation down to 4 F 20 C with full recovery at 4 F 20 C from exposure to 40 F 40 C Storage Temperature 40 F to 150 F 40 C to 65...

Page 28: ...d on the front of the economizer controller Keypad Use the four navigation buttons see Fig 50 to scroll through the menus and menu items select menu items and to change parameter and configuration set...

Page 29: ...ays 2 Press the Enter button to return to the current menu parameter 3 Press the Menu Up Exit button to return to the previ ous menu Menu Structure Table 11 illustrates the complete hierarchy of menus...

Page 30: ...and displays measured discharge temperature Displays _ _ _F if sensor sends invalid value if not connected short or out of range OA TEMP _ _ _ F or _ _ _ C 40 F to 140 F 40 C to 60 C OUTSIDE AIR TEMP...

Page 31: ...alpy curves DCV SET 1100ppm 500 to 2000 ppm increment by 100 DEMAND CONTROLLED VENTILATION Displays only if CO2 sensor is connected Set point for Demand Controlled Ventilation of space Above the set p...

Page 32: ...out for second exhaust fan SYS use output as an alarm signal OCC INPUT INPUT or ALWAYS OCCUPIED MODE BY EXTERNAL SIGNAL When using a setback thermostat with occupancy out 24 vac the 24 vac is input I...

Page 33: ...e fully closed position CONNECT Y1 O N A N A Closes the Y1 O relay Y1 O CONNECT Y2 O N A N A Closes the Y2 O relay Y2 O CONNECT AUX1 O N A N A Energizes the AUX output If Aux setting is NONE no action...

Page 34: ...ion with a 2 speed indoor fan with or without DCV see Tables 17 and 18 For enthalpy operation with a 2 speed indoor fan with or without DCV see Tables 19 and 20 ALARMS CONT FREEZE ALARM N A N A Check...

Page 35: ...NTILATION DCV OUTSIDE AIR GOOD TO ECONOMIZE Y1 I Y2 I FAN SPEED Y1 O Y2 O OCCUPIED UNOCCUPIED Below CO2 set No Off Off High 0 v Off 0 v Off VENTMIN Closed On Off High 24 v On 0 v Off VENTMIN Closed On...

Page 36: ...UPIED UNOCCUPIED Below CO2 set No Off Off High 0 v Off 0 v Off VENTMIN Closed On Off High 24 v On 0 v Off VENTMIN Closed On On High 24 v On 24 v On VENTMIN Closed Yes Off Off High 0 v Off 0 v Off VENT...

Page 37: ...Y2 I FAN SPEED Y1 O Y2 O OCCUPIED UNOCCUPIED Below CO2 Set No OFF OFF LOW 0v Off 0v Off VENTMIN Closed ON OFF LOW 24v On 0v Off VENTMIN Closed ON ON HIGH 24v On 24v On VENTMIN Closed Yes OFF OFF LOW...

Page 38: ...s to determine the speed of the supply fan and controls the OA damper to the required posi tion see Table 21 The W heating mode is not controlled by the W7220 but it re quires the status to know where...

Page 39: ...he item RUN appears 3 Press the Enter button to start the test The unit pauses and then displays IN PROGRESS When the test is complete DONE appears 4 When all desired parameters have been tested press...

Page 40: ...e as factory installed options on 48FC models Smoke detectors may be specified for supply air only for return air without or with economizer or in combina tion of supply air and return air Return air...

Page 41: ...Unoccupied sequence at terminals marked OCCUPANCY Detach the jumper covering the Occupancy terminals on the UCB and then attach the required connections Step 15 Install Accessories Available accessor...

Page 42: ...t age cover in the Control Box 3 Connect a multimeter to the Vdc terminals on the UCB 4 Set the Range Switch to either A B or C per the Switch Range table 5 Using a straight blade screwdriver turn the...

Page 43: ...NDOOR FAN and then press ENTER 8 Refer to the job specifications to set the following deter mining the values per the RPM Calculator label see Fig 59 Use the UP and DOWN arrow keys and the BACK key to...

Page 44: ...12 1601 1692 1784 1878 1973 2069 2166 1500 1625 1750 1875 2000 2125 2250 2375 65 0 4 1609 1688 1768 1850 1933 2018 2104 2192 2282 65 0 6 1764 1839 1916 1994 2073 2153 2235 2317 0 8 1902 1974 2047 2123...

Page 45: ......

Page 46: ...to discontinue or change at any time specifications or designs without notice and without incurring obligations Catalog No 04 53480245 01 Printed in U S A Form 48FC 4 7 02SI Pg 46 2 19 Replaces 48FC 4...

Page 47: ..._ Verify gas pressure to unit gas valve is within specified range Y N _____ Check gas piping for leaks Y N _____ Check that indoor air filters are clean and in place Y N _____ Check that outdoor air i...

Page 48: ...SIG B Discharge pressure _______________ PSIG C Entering air temperature _______________ F D Liquid line temperature at outlet or reheat coil _______________ F E Confirm correct rotation for compresso...

Reviews: