background image

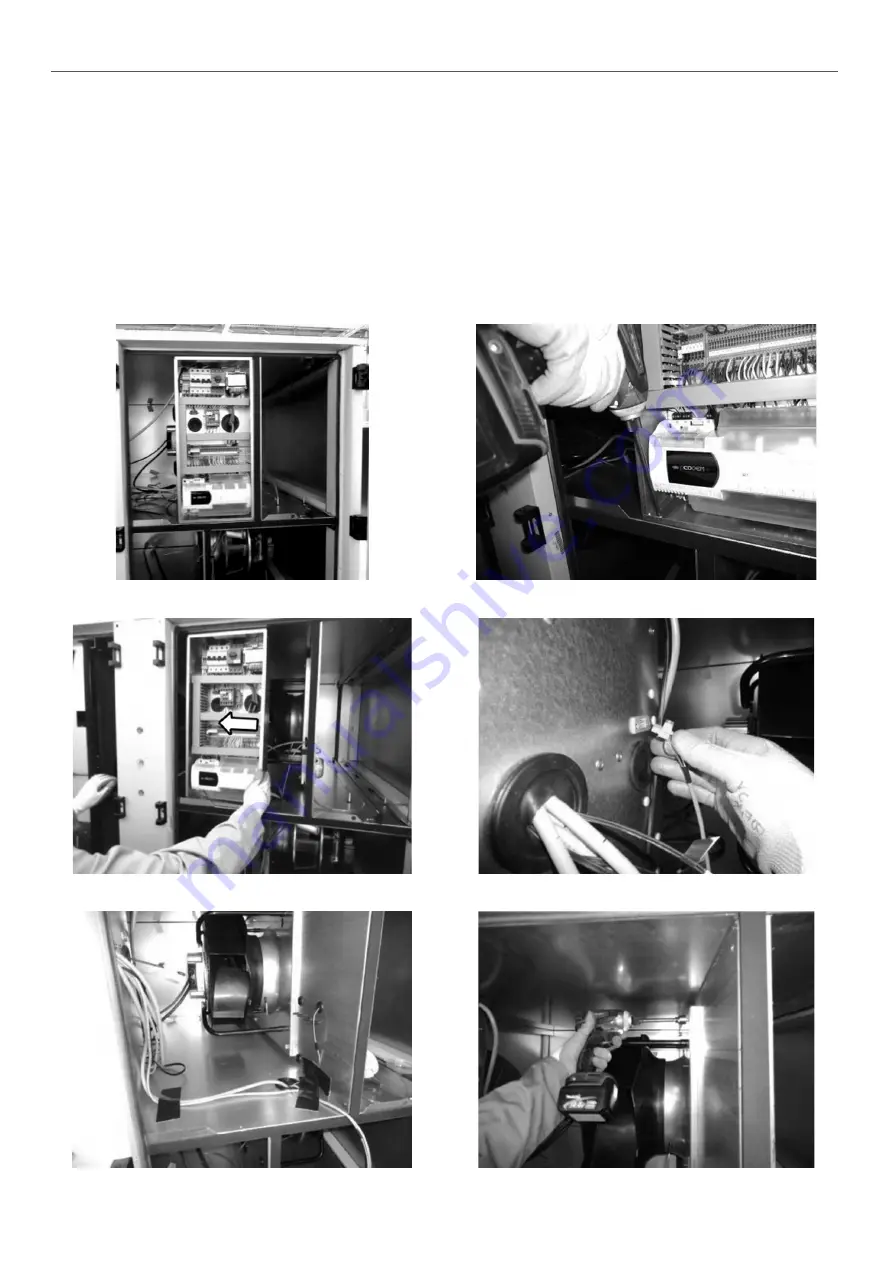
9.2 - FAN MOTOR ASSEMBLY

Check and retighten the electrical connections once a year.

Intake FMA removal method

1.  Open the door

2.  Release the 4 x M8 screws
3.  Disconnect the motor's electrical connections
4.  Take out the FMA

Exhaust FMA removal method

1.  Open the door

2.  Remove the upper and lower fixings from the electrics box

3.  Move the electrics box; a sufficient length of cable is provided

4.  Disconnect the various quick connectors

5.  Provide sufficient clearance

6.  Remove the 4 x M8 screws

9 - MAINTENANCE/SERVICE INTERVALS

24

Summary of Contents for 39HXA

Page 1: ...STALLATION OPERATION AND M A I N T E N A N C E I N S T R U C T I O N S Translation of the original document Plug Play air handling unit with direct expansion coil 39HXA Air flow rate from 580 to 8500 m h ...

Page 2: ...INSTALLING THE SIPHON 21 8 SYSTEM START UP 22 8 1 CONTROL 22 9 MAINTENANCE SERVICE INTERVALS 23 9 1 FILTERS 23 9 2 FAN MOTOR ASSEMBLY 24 9 3 HEAT RECOVERY UNIT 25 9 4 ELECTRICS BOX 25 9 5 ELECTRIC HEATERS 25 9 6 HYDRAULIC COILS 25 9 7 DX COIL 25 9 8 SERVICE INTERVALS 25 10 PROBLEMS CAUSES SOLUTIONS 26 11 TESTS AND GUARANTEES 27 The illustrations in this document are for illustrative purposes only ...

Page 3: ...afety instructions Observe all the regulations in the safety codes To prevent any risk of accident prohibit public access by clearly marking the work area Wear all the required Personal Protective Equipment PPE Follow the handling instructions Handle heavy and bulky equipment with care when lifting handling and setting down Technicians who install commission operate and service the unit must under...

Page 4: ...ls delivered Any damaged or missing items must be specified on the delivery note in the presence of the driver before signing the delivery note These comments must be confirmed to the carrier by registered letter within 3 business days The comments conditional and pending unwrapping shall have no value The customer must unwrap the goods in the presence of the driver Claims must be made at the time...

Page 5: ...U casing Furthermore ensure that the steel tubes are secured to prevent any movement COLIS PACKAGE If the above mentioned lifting methods cannot be used the unit may be lifted using a forklift truck taking great care not to dent the lower panel use forks of a sufficient length Follow the applicable handling rules The units must be set down directly on flat level ground The flatness value must be t...

Page 6: ... which are more restrictive than those it was designed for pressure temperature type and circulation of fluids Name plate This is fixed inside the unit intake fan section and shows the unit s specifications as well as the order number and code 02380021 0001 7219278 405377 182 KG 0 75 KW 230 400V 50HZ 2P XXXXXXXXXXXXXXX CTA 22 FDY TENSION VOLTAGE P ABSORBEE INPUT INTENSITE CURRENT POIDS WEIGHT SERV...

Page 7: ...ty This unit complies with the requirements of Supply of Machinery Safety Regulations 2008 Electromagnetic Compatibility Regulations 2016 The Restriction of the Use of Certain Hazardous Substances in Electrical and Electronic Equipment Regulations 2012 The Ecodesign for Energy Related Products and Energy information Regulations 2019 and following amendments UK REACH Regulations 2019 UK Importer To...

Page 8: ...9 1600 1810 648 The dimensions in the tables above include all the components attached to the casing hinges collars feet 6 2 LOCATION OF COMPONENTS E D C E F E B G I H E B Fan motor assembly C General switch on outer casing Main earth terminal on inner casing see 7 INSTALLATION CONNECTIONS D Electrics box E Filters F Rotary heat exchanger G Energy meter enclosure if present H Indoor coil hydraulic...

Page 9: ...20 030 050 075 Filter Dimensions x Number of cells air flow 704x327x48 x 1 452x435x48 x 2 552x535x48 x 2 466x685x48 x 3 566x835x48 x 3 Dual filtration When dual stage filtration is installed the two stages of cells are installed on the same runner Recommended fouling level value The pressure switches installed enable a filter fouling warning to be issued They are factory set based on The unit size...

Page 10: ... 3000 4000 5000 6000 7000 8000 9000 ΔP Pa Qv m h 010 020 030 050 075 M5 F7 0 50 100 150 200 250 0 1000 2000 3000 4000 5000 6000 7000 8000 9000 ΔP Pa Qv m h 010 020 030 050 075 M5 F9 0 50 100 150 200 250 300 350 400 0 1000 2000 3000 4000 5000 6000 7000 8000 9000 ΔP Pa Qv m h 010 020 030 050 075 6 DESCRIPTION OF THE UNIT TECHNICAL CHARACTERISTICS 10 ...

Page 11: ...2 2 2 2 2 Max power W 2 x 500 2 x 1000 2 x 1800 2 x 2680 2 x 3030 Max current A 2 x 2 2 2 x 1 6 2 x 2 8 2 x 4 1 2 x 4 7 Polypropylene wheel Sizes 010 020 030 Wheel Ø 250 310 400 Quantity 2 2 2 Max power W 2 x 520 2 x 790 2 x 1320 Max current A 2 x 2 3 2 x 1 3 2 x 2 1 Heat recovery unit Constant speed rotary heat exchanger controlled by the unit s control system Options and accessories Support feet...

Page 12: ...attached supplier instructions Constant pressure sensor Constant pressure is only controlled on the flow of fresh air being supplied if the optional constant pressure kit has been purchased The fresh air fan is controlled by the signal from this pressure sensor in the duct The exhaust air flow is controlled by the flow rate signal read off the flow of fresh air and may vary according to a factor M...

Page 13: ...eaking capacity 5 3 A Cable length 2500 mm BLACK wire winter 29 Ø 1 2 ou 7 8 21 IVORY wire shared BLUE wire do not use Damper The damper is not protected against the weather if the canopy option has not been selected 6 DESCRIPTION OF THE UNIT TECHNICAL CHARACTERISTICS 13 ...

Page 14: ...able mountings gooseneck type electric connection to the unit etc Flexible sleeve 7 1 INSTALLATION OUTDOORS The installation of a dual flow unit outdoors requires a roof and a canopy to be fitted these are usually supplied mounted and adapted to suit each configuration supplied in kit form if delivery of the elements assembled is not possible Fitting the roofs The roofs for units are designed to p...

Page 15: ... as applicable see illustrations Sealed rivet Canopy without damper Canopy with damper Screen Screen Screen Sizes B Weight kg 010 274 2 5 020 304 3 4 030 358 5 4 040 050 390 7 060 075 100 528 12 2 150 428 10 7 2 CONNECTIONS DIMENSIONS OF AIR FLOW CIRCUITS Sizes 010 020 030 050 075 Connections mm air intake and discharge Ø 250 Ø 355 458x984 608x1284 758x1584 1 Internal dimensions 7 INSTALLATION CON...

Page 16: ...The diameter of the condensate tube on all the pans is 16 mm 1 row coil Sizes 010 020 030 050 075 Ø connections mm 4 way valve Valve inlet G 1 2 G 1 2 G 3 4 G 3 4 G 1 Valve outlet G 1 2 G 1 2 G 3 4 G 3 4 G 1 1 2 2 row coil Sizes 010 020 030 050 075 Ø connections mm 4 way valve Valve inlet G 3 4 G 3 4 G 3 4 G 3 4 G 1 Valve outlet G 3 4 G 3 4 G 3 4 G 3 4 G 1 1 2 7 INSTALLATION CONNECTIONS 16 ...

Page 17: ...construction of pressure equipment in accordance with the European pressure equipment directive EU 2014 68 The manufacturer of the refrigerant unit must perform a risk assessment of the unit s conditions of use to guard against all risks The manufacturer must take all steps to ensure that the pressure always remains below the maximum permitted threshold Before commissioning coils on chiller units ...

Page 18: ...ions between 0 75 and 2 5 mm a H 05 VV F type cable may be used otherwise the cable must be type H 07 RN F The power supply cable must be sized in accordance with current standards and regulations The supply cable must be secured using the anchorage provided located between the disconnect switch and the Ø 22 2 blanking cover Once the supply cable has been fed through and connect tighten the clamp ...

Page 19: ...1 7 TEMPERATURE INTRODUCTION 38 B4 B2 10 39 B5 B1 11 TEMPERATURE AIR NEUF 40 B5 B2 12 FIRE DEFAULT DEFAULT SYNTHESIS DUCT PRESSURE AIR QUALITY ECO COMFORT REMOTE CONTROL SUPPLY TH TUNE DAMPER 1 DAMPER 2 PRESSURE SWITCH SUPPLY AIR FILTER PRESSURE SWITCH EXHAUST AIR FILTER EXHAUST AIR TEMPERATURE SUPPLY AIR TEMPERATURE FRESH AIR TEMPERATURE NB the maximum section of the stripped wire is Ø 1 5 mm and...

Page 20: ...ng Dry contact shared b 12 Digital inputs X2 _ b 13 Th Tune power supply 2 wires Machine terminal block Notes Inlet Outlet X2 _ b 14 24V power supply pLAN X2 _ b 15 Ground Presence of changeover coil 2 wires Machine terminal block Notes Inlet Outlet X2 _ b 16 C O thermostat black wire Digital inputs X2 _ b 17 C O thermostat white wire The changeover thermostat must be positioned on the customer hy...

Page 21: ...ain the sizing of the siphon must incorporate dimensions of 2H Schematic diagram of siphon Assembly with depression Z X Y tubing diameter insulation thickness Y Y 0 5 x X X X 25 mm for each 250 Pa of negative static pressure 25 mm mmWC Slight slope of 0 005 To sewer system Z mm Y mm X mm Negative pressure recovery pan 7 INSTALLATION CONNECTIONS 21 ...

Page 22: ... bodies inside it Check the electrical supply voltage and the ratings of the overload protections against the current ratings of each component Proceed to commission the unit checking the steps below To configure the setpoints refer to the corresponding manual Simulate activation of the various electric components controlled components and alarms Check the currents Temperature alarm Air flow alarm...

Page 23: ... taken when cleaning the air flow circuits Hence the frequency of filter checks should be increased during this period Maintenance intervals The filter life depends essentially on the amount of dust in the air and the efficiency of the filtration system The filtration quality cannot be maintained if the filter medium has been damaged during maintenance We recommend that the filters be replaced onc...

Page 24: ...nect the motor s electrical connections 4 Take out the FMA Exhaust FMA removal method 1 Open the door 2 Remove the upper and lower fixings from the electrics box 3 Move the electrics box a sufficient length of cable is provided 4 Disconnect the various quick connectors 5 Provide sufficient clearance 6 Remove the 4 x M8 screws 9 MAINTENANCE SERVICE INTERVALS 24 ...

Page 25: ...ce a year Visually inspect the components wires and cables 9 5 ELECTRIC HEATERS The electric heater requires very little maintenance However the following checks are necessary Visually inspect the heating elements wires and connection cables after every 1500 hours of operation Check and retighten the connections once or twice a year 9 6 HYDRAULIC COILS The hydraulic coil requires very little maint...

Page 26: ...e connections Operating check Retighten the electrical connections Check the components Operating check Pressure temperature sensor Check correct operation and setpoint adjustment Check correct operation and setpoint adjustment Check correct operation and setpoint adjustment Condensate drain pan Clean with water and a non abrasive detergent Clean with water and a non abrasive detergent Refrigerant...

Page 27: ...hen this date occurs within three months of the invoice date It is effective for a period of 15 months from the unit invoice date in all other cases CIAT s guarantee on motors is limited to the terms of guarantee extended by its supplier Under no circumstances must the fitter carry out work on the motor This will invalidate any future claims on the warranty Note for further information refer to th...

Page 28: ...668 04 10 2022 Supersedes order No EN7546668 03 01 2022 Carrier S C S Rte de Thil 01120 Montluel France Manufacturer reserves the right to change any product specifications without notice Printed in the European Union ...

Reviews: