


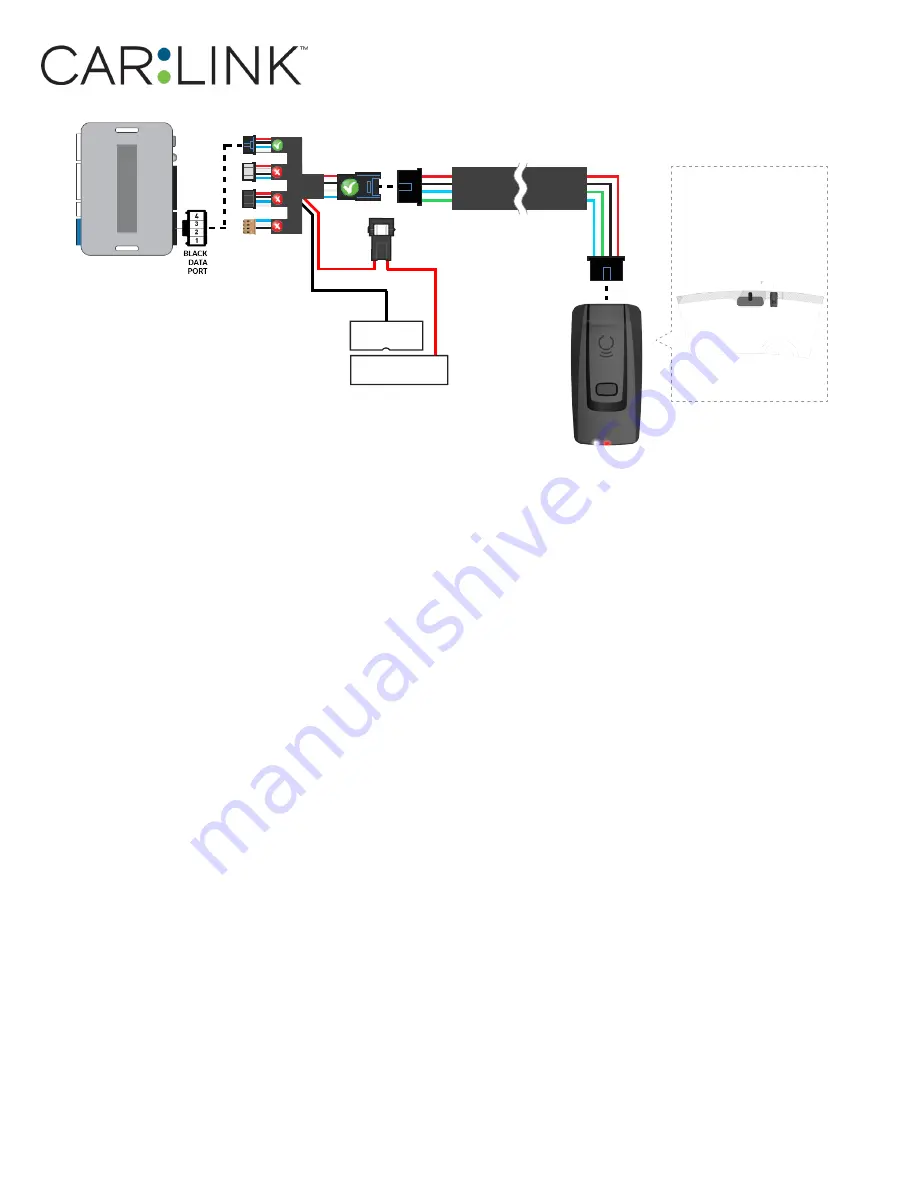
Antenna:
Cord length 9 feet
Installation:
Place antenna 3 inches
(minimum) from any obstructions
Orientation:
Vertical; antenna
facing downwards (as seen in
diagram)
HRN
-CRF
-02
(+)
12V BATTERY
(1)
GROUND
(1)
3
(1) Connect when using with ADS-AL-CA.
STEP 2. CONNECT
STEP 3. ADD A DEVICE/VEHICLE TO AN ACCOUNT
a. Download the App and Log into your account (see page 2 of this document for details)
b. Click the “+” sign at the bottom right of the Application screen. This will allow you to temporarily add
and configure your customers system inside your personal account. A system refers to the Antenna
being installed in the windsheild of the vehicle.
c. Before adding a system to your device, ensure the remote starter IS NOT armed/locked or in Valet mode
and set the ignition of the vehicle to the On position.
d. Then Tap to “Scan QR Code” and use the smartphone camera to scan the QR Code located on top of the
antenna.
e. Once connected, the system is in “Installer Mode”. Follow the on-screen instructions for configuring the
system.
STEP 4. PRE-CONFIGURE THE APPLICATION EXPERIENCE FOR YOUR CUSTOMER
a. Start by setting the protocol of the antenna being used. This is acheived by selecting the Brand, Model
and protocol used inside the Remote starter. When done, click on “Confirm”. System will now try to
communicate with the remote starter to confirm that all settings related to protocol are valid.
b. Once back in the control panel, click on the Settings Gear at the top right of the screen and edit the
Vehicle name, configure the Auxiliaries that might have been added (if applicable) and click “OK” when
done. Then choose the vehicle to display inside the control panel in the VEHICLE IMAGE section and
click OK.
c. When your configurations are all completed, click “OK” at the top right corner. All Configurations will
take effect.
STEP 5. TESTING THE SYSTEM
When the system is connected and fully configured, testing can begin. Test all the application functions
(Start, Stop, Lock, Unlock, Auxiliaries, Etc.) When testing is completed, tap on the “installer icon” at the top
of control screen. When prompted Click “Yes, and delete system from account” since this is the installer
mode and not the End User mode. This will make the system “Ready for Customer Delivery”.
Also make sure that the Owners Card is handed to the Owner of the vehicle or attached to the vehicle
keychain. Doing this will ensure that the instructions on how to setup their App, Account and add the Sys-
tem is done correctly by using the system QR Code affixed on the windsheild mounted antenna.
NOTE : UNDER ANY CIRCUMSTANCES, PLEASE DO NOT REMOVE THE QR CODE FROM THE ANTENNA!
INSTALLATION, WIRING & PROGRAMMING GUIDE


