Carefree of Colorado
Installation Manual
Mirage
5
052979-003r5
M
OUNTING THE
A
WNING
U
NIT
1. While lifting the awning, route the awning motor
wires through the 1/2” hole drilled previously.
2. Set the awning into the hooks of the mounting
plate.
3. Adjust the horizontal position of the awning as
required.
S
ECURING THE
A
WNING
NOTE: This procedure requires opening the awning. For motorized awnings, follow the Manual
Override instructions on page 12. For motorized awnings, these steps can be done after
the electrical installation when motorized power is available.
Drill in
this area
O 3/16” Thru
Ream case only to O 5/16”
1/4 x 1 1/2 Lag Screw (3 plcs)
MIRAGE010
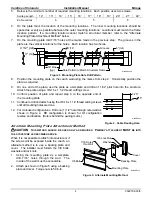
Figure 7. Securing the Awning.
1. Adjust the awning horizontally as required.
2. Open the awning approximately 3 feet to access the back panel of the awning case.
3. Drill three (3) 3/16” holes through the case, mounting plate and into wall (do not go through interior
surfaces of wall) in the approximate areas shown above.
4. Ream out the holes in the case only to 5/16”.
5. Attach the awning case to the mounting plate and wall using three (3) 1/4 x 1 1/2 lag screws.
6. From inside, seal the wires and access hole with a quality silicone sealant.
This completes the basic awning installation. For manual configurations, no further action is required. For
motorized configurations, proceed to the next section "Electrical".
MIRAGE018
Back Plate
Mounting Plate
Figure 6. Mounting the Awning.


