CarShow Installation Guide
– Honda CRV
CarShow
Copyright 2013 All Rights Reserved
Installation Guide
CS-CRV12-3
Page 5
CarShow System Assembly Instructions
This step will walk you through how to attach/connect vehicle-specific faceplate to Electronic Control
Unit (ECU)
STEP
3
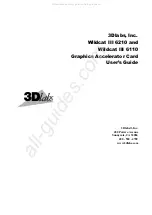
Vehicle-specific face plate (shown at right) will need to
be attached to ECU. This step will walk you through
this simple process.
Electronic Control Unit
ECU shown at right
28-Pin Connector
Be sure that 28-pin connector is securely connected
PRIOR
to securing faceplate to ECU.
NOTE:
If faceplate connector is not fully connected to
ECU, system will display
“No Faceplate Detected”
in
the top Nav bar of the menu screen when unit is
powered on.
ECU/Faceplate Assembly
Be sure that 28-pin connector is securely connected
PRIOR
to securing faceplate to ECU.
NOTE:
If faceplate connector is not fully connected to
ECU, system will display
“No Faceplate Detected”
in
the top Nav bar when unit is powered on.
Insert tabs from ECU into bottom of faceplate, and
then rotate faceplate towards the ECU until
snapped into place.