background image

10 


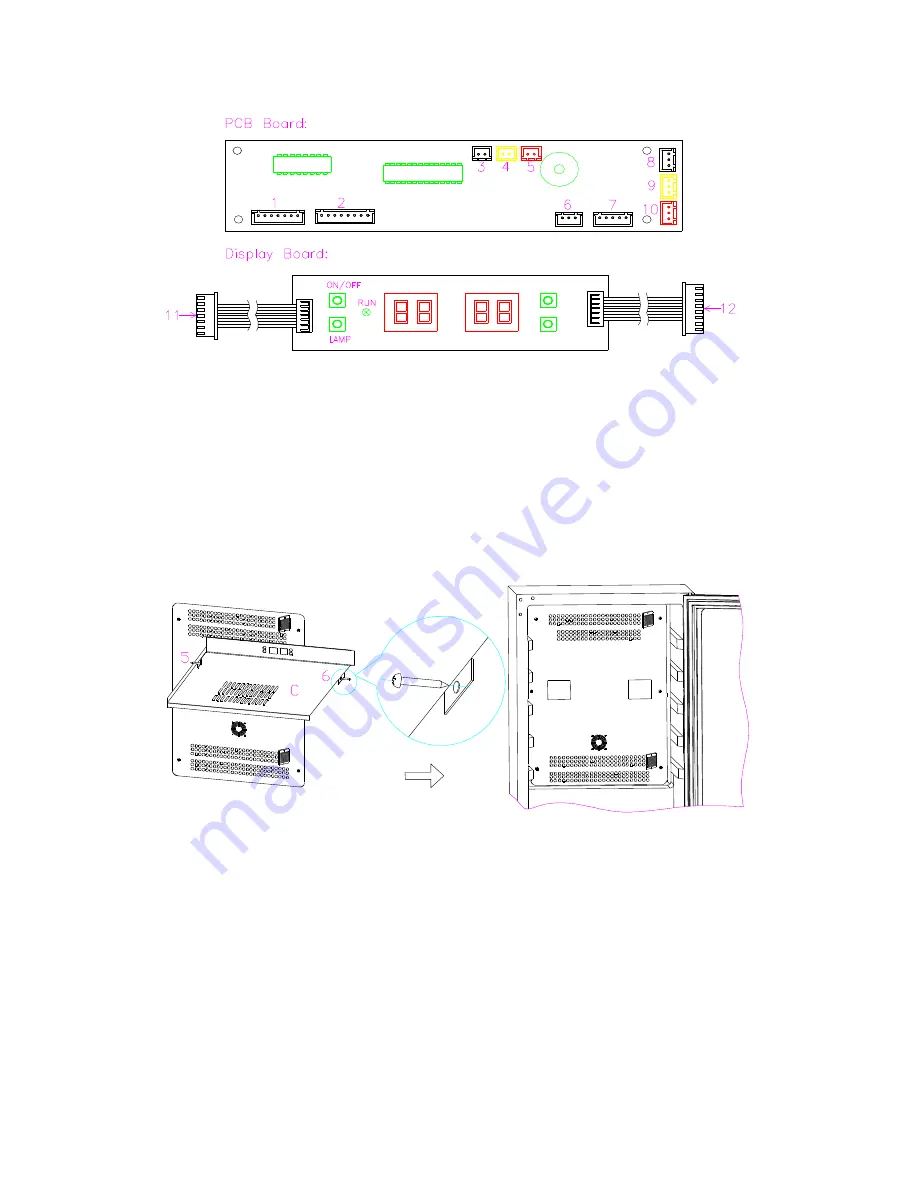
Fig.15 


1.    To the display PCB (connect to 11)                              2.To the display PCB (connect to 12) 

3.     

To the sensor of the evaporator (White)       

4.

 To the sensor of the refrigeration compartment

(Yellow ) 

5. 

To the sensor of the freezing compartmen

(Red )            6.To LED light

Black


7.To power PCB (White )                                                8.To fan of heater    (White ) 

9.

To the fan of the refrigeration compartment

(Yellow )    10.T

o the fan of the freezing compartment

(Red ) 


c.

 Remove the fixing screws (5,6), then pull out electric box (C) to expose the air duct board; 

(Fig.16)


  Fig.16 

3>. How to remove the air duct board(A),There are two kind of air duct board(A) 

a.

Remove the fixing screws of air duct board (1,2,3,4,5,6), then pull out air duct board (A). See


(Fig 17)


Be attention to unplug the connection wire when removing the air-duct board. You can move slowly aside until 

you can see the fans wire, and unplug it, and then take out the whole air-duct board.


Summary of Contents for WI6126

Page 1: ...WI6126 Caple 60cm Wine Cabinet Technical information...

Page 2: ......

Page 3: ...DG12 1 Evaporator 1 14 DG13 458 Water box 1 15 DG13 7 Shelf support 1 16 DG20 1 Wire clamp 1 17 DG8 9 Senser 1 18 DG22 422 Air duct board 1 19 DG8 8 Senser 1 20 DG13 198 Cover of senser 2 21 DG22 421...

Page 4: ...BH PTC heater fan 1 39 DG11 18 PTC heater 1 40 DG14 172 BR Lower hinge module Right 1 41 DG22 88 Support bracket of front legs 1 42 DG13 6 11 Cabinet leg type BC50N 4 43 DG12 91 Condenser 1 44 DG12 6...

Page 5: ......

Page 6: ...WI6126 Caple dual zone wine cabinet Caple dual zone wine cabinet Service Manual...

Page 7: ...e attempting any cleaning or maintenance this unit MUST be disconnected from the electrical supply to prevent electrical shock Preparation before maintenance Tools 1 Pliers 2 Phillips head screwdriver...

Page 8: ...porator freezing problems Page 15 Unstable internal Temperature Page 16 Control system problems Fault finding by the self check mode Page 16 Sensor fault Page 17 How to replace the sensor Page 17 LED...

Page 9: ...ogen by process pipe and please put the hand close to the cut kerf of the vent pipe If there is a little gas leak form the terminal it means normal or it is jamed B Make sure the capilary is working n...

Page 10: ...is empty How to remove the air duct board 1 Remove the shelves firstly and there is two method below a Remove the shelves some models have Phillips head screws to hold other models have no screws Fig...

Page 11: ...3 Fig 3 1 d Pull the shelves to the bottom circumvolve any side of the right and left and let the setter of the shelve go out of the channel and then draw out the shelves Fig 4 Fig 4 2 How to remove t...

Page 12: ...ard If there is any similar situation use the same method Fig 5 b Pull out electric box to expose the control panel as per the direction of arrowhead then unplug all the connectors from the control pa...

Page 13: ...nt F1 red 4 To the sensor of the freezing compartment X1 yellow 5 To the sensor of the refrigeration compartment X10 White 6 To the sensor of the evaporator X11 Red 7 To the power supply L N 8 To the...

Page 14: ...g 9 Fig 9 The new structure electrical removement a Remove the shelves then remove the fixing screws 2 3 The right diagram shows the box for clarity only See Fig 10 Fig 10 b Remove the the upper cover...

Page 15: ...movement in this version PCB board is devide into 2 blocks one is power PCB the other is control PCB a Remove the shelves then remove the fixing screws 1 2 3 4 Fig 13 Fig 13 b Remove the the upper cov...

Page 16: ...rtment Yellow 10 To the fan of the freezing compartment Red c Remove the fixing screws 5 6 then pull out electric box C to expose the air duct board Fig 16 Fig 16 3 How to remove the air duct board A...

Page 17: ...d 1 2 3 4 5 6 then pull out air duct board A See Fig 18 Fig 18 4 For a View of the internal configuration after removal of the air duct board see Fig 1 Front side joints location See Fig 19 A Capillar...

Page 18: ...1 Fig 21 1 B Dry filter process pipe soldered joint C Dry filter soldered joint D Capillary soldered joint E Process pipe soldered joint F Suction pipe soldered joint G Discharge pipe soldered joint H...

Page 19: ...f wine cellar compressor noise 1 The working of motor and piston motion will cause noise when compressor working So if noise is steady and not exceeds 42 dB it s normal If noise is not steady or very...

Page 20: ...4 and remove the air cycling fan and replace with a new one Fig 23 Fig 23 3 Regarding the old version eletrical box remove middle air duct board lower cover Fig 9 and remove the screw 1 2 3 4 replace...

Page 21: ...l the fan installing position are different but the replace methods almost same Fig 26 4 Remove the 4 fixing screw of the fans with the Phillips head screwdrivers 3 4 5 6 replace the fan Fig 26 1 Fig...

Page 22: ...e capillary Caused by Compressor oil flowing into the cooling system pipe work because of wine cooler lean during transportation and the jetting oil in the capillary cause noise Solutions Clean the co...

Page 23: ...s and the RUN indicator light are on all the time d If the cooler has condenser and evaporator fans they should work at full speed Heater and air cycling fans should work for 30 seconds alternately e...

Page 24: ...nsors 1 Evaporator sensor there are two different position a and b of the evaporator sensor a One is that the evaporator sensor is plugged into the fin of evaporator Remove the air duct board to acces...

Page 25: ...r remove the air duct board page 6 and take off the fixing screw 1 and take off the sensor and unplug another terminal s from socket X1 Fig 7 in the PCB board and replace the sensor with the same mode...

Page 26: ...he transformer Fig 7 model 2 PCB board divide into 2 blocks the main PCB board is in the electrical box Fig 15 the other power PCB board is in the left of the compressor s box with the transformer Fig...

Page 27: ...aw the PCB board and draw off the PCB board C replace it with the same model s PCB board Fig 33 c Remove two fixing screw of the transformer take off the tranformer D for replacement Fig 33 d How to r...

Page 28: ...e connector press the 4 studs 3 one by one Updraw the control PCB board and draw off the PCB board replace it with the same model s PCB board Fig 34 Fig 34 B How to replace the power PCB and transform...

Page 29: ...ter fan connector Red 3 To control PCB White 4 Compressor connecter 5 Connectors of the power N 6 Connector of power L 7 Transformer secondary connector 8 Transformer primary connector How to replace...

Page 30: ...place the LED light A How to replace the LED light in upper zone Fig 39 a Remove the shelves Fig 1 b Remove the screws 7 fixing light cover B c Remove the screw 8 in the center of the light cover disc...

Page 31: ...ght upward replace it Fig 34 How to replace the decorative frame Remove the screw 1 2 3 pull the decorative frame according to the arrowhead that view K show then remove the screw 4 5 6 from the gap b...

Reviews: