background image

21

Instruction manual Oi363

Please keep this instruction manual for future reference 

R E P L A C I N G   L E D   L I G H T I N G 

LIGHT SOURCE ENERGY CLASS

This product contains a light source of energy efficiency class G.

The LED light must be replaced by an authorised engineer or similar only. For more 
information, please contact Caple service - 0117 938 7420 or [email protected]

Unplug the unit from the power supply before starting the process. 

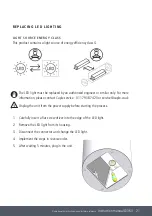
1.  Carefully insert a flat screw driver into the edge of the LED light.

2.  Remove the LED light from its housing.

3.  Disconnect the connector and change the LED light.

4.  Implement the steps in reverse order.

5.  After waiting 5 minutes, plug in the unit.

F

1. Carefully remove the 2 screws that secure the light.
2. Remove the LED light from its housing.
3. Disconnect the connector and change the LED light.
4. Implement the steps in reverse order.
5. After waiting 5 minutes, plug the unit.

,

Unplug the unit from the power supply before starting the process.

LIGHT SOURCE ENERGY CLASS

This  product  contains a light source of energy efficiency class F.

LED strip

1.  Open the glass panels.

2.  Use  an  appropriate  tool  to  remove  the 
screws  that  fix  the  LED  bars.

3. Remove  the  LED  light  from  its  housing 

by  sliding  to  the  side.  Disconnect the
connector and change the LED light.

4. Implement the steps in reverse order.

5. After waiting 5 minutes, plug in the unit.

1. Carefully insert a flat screw driver into the edge of the cover and lift cover off.
2. Remove the LED light from its housing.
3. Disconnect the connector and change the LED light.
4. Implement the steps in reverse order.
5. After waiting 5 minutes, plug the unit.

,

Unplug the unit from the power supply before starting the process.

LIGHT SOURCE ENERGY CLASS

This product contains a light source of energy efficiency class F.

LED strip

F

1. Carefully remove the 2 screws that secure the light.
2. Remove the LED light from its housing.
3. Disconnect the connector and change the LED light.
4. Implement the steps in reverse order.
5. After waiting 5 minutes, plug the unit.

,

Unplug the unit from the power supply before starting the process.

LIGHT SOURCE ENERGY CLASS

This  product  contains a light source of energy efficiency class F.

LED strip

Unplug the unit from the power supply before starting the process

1.  Open the glass panels.

2.  Use  an  appropriate  tool  to  remove  the 
screws  that  fix  the  LED  bars.

3. Remove  the  LED  light  from  its  housing 

by  sliding  to  the  side.  Disconnect the
connector and change the LED light.

4. Implement the steps in reverse order.

5. After waiting 5 minutes, plug in the unit.

1. Carefully insert a flat screw driver into the edge of the cover and lift cover off.
2. Remove the LED light from its housing.
3. Disconnect the connector and change the LED light.
4. Implement the steps in reverse order.
5. After waiting 5 minutes, plug the unit.

,

Unplug the unit from the power supply before starting the process.

LIGHT SOURCE ENERGY CLASS

This product contains a light source of energy efficiency class F.

1. Carefully insert a flat screw driver into the edge of the cover and lift cover off.
2. Remove the LED light from its housing.
3. Disconnect the connector and change the LED light.
4. Implement the steps in reverse order.
5. After waiting 5 minutes, plug the unit.

,

Unplug the unit from the power supply before starting the process.

LIGHT SOURCE ENERGY CLASS

This product contains a light source of energy efficiency class F.

LED strip

G

1. Carefully remove the 2 screws that secure the light.
2. Remove the LED light from its housing.
3. Disconnect the connector and change the LED light.
4. Implement the steps in reverse order.
5. After waiting 5 minutes, plug the unit.

,

Unplug the unit from the power supply before starting the process.

LIGHT SOURCE ENERGY CLASS

This  product  contains a light source of energy efficiency class F.

LED strip


LED light

4.
5.

in


1. Carefully insert a flat screw driver into the edge of the cover and lift cover off.
2. Remove the LED light from its housing.
3. Disconnect the connector and change the LED light.
4. Implement the steps in reverse order.
5. After waiting 5 minutes, plug the unit.

,

Unplug the unit from the power supply before starting the process.

LIGHT SOURCE ENERGY CLASS

This product contains a light source of energy efficiency class F.

LED strip

Summary of Contents for Orbit OI363

Page 1: ...Contact Caple on 0117 938 7420 for spare parts or www caple co uk Orbit Island Hood Instruction Manual OI363 ...

Page 2: ...al Oi363 Please keep this instruction manual for future reference CO NT ENT S Warnings 3 Environmental Protection 6 Uses 9 Installation 10 Remote Control 15 Timing 18 Cleaning and Maintenance 19 Caple Contact Details 22 ...

Page 3: ...liances fed by energy other than electric power eg centralized heating radiators water heaters etc To evacuate the air outlet please comply with the pertaining rules given by competent authorities Provide the room with an adequate aeration when a cooker hood and appliances fed by energy other than electric power gas oil or coal stoves etc are used simultaneously The cooker hood when evacuating the...

Page 4: ... contacts of at least 3 mm then such disconnecting devices must be supplied within the fixed installation If the fixed appliance is endowed with a supply cord and a plug the appliance has to be put in a place where the plug can be reached easily The use of materials which can burst into flames should be avoided in close proximity of the appliance When frying please pay particular attention to fire...

Page 5: ... UK if necessary Children under 8 years of age must be kept away from the cooker hood unless they are constantly supervised Children 8 years and older may only use the cooker hood unsupervised if they have been shown how to use it safely and recognise and understand the consequences of incorrect operation The electrical safety of this appliance can only be guaranteed when correctly earthed It is e...

Page 6: ...touch the housing or the grease filters until the cooker hood has cooled down A P P R O P R I AT E U S E This appliance is intended to be used in household and similar applications such as Staff kitchen areas in shops offices and other working environments Farm Houses By clients in hotels motels and other residential type environments Bed and breakfast type environments ...

Page 7: ...more detailed information about treatment recovery and recycling of this product please contact your local council your household waste disposal service or the retailer where you purchased the product WARRANTY Your new appliance is covered by warranty The warranty card is enclosed if it is missing you must provide the following information to your retailer in order to receive a replacement date of...

Page 8: ... appliance has been manufactured to the strictest standards and complies with all applicable legislation TECHNICAL FICHE This appliance conforms to all current and applicable energy regulations To view the Technical Fiche that supports the energy labelling data please visit the product page on our website www caple co uk ...

Page 9: ...ough an evacuation duct connected from the extractor to the outside Both charcoal filter and air deflector are not necessary in this case USES The appliance is already arranged both for re circulation and vented installation In Recirculation mode Fig 1 the air and fumes conveyed by the appliance are cleaned both by a grease filter and by an active charcoal filter and put again into circulation thr...

Page 10: ...e hood place the electric feed correctly into the ornamental tube and create a hole for air evacuation if installing in vented ducted mode INSTALLATION Before installing the appliance make sure that none of the parts are damaged in any way In case of damaged parts contact your retailer and do not proceed with installation Read all of the following instructions with care before installing the appli...

Page 11: ...ed at a minimum distance of 65cm above the hob It is the manufacturer of the hob who determines the clearance required and the clearance quoted by the hob manufacturer must be followed In the absence of any instructions supplied with a gas hob the minimum distance between the hob and the hood must be at least 760mm ...

Page 12: ...curely with a hose clamp Insert the upper structure Fig 7 3 into the lower structure and adjust its height as required by matching it with the hob s minimum height Tighten the two structures securely with the screws provided Fig 7 3B Insert the two extension tubes from above Fig 7 4 slots into Fig 7 5 adjust the two structures to get them to the appropriate level Lift the hood together with the st...

Page 13: ...d fix securely with a hose clamp Insert the upper structure Fig 7 3 into the lower structure and adjust its height as required by matching it with the cooking top s minimum height Tighten the two structures securely with the screws provided Fig 7 3B Insert the two extension tubes from above Fig 7 4 fits into Fig 7 5 adjust the two structures to get them to the appropriate level Lift the hood toget...

Page 14: ...14 Instruction manual Oi363 Please keep this instruction manual for future reference INSTALLATION IMAGES ...

Page 15: ...ng frequency 433 92 Mhz Combinations 32 768 Max consumption 25 mA Operating temperature 20 55 C Dimensions 120 x 45 x 15 mm OPERATION The remote is equipped with 5 buttons for cooker hood management as specified below Light ON OFF command Motor ON speed level 1 OFF command Reduce speed Increase speed 10 minute timer INITIAL OPERATING CONDITION The manufacturer supplies the radio control unit ready...

Page 16: ...is provided with preset codes Should new codes be required proceed as follows Press simultaneously buttons for two seconds When LED s light on press buttons within 5 seconds LED s flashing 3 times indicate the procedure is completed WARNING This operation permanently deletes the preset codes LEARNING THE NEW TRANSMISSION CODE Once the transmission code is changed in the remote control unit the ele...

Page 17: ... off After any necessary repairs have been performed reset the emergency button WARNING The battery should be replaced every year to guarantee the optimal range of the transmitter To replace the battery take the plastic lid off remove the battery and replace it with a new one observing the correct battery polarities Used batteries should be discarded in special collection bins WARNING Any adjustme...

Page 18: ...dels are equipped with remote motors that as for internal motor versions include a timer device that switches down the speed when it exceeds 650 m h See External Motors Instructions Remote motors whose air capacity exceeds 650m h at both 4th and 3rd speed will have the following by default timer control functions The speed is automatically switched from 4th to 2nd speed after 6 minutes operation I...

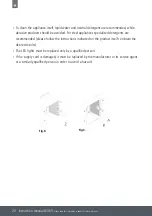
Page 19: ...and or in the dishwasher at least every two months or more depending on use NOTE If washing the grease filter in the dishwasher wash separately to prevent food particles becoming trapped in the filter mesh When the appliance is used in recirculating mode the active charcoal filter Fig 8Z needs to be periodically replaced The charcoal filter can be removed by removing the grease filter first Fig 3A...

Page 20: ...To clean the appliance itself tepid water and neutral detergent are recommended while abrasive products should be avoided For steel appliances specialised detergents are recommended please follow the instructions indicated on the product itself to obtain the desired results The LED lights must be replaced only by a qualified person If the supply cord is damaged it must be replaced by the manufactu...

Page 21: ...unit Unplug the unit from the power supply before starting the process LIGHT SOURCE ENERGY CLASS This product contains a light source of energy efficiency class F LED strip Unplug the unit from the power supply before starting the process 1 Open the glass panels 2 Use an appropriate tool to remove the screws that fix the LED bars 3 Remove the LED light from its housing by sliding to the side Disco...

Page 22: ...Caple Service Fourth Way Avonmouth Bristol BS11 8DW T 0117 938 1900 E service caple co uk www caple co uk ...

Reviews: