


2
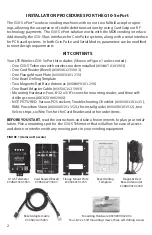
INSTALLATION PROCEDURES FOR THE G10-S ePort
The G10-S ePort® works in vending machines with one or two full bill acceptor open-
ings, allowing the acceptance of credit/debit transactions by using Card Swipe or RF
technology payments. The G10-S ePort solution works with the MDB vending interface.
Additionally, the G10-S has interfaces for Coin Pulse systems, along with a serial interface
for PC based systems. In both Coin Pulse and Serial Modes, parameters can be modifi ed
to meet design requirements.
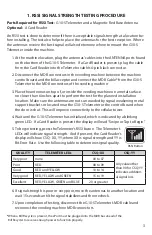
KIT CONTENTS
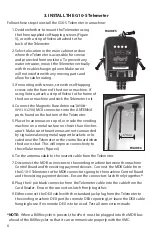
Your LTE Wireless G10-S ePort kit includes (Shown in Figure 1 unless noted):
• One G10-S Telemeter with wireless modem installed (
#VVWUT0101903
)
• One Card Reader (Bezel) (
#V8SUK1235003
)
• One Flange Mount Plate (
#VXXUE0101235
)
• One Bezel Drilling Template
• Two Magnetic Red Base Antennas (
#V8WUP0101290
)
• One Bezel Adapter Cable (
#V6SUC1435003
)
• Mounting Hardware: Four, 8-32 x 3/8” screws for mounting reader, and three self-
drilling screws (
#DCHZDHH62006
)
• NOT PICTURED: Various POS stickers, Troubleshooting Checklist (
#V8VUD1101435
),
RMA Procedure Sheet (
#UXXUD0101552
), this install guide (
#VVXUD0101912
), two
Velcro strips, six Wire Ties for the Card Reader, and other order items.
BEFORE YOU START, read the instructions and take a few moments to plan your instal-
lation. Pick a mounting spot for the G10-S Telemeter that will allow for ease of access
and does not interfere with any moving parts in your vending equipment.
FIGURE 1 (items not to scale)
G10-S Telemeter
#
VVWUT0101903
Card Reader (Bezel)
#
V8SUK1235003
Bezel Drilling
Template
Mounting Hardware
#DCHZDHH62006
Four, 8-32 x 3/8” mounting screws, three self-drilling screws.
Flange Mount Plate
#
VXXUE0101235
Bezel Adapter Cable
#V6SUC1435003
Magnetic Red
Base Antenna (2)
#
V8WUP0101290


