background image

VIDEO MENU

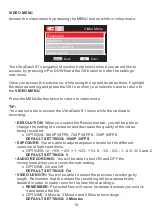
Access the video menu by pressing the MENU button while in video mode.

The UltraDash S1 navigations function help select where you would like to 
access, by pressing UP or DOWN and the OK button to enter the settings 
sub-menu.

Once you access the sub-menu, while using the up and down buttons, highlight 
the desired setting and press the OK to confirm your selection and to return to 
the 

VIDEO MENU.

Press the MENU button twice to return to video mode.

TIP:

-You are not able to access the UltraDash S1 menu while the camera is 
recording.

      • 

RESOLUTION: 

When you select the Resolution tab, you will be able to 

        change the settings to increase and decrease the quality of the video 
        being recorded. 
             o  OPTIONS: 1080P 30FPS, 720P 30 FPS, 720P 60FPS
                 

DEFAULT SETTINGS: 1080P 30FPS

      • 

EXPOSURE: 

You are able to adjust exposure levels for the different 

        varieties of light conditions.
             o  OPTIONS: +2, +5/3, +4/3, +1, +2/3, +1/3, 0, -1/3, -2/3, -1, -4/3, -5/3 and -2
                 

DEFAULT SETTINGS: 0 

      • 

AUDIO RECORDING:

  You will be able to turn ON and OFF the 

        microphone when you access the sub-setting.
             o  OPTIONS: On and Off
                 

DEFAULT SETTINGS: On

      • 

VIDEO LENGTH: 

You will be able to select the previous recordings by 

        length. Remember that the oldest file recording will be automatically 
        deleted in order to make room for the new file recordings.
             o  

REMEMBER:

 Protected files will never be deleted unless you unlock 

                 it and delete the file.
             o  OPTIONS: 2 Minute, 3 Minute and 5 Minute recordings
                 

DEFAULT SETTINGS: 3 Minutes

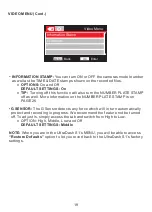
Video Menu

Resolution

Exposure

Audio Recording

Video Length

Back

MENU

Enter

OK

Video Menu

Resolution

Exposure

Audio Recording

Video Length

18

Summary of Contents for ultradash S1

Page 1: ...Instruction Manual...

Page 2: ......

Page 3: ...matic Start Stop Technology This feature is included to allow the user to maintain full focus on the road The vehicles ignition will let the camera turn on while connected to your vehicles cigarette l...

Page 4: ...ntents 05 Product Features 05 Suction Mount 06 Camera Parts Controls 07 In Vehicle Installation 13 Video Mode 17 Video Menu 18 Photo Mode 20 Photo Menu 21 Playback Mode 22 Set Up Menu 26 USB Storage P...

Page 5: ...services with the device unless you are qualified to control the object Misuse of the Cansonic UltraDash S1 may result in electric shock or fire exposure AVOID any circumstances with the camera that a...

Page 6: ...5Vdc 6G 140 F1 8 1920 x 1080 30fps default 2 7 960 W X 240 H pixels x RGB 16 9 8 32GB SDHC Class 10 48mb s for best results use a recognized brand 8GB Micro SD 60mins of recording 16GB Micro SD 120mi...

Page 7: ...ntain the camera as well as the focus you need to that perfect shot G SENSOR FILE PROTECTION When an accident happens there is no time to save what has just happened We have developed a unique feature...

Page 8: ...mera 2 Suction Cup a standard suction cup to place the mount on the window surface Remember to clean the surface of the window and add a small amount of moisture on the suction cup to allow for a stro...

Page 9: ...nt You are able to attach the camera to the provided mount here 2 Camera Lens The Cansonic UltraDash S1 camera lens has a standard wide angle view 140 Degrees and a 6 element glass lens for the best a...

Page 10: ...e on whatever mode you are in You can also press the button twice to open the cameras general settings 7 Down Screen Off Down This button will allow you to navigate through the cameras menu and can se...

Page 11: ...y available through Video Mode 10 Mode Screen Capture Button Mode By pressing this button you will be able to access all modes available on the UltraDash S1 Video Photo Playback Screenshot While you a...

Page 12: ...nic UltraDash S1 connect to your television directly by using the AV Cable sold separately 14 DC IN USB Port By connecting the UltraDash S1 with the supplied power cord you are able to charge the came...

Page 13: ...ettings reset Simply press the button until the camera shuts off and restarts again 16 MicroSD Card Slot You can insert the recommended memory card in this location Align the gold parts of the memory...

Page 14: ...t is fitted to allow a standard MicroSD card to record your footage Before installing make sure the gold end of the card is facing the LCD screen Once its aligned with the slot push the card in and wa...

Page 15: ...the suction cup Release the locking lever from the mount by pulling down on it Hold the suction cup in place with the mount and press against the window While it is being held in place put the release...

Page 16: ...emember to plug the car power cord to the camera in the power socket located on the top right corner DO NOT wire the UltraDash S1 directly to the car cigarette outlet Doing so will result in permanent...

Page 17: ...ed DO NOT operate the UltraDash S1 while driving Remember the camera will automatically record when the vehicle engine has started or when you turn your vehicle off PLEASE adjust your camera settings...

Page 18: ...l appear across it to indicate it is not recording 6 Recording The red dot icon will appear on the screen when the camera is actively recording 7 Recording Duration This will indicate the length of th...

Page 19: ...o OPTIONS 1080P 30FPS 720P 30 FPS 720P 60FPS DEFAULT SETTINGS 1080P 30FPS EXPOSURE You are able to adjust exposure levels for the different varieties of light conditions o OPTIONS 2 5 3 4 3 1 2 3 1 3...

Page 20: ...e NUMBER PLATE STAMP off as well More information on the NUMBER PLATE STAMP is on PAGE 26 G SENSOR The G Sensor detects any force which will in turn automatically protect and recording in progress We...

Page 21: ...or choosing Cansonic 1 2 3 4 5 6 08 08 2016 1 MODE This will indicate when the UltraDash S1 is in PHOTO MODE 2 EXPOSURE This display will let you know the photos current exposure level setting 3 TIME...

Page 22: ...let you in to the Sub Menu Press down on the MENU button twice to return to PHOTO MODE EXPOSURE You can adjust the levers of exposure from the different lighting conditions o Options 2 5 3 4 3 1 2 3 1...

Page 23: ...wed 3 FILE NUMBER Displays the current file number 4 TIME The screen will display the time relevant to the date 5 DATE The screen will display the date relevant to the file being displayed on screen 6...

Page 24: ...number will be displayed on every image the UltraDash S1 captures 4 TIME The screen will display the time relevant to the date 5 DATE The screen will display the date relevant to the file being displa...

Page 25: ...Exposure Back MENU Enter OK Delete File Delete ALL Files Delete Files Delete File Video Menu Resolution Exposure Back MENU Enter OK Delete File Delete ALL Files Delete Files Delete ALL Files You will...

Page 26: ...ect File Video Menu Resolution Exposure Back MENU Enter OK Protect Files Protect File Unprotect File Protect All Files Unprotect All Files Unprotect All Files Video Menu Resolution Exposure Back MENU...

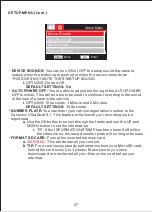
Page 27: ...hicle has been turned off The camera takes a standard 30 second standby mode and will automatically be turned off If an outside force moves your car the camera will automatically turn on and start rec...

Page 28: ...vehicle i OPTIONS 10 seconds 1 Minute and 2 Minutes DEFAULT SETTINGS 10 Seconds NUMBER PLATE You can enter your vehicle registration number to the Cansonic UltraDash S1 This feature will allow all you...

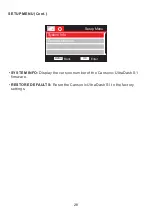
Page 29: ...solution Exposure Back MENU Enter OK Setup Menu System Info Restore Defaults firmware RESTORE DEFAULTS Reset the Cansonic UltraDash S1 to the factory settings SYSTEM INFO Display the version number of...

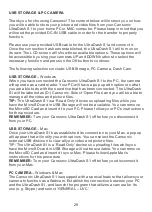
Page 30: ...s and you will be able to manage all the video and picture files TIP The UltraDash S1 is a Read Only devise so uploading files while you have the MicroSD card in USB Storage will not be available You...

Page 31: ...our UltraDash S1 and the external device Once you have done so continue to turn on the UltraDash S1 and the external device The UltraDash S1 s screen will appear blank as the image it is supposed to v...

Page 32: ...hese files may not be played on your PC if you do not have a suitable video player installed My video files jump when they are being played The memory card that the UltraDash S1 recommends for best qu...

Page 33: ...ou cannot view your files on the memory card be sure it is the recommended class 10 or UHS type 1 good quality branded micro SD card You must also format the memory card to the UltraDash S1 I cannot d...

Page 34: ...Dash s Parking Mode is active but now I cannot stop the recording Reminder that the UltraDash will begin recording when there is motion detected If you would like to turn this feature off turn the Ult...

Page 35: ...Instagram cansonic_usa Facebook cansonicusa Youtube Cansonic USA Official www cansonic com 34...

Page 36: ......

Reviews: