background image

14

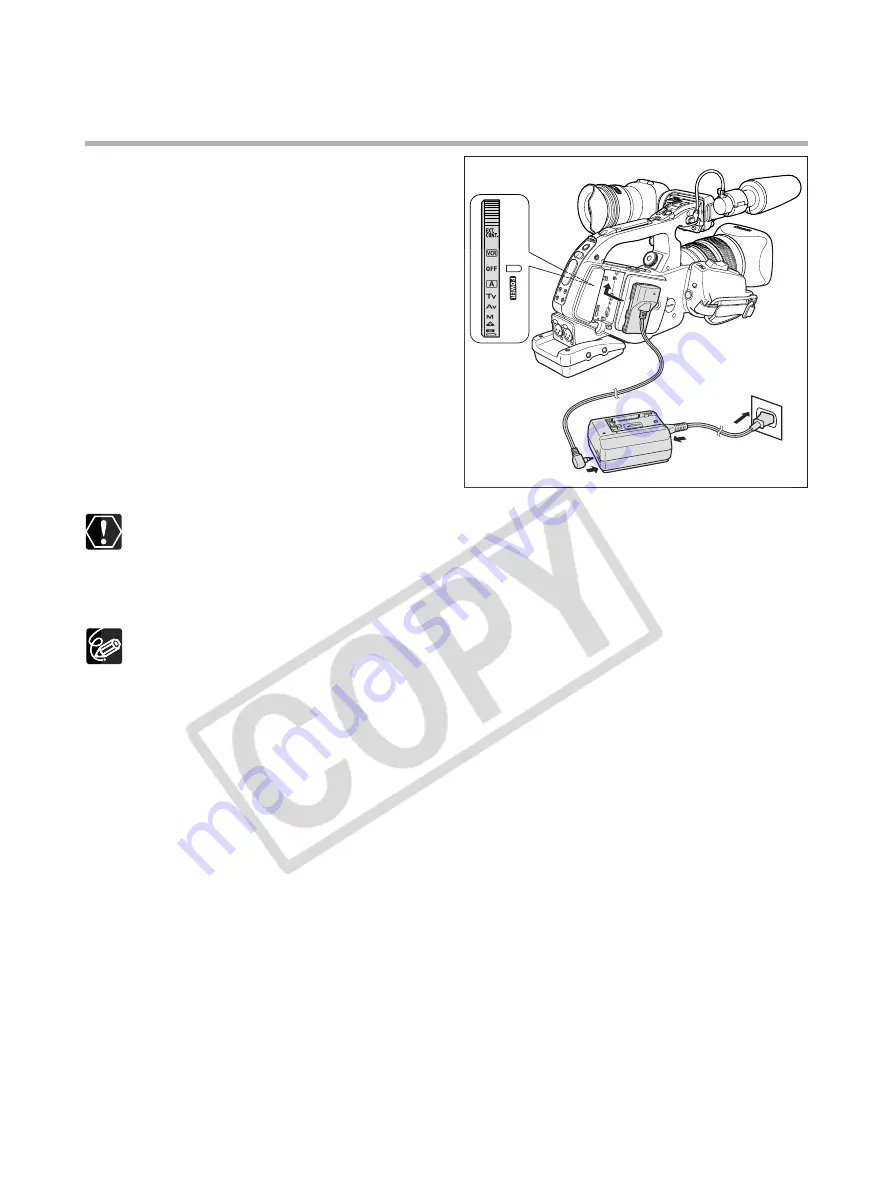
Using a Household Power Source

1. Turn the POWER dial to OFF.
2. Attach the DC coupler to the camcorder.

Press lightly and slide it in the direction of the
arrow until it clicks.

3. Connect the power cord to the power

adapter.

4. Plug the power cord into a power

outlet.

5. Connect the DC coupler to the adapter.
6. Detach the DC coupler after use.

Press the BATT. RELEASE button to detach the
DC coupler.

Disconnect the DC coupler from the power adapter when charging a battery pack.

Turn off the camcorder before connecting or disconnecting the power adapter.

If the adapter is used close to a TV, it may cause picture interference. Move the adapter away from
the TV or the antenna cable.

Do not connect any products that are not expressly recommended to the power adapter.

When the power adapter or battery pack is defective, the CHARGE indicator turns off, and
charging stops.

The CHARGE indicator informs you about the charge status.
0-50%:

Flashes once every second

50%-75%:

Flashes twice every second

More than 75%: Flashes 3 times every second
100%:

Glows steadily

q

e

t

r

w

Summary of Contents for XL 2

Page 1: ...PUB DIM 692 DIGITAL VIDEO CAMCORDER Instruction Manual CAMESCOPE NUMÉRIQUE Manuel d instruction VIDEOCÁMARA DIGITAL Manual de Instrucciones Mini Digital Video Cassette English Français Español NTSC A ...

Page 2: ...at to which the receiver is connected Consult the dealer or an experienced radio TV technician for help Use of shielded cable is required to comply with class B limits in Subpart B of Part 15 of FCC Rules Do not make any changes or modifications to the equipment unless otherwise specified in the manual If such changes or modifications should be made you could be required to stop operation of the e...

Page 3: ...t Do not defeat the safety purpose of the polarized plug 12 Power Cord Protection Power cords should be routed so that they are not likely to be walked on or pinched by items placed upon or against them Pay particular attention to plugs and the point from which the cords exit the product 13 Outdoor Antenna Grounding If an outside antenna is connected to the product be sure the antenna is grounded ...

Page 4: ...uct has been dropped or the cabinet has been damaged f When the product exhibits a distinct change in performance This indicates a need for service 20 Replacement Parts When replacement parts are required be sure the service technician has used replacement parts that are specified by Canon or that have the same characteristics as the original part Unauthorized substitutions may result in fire elec...

Page 5: ... Canon Inc D is a trademark m is a trademark Windows is either a registered trademark or trademark of Microsoft Corporation in the United States and or other countries Other names and products not mentioned above may be registered trademarks or trademarks of their respective companies Using this Manual Set the time zone date and time when you first start using your camcorder or when you have repla...

Page 6: ...Recording in 16 9 Mode 46 Setting the Time Code 47 Setting the User Bit 49 Audio Recording 50 Image Stabilizer Lenses Equipped with Image Stabilizer 54 Using the Programmed AE Modes 55 Recording in the Shutter Priority Tv Mode 58 Recording in the Aperture Priority Av Mode 59 Recording in the Manual Mode 60 Adjusting the Exposure 61 Using AE Shift 62 Adjusting the Gain 63 Setting the White Balance ...

Page 7: ...ing from Analog Video Devices VCR TV or Camcorder 97 Recording from Digital Video Devices DV Dubbing 98 Converting Analog Signals into Digital Signals Analog Digital Converter 99 Connecting to the Computer Using a DV IEEE1394 Cable 101 Additional Information Settings Retained at Power Off or STANDBY Mode 102 Screen Displays 104 List of Messages 107 Maintenance Others 108 Troubleshooting 113 System...

Page 8: ... Adapter Holder STV 150 Stereo Video Cable S 150 S video Cable Camcorder Dust Cap SS 1000 Shoulder Strap The serial number of this product can be found at the battery attachment unit of the camcorder Write down the number and other information here and retain this book as a permanent record of your purchase to aid identification in case of theft Date of Purchase Model Name XL2 Purchased From Seria...

Page 9: ...7 Eye cup 18 REC LEVEL switch CH3 CH4 53 CH3 CH4 dials 53 INPUT SELECT switch CH1 CH2 51 INPUT SELECT switch CH3 CH4 52 CH1 CH2 dials 53 REC LEVEL switch CH1 CH2 53 AUDIO MONITOR button 53 89 LIGHT button 9 Microphone locking screw 20 LIGHT Button Press the LIGHT button to illuminate the side panel for approximately 10 seconds If you press and hold the button for at least 3 seconds the panel remai...

Page 10: ...rminals 51 RCA BNC selector 88 Backup battery compartment 16 BATT RELEASE button 13 Cassette compartment 25 Lens hood locking screw 23 CUSTOM KEYS 74 CUSTOM PRESET ON OFF button 70 EJECT switch 25 CUSTOM PRESET SELECT button 70 About the m Terminal m LANC stands for Local Application Control Bus System The m terminal allows you to connect and control connected devices Connect only devices with the...

Page 11: ...ial 56 STANDBY button 33 WHITE BALANCE W button 64 WHITE BALANCE dial 64 GAIN dial 61 REC SEARCH button 36 85 REC SEARCH c record review button 36 85 COLOR BARS SELECT button 77 COLOR BARS ON OFF button 77 SHUTTER r button 58 SHUTTER t button 58 a pause button 85 External control mode VCR mode Power off Auto Shutter Priority Aperture Priority Manual Spotlight Low Light Easy Recording Recording pro...

Page 12: ...O MONITOR button 53 89 PLAYe button 85 button 85 REW button 85 SEARCH SELECT button 91 92 REC PAUSE button 97 98 PAUSEa button 85 STOP3 button 85 Zoom buttons 38 DATA CODE button 93 ZERO SET MEMORY button 90 MIX BALANCE buttons 89 buttons 91 92 FF1 button 85 button 85 SLOW button 85 Jog Shuttle dial 86 REMOTE SET button 95 SET button 26 button 85 WL D4000 Wireless Controller ...

Page 13: ...n of the arrow until it clicks The CHARGE indicator starts flashing It glows steadily when charging is complete 4 When charging is complete remove the battery pack from the adapter 5 Unplug the power cord from the power outlet and disconnect it from the adapter Attaching the Battery Pack 1 Turn the POWER dial to OFF 2 Attach the battery pack to the camcorder Press lightly and slide it in the direc...

Page 14: ...the power adapter when charging a battery pack Turn off the camcorder before connecting or disconnecting the power adapter If the adapter is used close to a TV it may cause picture interference Move the adapter away from the TV or the antenna cable Do not connect any products that are not expressly recommended to the power adapter When the power adapter or battery pack is defective the CHARGE indi...

Page 15: ...commend that you prepare battery packs 2 to 3 times longer than you think you might need To conserve battery power turn off the camcorder instead of leaving it in record pause mode Battery Pack BP 930 BP 945 Charging Time with the CA 920 145 min 220 min With 20 Maximum Recording Time With supplied 155 min 230 min L IS Lens color viewfinder With optional FU 1000 120 min 185 min Monochrome Viewfinde...

Page 16: ... chemical burn hazard if mistreated Do not recharge disassemble heat above 212 F 100 C or incinerate the battery Replace the battery with a CR2025 made by Panasonic Hitachi Maxell Sony Sanyo or with Duracell DL2025 Use of other batteries may present a risk of fire or explosion Do not pick up the battery using tweezers or other metal tools as this will cause a short circuit Wipe the battery with a ...

Page 17: ...the bracket and tighten the locking screw 2 Connect the viewfinder cable to the upper socket of the camcorder body Align the mark on the cable with the mark on the camcorder 3 Hook the viewfinder cable onto the cable clamp Detaching the Viewfinder Unit 1 Detach the viewfinder cable 2 Loosen the locking screw and slide the viewfinder unit off the bracket q w e ...

Page 18: ...the Eye Cup Align the hole for the dioptric adjustment lever with the lever and pull the eye cup into position Adjusting the Position of the Viewfinder The viewfinder position can be changed right left forward backward Right eye use Right Left Adjustment Loosen the locking screw move the viewfinder to the right left and tighten the screw Forward Backward Adjustment Loosen the locking lever move th...

Page 19: ...r when you are not using the viewfinder as LCD panel The screen is slightly brighter when you open the eyepiece adapter Dioptric Adjustment Turn on the camcorder and adjust the dioptric adjustment lever Prevent direct sunlight getting in the viewfinder The viewfinder LCD may become damaged due to concentration of the light by the lens Pay special attention when mounting the camcorder on a tripod o...

Page 20: ...ess the SET dial 5 Turn the SET dial up or down to adjust the setting and press the SET dial 6 Press the MENU button to close the menu Attaching the Microphone Unit 1 Loosen the microphone locking screw on the viewfinder unit open the microphone clamp and insert the microphone into the microphone clamp 2 Align the mark on the microphone with the mark on the clamp and tighten the screw 3 Plug the m...

Page 21: ...areful not to drop the camcorder when adjusting the strap Attaching the Adapter Holder Attach the adapter holder to use the optional CH 910 Dual Battery Charger Holder or a commercially available wireless microphone receiver 1 Attach the adapter holder and secure it by tightening the screws 2 Adjust the position of the support bars When using the optional CH 910 hook it onto the support bars and s...

Page 22: ...urn the lens counter clockwise until it stops and remove the lens 3 Attach the dust caps to the camcorder and the lens Be careful not to drop the lens or camcorder when mounting unmounting the lens Avoid direct sunlight or strong light sources when mounting unmounting the lens The XL mount is not compatible with the VL mount Do not touch the lens lens mount and the interior of the mount or expose ...

Page 23: ...ens from stray light and to protect the lens 1 Place the lens hood on the front of the lens and screw it clockwise until the Canon logo appears on top Be careful not to deform the lens hood Make sure that the lens hood is aligned with the thread 2 Tighten the locking screw w q ...

Page 24: ...mcorder and wireless controller are equipped with 2 remote sensor modes 95 If the wireless controller does not work check if camcorder and wireless controller are set to the same mode When the camcorder cannot be operated with the wireless controller or when it can only be operated in very close range replace the batteries Make sure to replace both batteries at the same time The wireless controlle...

Page 25: ...ompartment until it clicks 4 Wait for the cassette compartment to retract automatically and close the cassette compartment cover Do not interfere with the cassette compartment while it is opening or closing automatically or attempt to close the cover before the cassette compartment has fully retracted Be careful not to get your fingers caught in the cassette compartment cover If the camcorder is c...

Page 26: ... dial to select a setting option and press the SET dial 5 Press the MENU button to close the menu Pressing the MENU button at any time closes the menu Items that are not available appear in purple You may find it more convenient to use the wireless controller to operate the menu Press the MENU button on the wireless controller to open or close the menu Use the select buttons in place of the SET di...

Page 27: ...AL 30sec 1min 5min 10min INT REC TIME 0 5sec 1sec 1 5sec 2sec CUSTOM PRESET PRESET SETUP SEL PRESET 1 PRESET_A 2 PRESET_B 3 PRESET_C 70 CLEAR CANCEL PROTECT CLEAR GAMMA NORMAL CINE KNEE HIGH MIDDLE LOW BLACK STRETCH MIDDLE PRESS COLOR MATRIX NORMAL CINE COLOR GAIN COLOR PHASE R GAIN G GAIN B GAIN V DETAIL NORMAL LOW SHARPNESS CORING SETUP LEVEL MASTER PED NR OFF HIGH MIDDLE LOW READ PRESET SEL PRE...

Page 28: ...ST COLOR SHARPNESS CENTER MARK ON OFF 35 TV SCREEN ON OFF 104 AUDIO LEVEL ON OFF 53 GUIDE INFO OFF CUSTOM KEYS D T DISPLAY 31 74 LANGUAGE ENGLISH 84 DATE FORMAT 84 USR BIT DISP ON OFF 49 SYSTEM CUSTOM KEY 1 TIME CODE INDEX WRITE ZEBRA VCR STOP TV SCREEN 75 ZOOM HANDLE AUDIO LEVEL NONE CUSTOM KEY 2 TIME CODE INDEX WRITE ZEBRA VCR STOP TV SCREEN ZOOM HANDLE AUDIO LEVEL NONE WL REMOTE A1 A2 OFF B 95 ...

Page 29: ...F 12dB 51 DISPLAY SETUP EVF SETUP BRIGHTNESS 20 CONTRAST COLOR SHARPNESS TV SCREEN ON OFF 104 AUDIO LEVEL ON OFF 53 DISPLAYS ON OFF PLAYBK 104 6SEC DATE ON OFF 94 DATA CODE DATE TIME CAMERA DATA CAM D T 93 D TIME SEL DATE TIME DATE TIME 93 CUSTOM KEYS ON OFF 74 LANGUAGE ENGLISH 84 DATE FORMAT 84 USR BIT DISP ON OFF 49 SYSTEM CUSTOM KEY 1 TIME CODE TV SCREEN DATA CODE AUDIO LEVEL NONE 75 CUSTOM KEY...

Page 30: ...the SET dial to select the setting option that represents your time zone and press the SET dial To adjust for daylight saving time select the time zone with the U next to the area Setting the Date and Time 5 Turn the SET dial to select D TIME SET and press the SET dial The year display starts flashing 6 Turn the SET dial to select the year and press the SET dial The next part of the display starts...

Page 31: ...k CARACAS RIO Rio de Janeiro FERNAN Fernando de Noronha AZORES No Time zone No Once you have set time zone date and time you do not need to reset the clock each time you travel to another time zone Just set the time zone to the one of your destination and the camcorder automatically adjusts the clock Displaying Date and Time during Recording You can display the date and time in the lower left corn...

Page 32: ...lly lamp starts flashing and the REC lamp on the viewfinder lights up Press the start stop button again to pause recording When You Have Finished Recording 1 Set the POWER dial to OFF 2 Replace the lens cap 3 Unload the cassette 4 Disconnect the power source Wait until the tape counter stops completely before you start recording When you do not remove the cassette you can record the next scene wit...

Page 33: ...ve function after 5 minutes in record pause mode to protect tape and video heads You have the option to set the camcorder to shut off SHUT OFF or to turn off the VCR section leaving the camera section turned on VCR STOP In VCR STOP mode the camcorder retains camera settings such as aperture and shutter speed so you can adjust the camera section without worrying about the automatic shut off The VCR...

Page 34: ...changed from the following 60i 1 60 of a second 30p 1 30 of a second 24p 1 48 of a second You can select between drop frame or non drop frame time code 47 Indicates the remaining time of the tape in minutes b END flashes when the tape reaches the end When the time left is less than 15 seconds the remaining tape time may not appear Depending on the type of the tape the indication may not be display...

Page 35: ...splaying the Center Marker Use the center marker to accurately frame subjects Open the menu and select DISPLAY SETUP Select CENTER MARK set it to ON and close the menu Normal screen display Audio level indicator center marker recording program EXP lock ND filter custom preset shutter speed aperture AE shift gain white balance skin detail warning date time Date time No display CENTER MARK OFF DISPL...

Page 36: ...nds the tape plays back the last few seconds and returns to record pause mode Record Search In record pause mode this function allows you to play back the tape forward or reverse to locate the point where you wish to begin recording Press and hold the REC SEARCH button forward or button reverse Release the button at the point you wish to begin recording The camcorder returns to record pause mode R...

Page 37: ...on END SEARCH appears The camcorder rewinds fast forwards the tape plays back the last few seconds of the recording and stops the tape Pressing the button again cancels the search End search cannot be used once you unload the cassette End search may not work properly if a blank section exists on the tape END SEARCH button ...

Page 38: ...l above a number indicating the level is displayed next to the zoom indicator When the ZOOM SPEED switch is set to VARIABLE the zoom speed is linked to how hard you move the zoom lever Zoom speed with 20x L IS Lens from wide angle to telephoto CONSTANT Level 1 approx 60 seconds Level 16 approx 3 5 seconds VARIABLE Up to approx 10 seconds Zoom speed varies depending on the lens Zoom lever on the ca...

Page 39: ...1 Set the POSITION PRESET switch to ZOOM 2 Move the POSITION PRESET ON SET switch to SET The preset zoom position appears in yellow on the zoom indicator Returning to the Preset Zoom Position Move the POSITION PRESET ON SET switch to ON The camcorder returns to the preset zoom position The preset setting is canceled when you attach the optional Extender XL 1 6 or mount a lens with different magnif...

Page 40: ...as you take your hand away from the focus ring When recording under bright conditions the camcorder sets a small aperture value and the picture may appear blurred This may be more noticeable at wide angle When you are using a lens with built in ND filter turn it on off according to the screen display 43 When recording under dark conditions the focusing range narrows and the picture may appear blur...

Page 41: ...e power turned on you may lose focus on your subject This possible slight shift in focus is due to a rise in temperature in the camcorder interior and lens Check the focus before resuming shooting Temporary Autofocus Press the eAF switch on the lens in the direction of AF and hold it Autofocus is activated as long as you hold the eAF switch When using the eAF switch make sure the POSITION PRESET s...

Page 42: ...djust the focus with the focus ring 4 Move the POSITION PRESET ON SET switch to SET MF and the focus preset speed appear in yellow Setting the Focus Preset Speed Open the menu and select CAMERA SETUP Select F SPEED PSET select a setting option and close the menu The selected speed appears next to MF Returning to the Preset Focus Setting Move the POSITION PRESET ON SET switch to ON The camcorder re...

Page 43: ...ding under bright conditions the camcorder sets a small aperture value and the picture may appear blurred When you are using a lens with built in ND filter turn it on off according to the screen display Using the ND Filter Lenses with Built in ND Filter Screen display What it means What you should do No display ND filter is not activated ND displayed ND filter is activated ND flashes ND filter req...

Page 44: ...4p 2 3 Mode Signals are converted into 60 fps interlace using the 2 3 pulldown method This 24p mode is suited for playback on a TV screen 24p 2 3 3 2 Mode Signals are converted into 60 fps interlace using the 2 3 3 2 pulldown method This 24p mode is ideal for extracting true 24 frames per second in order to transfer to film Selecting the Frame Rate 30p camera 60i tape A B C D E F G H I J a a b b c...

Page 45: ...Light mode will be the same as in the Easy Recording mode Slow shutter speeds are not available Selecting the 24p Pulldown Mode Open the menu and select CAMERA SETUP Select 24p MODE SEL select a setting option and close the menu When you have selected 2 3 24p appears in white When you have selected 2 3 3 2 24p appears in orange If you are using an editing system not supporting the 2 3 3 2 pulldown...

Page 46: ...back a 16 9 recording on a normal TV the image appears horizontally squeezed If you connect the camcorder to a TV with an S S1 terminal or Video ID 1 system recordings made in the 16 9 mode will be automatically played back in widescreen mode The aspect ratio does not change when you operate the ASPECT RATIO switch during recording It changes once you pause recording Recording in 16 9 Mode ASPECT ...

Page 47: ...d run preset With record run the time code runs only when you are recording With free run the time code runs regardless of the operation of the camcorder With record run preset and free run you can select the starting point Normally select record run Select free run time code when you wish to record with multiple camcorders set to the same time code 1 Open the menu and select TIME CODE Select COUN...

Page 48: ...tiples of 5 When you change to 24p from 60i 30p the starting point will automatically become a multiple number of 5 When you mix drop frame and non drop frame time codes the time code at recording start may be discontinuous When recording over existing scenes When a time code discontinuity occurred near the recording start point the time code at recording start may be discontinuous When the backup...

Page 49: ...phabet and press the SET dial The next part of the display starts flashing Set the rest of the display in the same way 4 Close the menu To reset the user bit to 00 00 00 00 select CLEAR in step 2 User bit can be recorded when recording with the camcorder or from analog devices The user bit of your camcorder cannot be recorded when recording from digital devices Displaying the User Bit Open the men...

Page 50: ...rformed with this camcorder 16bit 12bit CH The channels next to channel 1 and 2 will not be used 12bit CH The channels 1 2 3 and 4 will be recorded simultaneously Selecting the Audio Mode 16bit 12bit CH 12bit CH Open the menu and select AUDIO SETUP Select AUDIO MODE select a setting option and close the menu Audio Recording channel 1 channel 2 channel 1 channel 2 channel 1 channel 2 channel 1 chan...

Page 51: ...en Connecting to the XLR terminals 1 Connect a microphone to the XLR terminals To supply a microphone with phantom power set the 48V switch to ON Make sure to connect the microphone first before turning on the phantom power Keep the microphone connected when turning off the phantom power 2 Set the INPUT SELECT switch to REAR 3 Set the REC CH SELECT switch to CH1 or CH1 CH2 4 Turn on the microphone...

Page 52: ... terminals of AUDIO2 Line in Recording 1 Connect the device to the RCA terminals of AUDIO2 2 Set the INPUT SELECT switch to AUDIO2 When Connecting to the XLR terminals 1 Connect a microphone to the XLR terminals To supply a microphone with phantom power set the 48V switch to ON Make sure to connect the microphone first before turning on the phantom power Keep the microphone connected when turning ...

Page 53: ...rn the respective CH1 CH2 CH3 or CH4 dial to adjust the audio level We recommend using headphones when adjusting the audio level If the input level is too high audio may become distorted even if the audio level indicator is displaying an appropriate level You can select to synchronize the audio signal with the video signal by adding an equal amount of delay to the audio Open the menu and select AU...

Page 54: ...The image stabilizer cannot be turned off in the Easy Recording mode The image stabilizer is designed to compensate a normal degree of camcorder shake The image stabilizer may not be effective when attaching an optional Extender We recommend turning off the image stabilizer when mounting the camcorder on a tripod STABILIZER ON OFF switch ...

Page 55: ...rder automatically controls camera adjustments allowing you to simply point and shoot However in the Auto mode you have the option of adjusting the settings manually Shutter Priority 58 Use this mode to select the shutter speed The camcorder automatically sets a matching aperture setting Aperture Priority 59 Use this mode to select between 7 aperture settings from f 1 6 to f 11 or to full iris clo...

Page 56: ...er shutter speeds 60i 1 8 1 59 30p 1 8 1 29 to deliver proper exposure Slow shutter speeds are not available in 24p mode The shutter speeds will be the same as in the Easy Recording mode Moving subjects may leave a trailing afterimage Picture quality may not be as good as in other modes White points may appear on the screen Autofocus may not work as well as in other modes In such case adjust the f...

Page 57: ...n i i i i 0 i auto i auto i i i i i i i 1 i 1 i i h i 1 h h 2 h 3 h 2 h i 1 i i h h h h h h i h h i h 3 h i i i i i 0 dB i i i i i i 0 i auto i i h Available i Not available 1 Available when the exposure is locked 2 Not available when exposure is locked 3 Available during clear scan 20 L IS 16 IS II and 3 zoom lens Recording program Manual focus ring Zoom ring Image Stabilizer ND filter Focus mode...

Page 58: ...he shutter speed The image quality may decrease to some extend when using slow shutter speeds Autofocus may not work when using slow shutter speeds When recording under artificial light sources such as fluorescent mercury or halogen lamps the screen may flicker depending on the shutter speed To avoid the flicker set the shutter speed to 1 100 Available shutter speeds depend on the selected frame r...

Page 59: ... automatically The aperture changes when you lock and change the exposure When the gain is set to automatic the aperture number flashes on the screen when the selected aperture is not appropriate for the recording condition In such case readjust the aperture When the built in ND filter of a lens is activated the picture may become dark when you set a high F number In such case turn the ND Filter o...

Page 60: ...150 1 180 1 210 1 250 1 300 1 360 1 420 1 500 1 600 1 720 1 840 1 1000 1 1200 1 1400 1 1700 1 2000 1 2300 1 2600 1 3000 1 4000 1 8000 1 15000 CS clear scan 24p 1 24 1 48 1 60 1 75 1 90 1 100 1 120 1 150 1 180 1 210 1 250 1 300 1 360 1 420 1 500 1 600 1 720 1 840 1 1000 1 1200 1 1400 1 1700 1 2000 1 2300 1 2600 1 3000 1 4000 1 8000 1 15000 CS clear scan Aperture F1 6 F1 8 F2 0 F2 2 F2 4 F2 6 F2 8 F...

Page 61: ...e aperture with the IRIS dial Changing the Shutter Speed after Exposure Lock You can select from 12 shutter speeds with 20 L IS lens Select the shutter speed with the SHUTTER r or t button Changing the Gain after Exposure Lock You can select from 6 gain levels 1 Press the GAIN dial so that it pops out 2 Turn the GAIN dial to adjust the level The selected level appears 18 dB is not available in 30p...

Page 62: ...exposure system to darken or lighten the image Select from 13 AE levels 2 0 1 5 1 0 0 75 0 5 0 25 0 0 25 0 5 0 75 1 0 1 5 2 0 1 Set the POWER dial to n Tv or Av 2 Turn the AE SHIFT dial to adjust the level The selected level appears Using AE Shift AE SHIFT dial POWER dial ...

Page 63: ...just the level The selected level appears Noise may appear on the picture when setting a high gain level Adjusting the Gain 3 dB For lowest noise recording for indoor low light or low contrast scenes Auto Automatic adjustment of gain 0 dB Life like night artificial light scenes 3 dB 6 dB Increases brightness in indoor or low light scenes Increases depth of field 12 dB 18 dB POWER dial GAIN dial 18...

Page 64: ...ually and save up to three white balance presets that can be reused for non sequential shooting Selecting an Automated White Balance Setting 1 Press the WHITE BALANCE dial so that it pops out 2 Set the WHITE BALANCE dial to A U or T White sheet or paper Setting the White Balance WHITE BALANCE dial Zoom lever Zoom ring POWER dial WHITE BALANCE W button Auto Automated adjustments of white balance U ...

Page 65: ...he light source W may keep flashing The result will still be better than with the auto setting When you have turned on off the built in ND filter of the lens reset the custom white balance Custom white balance may provide better results in the following cases Changing lighting conditions Close ups Subjects in a single color sky sea or forest Under mercury lamps or certain types of fluorescent ligh...

Page 66: ...ter speed Available zebra pattern settings 80 IRE 85 IRE 90 IRE 95 IRE and 100 IRE Selecting the Zebra Pattern Level Open the menu and select CAMERA SETUP Select ZEBRA LEVEL select a setting option and close the menu Activating the Zebra Pattern Open the menu and select CAMERA SETUP Select ZEBRA set it to ON and close the menu Using the Zebra Pattern CAMERA SETUP ZEBRA OFF 26 CAMERA SETUP ZEBRA LE...

Page 67: ...r Y LEVEL adjust the levels and close the menu HUE Adjust the hue for detection of the skin area Adjusting to R detects reddish skin color and to G detects greenish skin color CHROMA Adjust the saturation for detection of the skin area Adjusting to detects brighter skin color and to detects lighter skin color AREA Adjust the color range for detection of the skin area Adjusting to detects a wide co...

Page 68: ... highlight area of the image to prevent overexposure You can select from HIGH MIDDLE or LOW Black Stretch Black Press Adjust the dynamic range in the black area of the image You can select from STRETCH MIDDLE or PRESS STRETCH emphasizes contrast in the dark area while PRESS enhances or deepens darkness Color Matrix Select from two color matrix settings NORMAL and CINE Setting gamma and color matri...

Page 69: ...h V DETAIL set to LOW in 60i mode CP appears in yellow Sharpness Adjust the degree of sharpness in the picture Adjust to for a softer picture and to for a sharper picture When set to the side noise may become more noticeable Coring Adjust the detail noise level Adjust to to add the noise and to to reduce noise Setup Level Adjust the black level of the video signal Adjust to to darken the picture a...

Page 70: ...tempt to change a protected setting starts flashing Protecting a Custom Preset File Open the menu and select CUSTOM PRESET followed by PRESET SETUP Select CLEAR set it to PROTECT and close the menu To cancel the protection reselect PROTECT Resetting a Custom Preset File 1 Open the menu and select CUSTOM PRESET followed by PRESET SETUP 2 Select CLEAR and set it to CLEAR A confirmation message appea...

Page 71: ...STOM PRESET ON OFF button The setting is activated Importing a Custom Preset Setting from Another XL2 You can import a custom preset setting from another XL2 and save it to your camcorder Preparations 1 Connect the camcorders with a DV cable 2 XL2 from which you wish import Set the POWER dial to EXT CONT XL2 to which you wish to import Set the POWER dial to a recording program other than Commercia...

Page 72: ...ct SEL POSITION The SEL POSITION menu appears 4 Select SEL PRESET and set it to the custom preset file you wish to overwrite 5 Select OVERWRITE A confirmation message appears 6 Select YES The custom preset file is imported Make sure that protection is canceled when saving a preset setting You can review but not change the preset settings of the connected XL2 READ PRESET can only be selected when a...

Page 73: ...cy from 60 0 Hz to 202 5 Hz 1 Set the POWER dial to Tv or M 2 Press the SHUTTER r button to display CS 3 Open the menu and select CAMERA SETUP Select CLEAR SCAN adjust the frequency and close the menu Select a frequency with which the black band does not appear Using Clear Scan for Recording Computer Screens CAMERA SETUP CLEAR SCAN 60 0Hz 26 POWER dial SHUTTER r button ...

Page 74: ...and select DISPLAY SETUP Select GUIDE INFO set it to CUSTOM KEYS and close the menu In VCR mode Open the menu and select DISPLAY SETUP Select CUSTOM KEYS set it to ON and close the menu Default settings Recording Mode VCR Mode CUSTOM KEY 1 TIME CODE TV SCREEN CUSTOM KEY 2 INDEX WRITE DATA CODE Using the Custom Keys Recording Mode Time code Index write Zebra pattern VCR STOP TV screen Handle zoom s...

Page 75: ...ting menu appears Index Write You can add an index signal to your recording for easy search in VCR mode Press the CUSTOM KEY 1 or 2 button The index signal will be recorded for approx 6 seconds When the camcorder is in record pause mode the index signal will be written when you start recording An index signal cannot be added or erased later Index write cannot be used during interval timer recordin...

Page 76: ...n to return to record pause mode TV Screen 104 You can show the camcorder display on a connected TV Press the CUSTOM KEY 1 or 2 button Handle Zoom Speed 38 Press the CUSTOM KEY 1 or 2 button The ZOOM HANDLE menu appears Select a setting option with the SET dial Audio Level Indicator 53 Press the CUSTOM KEY 1 or 2 button The audio level indicator appears Press the button again to hide the audio lev...

Page 77: ...ARS SELECT button to display COLOR BARS The setting changes with each press of the button COLOR BARS flashes 2 Press the COLOR BARS ON OFF button COLOR BARS stops flashing and the color bars appear Press the button again to deactivate the color bars Recording Color Bars Audio Reference Signal COLOR BARS ON OFF button COLOR BARS SELECT button ...

Page 78: ... a 1 kHz audio reference signal 12 dB or 20 dB along with the color bars Open the menu and select AUDIO SETUP Select 1kHz TONE select the audio signal and close the menu The selected audio reference signal sounds AUDIO SETUP 1kHz TONE OFF 26 ...

Page 79: ...2 seconds recording time at a 5 minutes interval standby time of 5 minutes including the recording time of 2 seconds Selecting Interval and Recording Time 1 Open the menu and select CAMERA SETUP 2 Select INTERVAL T and set it to ON 3 Select INTERVAL and select an interval 4 Select INT REC TIME and select a recording time 5 Close the menu INT T flashes Interval time 5 min 5 min Record 2 sec 4 min 5...

Page 80: ...ss the start stop button The camcorder returns to record pause mode and INT T starts flashing Press the start stop button to restart recording To Finish Interval Recording 1 Press the start stop button 2 Open the menu and select CAMERA SETUP Select INTERVAL T set it to OFF and close the menu When you record for a long time more than 12 hours we recommend turning off the screen display by pressing ...

Page 81: ... cancel the self timer press the SELF TIMER button Once the countdown has begun you can also press the start stop button to cancel the self timer The self timer will be canceled when you turn off the camcorder The self timer can also be activated through the menu Open the menu and select CAMERA SETUP Select SELF TIMER set it to ON and close the menu Recording with the Self Timer Start Stop button ...

Page 82: ...the start stop button again XL2 Record pause mode Connected device Record pause mode The status of the connected device is indicated as follows 2 Connected device is recording 3 Connected device is in record pause or stop mode Connected device is in a mode other than record pause or stop DV CONTROL is set to ON but no DV device is connected When the XL2 stops recording without operating the start ...

Page 83: ...rder or vice versa picture and sound may become distorted Superimposing the Screen Displays Character record is a feature that allows for the superimposition of meta data month day hour minute and second permanently burned on to the video This is ideal for surveillance and law enforcement use Open the menu and select SYSTEM Select CHAR REC set it to ON and close the menu Make sure to set CHAR REC ...

Page 84: ...ed the language follow the mark next to the menu item to change the setting The displays and at the bottom of the screen refer to the button names on the camcorder and will not change when you change the language Changing the Date Format You can select between three date formats For example JAN 1 2004 1 JAN 2004 and 2004 1 1 Open the menu and select DISPLAY SETUP Select DATE FORMAT select a format...

Page 85: ...se playback press the a button during normal playback 1 Fast Forward Playback Rewind Playback Plays back the tape at 9 5 times normal speed forward or reverse Press and hold the button during normal playback or fast forward 4a Reverse Playback Press the button on the wireless controller during normal playback Press the e play button to return to normal playback ae Frame Advance 4a Frame Reverse Pl...

Page 86: ...yback modes The camcorder stops the tape automatically after 5 minutes in playback pause mode to protect tape and video heads Shuttle Dial Use the shuttle dial in play or playback pause mode to control the playback speed and direction Turn the shuttle dial to select slow 1 and 2 playback modes both forward and reverse as well as fast forward and rewind playback Turn it fully to the left right to r...

Page 87: ...o terminals of the TV VCR 4 If connecting to a TV set the input selector to VIDEO If connecting to a VCR set the input selector to LINE We recommend powering the camcorder from a household power source The picture quality is higher when connecting to a TV with an S S1 terminal TVs with S S1 terminal or Video ID 1 system Recordings made in the 16 9 mode will be automatically played back in widescre...

Page 88: ...der s VIDEO and AUDIO1 terminals and the audio video terminals on the TV VCR 3 If connecting to a TV set the input selector to VIDEO If connecting to a VCR set the input selector to LINE When connecting to the RCA terminal set the RCA BNC selector to RCA When connecting to the BNC terminal set the RCA BNC selector to BNC VIDEO R L INPUT AUDIO STV 150 Stereo Video Cable supplied Signal flow ...

Page 89: ...select a setting option and close the menu Selecting the Audio Mix 1 Open the menu and select AUDIO SETUP Select MIX SELECT set it to VARIABLE or FIXED and close the menu 2 When you have selected VARIABLE adjust the mix balance with the MIX BALANCE CH1 2 and CH3 4 buttons on the wireless controller Audio Output AUDIO MONITOR button AUDIO2 RCA terminals AUDIO1 RCA terminals SEL AUDIO CH CH1 CH2 AUD...

Page 90: ...troller 1 Press the ZERO SET MEMORY button at the point you wish to return to later 0 00 00 Â appears To cancel press the ZERO SET MEMORY button again 2 When you have finished playback rewind the tape RTN appears The tape stops automatically at 0 00 00 The tape counter changes to time code The zero set memory may not function correctly when the time code has not been recorded consecutively ZERO SE...

Page 91: ...reless controller 1 Press the SEARCH SELECT button to display INDEX SEARCH 2 Press the or button to begin searching Press more than once to search for further index signals up to 10 times Press the STOP 3 button to stop searching Playback may start slightly before or after the index signal button button SEARCH SELECT button STOP3 button ...

Page 92: ...LECT button to display DATE SEARCH 2 Press the or button to begin searching Press more than once to search for further date changes up to 10 times Press the STOP 3 button to stop searching A recording of longer than a minute per date area is required Date search may not function if the data code is not correctly displayed button button SEARCH SELECT button STOP3 button ...

Page 93: ...combination you wish to display Selecting the Date Time Display Combination Open the menu and select DISPLAY SETUP Select D TIME SEL set it to DATE or TIME and close the menu Selecting the Data Code Display Combination Open the menu and select DISPLAY SETUP Select DATA CODE set it to CAMERA DATA or CAM D T and close the menu DISPLAY SETUP D TIME SEL DATE TIME 26 DISPLAY SETUP DATA CODE DATE TIME 2...

Page 94: ... not display the next time you turn on the camcorder Six Second Auto Date Date and time appear for 6 seconds when you begin playback or to indicate that date or time zone has changed Open the menu and select DISPLAY SETUP Select 6SEC DATE set it to ON and close the menu DISPLAY SETUP 6SEC DATE OFF 26 ...

Page 95: ...conds 2 On the wireless controller press and hold the REMOTE SET button Press the ZOOM T button for mode 2 Keep the button pressed for over 2 seconds If you have set the camcorder to mode 1 press the ZOOM W button for mode 1 The wireless controller returns to mode 1 when you replace the batteries Change the mode if necessary Make sure that camcorder and wireless controller are set to the same mode...

Page 96: ...k cassette and set the device to record pause mode 3 Locate the scene you wish to copy and pause playback shortly before the scene 4 Play back the tape 5 Connected device Begin recording when the scene you wish to copy appears Stop recording when copying is complete 6 Stop playback When connecting a VCR the quality of the edited tape will be slightly lower than that of the original When connecting...

Page 97: ...DIO1 4 channel recording Select the input with the INPUT SELECT switch of AUDIO1 and AUDIO2 for analog line in set it to AUDIO1 and AUDIO2 5 Connected device Load the recorded cassette 6 Press the 2 and a button or the REC PAUSE button on the wireless controller In record pause mode and during recording you can check the picture on the screen 7 Connected device Play back the tape 8 Press the a but...

Page 98: ...you wish to record appears Recording starts 7 Press the 3 button to stop recording Press the a button to pause recording Press the a button again to restart recording 8 Connected Device Stop playback Blank sections may be recorded as anomalous picture If the picture does not appear reconnect the DV cable or turn the camcorder off and back on again You can only record signals from devices with the ...

Page 99: ...als via the DV terminal The DV terminal serves as output terminal only Connecting the Devices Turn off all devices before starting the connections Unload the tape from the camcorder Refer also to the instruction manual of the connected device You can also connect to the VIDEO terminal 88 R L AUDIO VIDEO S S1 VIDEO STV 150 Stereo Video Cable supplied S 150 S video Cable supplied Commercially availa...

Page 100: ...nals or anomalous signals such as ghost signals For normal use set AV DV to OFF If it is set to ON digital signals cannot be input via the camcorder s DV terminal Depending on the software and the specifications of your computer you may not be able to transfer converted signals via the DV terminal We recommend powering the camcorder from a household power source You can also press the AV DV button...

Page 101: ...V PC Recorder from the Canon Homepage to record video audio to the computer s hard disk For details refer to the DV PC Recorder Software leaflet Operation may not work correctly depending on the software and the specifications settings of your computer If the computer freezes while you have connected the camcorder disconnect and reconnect the DV cable If the problem persists disconnect the interfa...

Page 102: ... h Color bars on off Reset h CAMERA MENU settings h Self timer on off Returns to off Interval timer on off Returns to off TV SCREEN on off h EVF display Returns to normal display Side panel light Returns to off Zero set memory h The following list shows the settings that are retained when you turn the power off or press the STANDBY button when the backup battery is installed Recording Mode Except ...

Page 103: ...peed h Reset setting in Manual mode Custom white balance h h Exposure lock on off Returns to off Aperture shutter speed Reset setting during exposure lock Color bars setting h Reset Color bars on off h Reset CAMERA MENU setting h Self timer on off h Interval timer on off h TV SCREEN on off h EVF display h Side panel light h Zero set memory h Recording Mode The following list shows the settings tha...

Page 104: ... Displays on the TV Screen When you connect a TV for recording you can select to hide the camcorder displays on the TV screen For playback you can show the camcorder displays on the TV screen Open the menu and select DISPLAY SETUP Select TV SCREEN set it to OFF and close the menu The displays disappear from the TV screen Open the menu and select DISPLAY SETUP Select TV SCREEN set it to ON and clos...

Page 105: ...anced accessory shoe Character recording 83 End search 37 Condensation warning 110 Tape operation REC PAUSE STOP EJECT Self timer 81 Gain 63 Recording mode 83 Zoom position zoom speed 38 exposure level 60 Programmed AE 55 Aperture 59 60 Exposure lock 61 AE shift 62 White balance 64 Manual focus 41 Color bars 77 Custom preset 68 Shutter speed 58 60 Custom keys 74 date and time 30 In Manual mode Ski...

Page 106: ...ndicator Screen Displays during Playback Audio mode 50 User bit 49 Audio level indicator 53 Date search 92 index search 91 Tape operation 85 Audio output 89 Mix balance 89 Data code 93 Custom keys 74 Frame rate 44 2 2 1 1 REC PAUSE STOP EJECT e FF 1 REW Fast forward playback rewind playback 2 playback 1 playback Frame advance playback frame reverse playback Playback pause ...

Page 107: ...ds are dirty Clean the video heads Appears for 1 second when you press the STANDBY button Lens is not correctly mounted Turn the lens until it clicks If the message does not disappear unmount and remount the lens You attempted to play back a copyright protected tape You attempted to dub a copyright protected tape May also appear when an anomalous signal is received during analog line in recording ...

Page 108: ...t Do not disassemble the camcorder If the camcorder does not function properly consult qualified service personnel Handle the camcorder with care Do not subject the camcorder to shocks or vibration as this may cause damage Avoid sudden changes in temperature Moving the camcorder rapidly between hot and cold temperatures may cause condensation to form on its internal surfaces 110 Storage If you do ...

Page 109: ...nformation Viewfinder 1 Pull up the eye cup and open the protect cover e g using a flathead screwdriver 2 Clean the glass with a cotton swab 3 Reattach the protect cover Be careful not to scratch the glass when cleaning ...

Page 110: ...k correctly even when you clean the video heads Do not use wet type cleaning cassettes as this may damage the camcorder Condensation Moving the camcorder rapidly between hot and cold temperature may cause condensation water droplets to form on its internal surfaces Stop using the camcorder if condensation is detected Continued use may damage the camcorder Condensation may form in the following cas...

Page 111: ...t try to disassemble or modify it Do not drop or knock it Do not get it wet Charged battery packs continue to discharge naturally Therefore charge them on the day of use or the day before to ensure a full charge Attach the terminal cover whenever a battery pack is not in use Contact to metallic objects may cause a short circuit and damage the battery pack Dirty terminals may cause a poor contact b...

Page 112: ...ccidental erasure slide the tab on the cassette to the left This switch position is usually labeled SAVE or ERASE OFF If you load a protected cassette in recording mode the message THE TAPE IS SET FOR ERASURE PREVENTION appears for approx 4 seconds and v starts flashing If you wish to record on that cassette slide the tab back to the right Using the Camcorder Abroad Power Sources You can use the c...

Page 113: ... will not work h flashes on the screen REMOVE THE CASSETTE appears on the screen The wireless controller will not work 25 110 25 95 24 Recording The POWER dial is not set to a recording program Time zone date and time are not set or the backup battery is exhausted Cassette is not loaded The POWER dial is not set to a recording program The lock lever on the carrying handle is activated Autofocus do...

Page 114: ...59 19 51 52 53 51 52 51 52 Problem Cause Solution Playback Camcorder is turned off or is not set to VCR mode Cassette is not loaded Video heads are dirty You attempted to play back or dub copyright protected tape Set the camcorder to VCR mode Load a cassette Clean the video heads Stop playback dubbing Pressing the playback button does not start playback Tape is running but image will not appear on...

Page 115: ...ssette Extender XL 1 6 CH 910 Dual Battery Charger Holder TV VCR 20 L IS Zoom Lens XL 5 4 108 mm SS 1000 Shoulder Strap TA 100 Tripod Adapter MA 300 Microphone Adapter Commercially available DV cable S 150 S video Cable STV 150 Stereo Video Cable HC 3200 System Case BP 930 BP 945 Battery Pack ZR 1000 Zoom Remote Controller Can be attached to the 20 L IS 16 IS II and 16 manual zoom lenses EF S lens...

Page 116: ...r plugs into your car s cigarette lighter socket and runs off a 12 24V DC negative ground battery Call or visit your local retailer dealer for genuine Canon video accessories You can also obtain genuine accessories for your Canon camcorder by calling 1 800 828 4040 Canon U S A Information Center Use of genuine Canon accessories is recommended This product is designed to achieve excellent performan...

Page 117: ... Monochrome CRT Viewfinder Unit Professional quality B W viewfinder with a 1 5 inch CRT When you use the FU 1000 with the XL2 you can supply power from the CA 920 or optional CB 920 The battery adapter supplied with the FU 1000 is not required Attach the DC Coupler directly to the XL2 and connect it with the CA920 CB 920 TA 100 Tripod Adapter The TA 100 allows you to quickly mount unmount the XL2 ...

Page 118: ...002AA HC 3200 System Case 9826A001AA DVM CL DV Cleaning Cassette 3134A002AA FU 1000 Monochrome Viewfinder 4252A001AA This mark identifies genuine Canon video accessories When you use Canon video equipment we recommend Canon brand accessories or products bearing the same mark Zoom Remote Controller ZR 1000 When this product is plugged into the LANC m terminal of a Canon camcorder it is possible to ...

Page 119: ...ith focus ring with 20 L IS lens White Balance Auto white balance pre set white balance indoor outdoor or custom white balance Minimum Illumination 0 7 lx with 20 L IS lens 60i mode Manual mode 1 8 shutter F1 6 Gain 18 dB Recommended Illumination More than 100 lx Input Output Terminals S video Terminal 1 Vp p 75 ohms Y signal 0 286 Vp p 75 ohms C signal Video Terminal RCA jack BNC jack 1 Vp p 75 o...

Page 120: ... C Battery capacity 3 000 mAh Dimensions 1 5 1 5 2 8 in 38 2 39 0 70 5 mm Weight 6 7 oz 190 g Weight and dimensions are approximate Errors and omissions excepted Subject to change without notice 20 L IS Lens 16 IS II Zoom Lens 3 Zoom XL Lens 16 Manual Zoom Lens Wide angle 37 12 27 42 4 3 48 24 27 42 16 9 36 36 27 12 4 3 47 42 27 12 16 9 56 18 42 48 4 3 71 6 42 48 16 9 37 12 27 42 4 3 48 24 27 42 1...

Page 121: ...21 Grip zoom 38 Handle zoom 38 Hue 67 Index search 91 Index write 75 Interval timer 79 Knee 68 Language 84 LCD panel 19 Lens hood 23 Low angle recording 33 Low light mode 56 LP mode 83 Maintenance 108 Manual focus 41 Manual mode 55 Master pedestal 69 Menu 26 Microphone 20 51 Mix balance 89 ND filter 43 NR 69 Optional accessories 116 Playback 85 Power adapter 13 Power save 33 Programmed AE 55 Recor...

Page 122: ...ocess Filters ALC EVR PHONE VOL OUT 48kHz CH 1 CH 2 32kHz CH 1 CH 2 48kHz 32kHz CH 3 CH 4 R XLR GAINUP menu REAR FRONT PHONES Advanced accessory shoe Phantom 48V ON OFF CH 1 CH 3 CH 2 CH 4 1 shield 2 hot 3 cold Mic Power CH 3 CH 1 3 CH 2 4 CH 4 ATT Rear MIC ATT SW ATT FRONT MIC ATT SW Head Amp balance unbalance balance unbalance ATT Head Amp ATT Head Amp ATT Head Amp ATT Phone Amp Phone Amp Head A...

Page 123: ...Lch METER Lch RCA CH 2 CH 4 PHONE Rch METER Rch DELAY DELAY from Tape from 1394 to Tape to 1394 normal normal Line Out Line Out PB PB CH1 CH3 CH2 CH4 MIX MIX CH1 CH2 CH1 REC CH SELECT SW AUD M SET menu DELAY DELAY AUDIO MONITOR RCA CH 3 RCA CH 4 MUTE MUTE MUTE MUTE CH3 CH4 normal normal Line Out Line Out PB PB CVF display ...

Page 124: ...al purchase labor will be provided free of charge by our factory service centers or designated service facilities located in the United States When returning equipment under this warranty you must pre pay the shipping charges and you must enclose the Bill of Sale or other proof of purchase with a complete explanation of the problem During your ONE YEAR warranty period repairs will be made and the ...

Page 125: ......

Page 126: ...NTREAL 5990 Côte de Liesse Quebec H4T 1V7 If you have any questions call the Canon Canada Information Center toll free at 1 800 828 4040 Canada only Si vous avez des questions veuillez téléphoner sans frais au Canada 1 800 828 4040 Canada seulement MEXICO CANON MEXICANA S DE R L DE C V Periferico Sur No 4124 Col Ex Rancho de Anzaldo C P 01900 México D F México CENTRAL Y SURAMÉRICA CANON LATIN AMER...

Reviews: