background image

Recording Audio

81

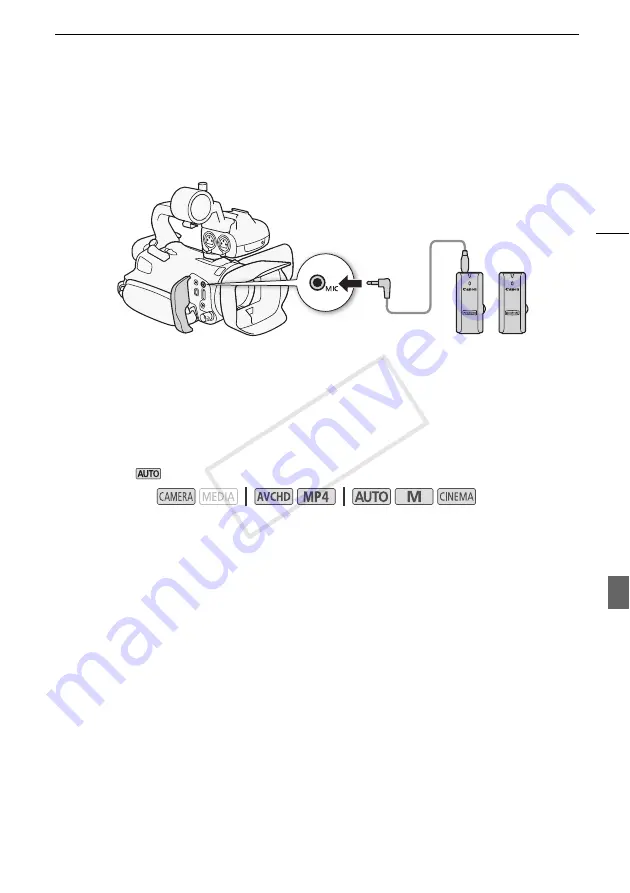
Using the WM-V1 Wireless Microphone

Using the optional WM-V1 Wireless Microphone, you can reliably record sound even when recording 
subjects at a distance exceeding the practical range of the built-in microphone. For details about using 
the WM-V1, refer to the instruction manual supplied with the microphone.

Audio Scenes and Other Audio Settings

You can have the camcorder optimize the audio settings of the built-in microphone by selecting the 
audio scene that matches your surroundings. This will greatly enhance the sense of "being there". 
Alternatively, you can select [

 Custom Setting]* in order to adjust the camcorder's various audio 

settings to your liking.
See the following table for the settings used by each audio scene.

* Not available in 

 mode.

1 Open the audio scene selection screen.

[FUNC.] 

>

 [

 Audio Scene]

2 Touch the desired option and then touch [

X

].

• When you select [

 Custom Setting], customize the audio settings to your preference with the 

relevant procedures (see the reference pages in the following table).

Options

(



 Default value)

Operating modes:

[

 Standard]

To record most general situations. The camcorder records with standard settings.

[

 Music]

To vibrantly record music performances and singing indoors.

[

 Speech]

Best for recording human voices and dialog.

[

 Forest and Birds]

To record birds and scenes in forests. The camcorder clearly captures sound 

as it spreads.

[

 Noise Suppression]

To record scenes while reducing noise from wind, passing vehicles and 

similar ambient sound. Ideal for recording at the beach or in places with a lot of noise.

[

 Custom Setting]



Allows you to adjust the audio settings to your liking. The settings that you can 

adjust are the [

ä

 Mic Level] setting in the FUNC. panel and the following settings in the 

p

 menu: 

[Built-in Mic Wind Screen], [Built-in Mic Att.], [Built-in Mic Freq. Response] (audio equalizer), and [Built-
in Mic Directionality].

COP

Y

Summary of Contents for XA20

Page 1: ...PUB DIM 1071 000 HD Camcorder Instruction Manual Caméscope HD Manuel d instruction Videocámara HD Manual de Instrucciones COPY ...

Page 2: ...andard s Operation is subject to the following two conditions 1 this device may not cause interference and 2 this device must accept any interference including interference that may cause undesired operation of the device This transmitter must not be co located or operated in conjunction with any other antenna or transmitter The available scientific evidence does not show that any health problems ...

Page 3: ...when the apparatus has been damaged in any way such as power supply cord or plug is damaged liquid has been spilled or objects have fallen into the apparatus the apparatus has been exposed to rain or moisture does not operate normally or has been dropped REGIONS OF USE XA25 XA20 are in compliance as of April 2013 with the radio signal regulations of the regions listed below For details on other re...

Page 4: ... of Twitter Inc Wi Fi is a registered trademark of the Wi Fi Alliance Wi Fi Certified WPA WPA2 and the Wi Fi Certified logo are trademarks of the Wi Fi Alliance WPS as used on the camcorder s settings onscreen displays and in this manual signifies Wi Fi Protected Setup The Wi Fi Protected Setup Identifier Mark is a mark of the Wi Fi Alliance JavaScript is a trademark or registered trademark of Ora...

Page 5: ...The handle unit is removable so you can detach it when you need improved portability and then reattach it when you need extra functionality Manual controls at your fingertips The focus zoom ring helps you achieve the focus you are looking for You can also easily change the ring s functionality so that you can operate the zoom Furthermore you can assign certain frequently used functions to a custom...

Page 6: ...trol A 124 using the Web browser on a smartphone or tablet to view the camcorder s recordings A 130 and using an iOS device to share your videos on the Internet A 132 OLED screen and LCD viewfinder The OLED screen and LCD viewfinder both have 100 frame coverage which will ensure that you can accurately check that your shots are framed how you want them The OLED screen has incredible clarity which ...

Page 7: ... or Android device to remotely control the camcorder and view the image on its screen A 124 Use the Web browser on your iOS or Android device to view the recordings on the camcorder A 130 Connect the camcorder to an access point on a Wi Fi network After doing so you can save your recordings on a computer A 135 or play back your recordings using the camcorder as a media server A 134 Use an iOS devi...

Page 8: ... Format AVCHD MP4 39 Selecting the Memory Card for Recordings 39 3 Recording 40 Recording Movies and Photos 40 Preparing to Record 40 Recording in AUTO Mode 41 Recording in n Manual Mode 45 Reviewing the Latest Scene Recorded 46 Selecting the Recording Mode Video Quality 47 Dual Recording and Relay Recording 49 Selecting the Frame Rate 50 Slow Fast Motion Recording 51 CINEMA Mode and Cinema Look F...

Page 9: ...0 Video Snapshot 91 Pre Recording 92 Onscreen Displays and Data Code 93 Infrared Recording 94 Activating Infrared Mode 94 Using the GP E2 GPS Receiver 95 4 Customization 96 CUSTOM Dial and Button 96 Assignable Buttons 97 Changing the Assigned Function 97 Using an Assignable Button 98 Saving and Loading Menu Settings 99 Saving Menu Settings to a Memory Card 99 Loading Menu Settings from a Memory Ca...

Page 10: ...mote 127 Remote Browse Viewing Recordings Using a Web Browser on Your iOS or Android Device 130 Uploading Recordings Using an iOS Device 132 Playback on a Computer 134 Transferring Files to a Computer or FTP Server 135 Wi Fi Connection Using an Access Point 137 Wi Fi Protected Setup WPS 137 Searching for Access Points 138 Manual Setup 138 Viewing and Changing Wi Fi Settings 140 10 Additional Infor...

Page 11: ...cated in the icon The icon refers to text and illustrations that apply only to the indicated model The following terms are used in this manual Memory card refers to an SD SDHC or SDXC memory card Screen refers to the OLED screen and the viewfinder screen Scene refers to one movie unit from the point you press the Y button to start recording until you press again to pause the recording iOS device i...

Page 12: ...ptions you will select and to other onscreen messages and displays The three sets of icons indicate the operating mode and whether a function is available in that mode Indicates whether the camcorder is in shooting CAMERA or playback MEDIA mode In this example the function is available only in mode For details refer to Turning the Camcorder On and Off A 30 Indicates the movie format For details re...

Page 13: ... ROM includes the instruction manual of the software on PDF file CA 570 Compact Power Adapter incl power cord and ferrite core BP 820 Battery Pack Microphone holder unit incl screws Handle unit incl screws WL D89 Wireless Controller incl CR2025 lithium button battery HTC 100 S High Speed HDMI Cable STV 250N Stereo Video Cable IFC 300PCU S USB Cable Lens hood with lens barrier Lens cap Data Import ...

Page 14: ...ding button A 46 Assignable button 5 A 97 5 Lens hood A 25 6 Focus Zoom ring A 54 59 7 CUSTOM customizable dial A 96 8 CUSTOM customizable button A 96 9 INFRARED switch A 94 10 Double memory card slot cover 11 DISP onscreen display button A 93 BATT INFO battery information button A 155 3 2 4 11 9 10 8 7 6 5 1 Left side view COPY ...

Page 15: ...erminal A 107 108 4 REMOTE terminal For connecting commercially available remote controllers 5 HD SD SDI terminal A 108 6 headphones terminal A 89 7 USB terminal A 114 8 DC IN terminal A 21 9 AV OUT terminal A 107 109 10 Grip belt A 27 2 6 7 3 4 5 10 1 9 8 Right side view COPY ...

Page 16: ...ignable button 2 A 97 6 OLED touch screen A 26 31 7 Focus Zoom ring switch A 59 8 Viewfinder A 25 9 Dioptric adjustment lever A 25 10 Joystick A 32 SET button A 32 11 Strap mount A 27 12 Assignable button 3 A 97 13 Assignable button 4 A 97 14 Battery attachment unit A 21 15 START STOP button A 40 16 FUNC button A 32 1 6 7 8 9 10 11 16 15 14 13 12 5 4 3 2 Front view Back view COPY ...

Page 17: ...1 Built in stereo microphone A 79 2 Handle attachment unit A 24 3 Mode switch A 31 4 Zoom rocker A 59 5 ACCESS indicator A 40 6 Power switch A 30 7 POWER CHG battery charging indicator A 21 1 2 3 4 5 2 7 6 Top view COPY ...

Page 18: ...Names of Parts 18 1 Tripod socket A 29 2 BATTERY RELEASE switch A 22 3 Eye cup A 25 1 2 3 Bottom view COPY ...

Page 19: ...PUT 1 CH1 and INPUT 2 CH2 A 86 8 INPUT terminal ON OFF switch A 80 9 Audio level switches for INPUT 1 CH1 and INPUT 2 CH2 A 87 10 Audio level dials for INPUT 1 CH1 and INPUT 2 CH2 A 87 11 Microphone cable clamp A 79 12 INPUT 1 CH1 and INPUT 2 CH2 terminals collectively referred to as INPUT terminals A 86 13 Infrared light A 94 14 Tally lamp A 41 15 Handle unit front screw A 24 16 Handle unit rear ...

Page 20: ...utton A 40 2 G mode selection button A 100 3 MENU button A 34 143 4 DISP onscreen display button A 93 5 SET button 6 Ñ stop button A 100 7 PHOTO button A 40 8 Zoom buttons A 59 9 Navigation buttons Í Î Ï Ð 10 Ò play pause button A 100 1 7 8 9 10 2 3 4 5 6 COPY ...

Page 21: ... around the core then close the unit until it clicks shut Charging the Battery Pack The camcorder can be powered with a battery pack or directly using the compact power adapter For approximate charging times and recording playback times with a fully charged battery pack refer to Charging Recording and Playback Times A 175 1 Connect the power cord to the compact power adapter 2 Plug the power cord ...

Page 22: ...minal or to the compact power adapter any electrical equipment that is not expressly recommended for use with this camcorder To prevent equipment breakdowns and excessive heating do not connect the supplied compact power adapter to voltage converters for overseas travels or special power sources such as those on aircraft and ships DC AC inverters etc NOTES We recommend charging the battery pack in...

Page 23: ...then use the camcorder until the battery pack is completely exhausted Doing so will ensure that the remaining recording time will be displayed accurately We recommend that you prepare battery packs to last 2 to 3 times longer than you think you might need USA and Canada only The Lithium ion polymer battery that powers the product is recyclable Please call 1 800 8 BATTERY for information on how to ...

Page 24: ...Microphone Holder Unit Use the supplied screws to attach the microphone holder unit to the handle unit Attaching the Handle Unit 1 Align the handle unit with the handle attachment unit and then slide the handle unit forward until it is in place Make sure the front and rear screws are raised when you slide the handle unit 2 Firmly tighten the front and rear screws with a coin or similar object NOTE...

Page 25: ...d is aligned with the bottom of the lens 햲 and then turn the lens hood clockwise until it stops with a click 햳 Be careful not to deform the lens hood Make sure that the lens hood is aligned with the thread To remove the lens hood turn it counterclockwise Using the Viewfinder If it is difficult to use the OLED screen you can use the viewfinder which can be tilted 45 degrees upward You can also use ...

Page 26: ...reen while you use the viewfinder To allow the camcorder to be operated with the wireless controller from the front NOTES When you rotate the OLED panel video noise may appear on the screen momentarily This is not a malfunction You can adjust the brightness of the OLED screen with the q OLED Brightness setting or by holding D pressed down for more than 2 seconds You can also adjust the brightness ...

Page 27: ...s Misfired pixels in the viewfinder may appear instead as white dots This has no effect on the recorded image and does not constitute a malfunction Grip Belt and Straps Fasten the grip belt Adjust the grip belt so that you can reach the zoom rocker with your index finger and the Y button with your thumb Attaching an optional wrist strap Attach the wrist strap to the strap mount on the grip belt ad...

Page 28: ...tton battery into the wireless controller 1 Press the tab in the direction of the arrow and pull out the battery holder 2 Place the lithium button battery with the side facing up 3 Insert the battery holder To use the wireless controller Point the wireless controller at the camcorder s remote sensor when you press the buttons You can rotate the OLED panel 180 degrees to use the wireless controller...

Page 29: ...very close range replace the battery The wireless controller may not work properly when the remote sensor is situated under strong light sources or direct sunlight Using a Tripod You can mount the camcorder on a tripod but do not use tripods with mounting screws longer than 6 5 mm 0 26 in as this may cause damage to the camcorder COPY ...

Page 30: ...choose to turn the camcorder on in CAMERA mode for making recordings or MEDIA mode for playing back recordings Select the mode using the power switch To turn on the camcorder Set the power switch to CAMERA for mode A 40 or MEDIA for mode A 100 To turn off the camcorder Set the power switch to OFF mode mode COPY ...

Page 31: ...oy full access to menus settings and advanced functions A 45 Cinema mode Set the mode switch to E With this mode you can give your recordings a cinematic look and use cinema look filters to create unique movies A 52 Using the Touch Screen The control buttons and menu items that appear on the touch screen change dynamically depending on the operating mode and the task you are performing With the in...

Page 32: ...ting the touch screen with wet or gloved hands Applying excessive force or forcefully scratching the touch screen Attaching commercially available screen protectors or adhesive film onto the touch screen s surface Using the FUNC Button and Joystick You can navigate some of the camcorder s menus and screens using the FUNC button and joystick instead of using the touch panel Joystick SET button When...

Page 33: ...S After the FUNC panel is open select the function you want to use You may need to scroll up and down the screen or touch ã ä to find the control button of the desired function In mode access to functions is limited In mode Just like during mode you can open the FUNC panel by touching FUNC on the OLED screen by pressing F or by pushing the joystick Ý Þ to select FUNC and then pressing S After the ...

Page 34: ...touch æ 6 Touch the desired option and then touch X You can touch X to close the menu at any time To use the joystick 1 mode only Push the joystick Ý Þ to select FUNC and then press S Alternatively you can press F 2 Push the joystick Ý Þ to select MENU and then press S 3 Push the joystick Þ to select the desired tab and then press S 4 Push the joystick Ý to move the selection bar to the desired se...

Page 35: ...me screens the date will be displayed in short form numbers instead of month names or only the day and month but it will still follow the order you selected 6 Touch 24H to use 24 hour clock or leave it unselected to use 12 hour clock AM PM 7 Touch OK to start the clock and close the setup screen NOTES You can adjust the date and time later on with the q Date Time setting When you do not use the ca...

Page 36: ...date and time of an additional location This is convenient when you travel so that you can set the camcorder to match the time of your home location or that of your travel destination 1 Open the Time Zone DST screen FUNC MENU q Time Zone DST Touching FUNC is necessary only when performing the procedure in mode 2 Touch to set the home time zone or to set the time zone of your destination when you a...

Page 37: ...ommend using memory cards rated SD Speed Class 6 or 10 When you record movies using other recording modes we recommend using memory cards rated SD Speed Class 4 6 or 10 To record movies using slow fast motion we recommend using memory cards rated SD Speed Class 10 SDXC Memory Cards You can use SDXC memory cards with this camcorder When using memory cards with other devices such as digital recorder...

Page 38: ...utions while the ACCESS indicator is flashing Failure to do so may result in permanent data loss Do not disconnect the power source or turn off the camcorder Do not remove the memory card Turn off the camcorder before inserting or removing a memory card Inserting or removing the memory card with the camcorder on may result in permanent data loss Memory cards have front and back sides that are not ...

Page 39: ... save important recordings in advance using an external device A 114 Selecting the Movie Format AVCHD MP4 You can choose to record movies in AVCHD or MP4 format AVCHD movies are ideal for playback with fantastic picture quality MP4 movies are versatile and can easily be played back on smartphones and tablets or uploaded to the Web 1 Open the Movie Format screen FUNC MENU Movie Format 2 Select the ...

Page 40: ...camcorder is operating correctly Preparing to Record 1 Attach a charged battery pack to the camcorder A 21 2 Insert a memory card into a memory card slot To use relay recording or dual recording A 49 insert memory cards into both memory card slots 3 Open the lens barrier Set the lens barrier switch to OPEN 4 If you need to use the viewfinder pull it out and adjust it if necessary You can use the d...

Page 41: ...or recording movies The tally lamp will also go out You can also press Y on the handle unit or wireless controller To take photos Touch PHOTO In the lower center of the screen a green icon g will appear Also in the upper right of the screen Ð will appear with the icon of the memory card selected for recording photos The ACCESS indicator will flash as the photo is being recorded You can record phot...

Page 42: ... appear under tele macro conditions Tele macro is activated automatically when you zoom toward the telephoto end and close in on the subject Tele macro allows you to get closer shots of small subjects and adds a soft focus to the background so the subject not only looks larger but also stands out more Background color of the icon Bright1 gray Blue skies1 light blue Vivid colors1 yellow green red S...

Page 43: ... memory card to another during relay recording the video will be recorded as two separate relay scenes With the supplied software Data Import Utility you can join relay scenes recorded on both memory cards as a single scene and save it on a computer A 114 For scenes with a long recording time the video stream file in a scene will be split approximately every 4 GB Even in such case playback will be...

Page 44: ...umber of photos that can be saved on a 1 GB memory card are summarized in the following table However the actual number of photos that can be recorded will vary depending on the subject and shooting conditions Photos cannot be recorded while the digital zoom is activated or during dual recording You can capture a photo from a scene during playback A 102 When you need to record for a long time with...

Page 45: ...he power source or turn off the camcorder Do not change the camcorder s operating mode Be sure to save your recordings regularly A 114 especially after making important recordings Canon shall not be liable for any loss or corruption of data NOTES The START STOP button on the handle unit has a lock lever to prevent accidental operation Set the lock lever to C in cases such as when you do not want a...

Page 46: ...a movie during playback A 102 The photo size and number of photos that can be saved on a 1 GB memory card are summarized in the following table However the actual number of photos that can be recorded will vary depending on the subject and shooting conditions Photos cannot be recorded while the digital zoom is activated or during dual recording You can capture a photo from a scene during playback ...

Page 47: ...device you may not be able to play back your recordings AVCHD scenes recorded at 28 Mbps cannot be saved on AVCHD discs Use an external Blu ray Disc recorder compliant with AVCHD Ver 2 0 specifications to copy those movies onto Blu ray discs The following types of MP4 scenes will be recognized as multiple files on other devices Scenes exceeding 4 GB Scenes recorded at 35 Mbps exceeding 30 minutes ...

Page 48: ...4 Mbps LPCM and 24 Mbps 17 Mbps 5 Mbps Memory card 8 GB Memory card 35 min 40 min 1 hr 3 hr 16 GB Memory card 1 hr 15 min 1 hr 25 min 2 hr 5 min 6 hr 5 min 32 GB Memory card 2 hr 30 min 2 hr 55 min 4 hr 10 min 12 hr 15 min 64 GB Memory card 5 hr 5 min 5 hr 55 min 8 hr 20 min 24 hr 30 min 128 GB Memory card 10 hr 10 min 11 hr 55 min 16 hr 45 min 49 hr Recording mode 35 Mbps 59 94P 24 Mbps 17 Mbps 4...

Page 49: ... option is always the same movie format and recording mode of the movie that will be recorded on memory card 2 The second two options are always 4Mbps and 3Mbps which result in small files that are ideal for transferring to a computer 3 Touch X Activating relay recording 1 Open the Dual Relay Recording screen FUNC MENU Dual Relay Recording 2 Touch Relay Recording and then touch X NOTES To use neit...

Page 50: ...e screen FUNC MENU Frame Rate 2 Touch the desired frame rate and then touch X Options for AVCHD movies Default value Recorded as 59 94i Options for MP4 movies Default value NOTES The frame rate can be set independently for and modes Operating modes 59 94i 59 94 fields per second interlaced Standard frame rate of NTSC analog TV signals PF29 97 29 97 frames per second progressive Use this frame rate...

Page 51: ...of the time code A 76 is set to Rec Run or Regen and the time code will advance by the number of frames recorded If you activate slow fast motion recording mode while the running mode is set to Free Run the running mode will automatically change to Rec Run When you end slow fast motion recording mode the running mode will return to its previous setting For low shooting frame rates it may take appr...

Page 52: ... other cinema look filters The selected cinema look filter will be applied and its number will appear on the control button To select the effect level of Cinema Standard 1 Open the parameter selection screen w ON 2 Touch Color Depth Softening Filter Key Brightness or Contrast 3 Touch the desired level or touch Ï or Ð to adjust the parameter You can also drag your finger along the dial The picture ...

Page 53: ...ES During mode the following functions are not available Taking photos Dual recording Recording movies at 28 Mbps or 35 Mbps 1 Cinema Standard 2 Vivid 3 Dream 4 Cool 5 Nostalgic 6 Sepia 7 Old Movies 8 Memory 9 Dramatic B W Filter number will appear on the control button and name Preview the effect on the screen Select the effect level Brief description onscreen guidance COPY ...

Page 54: ... focusing distance will be adjusted automatically You have the option to further adjust the focus manually as necessary 5 If necessary turn the focus zoom ring to further adjust the focus The center of the screen will be magnified to help you focus more easily You can also turn off this function with the p Focus Assistance setting The focusing distance displayed will change as you adjust the focus...

Page 55: ...oose to switch the screen to black white further emphasizing the edges 1 Open the focus controls FUNC Focus 2 Touch w For the black white setting Touch Off or On For the peaking color Touch Red Blue or Yellow 3 Touch K 4 Touch O Peaking is activated and edges are highlighted You can turn the focus zoom ring on this screen or touch X to hide the focus controls Touch O again to turn off the peaking ...

Page 56: ...or 59 94i When recording under dark conditions the focusing range narrows and the picture may appear blurred While using autofocus you can turn the focus zoom ring to focus manually When you stop turning the ring the camcorder returns to autofocus This is useful in situations such as when focusing on a subject on the other side of a window When the recording program is set to Š Fireworks the focus...

Page 57: ...t Scene Œ Low Light or Š Fireworks By default face detection tracking are activated If the function was turned off perform the following procedure to turn it on 1 Open the Face Detection Tracking screen FUNC MENU p Face Detection Tracking 2 Touch i On and then touch X To select the main subject If there is more than one person in the picture the camcorder will automatically select one person it de...

Page 58: ...rk or bright in relation to the overall picture Faces turned to the side at a diagonal or partially hidden Face detection tracking cannot be used in the following cases When the shutter speed used is slower than 1 30 1 24 if the frame rate is set to 23 98P When the digital zoom is activated at more than 80x zoom Touching somewhere with a color or pattern unique to the subject will make it easier t...

Page 59: ...rge the image on the screen digitally Digital zoom is not available in mode or when p Conversion Lens is set to WA H58 Using the Focus Zoom Ring 1 Set the focus zoom ring switch to ZOOM 2 Turn the focus zoom ring to adjust the zoom Turn the focus zoom ring slowly for a slow zoom turn it faster for faster zooms The zoom bar that appears on the screen indicates the approximate zoom position NOTES If...

Page 60: ...Open the Zoom Speed Level screen FUNC MENU p Zoom Speed Level 2 Touch Z Fast Normal or Slow and then touch K When Zoom Speed Level is set to Z Fast the sound made by the camcorder s internal machinery will increase and may be recorded in the scene 3 Touch Zoom Rocker Zoom Speed 4 Touch Y for variable speed or X for constant speed If you selected X touch ð or ñ or drag your finger along the bar to ...

Page 61: ... of three levels The zoom rocker operates at a constant speed that you can select To use the zoom rocker make sure you attach the handle unit to the camcorder in advance Refer to the following table for a summary of the zoom speed 1 Open the Zoom Speed Level screen FUNC MENU p Zoom Speed Level 2 Touch Z Fast Normal or Slow and then touch K When Zoom Speed Level is set to Z Fast the sound made by t...

Page 62: ...esired constant speed 5 Touch X Approximate zoom speeds wireless controller Measured from full wide angle to full telephoto When the zoom speed is too fast approximately 1 9 seconds end to end the camcorder will have more trouble focusing automatically while zooming Using the Touch Screen s Zoom Controls 1 Display the zoom controls on the touch screen FUNC ZOOM The zoom controls appear on the left...

Page 63: ...zoom controls FUNC ZOOM 4 Touch f digital tele converter and then touch X The center of the screen will be enlarged approximately 2 times and the f icon will appear Touch f again before closing the screen to deactivate the digital tele converter NOTES You can attach the optional tele converter and use it in conjunction with this function to increase the effect The digital tele converter cannot be ...

Page 64: ...fective as the zoom approaches full wide angle Å Standard Compensates for a lower degree of camcorder shake such as when shooting while remaining stationary and is suitable for shooting natural looking scenes Ì Off Use this setting when the camcorder is mounted on a tripod Powered IS After setting an assignable button to È Powered IS you can use Powered IS to make the image stabilization even more...

Page 65: ...oise it will contain POINTS TO CHECK Select a recording program other than the Special Scene recording programs or n Manual Exposure 1 Open the AGC limit adjustment screen FUNC x AGC Limit n Manual Touch m Automatic to remove the AGC limit 2 Touch Ï or Ð to set the AGC limit You can also drag your finger along the dial 3 Touch X The selected AGC limit will appear on the screen NOTES If you set q C...

Page 66: ... screen next to the recording program icon Options Default value Available shutter speed settings Available shutter speed settings when the frame rate is set to 23 98P Available aperture value settings ND filter settings will be available when the aperture value is F4 0 Operating modes Programmed AE The camcorder automatically adjusts the aperture and shutter speed to obtain the optimal exposure f...

Page 67: ...lect Shutter Pri AE and set the shutter speed to 1 100 Aperture Pri AE The actual range of values available for selection will vary depending on the initial zoom position When setting a numeric value aperture or shutter speed the number displayed will flash if the aperture value or shutter speed is not appropriate for the recording conditions In such case select a different value During exposure l...

Page 68: ...Touch the control button of the setting you wish to adjust 3 Touch Ï or Ð to set the desired value You can also drag your finger along the dial The exposure will change according to the setting s new value Repeat steps 2 and 3 to adjust other settings Before touching X you can also use the zebra pattern see below 4 Touch X NOTES If you set q CUSTOM Dial Button to l Manual Exposure A 96 you can adj...

Page 69: ...re 1 Open the exposure adjustment screen FUNC y Exposure 2 Touch a subject that appears inside the y frame The Touch AE mark I will flash and the exposure will be adjusted automatically so the area you touched will be correctly exposed You have the option to further adjust the exposure manually as necessary Depending on the subject you may want to use the Highlights setting as described below You ...

Page 70: ...tuations in which the subject is constantly backlit you can use backlight correction to make the entire picture brighter especially dark areas This will take precedence over the p Auto Backlight Correction setting which is useful in situations in which the subject is not constantly backlit 1 Open the BLC Always On screen FUNC BLC Always On 2 Touch ON and then touch X appears on the screen Alternat...

Page 71: ...corder at a white object so it fills the whole screen and touch Set WB When the adjustment is completed Šstops flashing and disappears The camcorder will retain the custom white balance even if you turn it off Options Default value Operating modes à Automatic The camcorder automatically sets the white balance for natural looking colors Daylight To record outdoors on a bright day Shade To record i...

Page 72: ...r than with à Automatic Using a custom white balance may provide better results in the following cases Changing lighting conditions Close ups Subjects in a single color sky sea or forest Under mercury lamps certain types of fluorescent lights and LED lights Depending on the type of fluorescent light optimal color balance may not be obtained with Fluorescent or À Fluorescent H If the color looks un...

Page 73: ...program and then touch X Options Default value Operating modes úPortrait The camcorder uses a large aperture to achieve a sharp focus on the subject while blurring the background ûSports To record sports scenes such as tennis or golf ü Night Scene To record nightscapes with lower noise ýSnow To record in bright ski resorts without the subject being underexposed þBeach To record on a sunny beach wi...

Page 74: ...y days or in shaded places Check the image on the screen Œ Low Light Moving subjects may leave a trailing afterimage Picture quality may not be as good as in other modes White points may appear on the screen Autofocus may not work as well as in other modes In such case adjust the focus manually Š Fireworks To avoid camcorder blur blur due to the camcorder moving we recommend using a tripod œSpotli...

Page 75: ...ouch Ï or Ð or drag your finger along the dial to adjust the effect level levels richer colors sharper image stronger contrast brighter image levels shallower colors softer image softer contrast darker image To adjust other parameters touch K to return to the image effects screen Touch the desired control button and repeat step 3 4 Touch X to save and apply the customized picture settings b will a...

Page 76: ...code will start running Options Setting the Time Code s Initial Value If you set the running mode to Preset you can set the initial value of the time code 1 Open the Initial Time Code screen FUNC MENU Initial Time Code The time code setting screen will appear with the orange selection frame indicating the hours To reset the time code to 00 00 00 00 select Reset instead Touch Cancel to close the sc...

Page 77: ...00 if you select NDF it will appear as 00 00 00 00 NOTES When the frame rate is set to 23 98P the frames value in the time code runs from 0 to 23 For other settings it runs from 0 to 29 When you are using pre recording mode Free Run is automatically set and cannot be changed When you mix drop frame and non drop frame time codes there might be a discontinuity in the time code at the point where the...

Page 78: ...t Date In such case the rest of the procedure is not necessary The user bit setting screen will appear with the orange selection frame on the leftmost digit To reset the user bit to 00 00 00 00 touch Reset and then touch X Touch Cancel to close the screen without setting the user bit 2 Touch Í or Î to change the digit as necessary 3 Touch another digit you want to change 4 Change the rest of the d...

Page 79: ...g modes Only available when the handle unit is attached to the camcorder Recording Audio to Channel 1 CH1 This camcorder features many convenient options for recording audio The following table provides a summary of selecting the audio recorded to channel 1 which depends on whether the handle unit is attached the position of the INPUT terminal ON OFF switch and whether a microphone or analog audio...

Page 80: ...h the microphone cable clamp under the microphone holder 햴 3 Plug the microphone cable into the desired INPUT terminal 햵 or the MIC terminal 햶 Using the Built in Microphone or an External Microphone Connected to the MIC Terminal Follow the step below to use the built in microphone or an external microphone connected to the MIC terminal Use commercially available condenser microphones with their ow...

Page 81: ...h the desired option and then touch X When you select Custom Setting customize the audio settings to your preference with the relevant procedures see the reference pages in the following table Options Default value Operating modes Standard To record most general situations The camcorder records with standard settings Music To vibrantly record music performances and singing indoors Speech Best for ...

Page 82: ...d Ï or Ð to adjust the audio recording level as necessary As a guideline adjust the audio recording level so that the audio level meter will go to the right of the 18 dB mark one mark right of the 20 dB mark only occasionally 3 Touch X to lock the audio recording level at the current level ä Mic Level Built in Mic Att Built in Mic Wind Screen Built in Mic Freq Response Built in Mic Directionality ...

Page 83: ...uto wind screen POINTS TO CHECK Set Audio Scene to Custom Setting A 81 1 Open the Built in Mic Wind Screen screen FUNC MENU p Built in Mic Wind Screen 2 Touch the desired option and then touch X Options Default value NOTES Some low frequency sounds will be suppressed along with the sound of wind When recording in surroundings unaffected by wind or if you want to record low frequency sounds we reco...

Page 84: ...d POINTS TO CHECK Set Audio Scene to Custom Setting A 81 2 Automatic The camcorder will automatically activate the built in microphone attenuator as necessary for optimal audio recording levels so high audio levels will not be distorted i On The built in microphone attenuator will be activated at all times to reproduce more faithfully the sound dynamics j Off The built in microphone attenuator wil...

Page 85: ... Att 2 Touch the desired option and then touch X Options Default value í Monaural Mono recording that emphasizes sound coming from the front of the camcorder microphone h Normal Standard stereo recording a middle point between the î Wide and í Monaural settings in reach î Wide Stereo recording of ambient sound over a more extensive area that adds to the sense of presence of movies ï Zoom Stereo re...

Page 86: ...eep the microphone connected when turning off the phantom power Recording Audio to Channel 2 CH2 You can select the audio source that will be recorded to channel 2 1 Open the CH2 Input screen FUNC MENU p CH2 Input 2 Touch the desired option and then touch X Options Default value Operating modes INPUT 1 The audio signal input through the INPUT 1 terminal will be recorded to channel 1 and channel 2 ...

Page 87: ...st the audio recording level so that the audio level meter will go to the right of the 18 dB mark one mark right of the 20 dB mark only occasionally NOTES When the audio level meter reaches the red point 0 dB the sound may be distorted If the audio level meter display is normal but the sound is distorted activate the microphone s attenuator A 88 We recommend using headphones to check the sound lev...

Page 88: ...Microphone s Attenuator INPUT terminals You can activate the microphone attenuator 20 dB for microphones connected to the INPUT 1 and INPUT 2 terminals to prevent audio from being distorted if the audio level is too high POINTS TO CHECK Set the sensitivity switch of the desired INPUT terminal to MIC or MIC 48V 1 Open the desired INPUT terminal s microphone attenuator submenu FUNC MENU p INPUT 1 Mi...

Page 89: ...ng playback During playback adjust the headphones volume the same way you adjust the speaker s volume A 101 IMPORTANT When using headphones make sure to lower the volume to an appropriate level NOTES Use commercially available headphones with a 3 5 mm minijack When you are monitoring the audio you can choose to synchronize the audio signal with the video signal or monitor the audio in real time Us...

Page 90: ...lti format HDTV color bars 1 Open the Color Bars menu FUNC MENU Color Bars 2 Touch the desired option and then touch X The selected color bars appear on the screen and will be recorded when you press Y Recording an Audio Reference Signal The camcorder can output a 1 kHz audio reference signal with the color bars 1 Open the 1 kHz Tone submenu FUNC MENU 1 kHz Tone 2 Select the desired level and then...

Page 91: ...tivate video snapshot mode 3 Press Y The camcorder records for a few seconds and then automatically returns to record pause mode When the camcorder stops recording the screen will momentarily turn black as if a camera shutter had released NOTES The default length of a video snapshot scene is 4 seconds but you can change it to 2 or 8 seconds with the Video Snapshot Length setting Any of the followi...

Page 92: ... on the memory card will start 3 seconds before Y was pressed NOTES The camcorder will not record the full 3 seconds prior to pressing Y if the button was pressed within 3 seconds of having turned on pre recording or having finished the previous recording Any of the following actions will deactivate the pre recording function Leaving the camcorder without any operation for 1 hour Changing the camc...

Page 93: ... markers will be displayed only when p Onscreen Markers is set to an option other than j Off 2 Pressing D has the same effect as touching the screen During single photo view and while playing back a scene the playback controls are displayed only momentarily Operating modes About the Data Code With every scene or photo recorded the camcorder keeps a data code date time of recording information abou...

Page 94: ...ght A 97 5 Press the assignable button to turn on the built in infrared light Alternatively you can use the p IR Light setting changes to NOTES When the camcorder is in infrared mode the following adjustments are made automatically Gain shutter speed and aperture are set to automatic levels Autofocus is activated However you can change the focus mode to manual focus AGC limit white balance image e...

Page 95: ...ntry Be careful about using GPS functions where the operation of electronic devices is restricted Others may be able to locate or identify you by using location data in your geotagged pictures or movies Be careful when sharing these images with others as when posting them online where many others can view them GPS signal reception may take some time Never leave the receiver near any equipment that...

Page 96: ...cording program to Shutter Pri AE or Aperture Pri AE you can adjust the shutter speed or aperture value with the CUSTOM dial l Manual Exposure When you set the recording program to n Manual Exposure repeatedly press C to toggle between the aperture value shutter speed and gain Next use the CUSTOM dial to adjust the setting x AGC Limit Adjusts the AGC limit Press C to display the current AGC limit ...

Page 97: ...58 Video Snapshot Turns video snapshot on off A 91 Ä WB Priority Turns white balance priority on off A 150 z Pre REC Turns pre recording on off A 92 Default setting for assignable button 2 IR Light Turns the infrared light on off A 94 œ Audio Output CH Switches the audio output channel between CH1 CH2 CH1 CH1 CH2 CH2 and All All A 110 AF MF Switches between autofocus and manual focus A 54 Default ...

Page 98: ... Functions the same as selecting y Exposure A 68 in the FUNC panel Audio Scene Functions the same as selecting Audio Scene A 81 in the FUNC panel Mic Level Functions the same as selecting ä Mic Level A 82 in the FUNC panel Zoom Functions the same as selecting R Zoom A 59 in the FUNC panel Image Stabilizer Functions the same as selecting Image Stabilizer A 64 in the FUNC panel Image Effects Functio...

Page 99: ...ssary only when performing the procedure in mode 3 Touch Save and then touch Yes The current settings are saved to the memory card 4 Touch OK and then touch X Loading Menu Settings from a Memory Card 1 Insert a memory card with menu settings into memory card slot 3 2 Open the Backup Menu Settings 7 screen FUNC MENU q Backup Menu Settings 7 Touching FUNC is necessary only when performing the proced...

Page 100: ...red scene to play it back The camcorder will play back the scene selected and continue until the end of the last scene in the index screen Touch the screen to display the playback controls During playback the playback controls will disappear automatically after a few seconds without operation In playback pause touch the screen again to hide the playback controls Operating modes Index screen button...

Page 101: ...ber and the last four digits indicate the month and day May 1 for the example folder above Jump to the beginning of the scene Double tap to jump to the previous scene Jump to the beginning of the next scene Pause the playback Fast playback backward forward Display the volume controls A 101 Stop the playback Data code A 93 Touch several times to increase the playback speed to approximately 5x 15x 6...

Page 102: ...te and time display or change the information displayed with the s Data Code setting Depending on the recording conditions you may notice brief stops in video or sound playback between scenes During fast slow playback you may notice some anomalies blocky video artifacts banding etc in the playback picture The speed indicated on the screen is approximate Slow reverse playback will look the same as ...

Page 103: ...r left right until a scene you want to delete appears 2 Open the Delete screen FUNC Delete 3 Touch the desired option When you touch Select perform the following procedure to select the individual scenes you want to delete before touching Yes 4 Touch Yes Touch Stop to interrupt the operation while it is in progress Some scenes may be deleted nevertheless The selected scenes are deleted 5 Touch OK ...

Page 104: ...ory card slot cover Do not disconnect the power source or turn off the camcorder Do not change the camcorder s operating mode NOTES To delete all movies and make all recordable space available again you may prefer to initialize the memory card A 38 date folder name Delete all the scenes recorded on a particular date For AVCHD movies the date will appear in the control button For MP4 movies the fol...

Page 105: ...locate the desired point 5 Divide the scene µ Divide Yes The video from the division point to the end of the scene will appear as a new scene in the index screen NOTES When advancing reversing frames while dividing the scenes the interval between frames is about 0 5 seconds If the scene cannot be divided at the point where you paused the playback advance reverse a frame and then divide the scene D...

Page 106: ...e movie will be trimmed is indicated by the marker Playback controls will appear on the screen A 102 Use any special playback modes as necessary to locate the desired point 5 Trim the scene Trim Select whether to trim before Trim Before Marker or after Trim After Marker the marker Select whether to save as a new scene Save as New or overwrite the existing scene Overwrite If you chose to save the t...

Page 107: ...configuration The camcorder will automatically switch between the AV OUT and HDMI OUT terminals based on the external connection Connection Diagram We recommend that you power the camcorder from a household power outlet using the compact power adapter Operating modes STV 250N Stereo Video Cable supplied VIDEO IN AUDIO IN HDMI IN SDI IN BNC cable commercially available HTC 100 S High Speed HDMI Cab...

Page 108: ...option and then touch X NOTES By default onscreen displays will be embedded in the output video signal You can change this using the q Output Onscreen Displays setting Using the HDMI OUT Terminal The HDMITM OUT terminal also offers a digital connection and outputs both a video and audio signal If you selected k Automatic the output signal will automatically switch to HD or SD depending on the capa...

Page 109: ... such case use another terminal If you selected an option other than k Automatic and the connected monitor is not compatible with the signal output from the camcorder then HDMI output will stop By default onscreen displays will be embedded in the output video signal You can change this using the q Output Onscreen Displays setting Using the AV OUT Terminal The AV OUT terminal outputs a down convert...

Page 110: ...e Audio Channel You can select the audio channel that is output from the AV OUT terminal or headphone terminal POINTS TO CHECK When performing this procedure in mode set the INPUT terminal ON OFF switch to ON 1 Open the Audio Output CH submenu FUNC MENU q Audio Output CH Touching FUNC is necessary only when performing the procedure in mode 2 Touch the desired option and then touch X Options Defaul...

Page 111: ...e camcorder during recording GPS information will also appear To return to the index screen from single photo view 1 Touch the screen to display the playback controls 2 Touch f Operating modes Index screen button Displays the currently selected memory card Press to change the index screen Drag your finger left right for the next previous index page Display the next previous index page Folder name ...

Page 112: ...n touch K IMPORTANT Observe the following precautions while the ACCESS indicator is on or flashing Failing to do so may result in permanent data loss Do not open the double memory card slot cover Do not disconnect the power source or turn off the camcorder Do not change the camcorder s operating mode The following image files may not be displayed correctly Images not recorded with this camcorder I...

Page 113: ... Stop to interrupt the operation while it is in progress Some photos will be deleted nevertheless 4 Touch OK To select individual photos 1 Touch on the individual photos you want to delete A checkmark will appear on the photos you touch The total number of selected photos will appear next to the icon Touch a selected photo to remove the checkmark To remove all checkmarks at once touch Remove All Y...

Page 114: ...Data Import Utility Save scenes to the computer all scenes new scenes only Join relay scenes either AVCHD or MP4 format that were saved on separate memory cards A 49 and save them as a single scene Join multiple video stream files of a single scene either AVCHD or MP4 format split because of the 4 GB maximum file size restriction and save them as a single scene For more details check the Data Impo...

Page 115: ...u install the supplied software Data Import Utility you can save movies to your computer 1 Camcorder Power the camcorder using the compact power adapter 2 Camcorder Set the power switch to MEDIA 3 Camcorder Open the desired movie index screen A 100 4 Connect the camcorder to the computer using the supplied USB cable 5 Camcorder Touch All for PC only 6 Computer Click the icon on the desktop to star...

Page 116: ... will appear on the scenes you touch The total number of selected scenes will appear next to the icon Touch a selected scene to remove the checkmark To remove all checkmarks at once touch Remove All Yes 2 After selecting all the desired scenes touch OK Options Copying a Single Photo 1 In single photo view select the photo you want to copy 2 Touch the screen to display the playback controls 3 Open ...

Page 117: ...OK Options IMPORTANT Observe the following precautions while the ACCESS indicator is on or flashing Failing to do so may result in permanent data loss Do not open the double memory card slot cover Do not disconnect the power source or turn off the camcorder Do not change the camcorder s operating mode NOTES In the following cases you will not be able to copy recordings to the memory card If the do...

Page 118: ...frame rate of 29 97P 3 Touch the individual scenes you want to convert A checkmark will appear on the scenes you touch The total number of selected scenes will appear next to the icon Touch a selected scene to remove the checkmark To remove all checkmarks at once touch Remove All Yes 4 After selecting all the desired scenes touch OK and then touch Next To add a cinema look filter A 52 Touch FILTER...

Page 119: ...n other than All for PC only Camcorder When the connection is successfully established USB Connection appears on the screen Recording Details will vary depending on the device used so be sure to refer to the instruction manual of the digital video recorder In Standard Definition You can copy your movies by connecting the camcorder to a VCR or a digital video recorder with analog audio video inputs...

Page 120: ...esume playback By default the data code will be embedded in the output video signal You can change this using the s Data Code setting 6 External recorder Start recording when the scene you wish to copy appears stop recording when it ends 7 Camcorder Stop playback COPY ...

Page 121: ... iOS device is used in this text to refer to Wi Fi enabled iPhones iPods and iPads while Android device refers to Wi Fi enabled Android smartphones and tablets Wi Fi connection When you use the Wi Fi Remote app you can use your iOS or Android device to remotely control the camcorder and make recordings A 124 Wi Fi connection Wirelessly connect the camcorder to your iOS device Android device or com...

Page 122: ...k and upload your recordings You can even use this connection type if you plan to share videos on YouTube and Facebook on the go 3 The Movie Uploader app provided by PIXELA is available for free from the App Store Wi Fi connection Wirelessly connect the camcorder to a wireless router access point on a Wi Fi network A 137 Use this connection if you plan to save your recordings on a computer or FTP ...

Page 123: ...t name such as wireless LAN router or wireless network router Make sure the optional WM V1 Wireless Microphone is not attached to the camcorder Wi Fi functions are not available when the microphone is attached About the Wi Fi antenna When using the camcorder s Wi Fi functions do not cover the Wi Fi antenna with your hand or other object Covering it may interfere with wireless signals About the cam...

Page 124: ...e camcorder s password After you enter the password once you will not need to enter it again unless you reset or overwrite the camcorder s settings 1 Open the Smartphone Connection screen FUNC MENU p s Wi Fi Smartphone Connection Touch s for the Remote Browse and Media Server functions 2 Touch the camcorder s password 3 Enter an 8 character password and touch OK To enter a password use the virtual...

Page 125: ...e screen will appear As long as you do not change the port settings the URL is always the same so you may find it convenient to bookmark it 7 Camcorder Touch X When the connection has been established appears on the camcorder s screen If an iOS or Android device is not connected the icon will appear in yellow 8 iOS Android device Operate the controls on the screen while viewing the image from the ...

Page 126: ...73 3 Time code A 76 4 Wi Fi Remote connection status 5 Operation A 155 6 D key lock Press to lock all the controls on the application s screens When pressed the icon turns orange and the entire screen becomes grayed out 7 Remaining battery level A 155 2 13 14 12 11 10 9 8 7 6 15 16 17 18 19 20 21 22 5 4 3 2 1 12 10 When the recording program is set to Aperture Pri AE COPY ...

Page 127: ... aperture adjustment buttons A 66 68 S a FOCUS focus adjustment buttons A 54 S s Live view image area Basic controls Use the basic controls when using the application on devices with smaller screens With the basic controls the following functions are available turning live view on and off starting and stopping recording zoom and key lock Remote Operation Using Wi Fi Remote Recording movies 1 Press...

Page 128: ...e will be displayed on the Wi Fi Remote screen and will be applied to the camcorder If you selected Æ or Ç 3 Point the camcorder at a white object so that it fills the whole screen Use the same lighting conditions you plan to use when recording Make sure the white object fills the screen until the procedure is completed 4 Press Å If a custom white balance has not yet been stored Å will flash slowl...

Page 129: ...side to focus farther away There are three levels of adjustment is the smallest and the largest Adjusting the zoom Press one of the zoom controls to adjust the zoom position as necessary Press one of the controls on the WIDE side to zoom out or one of the controls on the TELE side to zoom in There are three levels of adjustment is the slowest and is the fastest NOTES Depending on the network setup...

Page 130: ... settings screen The network names of detected access points will appear 4 iOS Android device Touch the access point with the same SSID displayed in step 2 If you have performed this procedure before and you have not changed the camcorder s password the connection will be established automatically 5 iOS Android device Enter the camcorder s password set previously Connected will appear on the camco...

Page 131: ...n 11 Camcorder Touch End OK when finished NOTES The following types of MP4 scenes will be recognized as multiple files on other devices Scenes exceeding 4 GB Scenes recorded at 35 Mbps exceeding 30 minutes Scenes recorded with a recording mode other than 35 Mbps exceeding 1 hour Only one device may be connected to the camcorder at a time COPY ...

Page 132: ... screen MENU s Wi Fi Movie Uploader The camcorder s SSID network name will appear The camcorder will be ready to connect with the iOS device To set or change the camcorder s password perform the procedure in Setting the Camcorder s Password A 124 starting from step 2 3 iOS device Activate Wi Fi in the settings screen The network names of detected access points will appear 4 iOS device Touch the ac...

Page 133: ...on the version of iOS you are using For details about the Movie Uploader app visit PIXELA s Web site http www pixela co jp oem canon e movieuploader English only The following types of MP4 scenes will be recognized as multiple files on other devices Scenes exceeding 4 GB Scenes recorded at 35 Mbps exceeding 30 minutes Scenes recorded with a recording mode other than 35 Mbps exceeding 1 hour COPY ...

Page 134: ...ection in Wi Fi Connection Using an Access Point A 137 Connected will appear on the camcorder s screen and the connection will be established After the connection is established you can touch View Information to view the access point s SSID connection protocol and the camcorder s IP address and MAC address You can also select the access point to which the camcorder will connect 6 Computer Select y...

Page 135: ...for Destination Folder and then touch OK Depending on the FTP server s settings the required text for the port number and destination folder may differ Check the settings on your FTP server The camcorder will connect to the access point selected in Wi Fi Connection Using an Access Point A 137 7 When Save the access point appears on the screen touch OK and then perform the procedure in Wi Fi Connec...

Page 136: ...ontent and make sure they are safe to delete before deleting them NOTES Depending on the access point s settings and capability it may take some time to transfer files Using the virtual keyboard When you need to enter text for various settings touch the text field and a virtual keyboard will appear on the screen You must use the touch screen to operate the virtual keyboard The illustrations below ...

Page 137: ...ount of time required may differ Make sure the router s WPS function is activated WPS PIN Code method From a computer or similar device connected to the access point use the Web browser to open the router s WPS settings screen After the 8 digit PIN code appears on the camcorder s screen enter it into your router s WPS settings screen Operating modes WPS Button Simply press and hold the WPS button ...

Page 138: ... not necessary 4 Touch OK twice After the connection is established continue using the function you were previously using For details refer to the procedure in Playback on a Computer A 134 Transferring Files to a Computer or FTP Server A 135 or Viewing and Changing Wi Fi Settings A 140 as necessary Manual Setup Perform this procedure to manually configure the wireless connection settings This may ...

Page 139: ... and then touch Next Touch the next field to change the value as necessary 10 Touch Next 11 Touch OK After the connection is established continue using the function you were previously using For details refer to the procedure in Playback on a Computer A 134 Transferring Files to a Computer or FTP Server A 135 or Viewing and Changing Wi Fi Settings A 140 as necessary NOTES The Wi Fi functions avail...

Page 140: ...Touch Access Point Connection The four access points SSID settings in the camcorder s memory will appear To add an access point touch Not configured and then perform the procedure in Wi Fi Connection Using an Access Point A 137 After doing so the screen from this step will appear again 3 Touch w next to the SSID of the access point whose settings you want to view The access point s settings will a...

Page 141: ...onnect to a wired network including to the Internet using the Wi Fi standard In most cases this will be your wireless router FTP Server An FTP server is an application running on a computer that allows users to transfer files to and from that computer IP Address Exclusive number assigned to each device connected to the network SSID Service Set Identifier This is simply the public name of a Wi Fi n...

Page 142: ...ent À Fluorescent H É Tungsten  Color Temperature Æ Set 1 Ç Set 2 z z 71 x AGC Limit m Automatic n Manual z z 65 Focus Touch AF frame D manual focus Toggle on or off O peaking Toggle on or off w settings Peaking and B W Peaking Color When D is on SET focus preset When SET is on ON return to preset focus position z z 54 y Exposure Touch AE frame n exposure compensation Toggle on or off w settings ...

Page 143: ...Join Scenes 118 Delete date folder name Select All Scenes This Scene 103 Divide z 105 Trim z 106 Control Button Photo Index Screen Single Photo View A Copy 6 7 Copy 7 6 folder name Select All Photos z 116 Delete 113 Menu item Setting options A Digital Zoom j Off s 400x f Digital Tele conv Soft Zoom Control j Off Start Stop Start Stop 63 Zoom Speed Level Z Fast Normal Slow 60 Zoom Rocker Zoom Speed...

Page 144: ... Conversion Lens TL H58 WA H58 j Off Intelligent IS È With È Without È 43 Onscreen Markers j Off 4 Level Gray Level Black 6 Grid Gray Grid Black IR Light i On j Off IR Rec Color White Green 94 Built in Mic Wind Screen H Auto High L Auto Low j Off 83 Built in Mic Att k Automatic i On j Off 83 Built in Mic Freq Response h Normal ç Boost LF Range è Low Cut Filter é Boost MF Range ê Boost HF LF Range ...

Page 145: ... cm 2 ft for the Wide Attachment When you select WA H58 and you zoom in the zoom position marker will stop before reaching the end of the zoom bar This Wide Attachment decreases the focal length by a factor of 0 75 When you select a setting other than j Off the AF mode is automatically set to Normal AF The approximate subject distance displayed on the screen will change depending on the setting If...

Page 146: ...at AVCHD MP4 z 39 Recording Mode For AVCHD movies 28 Mbps LPCM 59 94P 28 Mbps 59 94P 24 Mbps LPCM 24 Mbps 17 Mbps 5 Mbps For MP4 movies 35 Mbps 59 94P 24 Mbps 17 Mbps 4 Mbps 3 Mbps z 47 Recording Media v Rec Media for Movies 6 Mem Card A 7 Mem Card B z 39 Rec Media for Photos 6 Mem Card A 7 Mem Card B z z z Dual Relay Recording Standard Recording Dual Recording Relay Recording z 49 Frame Rate For ...

Page 147: ... with the same file number will be saved in the same folder as the file IMG_0107 JPG Folders can contain up to 500 files MP4 movies and photos combined and a new folder is created every time a folder exceeds this number The first three digits of the file number range from 100 to 999 and the last four digits range from 0001 to 9999 File numbers are automatically assigned consecutive numbers Availab...

Page 148: ...ance B blue 25 to 25 0 R red 25 to 25 0 z z z VF Brightness Bright h Normal z z z Headphone Volume Ö 0 15 8 z z z 89 119 Speaker Volume Ú 0 15 8 z z 101 Notification Sounds High Volume ø Low Volume j Off z z z Audio Output CH ƒ CH1 CH2 š CH1 CH1 Ÿ CH2 CH2 Œ All All z z z 110 Monitor Delay Þ Line Out h Normal z 89 Wireless Remote Control i On j Off z z z Tally Lamp i On j Off z z z CUSTOM Dial Butt...

Page 149: ...ing Direction h Normal X Reverse z Focus Zoom Ring Response Z Fast Normal Slow z Focus Preset Speed Z Fast Normal Slow z Battery Info z z z Output Terminal j Off HD SD SDI HD SD SDI HDMI HDMI Ò AV OUT z z z 108 Rec Command i On j Off z 43 HD SD SDI Output 480i 720P 1080i z z z 108 HDMI Output k Automatic 480i 480P 720P 1080i 1080P z z z 108 HDMI Time Code i On j Off z z z HDMI Status z z z Output ...

Page 150: ...vels You can use this to make the screen brighter if it is difficult to see Notification Sounds A beep will accompany some of the camcorder s operations While pre recording A 92 is activated the camcorder will not emit any notification sounds Wireless Remote Control Allows the camcorder to be operated with the wireless controller Tally Lamp Activates the tally lamp when the camcorder is recording ...

Page 151: ... have the camcorder automatically set the time based on the information acquired from GPS For more details refer to Setting Time from GPS on the Camera in the receiver s instruction manual GPS Information Display When the optional GP E2 GPS Receiver is attached to the camcorder this function allows you to view GPS information For more details refer to Viewing GPS Information in the receiver s inst...

Page 152: ...s frames 9 Operation A 155 10 Remote sensor off A 150 11 Pre recording A 92 D Video snapshot length A 91 12 Image stabilizer A 64 13 Frame rate A 50 14 Remaining battery time A 155 15 Remaining recording time1 6 7 On the memory card Relay recording A 49 16 Recording mode A 47 17 Movie format A 39 18 Frame rate recording mode and movie format for dual recording2 A 49 19 Audio peak limiter A 145 20 ...

Page 153: ...0 Exposure compensation A 69 31 AGC limit A 65 Gain during the n Manual Exposure recording program A 68 32 Manual focus A 54 33 Backlight correction A 70 34 White balance A 71 35 GPS A 95 36 Image effects A 75 37 Slow fast motion recording shooting frame rate playback frame rate A 51 38 Wind screen A 83 39 Audio scene select A 81 40 External audio input from the MIC terminal A 85 41 Digital tele c...

Page 154: ...48 50 14 8 49 51 48 Playback control buttons A 101 49 Scene number 50 Data code A 93 146 51 Volume controls A 101 52 53 54 50 1 55 56 52 Control button MENU Open the setup menus A 34 143 53 Current photo Total number of photos 54 File number A 147 55 Control button f Return to the photo index screen A 111 56 Control button h Photo jump A 112 COPY ...

Page 155: ...appear in red Replace or charge the battery pack When you attach an empty battery pack the power may turn off without displaying Depending on the conditions under which the camcorder and the battery pack are used the actual battery charge may not be indicated accurately When the camcorder is off press B to display the charge status of a battery pack The Intelligent System will display the charge s...

Page 156: ...nicate with the battery pack attached Battery packs not recommended by Canon for use with this camcorder cannot be charged using this camcorder If you are using a battery pack recommended by Canon for use with this camcorder there may be a problem with the camcorder or battery pack Consult a Canon Service Center A noise can be heard from the compact power adapter A faint sound can be heard while t...

Page 157: ...se Û playback Ð takes longer than usual When the memory card contains a large number of scenes some operations may take longer than usual Save your recordings A 114 and initialize the memory card A 38 Movies or photos cannot be recorded properly This may occur as movies and photos are recorded deleted over time Save your recordings A 114 and initialize the memory card A 38 Cannot record a photo wh...

Page 158: ...l Even after stopping recording the ACCESS indicator does not go off The scene is being recorded on the memory card This is not a malfunction The red POWER CHG indicator flashes rapidly one flash at 0 5 second intervals The temperature of the battery pack is outside its operating range approximately 0 40 C 32 104 F Remove the battery pack warm it or let it cool down as necessary and try charging i...

Page 159: ...reworks shows or concerts sound may become distorted or it may not be recorded at the actual levels Adjust the audio recording level manually A 82 The picture is displayed correctly but there is no sound from the built in speaker Speaker volume is turned off Adjust the volume A 101 If the STV 250N Stereo Video Cable is connected to the camcorder disconnect it Memory Card and Accessories Cannot ins...

Page 160: ...MP4 movies or photos on my computer When the memory card contains too many MP4 movies and photos combined Windows 2 500 or more Mac OS 1 000 or more you may not be able to transfer photos to a computer Try using a card reader to transfer the photos on the memory card Wi Fi Functions Refer also to the instruction manual of your access point and other devices you will use Cannot connect with the acc...

Page 161: ...n to not being configured so set the password again Then delete the previous network settings from the external device and try connect it to the camcorder List of Messages Refer to List of Messages for Wi Fi Functions A 165 for a list of messages related to Wi Fi functions Accessing the memory card Do not remove the memory card You opened the double memory card slot cover while the camcorder was a...

Page 162: ...e scenes to MP4 without joining them Cannot play back Movies cannot be played back from a 64 MB or smaller memory card Use a recommended memory card A 37 Cannot play back Check the memory card There is a problem with the memory card Save your recordings A 114 and initialize the memory card using the Complete Initialization option A 38 If the problem persists use a different memory card Cannot play...

Page 163: ...ialize it A 38 Initialize only using the camcorder Initialize the memory card with this camcorder A 38 May not be possible to record movies on this memory card You may not be able to record movies on a memory card without a Speed Class rating or rated SD Speed Class 2 Replace the memory card with one rated SD Speed Class 4 6 or 10 Mem Card Number of scenes already at maximum The memory card alread...

Page 164: ... Replace the memory card with one rated SD Speed Class 4 6 or 10 When the recording mode is 28 Mbps LPCM 59 94P 28 Mbps 59 94P or 35 Mbps 59 94P you must use a memory card rated SD Speed Class 6 or 10 When recoding movies using slow fast motion you must use a memory card rated SD Speed Class 10 After repeatedly recording deleting and editing scenes fragmented memory it will take longer to write da...

Page 165: ...itialization option A 38 Another user is already controlling the camcorder Try again later This message appears on the screen of the Wi Fi device Multiple Wi Fi devices are trying to connect with the camcorder Make sure only one Wi Fi device is trying to connect and then touch Retry IP address conflict Change the camcorder s IP address to avoid any conflict with devices connected to the same netwo...

Page 166: ...g a DNS server set the DNS address to 0 0 0 0 If you are using a wireless gateway router make sure all of the devices in the network including the camcorder are configured with the correct gateway address Wi Fi authentication unsuccessful Make sure the camcorder and access point are using the same authentication encryption method and encryption key If the access point is using MAC address filterin...

Page 167: ...e access point s configuration screen Wireless communication is not working correctly Cordless phones microwave ovens refrigerators and other appliances may interfere with the wireless signal Try using the camcorder in a location farther away from such appliances Turn off the camcorder and access point After a short while turn them on again and perform the Wi Fi network setup again If the problem ...

Page 168: ...ation problems or very sensitive skin or when using the camcorder in very hot places Do not leave the camcorder in places subject to high temperatures like the inside of a car parked under direct sunlight or high humidity Do not use the camcorder near strong electromagnetic fields such as above TVs near plasma TVs or mobile phones Do not use the camcorder s Wi Fi functions inside hospitals medical...

Page 169: ... with a soft cloth Long term storage Store battery packs in a dry place at temperatures no higher than 30 C 86 F To extend the battery life of the battery pack discharge it completely before storing it Charge and discharge all your battery packs fully at least once a year Remaining battery time When you are using a battery pack that is compatible with Intelligent System if the remaining battery ti...

Page 170: ... cards in places subject to high humidity and high temperature Do not disassemble bend drop or subject memory cards to shocks and do not expose them to water Check the direction before inserting the memory card Forcing a memory card into a slot if it is not correctly oriented may damage the memory card or the camcorder Do not attach any labels or stickers on the memory card Secure Digital SD memor...

Page 171: ...t up with unimportant recordings and then initialize it again using the same option This makes recovering the original recordings very difficult WARNING The battery used in this device may present a fire or chemical burn hazard if mishandled Do not disassemble modify immerse in water heat above 100 C 212 F or incinerate the battery Replace with a CR2025 battery made by Panasonic Hitachi Maxell Son...

Page 172: ...Moving the camcorder rapidly between hot and cold temperatures may cause condensation water droplets to form on its internal surfaces Stop using the camcorder if condensation is detected Continued use may damage the camcorder Condensation may form in the following cases When the camcorder is moved quickly from cold to warm places When the camcorder is left in a humid room When a cold room is heate...

Page 173: ...k on a TV Screen You can only play back your recordings on TVs compatible with the NTSC system NTSC is used in the following regions countries Americas All of North America and Central America most Caribbean islands except in French territories like Guadeloupe and Martinique most of South America except in Argentina Brazil and Uruguay Asia Only in Japan the Philippines South Korea Taiwan and Myanm...

Page 174: ...rs from area to area WM V1 Wireless Microphone GP E2 GPS Receiver SS 600 SS 650 Shoulder Strap WA H58 Wide Attachment Protect Filter 58 mm ND4L Filter 58 mm ND8L Filter 58 mm HTC 100 S High Speed HDMI Cable STV 250N Stereo Video Cable IFC 400PCU USB Cable WS 20 Wrist Strap SC 2000 Soft Carrying Case BP 820 BP 828 Battery Pack CG 800 Battery Charger CA 570 Compact Power Adapter TL H58 Tele converte...

Page 175: ...d vary according to charging conditions and initial charge of the battery pack Recording and playback times given in the following tables are approximate and vary according to recording mode and charging recording or playback conditions The effective usage time of the battery pack may decrease when recording in cold surroundings when using the brighter screen settings etc Use of genuine Canon acce...

Page 176: ...35 min 135 min 350 min 17 Mbps 225 min 220 min 140 min 135 min 350 min 5 Mbps 230 min 230 min 140 min 140 min 355 min Battery pack Recording mode Recording maximum Recording typical Playback OLED Viewfinder OLED Viewfinder OLED BP 820 35 Mbps 59 94P 140 min 140 min 85 min 85 min 220 min 24 Mbps 160 min 160 min 95 min 95 min 235 min 17 Mbps 160 min 160 min 95 min 95 min 235 min 4 Mbps 170 min 170 m...

Page 177: ... 90 min 90 min 240 min 17 Mbps 155 min 155 min 90 min 90 min 245 min 5 Mbps 155 min 155 min 95 min 90 min 250 min BP 828 28 Mbps LPCM 59 94P 28 Mbps 59 94P 215 min 215 min 130 min 130 min 350 min 24 Mbps LPCM 24 Mbps 230 min 225 min 140 min 140 min 365 min 17 Mbps 230 min 230 min 140 min 140 min 365 min 5 Mbps 235 min 235 min 145 min 145 min 370 min Battery pack Recording mode Recording maximum Re...

Page 178: ...rotector filters help you to control difficult lighting conditions WM V1 Wireless Microphone Reliably record rich sound even when shooting subjects at a distance The transmitter is conveniently equipped with a clothing clip and the receiver can be attached to the camcorder s grip belt SC 2000 Soft Carrying Case A handy camcorder bag with padded compartments and plenty of space for accessories This...

Page 179: ... compliant printer the camcorder s image data at the time of shooting is used and optimized yielding extremely high quality prints Video Signal Configuration AVCHD MP4 Recording Media SD SDHC SD High Capacity or SDXC SD eXtended Capacity memory card not included two memory card slots Maximum Recording Time Commercially available 32 GB memory card AVCHD movies 28 Mbps LPCM 59 94P and 28 Mbps 59 94P...

Page 180: ...ull wide angle White Balance Auto white balance Custom white balance 2 settings User defined color temperature or Preset white balance settings Daylight Shade Cloudy Fluorescent Fluorescent H Tungsten Minimum Illumination 0 1 lx Low Light recording program Shutter speed at 1 2 1 2 lx Programmed AE recording program Auto slow shutter On Shutter speed at 1 30 Recommended Illumination More than 100 l...

Page 181: ... 5 kΩ or more Microphone attenuator 20 dB INPUT Terminal INPUT jack pin1 shield pin2 hot pin3 cold 2 sets balanced Sensitivity For microphone input 60 dBu manual volume center full scale 18 dB 600 Ω For line input 4 dBu manual volume center full scale 18 dB 10 kΩ Microphone attenuator 20 dB headphone Terminal 3 5 mm stereo minijack unbalanced 29 dBV 16 Ω load Max volume 100 Ω REMOTE Terminal 2 5 m...

Page 182: ...attery type Rechargeable lithium ion battery compatible with Intelligent System Rated voltage 7 4 V DC Operating temperature 0 40 C 32 104 F Battery capacity 1780 mAh typical 13 Wh 1700 mAh minimum Dimensions 30 7 x 39 4 x 40 2 mm 1 2 x 1 6 x 1 6 in Weight 85 g 3 0 oz About available Wi Fi frequencies and channels The camcorder s Wi Fi functions operate in a predetermined range of frequencies and ...

Page 183: ...memory card 116 CUSTOM button 96 CUSTOM dial 96 D Data code 93 146 Date and time 35 Deleting Movies 103 Photos 113 Digital tele converter 63 Dividing scenes 105 Dual recording 49 E Error messages 161 Exposure compensation 69 External microphone 80 F Face detection 57 Fireworks recording program 74 Focus preset 54 Focus zoom ring 54 59 Frame rate 50 FTP transfer 135 FUNC panel 33 142 H Handle unit ...

Page 184: ... S Saving recordings Using a computer 114 Using external video recorders 119 Selecting the memory card for recording 39 Setup menus 34 143 Shutter speed 66 68 Slow fast motion 51 Smart AUTO 42 Snow recording program 73 Sports recording program 73 Spotlight recording program 74 Sunset recording program 73 T Telephoto 59 Time code 76 Time zone DST 36 Touch AE 69 Touch AF 54 Touch screen operations 3...

Page 185: ...handling accident improper maintenance or failure to follow operating instructions B If the Equipment is defective as a result of leaking batteries sand dirt or water damage C If defects or damages are caused by the use of unauthorized parts or by service other than by Canon USA s factory service centers or authorized service facilities D If the Equipment is used for commercial or industrial use T...

Page 186: ...nish of the Equipment media nor does it apply to Equipment purchased outside Canada If the Equipment contains a hard disk drive Canon Canada recommends that data stored on that drive be duplicated or backed up to prevent its loss in the event of a failure or other malfunction of such drive TO OBTAIN WARRANTY SERVICE Ship your Equipment in its original carton box or equivalent properly packed fully...

Page 187: ...LTD 19 F The Metropolis Tower 10 Metropolis Drive Hunghom Kowloon Hong Kong Tel 852 3191 2333 Fax 852 2428 3963 Visit your local Canon Web site to download the latest version of this Instruction Manual For support concerning the supplied software contact your local Canon Service Center Consultez le site Web Canon de votre pays pour télécharger la version la plus récente de ce manuel d instruction ...

Reviews: