background image

Preparations


Š

 21

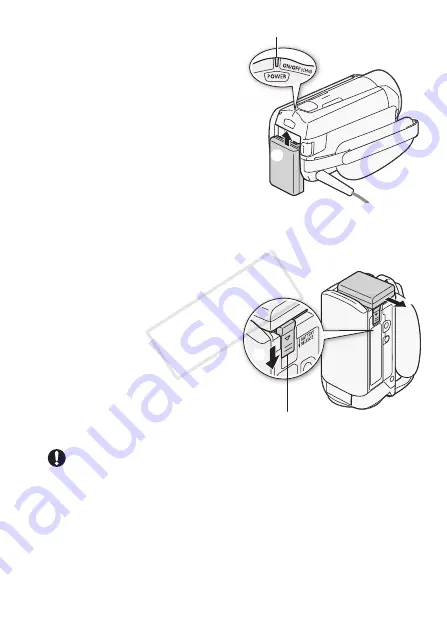
4 Charging will start when the 

camcorder is turned off.

• If the camcorder was on, the 

green ON/OFF (CHG) indicator 
will go out when you turn off the 
camcorder. After a moment, 
the ON/OFF (CHG) indicator 
will turn on in red (battery pack 
charging). The red ON/OFF 
(CHG) indicator will go out 
when the battery pack is fully 
charged.

• If the indicator flashes, refer to 

Troubleshooting

 (

A

190).

To remove the battery pack

1 Slide 

d

 in the 

direction of the arrow and hold it 
pressed down.

2 Slide the battery pack and 

then pull it out.

IMPORTANT

• Turn off the camcorder before connecting or disconnecting the com-

pact power adapter. After pressing 

P

 to turn off the camcorder, 

important data is updated in the memory. Be sure to wait until the green 
ON/OFF (CHG) indicator goes out.

• Do not connect to the camcorder’s DC IN terminal or to the compact 

power adapter any electrical equipment that is not expressly recom-
mended for use with this camcorder.

���

ON/OFF (CHG) (charge) indicator

���

���

BATTERY RELEASE switch

COP

Y

Summary of Contents for VIXIA HF R30

Page 1: ...PUB DIE 0412 000 HD Camcorder Instruction Manual COPY...

Page 2: ...ect sunlight fire etc While using the compact power adapter do not wrap it or cover it with a piece of cloth and do not place it in confined narrow spaces CAUTION TO REDUCE THE RISK OF ELECTRIC SHOCK...

Page 3: ...fications to the equipment unless otherwise specified in the manual If such changes or modifications should be made you could be required to stop operation of the equipment Model ID0002 including WLAN...

Page 4: ...nplug this apparatus during lightning storms or when unused for long periods of time 11 Refer all servicing to qualified service personnel Servicing is required when the apparatus has been damaged in...

Page 5: ...d in this manual signifies Wi Fi Protected Setup DLNA the DLNA Logo and DLNA CERTIFIED are trademarks service marks or certification marks of the Digital Living Network Alliance Other names and produc...

Page 6: ...ed storage drive back home You can upload your recordings wirelessly directly from your camcorder to YouTube and Facebook A 160 You can play back the record ings in your camcorder from DLNA compatible...

Page 7: ...and other settings accordingly for beautiful results Memory Save A 136 Image Stabilization Easily save the whole content of the built in memory or a memory card onto an external hard drive connected d...

Page 8: ...ite Upload MP4 movies to your computer A 133 Save your recordings You can also create discs from your recordings Standard Definition Upload AVCHD movies to your computer A 131 You can also choose to c...

Page 9: ...st connecting to an access point A 151 Transfer your recordings wirelessly from the camcorder to a computer or FTP server A 156 Wirelessly connect to a Wi Fi enabled iOS device like an iPhone to uploa...

Page 10: ...and Adjusting the LCD Screen 26 Basic Operation of the Camcorder 26 Using the Touch Screen 27 Using the Menus 31 Operating Modes 34 First Time Settings 34 Setting the Date and Time 35 Changing the La...

Page 11: ...nema Style 67 Using Story Creator to Create Compelling Stories 70 Cinema Mode and Cinema Look Filters 72 Video Snapshot 73 Decoration Adding a Personal Touch 79 Playing Back Stories from the Gallery 8...

Page 12: ...Dividing Scenes Photos 118 Viewing Photos 120 Deleting Photos 122 Slideshow External Connections 123 Terminals on the Camcorder 124 Connection Diagrams 127 Playback on a TV Screen 128 Saving and Shari...

Page 13: ...Wireless Playback on a DLNA Compatible Device Additional Information 168 Appendix Menu Options Lists 168 Main Functions Panel 172 Other Settings Menus 182 Appendix Onscreen Icons and Displays 187 Trou...

Page 14: ...operating procedures POINTS TO CHECK Restrictions or requirements regarding the function described A Reference page number within this manual Text that applies only to the models shown in the icon Th...

Page 15: ...ailable in the operating mode indicated and indicates that the function is not available The operating mode icons are divided into three groups the first three icons represent the camera mode the seco...

Page 16: ...s and CD ROMs The following accessories are supplied with the camcorder CA 110E including power cord in Asia only XCA 110 Compact Power Adapter BP 709 Battery PackW XIFC 300PCU S USB Cable HTC 100 S H...

Page 17: ...geBrowser EX This CD ROM contains an automatic installer for the supplied software ImageBrowser EX which allows you to save and manage MP4 movies and photos and upload MP4 movies to CANON iMAGE GATEWA...

Page 18: ...7 AV OUT terminal A 123 125 headphones terminal A 111 8 HDMI OUT terminal A 123 124 9 USB terminal A 123 125 136 140 A q Memory card slot A 39 A a START STOP button A 44 A s DC IN terminal A 20 A d G...

Page 19: ...q POWER button S a ON OFF CHG charge indicator Green On Orange Standby A 51 Red Charging A 20 S s Battery attachment unit A 20 S d Serial number S f Tripod socket A 206 S g BATTERY RELEASE switch A 2...

Page 20: ...arging times and recording playback times with a fully charged battery pack refer to Charging Recording and Playback Times A 213 1 Plug the power cord into a power outlet For Asia only Connect the pow...

Page 21: ...ve the battery pack 1 Slide d in the direction of the arrow and hold it pressed down 2 Slide the battery pack and then pull it out IMPORTANT Turn off the camcorder before connecting or disconnecting t...

Page 22: ...e sure the ON OFF CHG indicator has gone out before restoring the power supply If remaining battery time is an issue you can power the camcorder using the compact power adapter so the battery pack wil...

Page 23: ...with your thumb You can attach the supplied stylus pen to the grip belt To remove the grip belt 1 Lift the padded handgrip s flap and detach the strap from the Velcro pad 2 Pull the strap to remove i...

Page 24: ...the lens cover Rotating the LCD Panel Open the LCD panel 90 degrees You can rotate the panel 90 degrees downward You can rotate the panel 180 degrees toward the lens Rotating the LCD panel 180 degrees...

Page 25: ...misfire or appear as black red blue or green dots This has no effect on the recorded image and does not constitute a malfunction For details about how to take care of the touch screen refer to Handli...

Page 26: ...rder will recognize as the main subject of the scene etc Drag While applying pressure swipe your finger up and down or left and right across the screen Used to scroll menus to browse through index scr...

Page 27: ...nd settings After you press the HOME menu will appear and you can select from the following control buttons The available control buttons depend on whether the camcorder is in recording or playback mo...

Page 28: ...de A 67 when choosing to record in AVCHD Available only in recording mode For details on how to set the recording standard refer to Recording A 31 Wi Fi Allows you to access the various Wi Fi func tio...

Page 29: ...odes Touch Edit to display a panel showing available operations copying deleting etc and then touch the operation you want to perform Touch the control button of the desired function Drag your finger...

Page 30: ...your finger up and down to bring the setting you want to change into the orange selection bar You can also use the and icons for scrolling Menu items not available appear grayed out You can touch any...

Page 31: ...of data the movie is recorded as namely AVCHD or MP4 1 Press to open the HOME menu 2 Touch Recording Standard and then touch the desired recording standard 3 Touch OK Camera mode Operation AUTO mode L...

Page 32: ...his recording standard if you plan to show off your movies and you want to impress your audience with fantastic picture quality Movies are recorded in AVCHD using Story Creator A 67 which allows you t...

Page 33: ...ng mode and playback mode You can press T when the camcorder is off to turn it on directly in playback mode NOTES When switching to a playback mode the memory selected for playback will be the same cu...

Page 34: ...Touch Y M D M D Y or D M Y to select the date format you prefer In some screens the date will be displayed in short form numbers instead of month names but it will still follow the order you selected...

Page 35: ...order is English You can set it to one of 27 languages Operating modes 1 Press 2 Select the desired language NOTES Some control buttons such as ZOOM or PHOTO will appear in English regardless of the l...

Page 36: ...Operating modes 1 Press 2 Open the Time Zone DST screen 3 Touch to set the home time zone or to set the time zone of your destination when you are traveling 4 Touch or to set the desired time zone If...

Page 37: ...eb site When using an SD memory card without a speed class rating you may not be able to record movies depending on the memory card used SD memory cards with a capacity of 64 MB or smaller cannot be u...

Page 38: ...ata loss After repeatedly recording deleting and editing scenes fragmented memory it will take longer to write data on the memory and recording may stop Save your recordings and initialize the memory...

Page 39: ...memory card slot until it clicks The memory card slot is at a slight angle toward the lens so be careful not to damage the memory card when inserting it Be sure you understand the information provided...

Page 40: ...record your movies and photos in the built in mem ory or on a memory card The default memory for recording both is the built in memory Operating modes POINTS TO CHECK Be sure you understand the inform...

Page 41: ...rding The approximate available recording time will now reflect the combined space in the memories used for relay recording NOTES There will be a momentary stop in the scene at the point where the cam...

Page 42: ...e compact power adapter Do not disconnect the power source or turn off the camcorder until the initialization is completed 2 Press 3 Initialize the memory 1 Touch this option if you want to physically...

Page 43: ...c files from the supplied VIXIA CD ROM to the memory card Windows users Use the supplied software VideoBrowser only or Transfer Utility only For details refer to the Software Guide PDF file of the sup...

Page 44: ...d functions refer to Recording in Manual Mode A 89 Basic Recording Shooting Video and Taking Photos in AUTO Mode With mode you can take great looking videos and photos by let ting the camcorder automa...

Page 45: ...ore using an Eye Fi card 2 Open the lens cover switch 3 Press To change the recording standard refer to Recording A 31 4 Set the camcorder to mode To record video Press Y to begin recording Press Y ag...

Page 46: ...Face detection A 99 to get beautiful shots of people every time tracking the subject even if the person moves Touch Track A 101 to track other moving subjects keeping them in focus and using the best...

Page 47: ...Blue skies light blue Vivid colors green red Sunsets orange Subject People stationary People moving Subjects other than people such as landscapes Close objects Background color of the icon Dark dark b...

Page 48: ...rify that Eye Fi cards have been approved in the country region of use See also Using an Eye Fi card A 146 NOTES About the power saving mode If q Power Saving Mode Auto Power Off is set to i On the ca...

Page 49: ...A 89 Photos are recorded as JPG files The photo size 1920x1080 and quality cannot be changed At this size a 1 GB memory card can hold approximately 670 photos However the actual number of photos that...

Page 50: ...h anywhere within the T area to zoom out or anywhere within the S area to zoom in Touch closer to the center for a slow zoom touch closer to the V U icons for faster zooms 3 Touch X to hide the zoom c...

Page 51: ...y when you are using a battery pack Additionally when you open the LCD panel the camcorder is ready to start recording in approximately 1 second allowing you to record the subject right away The actua...

Page 52: ...d while the ACCESS indicator is on or flashing or while the HOME menu or menus contained therein not including the Main Functions panel are being displayed The camcorder may also not enter standby mod...

Page 53: ...ails about basic video shooting refer to AUTO Mode A 44 Basic Playback Playing Back Video You can use the s Data Code setting to choose whether to display the recording date and other information for...

Page 54: ...playback controls will disappear automatically after a few seconds without operation In playback pause touch the screen again to hide the playback controls Open the index selection screen Memory bein...

Page 55: ...ing of the scene Double tap to jump to the previous scene Jump to the beginning of the next scene Pause the playback Fast playback backward forward Display the volume A 55 and background music mix bal...

Page 56: ...mode You may not be able to play back with this camcorder movies recorded on a memory card using another device NOTES Depending on the recording conditions you may notice brief stops in video or soun...

Page 57: ...ge number of recordings Recording date Drag your finger left to go to the next date with record ings Drag your finger up and down to browse through the scenes recorded in the displayed date Drag your...

Page 58: ...otos for example You can also select the memory from which you want to play back your recordings Operating modes In any index screen Touch G During single photo view touch the screen once to display t...

Page 59: ...o playback modes for AVCHD movies the Movies index screen vs the gallery In the Movies index screen you can find all the AVCHD mov ies you have recorded conveniently organized by recording date When y...

Page 60: ...layback controls 3 Delete the scene Deleting Scenes from the Movies or Movies Index Screen Operating modes 1 Open the Movies or Movies index screen For AVCHD movies to delete all the scenes recorded o...

Page 61: ...ns Deleting a Single Scene from a Story Operating modes 1 Open the list of scenes of the story that contains the scene you want to delete 2 In the Scene List screen drag your finger up down to select...

Page 62: ...es A grayed out rating button indicates that no scenes in the story have been given that particular rating The number of selected scenes appears on the screen Touch the rating button again to remove t...

Page 63: ...s Once deleted scenes cannot be recovered Deleting a story permanently deletes all the scenes it contains When deleting scenes scenes will be removed from the Movies or Movies index screen and from an...

Page 64: ...e movie timeline to break the scene to segments at fixed time intervals ranging from 6 seconds to 6 minutes Operating modes 1 Open the Movies index screen 2 Open the scene s Timeline screen The Timeli...

Page 65: ...Drag your finger left along the ruler to display the next 5 frames Scene s recording mode and length Recording date and time Drag your finger right along the ruler to display the previous 5 frames Cu...

Page 66: ...record ing information about the camera setup etc For MP4 movies the data code is the date of recording You can choose the information to be displayed Operating modes 1 Press 2 Select the information...

Page 67: ...ed as a single compelling video story A 79 Operating modes Creating a New Story 1 Press 2 Start Story Creator mode 3 Touch Create New Story and select the desired theme Drag your finger left right to...

Page 68: ...category Use the displayed recommended length as a reference when recording scenes Scenes will be recorded under the story and story scene currently selected You can also record video snapshot scenes...

Page 69: ...cenes within an Existing Story 1 Press 2 Start Story Creator mode 3 Touch Continue Existing Story and select the desired story Drag your finger left right to bring the desired story to the front and t...

Page 70: ...look In this mode you can also use a variety of professional cin ema look filters to create unique movies with a distinctive appearance Operating modes 1 Press 2 Set the camera mode to 3 Select the de...

Page 71: ...wing the effect on the screen NOTES Photos cannot be recorded while the camcorder is set to mode 1 Cinema Standard 2 Vivid 3 Cool 4 Nostalgic 5 Sepia 6 Old Movies 7 Dramatic B W Filter number will app...

Page 72: ...ngth recommended for the selected story scene category in Story Creator with the r Video Snapshot Length setting Operating modes 1 Press V A blue border appears on the screen Press V again to return t...

Page 73: ...uring playback or just before convert ing them to standard definition only A 142 Decorating Scenes while Recording Operating modes 1 Open the decoration screen The decoration screen will open automati...

Page 74: ...ll be included in the recording Image Mix Choose one of 27 different frames to add onto the canvas Image mix can be used in combination with the pens stamps and animated stamps In recording mode pause...

Page 75: ...and drawings and stamps will be saved in the built in memory only or on a memory card only To load a previously saved canvas In the decoration screen The camcorder will apply the last freehand drawing...

Page 76: ...text on dark background white text or black text 4 Touch the caption and drag it to the desired location To use image mix Operating modes 1 Touch to open the Select Image screen 2 Touch or to select a...

Page 77: ...rag your finger along the bottom bar to adjust the overall transparency of the image as necessary 7 Touch K to mix your image with live video Mixing Your Own Images with Live Video You can use images...

Page 78: ...in the built in memory will be restored after it is initialized When q Autostart Decoration is set to i On the decora tion screen will open automatically when you stow the LCD panel with the LCD scree...

Page 79: ...playing back stories from the gallery you can choose to play back only scenes with a certain rat ing Operating modes 1 Open the gallery Open the G Index Selection screen A 58 Drag your finger right or...

Page 80: ...ry scene display off Playback controls are the same as when playing back scenes from the Movies or Movies index screen A 55 IMPORTANT Observe the following precautions while the ACCESS indicator is on...

Page 81: ...ely after recording a scene rating buttons will appear at the bottom of the screen Touch one of the rating buttons to rate the scene from one to three stars You can touch to leave the scene unrated or...

Page 82: ...g Playback Operating modes 1 Play back from the gallery the story that contains the scenes you want to rate 2 During playback of a scene you want to rate pause the playback and rate the scene 3 Touch...

Page 83: ...os recorded on the memory card you will need to transfer the music tracks to the memory card in advance See the NOTES section A 85 1 Press 2 Open the gallery or Movies index screen 3 Press 4 Select th...

Page 84: ...1 During playback touch the screen to display the playback controls 2 Touch drag your finger along the Music Balance bar to adjust the background music balance as desired and touch K To delete a musi...

Page 85: ...mory card Refer to About the music files A 219 for the folder structure of the memory card Transfer music files to the memory card that contains the recordings you want to play back with background mu...

Page 86: ...es 2 When copying a scene you can touch Stop to interrupt the operation while it is in progress 3 This step is not necessary when moving a scene NOTES You cannot copy or move scenes to the two preexis...

Page 87: ...rrent date will be used as the story s title but you can change the title later on The title can be up to 14 characters long available characters are limited The title of the two preexisting stories U...

Page 88: ...and video files from the gallery some special characters in the story s title will be changed to an underscore _ in the file name Switch between letters and numbers special characters Change the posit...

Page 89: ...by using Special Scene recording programs A 95 Operating modes 1 Press P to turn on the camcorder By default movies and photos are recorded in the built in memory You can select the memory that will...

Page 90: ...n an Eye Fi card will be uploaded automatically after set ting the camcorder to playback mode if you are within the range of a configured network Always verify that Eye Fi cards have been approved in...

Page 91: ...movie quality select LP mode for longer recording times For MP4 movies you can choose one of two bit rates Bit rate indi cates how much information is recorded in 1 second of video Select 4 Mbps for...

Page 92: ...the supplied software VideoBrowser to create AVCHD discs The camcorder uses a variable bit rate VBR to encode video so the actual recording times will vary depending on the content of the scenes You c...

Page 93: ...continuously for 12 hours at that point the camcorder will stop for about 3 seconds before resuming recording Recording mode MXP FXP XP SP LP Memory 4 GB Memory card 20 min 30 min 40 min 1 hr 10 min...

Page 94: ...lds per second interlaced Standard frame rate of NTSC analog TV signals PF30 Shooting at 30 frames per second progressive Use this frame rate to easily edit your recordings for example to post them on...

Page 95: ...erture while you are able to adjust the other settings Operating modes To set the Programmed AE recording program select Programmed AE instead and then touch X The rest of the procedure is not necessa...

Page 96: ...e screen SCN Low Light Moving subjects may leave a trailing afterimage Picture quality may not be as good as in other modes White points may appear on the screen Autofocus may not work as well as in o...

Page 97: ...ditions Operating modes 1 Press 2 Select the IS mode Options Default value Dynamic Compensates for a higher degree of camcorder shake such as when shooting while walking and is more effec tive as the...

Page 98: ...ing opportuni ties This is especially useful when it is difficult to predict when to start recording Operating modes 1 Activate the pre recording function z will appear on the screen Repeat selecting...

Page 99: ...reen Closing the LCD panel to set the camcorder to standby mode Touching any of the following control buttons in the Main Functions panel Rec Programs White Balance Faders Decoration or Review Recordi...

Page 100: ...rder may mistakenly detect the faces of non human sub jects In such case turn face detection off In certain cases faces may not be detected correctly Typical examples include Faces extremely small lar...

Page 101: ...le frame will appear around the subject and track it as it moves Touch Cancel to remove the frame and cancel the tracking NOTES Touching somewhere with a color or pattern unique to the subject will ma...

Page 102: ...n record pause mode to start recording with a fade in Press Y while recording to fade out and pause the recording NOTES When you apply a fader not only the picture but also the sound will fade in or o...

Page 103: ...appears inside the y frame The Touch AE mark I will flash and the exposure will be adjusted automatically so the area you touched will be correctly exposed You have the option to further adjust the ex...

Page 104: ...lowing cases In mode when using a cinema look filter other than Cinema Standard When using the SCN Night Scene SCN Snow SCN Beach SCN Sunset or SCN Spotlight recording program Except in mode when usin...

Page 105: ...ied to help you focus more easily You can also turn off this function with the p Focus Assistance setting The focusing distance displayed will change as you adjust the focus The focusing distance will...

Page 106: ...utomatically when you zoom in to full telephoto and bring the camcorder up close to the subject POINTS TO CHECK Select a recording program other than SCN Fireworks Touch again to turn off the tele mac...

Page 107: ...alance Point the camcorder at a white object so it fills the whole screen and touch Set WB When the adjustment is completed stops flashing and disappears The camcorder will retain the custom white bal...

Page 108: ...r sky sea or forest Under mercury lamps certain types of fluorescent lights and LED lights Self Timer Operating modes For movies only 1 Press 2 Activate the self timer will appear on the screen Repeat...

Page 109: ...icrophone You can display the audio level indicator while recording Operating modes Manual Adjustment of the Audio Recording Level 1 Open the manual audio recording level adjustment screen The audio l...

Page 110: ...n choose to display it also when the audio level is adjusted automatically NOTES When you are using a microphone connected to the MIC terminal including the WM V1 Wireless Microphone the audio level i...

Page 111: ...headphones follow the procedure below to change the function of the terminal from AV output to headphones output Operating modes 1 Press 2 Change the function of the terminal to headphones output 3 Co...

Page 112: ...de the function of the AV OUT terminal will return automatically to AV output when you turn off the camcorder Using an External Microphone When recording in very quiet surroundings the built in microp...

Page 113: ...one is connected to the camcorder p Wind Screen will automatically be set to j Off If the audio level is too high and the sound gets distorted adjust the audio recording level manually A 109 or activa...

Page 114: ...u may want to print photos from video recorded at a party or create a small video clip using video snapshot scenes from the highlights of an event Operating modes Capturing a Video Snapshot Scene 1 Pl...

Page 115: ...from the end of the scene the video snapshot scene will be captured starting from the beginning of the following scene During the playback of video snapshot scenes captured from a previ ously recorded...

Page 116: ...cut out the rest Operating modes 1 Play back the scene you want to divide 2 Pause the playback at the point where you want to divide the scene 3 Open the scene division screen 4 Bring the scene to a p...

Page 117: ...ing the playback of a scene that was divided you may notice some anomalies in the picture sound at the point where the scene was cut The following scenes cannot be divided Video snapshot scenes and ot...

Page 118: ...r photo related operations Viewing Photos Operating modes 1 Press T 2 Open the Photos index screen if it is not displayed 3 Look for the photo you want to play back Move the zoom lever toward T to sho...

Page 119: ...h the photos using the scroll bar 1 Touch the screen to display the playback controls 2 Jump through the photos using the scroll bar Open the G Index Selection screen A 58 Memory being read Drag your...

Page 120: ...image files may not be displayed correctly Images not recorded with this camcorder Images edited on a computer Images whose file names have been changed Deleting Photos You can delete those photos tha...

Page 121: ...photos you want to delete A checkmark will appear on the photos you touch The total number of selected photos will appear next to the icon Touch a selected photo to remove the checkmark To remove all...

Page 122: ...eshow to display it in single photo view 4 Touch the screen to display the playback controls then touch to play back the slideshow set to the selected music track During the photo slideshow Touch the...

Page 123: ...e convenient cable This terminal is an HDMI mini receptacle When using a commercially available HDMI cable make sure the HDMI cable is Type A to Type C 3 USB Terminal This terminal is a mini AB recept...

Page 124: ...ctor About the HDMITM connection The HDMI High Definition Multimedia Interface connection is a convenient all digital connection using a single cable for both video and audio When you connect the camc...

Page 125: ...spect ratio q AV Headphones to AV Connection USB Type Digital data connection Connect to a computer to save your recordings to a compatible digital video recorder to copy your recordings or to an exte...

Page 126: ...r to the Software Guide PDF file of the supplied PIXELA s software To transfer music files from the supplied VIXIA Disc to a memory card in the camcorder in order to use them as background music For d...

Page 127: ...ecorded with x v Color A 176 on an HDTV compatible with this standard additional settings may be required on the connected HDTV Refer to the TV s instruction manual You can also play video directly fr...

Page 128: ...built in memory tab For AVCHD movies to copy all the scenes recorded on a specific date drag your finger left right until the desired date appears in the title bar 2 Copy the scenes When you select Se...

Page 129: ...es Touch Stop to interrupt the operation while it is in progress Copying a Single Photo Operating modes 1 In single photo view select the photo you want to copy 2 Touch the screen to display the playb...

Page 130: ...o copy before touching Yes Touch Stop to interrupt the operation while it is in progress To select individual photos 1 Touch on the individual photos you want to copy A checkmark will appear on the ph...

Page 131: ...is set to prevent writing If the file numbering is at maximum A 176 If there is no memory card in the memory card slot Scenes that were edited using the supplied software VideoBrowser and were then tr...

Page 132: ...ed video files cannot be transferred back to the camcorder and music files cannot be transferred from the supplied VIXIA CD ROM to a memory card in the camcorder 2 Open the Movies or Gallery index scr...

Page 133: ...r this camcorder The ImageBrowser EX User Guide will also be installed with the soft ware POINTS TO CHECK Before installing the software make sure your computer is connected to the Internet 1 Turn on...

Page 134: ...connection and install the software again First time connection to a computer running Windows Windows users only The first time you connect the camcorder to the computer you also need to select the Ca...

Page 135: ...corder video files that were previously saved to the computer do not disconnect the USB cable or turn off the cam corder or computer Doing so may result in scenes that cannot be played back on the cam...

Page 136: ...d directly to the camcorder You can also use the camcorder to play back your record ings directly from the hard drive Initialize the hard drive A 139 when you use it with this camcorder for the first...

Page 137: ...d Drive screen IMPORTANT Make sure you power the camcorder with the compact power adapter before you save a memory to the external hard drive If the compact power adapter becomes disconnected the conn...

Page 138: ...and then a memory card the folder name of memory save folders following the first one will end in a numerical suffix The Movies index screen will appear 5 Play back the movies stories and photos as y...

Page 139: ...leted 2 Press T to set the camcorder to playback mode 3 Connect the camcorder to the external hard drive using the optional UA 100 USB Adapter Connection 2 Refer to Connection Diagrams A 125 4 Press 5...

Page 140: ...video recorder has an SD memory card slot you can use the memory card to copy your movies without connecting the camcorder Make sure the external device is compatible with the type of memory card used...

Page 141: ...disc and set the recorder to record pause mode 2 Turn on the camcorder and set it to mode We recommend powering the camcorder using the compact power adapter Verify that q AV Headphones is set to AV...

Page 142: ...F file to install the supplied PIXELA s software Converting Scenes into Standard Definition from the Movies Index Screen Operating modes 1 Power the camcorder using the compact power adapter 2 Make su...

Page 143: ...rupt the operation while it is in progress 7 When the conversion is completed a confirmation screen will appear To select individual scenes step 4 1 Touch on the individual scenes you want to convert...

Page 144: ...uilt in memory tab 2 Select the rating of the stories you want to convert 3 Touch Edit Story Convert HD SD and continue the conversion to standard definition from step 5 in the previous procedure A 14...

Page 145: ...rd slot cover and do not remove the memory cards Observe the following precautions while the ACCESS indicator is on or flashing Failing to do so may result in permanent data loss Do not open the memor...

Page 146: ...start automatically 2 Convert the desired movies A 142 If you are within the range of a configured network Web upload will start automatically The status of the wireless communication is shown by the...

Page 147: ...Card the ACCESS indicator may flash from time to time Wireless communication via the Eye Fi card is available only in playback mode Any wireless transfer in progress will be stopped if you set the cam...

Page 148: ...ke photo albums and more This service may not be available in all countries regions Installation Install the software before you connect the camcorder to the computer for the first time The software i...

Page 149: ...commonly referred to as infrastructure mode or directly to an iOS device without using a wireless access point com monly referred to as ad hoc mode The steps you will perform will depend on how you p...

Page 150: ...ess point on a Wi Fi network A 151 Use this connection if you plan to play back videos on a DLNA compatible TV A 164 connected to the network using a LAN cable iOS device Access point LAN cable HDTV A...

Page 151: ...of your wireless router and other devices you will use General requirements Correctly configured Wi Fi network or hotspot that uses the 802 11b g n protocol POINTS TO CHECK Using an unprotected Wi Fi...

Page 152: ...a new connection point To replace the settings of an existing connection point touch Edit instead and then manually change the settings To delete the settings touch Delete and then Yes You can set up...

Page 153: ...u can review the network settings Touch Wi Fi Setup Check Current Configuration Desired connection point 1 to 3 or K three times when finished To manually assign an IP address step 5 After touching Ma...

Page 154: ...detect available nearby Wi Fi networks and display their SSID 3 Touch or to select the desired access point and then touch OK Wi Fi networks with a stealth function that do not broadcast their networ...

Page 155: ...3 or K three times when finished To manually enter a wireless access point step 3 Enter the details of the wireless access point If you select Open you can select No Encryption or WEP If you select O...

Page 156: ...ral requirements For computers running Windows OS A computer correctly connected to the same network as the camcorder with the supplied software Network Utility correctly installed config ured and run...

Page 157: ...nected If several computers connected to the network are running Network Utility a selection screen will appear In such case continue to step 4 otherwise skip to step 5 4 Touch or to select the specif...

Page 158: ...until the transfer is completed 2 Set the camcorder to playback mode and then press 3 Touch Wi Fi and then touch Transfer Files If the memory card slot cover is open the option will not be available M...

Page 159: ...ure they are safe to delete before deleting them NOTES AVCHD movies transferred using Network Utility will be saved in the Videos folder on the computer by default If you start VideoBrowser after you...

Page 160: ...correctly installed configured including your YouTube and Facebook account settings and running is in the notification area Network Utility will be installed automatically after you install VideoBrows...

Page 161: ...ity it can take some time to upload video files Uploading Videos Using an iOS Device You can connect the camcorder to an iOS device to upload your recordings to YouTube and Facebook even when you are...

Page 162: ...hared Key WEP you will need to specify the WEP index key Enter an encryption key of your choosing The encryption key must be one of the following 5 or 10 alphanumeric characters 10 or 26 hexadecimal c...

Page 163: ...Camcorder Touch OK The camcorder will connect as a media server 4 iOS device Touch Settings Wi Fi and then turn Wi Fi on A list of active networks will appear 5 iOS device On the network selection sc...

Page 164: ...e HDTV you can easily search for recordings in the camcorder and play them back Many DLNA players do not support playback of MP4 movies POINTS TO CHECK If you have not done so already complete the Wi...

Page 165: ...ur recordings The ACCESS indicator blinks during the connection Refer to the DLNA device s instruction manual for details on the procedure 5 Play back the videos in the folder that appears built in me...

Page 166: ...the camcorder closer to the wireless access point Turn off the wireless functions of other wireless devices other than the DLNA compatible device being used for playback Switch the wireless access po...

Page 167: ...without using an access point DLNA Digital Living Network Alliance A standard for easy communication and content sharing among consumer electronic devices comput ers and mobile devices across a home...

Page 168: ...ess otherwise specified functions available for AVCHD movies include movies made using Story Creator mode Main Functions Panel FUNC Menu Main Functions Panel Recording Modes Control Button Setting opt...

Page 169: ...50 Mic Level m automatic n manual Audio Level Indicator Toggle on or off z z 109 R Faders S Off T Fade Trigger Once U Fade Trigger Always V Wipe Once W Wipe Always z z 102 Decoration Pens and Stamps A...

Page 170: ...back Pause A From the built in memory Copy date Select All Scenes Select All Scenes 128 From the built in memory Convert HD SD date Select All Scenes 142 Delete date Select All Scenes Select All Scene...

Page 171: ...yback Pause A From the built in memory Copy by scene rating 129 From the built in memory Convert HD SD by scene rating 144 Delete or by scene rating This Scene This Scene 60 Delete Story z 63 Story Th...

Page 172: ...i On j Off z z Face Detection Tracking i On j Off z z 99 Auto Backlight Correction i On j Off z z 104 Auto Slow Shutter i On j Off z z Flicker Reduction j Off 50 Hz 60 Hz z z Fader Setting Black Scre...

Page 173: ...change the setting to reduce the effect Flicker reduction can be activated only when the recording program is set to Programmed AE Onscreen Markers You can display a grid or a horizontal line at the...

Page 174: ...the correct aspect ratio 4 3 TV TV sets with 4 3 aspect ratio Wide TV TV sets with 16 9 aspect ratio When the TV type is set to 4 3 TV during the playback of video originally recorded with an aspect r...

Page 175: ...lay 5 Mbps z 91 9 Mbps 4 Mbps z Frame Rate 1 60i Standard PF30 PF24 z 94 30P 24P z Rec Media for Photos built in memory memory card z z z2 40 Video Snapshot Length 1 C 2 sec D 4 sec F 8 sec z z2 72 11...

Page 176: ...ctually usable space It may be slightly smaller than the nominal built in memory capacity listed in the specifications x v Color Uses a color space with an extended gamut to achieve deeper colors clos...

Page 177: ...file number will have the file name MVI_0107 MP4 External Hard Drive Info When the camcorder is connected to an exter nal hard drive this setting displays information about the hard drive q System Set...

Page 178: ...10 min 20 min 30 min Initialize Initialize Built in Mem Mem Card only z z z z 42 Complete Initialization Toggle on or off Initialize 2 z z 139 Delete Memory Save Folder 2 z z 138 Time Zone DST home t...

Page 179: ...on a TV LCD Backlight Sets the screen to one of three brightness levels You can use this to make the screen brighter when recording in bright places for example Changing the brightness of the LCD scre...

Page 180: ...for 5 minutes Approximately 30 seconds before the camcorder shuts off Auto Power Off will appear Operating any of the camcorder s controls while the message is displayed will prevent the camcorder fr...

Page 181: ...s set to or mode depending on the TV used turning off the TV will automatically turn off the camcorder even if it is recording at the time We recommend not connecting more than 3 HDMI CEC compatible d...

Page 182: ...O Take a photo A 44 89 115 6 Control button Displays a shooting tip for the current story scene 7 Memory operation A 186 8 Intelligent IS A 48 9 Remaining battery level also remaining battery time whe...

Page 183: ...es seconds Self timer A 108 S f Image stabilizer A 97 S g Tele macro A 106 S h Remaining recording time On the memory card In the built in memory Relay recording A 41 only S j Frame rate A 94 S k Fade...

Page 184: ...yback AVCHD movies MP4 movies D k Eye Fi wireless communication A 146 D l Scene number F q Playback control buttons A 55 F a Data code A 66 174 F s Volume and background music balance controls A 55 84...

Page 185: ...hotos F g Control button Edit Open the Edit panel A 171 F h Current photo Total number of photos F j Control button h Photo jump A 119 F k Control button Slideshow A 122 F l Control button f Return to...

Page 186: ...the battery pack Depending on the condition of the camcorder or battery the actual battery charge may not match what is displayed on the screen When you attach an empty battery pack the power may turn...

Page 187: ...ttery pack Cannot charge the battery pack Make sure the camcorder is off so charging can start The temperature of the battery pack is outside its operating range approximately 0 40 C 32 104 F Remove t...

Page 188: ...The memory is full or it already contains the maximum number of scenes of AVCHD movies 3 999 scenes Delete some recordings A 60 120 or initialize the memory A 42 to free some space The point where Y...

Page 189: ...han usual When the memory contains a large number of scenes some operations may take longer than usual Save your recordings A 131 and initialize the memory A 42 Cannot capture a video snapshot scene f...

Page 190: ...screen The camcorder cannot communicate with the optional battery pack attached so the remaining battery charge cannot be displayed lights up in red A memory card error occurred Turn off the camcorder...

Page 191: ...ep a distance between the camcorder and devices that emit strong electromagnetic fields plasma TVs cellular phones etc Horizontal bands appear on the screen This is a phenomenon typical of CMOS image...

Page 192: ...is not available with an Eye Fi card in recording mode or while the optional WM V1 Wireless Microphone is attached to the camcorder Set the camcorder to playback mode or remove the WM V1 Wireless com...

Page 193: ...t the camcorder to a different USB port on the computer Cannot save photos on my computer When the memory contains too many photos Windows 2 500 photos or more Macintosh 1 000 photos or more you may n...

Page 194: ...of sight between the wireless router and the camcorder may interfere with the wireless signal Try using the camcorder in a location farther away from such appliances Wi Fi networks with a stealth fun...

Page 195: ...rectly You inserted a MultiMedia Card MMC into the camcorder Use a recommended memory card A 37 There was an error creating the file name Set File Numbering to Reset and initialize the memory card A...

Page 196: ...d using a computer Initialize the built in mem ory with this camcorder A 42 Cannot play the movies on this memory card Movies cannot be played back from a 64 MB or smaller memory card Use a recommende...

Page 197: ...r Use a recommended memory card A 37 If after the message disappears appears in red perform the following Turn off the cam corder and remove and reinsert the memory card If turns back to green you can...

Page 198: ...accessing the selected memory Initialize the memory with this camcorder A 42 LCD screen has been dimmed Use the LCD Backlight setting to change the brightness Change the q LCD Backlight setting to No...

Page 199: ...scenes 3 999 scenes has been reached Delete some scenes A 60 to free some space Number of stories already at maximum The gallery already contains the maximum number of stories 98 stories in any one gi...

Page 200: ...k There are no scenes with the selected rating No scenes have been rated yet Rate the scenes as you like A 81 The criteria you used to select scenes by rating resulted in no applicable scenes Change t...

Page 201: ...e camcorder was writing to the external hard drive Select Recover to try to recover the recordings Quickly erases all files and deletes partitions from the external hard drive Initialize If you initia...

Page 202: ...f connections or increase the maximum number Cannot log in to FTP server Check that the FTP server s user name and password are correctly configured in the cam corder They are case sensitive so make s...

Page 203: ...ork Transfer speed changed before connecting If the encryption method is set to WEP IEEE 802 11n cannot be used as the protocol for the connection so the connection was established using IEEE 802 11b...

Page 204: ...terminal and turn it off Wi Fi connection terminated Cordless phones microwave ovens refrigerators and other appliances may interfere with the wireless signal Try using the camcorder in a location fa...

Page 205: ...touch screen s operation is based on detecting applied pressure so you may not be able to correctly operate the touch screen with an additional protective layer Do not leave the camcorder in places s...

Page 206: ...y dam age the camcorder When recording movies try to get a calm stable picture Excessive cam corder movement while shooting and extensive use of fast zooms and panning can result in jittery scenes In...

Page 207: ...after a large number of repeated uses if a fully charged battery pack is left unused or if a battery pack is used for long periods of time in high tem peratures Use the time shown on the screen as an...

Page 208: ...has a built in rechargeable lithium battery to keep the date time and other settings The built in lithium battery is recharged while you use the camcorder however it will discharge completely if you d...

Page 209: ...ouch Screen Clean the LCD touch screen using a clean soft lens cleaning cloth Condensation may form on the surface of the screen when the temper ature changes suddenly Wipe it with a soft dry cloth Co...

Page 210: ...road Power Sources You can use the compact power adapter to operate the camcorder and to charge battery packs in any country with power supply between 100 and 240 V AC 50 60 Hz Consult a Canon Service...

Page 211: ...area TV HDTV Digital video recorder Computer External hard drive Card reader writer Optional accessories not listed below are described in more detail in the following pages 1 Stylus Pen 8 IFC 300PCU...

Page 212: ...te You can only use and charge these battery packs with camcorders and charg ers compatible with Intelligent System 5 CG 700 Battery Charger Use the battery charger to charge the battery packs Use of...

Page 213: ...The following recording and playback times are for AVCHD movies The recording and playback times for MP4 movies are the same as those for SP recording mode Recording AVCHD movies using the built in m...

Page 214: ...mode Recording maximum Recording typical Playback BP 709 MXP 50 min 25 min 75 min FXP 50 min 25 min 75 min XP 50 min 25 min 75 min SP 55 min 25 min 80 min LP 55 min 25 min 80 min BP 718 MXP 115 min 65...

Page 215: ...he camcorder an external hard drive or similar storage device with a standard A cable After doing so you can save an entire memory onto the device Check in advance the USB cable supplied with your ext...

Page 216: ...remely high quality prints Video Signal Configuration AVCHD 1080 60i MP4 720P Recordings made with the PF24 PF30 frame rate are converted and recorded on the memory as 60i Recording Media Built in mem...

Page 217: ...on at full telephoto 1 cm 0 39 in at full wide angle White Balance Auto white balance Custom white balance or Preset white balance settings Daylight Tungsten Minimum Illumination 0 4lx SCN Low Light...

Page 218: ...32 104 F Dimensions W x H x D excluding the grip belt 54 x 55 x 115 mm 2 1 x 2 2 x 4 5 in Weight camcorder body only 250 g 8 8 oz CA 110 Compact Power Adapter Power supply 100 240 V AC 50 60 Hz Rated...

Page 219: ...USIC_01 WAV to MUSIC_99 WAV About the image files for the Image Mix function The specifications of image files that can be used with the image mix function are as follows Image size 1920x1080 pixels F...

Page 220: ...Cinema look filters 70 Condensation 209 Connections to external devices 124 Copying recordings to a memory card 128 D Data code 66 174 Date and time 34 Decoration 73 Deleting Movies 60 Photos 120 Div...

Page 221: ...70 89 Photos 44 89 Recording mode 91 Recording programs 95 Recording standard AVCHD MP4 31 Recording time 93 Relay recording 41 Resetting all camcorder settings 191 Reviewing recordings 90 S Saving r...

Page 222: ...222 Additional Information V Video snapshot 72 Volume 55 W White balance 107 Wide angle 49 Wi Fi functions 149 Wind screen 173 Y YouTube 160 Z Zoom 49 Advanced zoom 49 Zoom speed 49 172 only COPY...

Page 223: ...Canon USA shall have no responsibility under this limited warranty for use of the Equipment in conjunction with incompatible peripheral equipment and incompatible software In order to obtain warranty...

Page 224: ...USING THE ALLEGED DAMAGE WITHOUT LIMITING THE FOREGOING YOU ASSUME ALL RISK AND LIABILITY FOR LOSS DAMAGE OR INJURY TO YOU AND YOUR PROPERTY AND TO OTHERS AND THEIR PROPERTY ARISING OUT OF USE MISUSE...

Page 225: ...ish of the Equipment media nor does it apply to Equipment purchased outside Canada If the Equipment contains a hard disk drive Canon Canada recommends that data stored on that drive be duplicated or b...

Page 226: ...6 Si vous avez des questions veuillez t l phoner 1 800 OK CANON 1 800 652 2666 sans frais au Canada seulement M XICO CANON MEXICANA S DE RL DE CV Blvd Manuel vila Camacho No 138 Piso 17 Col Lomas de C...

Reviews: