background image

Setting the Date/Time and Language

25

En

Fr

Es

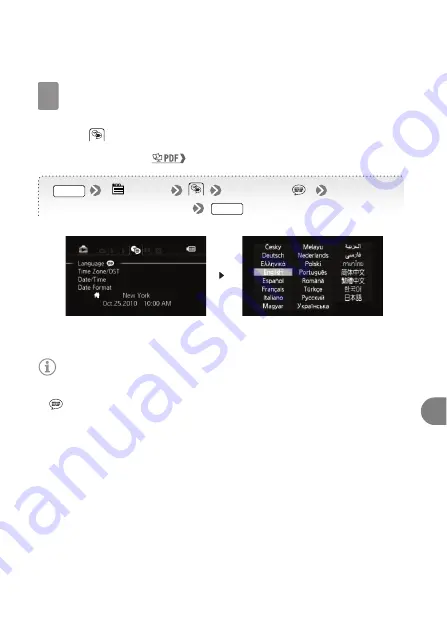
Select the language used for menus and on-screen displays.

You can select one of 22 languages to display the camcorder’s 

menus and on-screen displays. Select the language of your preference 
using the 

 menu.

See 

Using the Menus

 (

31) for details.

NOTES

If you changed the language by mistake, look for the menu option with the 

 mark.

4

FUNC.


[


Menu]     

[Language  ]  

Desired language 


FUNC.

English is the default language

Summary of Contents for VIXIA HF R10

Page 1: ...PUB DIM 0946 000...

Page 2: ...iate radio frequency energy and if not installed and use in accordance with the instructions may cause harmful interference to radio communications However there is no guarantee that interference will...

Page 3: ...Warning CAUTION TO REDUCE THE RISK OF ELECTRIC SHOCK DO NOT REMOVE COVER OR BACK NO USER SERVICEABLE PARTS INSIDE REFER SERVICING TO QUALIFIED SERVICE PERSONNEL CAUTION RISK OF ELECTRIC SHOCK DO NOT O...

Page 4: ...Unplug this product from the wall outlet before cleaning Do not use liquid or aerosol cleaners The product should be cleaned only as recommended in this manual 15 Avoid magnetic or electric fields Do...

Page 5: ...rvice personnel under the following conditions a When the plug is damaged b If any liquid has been spilled onto or objects have fallen into the product c If the product has been exposed to rain or wat...

Page 6: ...t cease to function in its intended manner it should be returned to the manufacturer or be discarded The serial number of this product can be found on the battery com partment cover of the camcorder W...

Page 7: ...c Other names and products not mentioned above may be trademarks or registered trademarks of their respective companies This device incorporates exFAT technology licensed from Microsoft ANY USE OF THI...

Page 8: ...2 PIXELA Applications Installation Guide also included Instruction Manual Photo Applications Ver 34 0 Music Data CD ROM Contains the full version Instruction Manual of the camcorder PDF file See the e...

Page 9: ...nstruction manual included as a PDF file in the Instruction Manual Photo Applications Ver 34 0 Music Data CD ROM 1 Turn on the computer 2 Insert the Instruction Manual Photo Applications Ver 34 0 Musi...

Page 10: ...tion NOTES Additional topics that complement the basic operating procedures Reference page number in this Quick Guide Text that applies only to the model s shown in the icon Brackets are used to refer...

Page 11: ...e Smart AUTO mode to let the camcorder select the best settings for your subject 27 INDEX SEL button Press to switch to the playlist or other content 47 PLAYLIST button Press to switch to the playlist...

Page 12: ...utton 29 A f POWER button A g ON OFF CHG charge indicator Green ON Orange Standby 33 Red Charging 18 A h LCD screen 28 A j Joystick 23 A k FUNC button Press to access the FUNC menu and setup menus Whe...

Page 13: ...42 S s MIC terminal Connect an external microphone 70 S d AV OUT terminal Connect the camcorder to a standard definition TV 42 headphones terminal 69 S f DC IN terminal 18 S g START STOP button 29 S...

Page 14: ...63 4 Image effect Try using various image effects to change the look of your recordings 65 5 Digital effect The camcorder offers various transition effects faders for movies and digital effects to ad...

Page 15: ...ce detection You can have the camcorder automatically detect people s faces and use this information to adjust the focus and set the best exposure and color control settings for beautiful videos and p...

Page 16: ...photos On the memory card In the built in memory in red Cannot record any more photos in red No memory card in the camcorder S l Camcorder shake warning When this icon appears on screen you may need t...

Page 17: ...ark or too bright 95 D j Current photo Total number of photos D k Photo number 139 D l Protected photo mark Protect your favorite photos to prevent deleting them by mistake 96 F q Date and time of rec...

Page 18: ...efore use Connect the compact power adapter Plug into a power outlet Connect the camcorder Plug into the DC IN terminal When connecting the compact power adapter s cable to the camcorder make sure to...

Page 19: ...t softly into the compartment and press gently until it clicks 4 Close the battery compartment cover Charging will start when the camcorder is turned off Lamp off camcorder turned off Red lamp flashes...

Page 20: ...onnecting the compact power adapter After turning off the camcorder important data is updated in the memory Be sure to wait until the ON OFF CHG indicator goes out The first time you use a battery pac...

Page 21: ...an issue you can power the camcorder using the compact power adapter so the battery pack will not be consumed Charged battery packs continue to discharge naturally Therefore charge them on the day of...

Page 22: ...the menus and advanced functions and to change various settings up to your preferences In either mode press to shoot movies or press to take photos See Advanced Functions 55 Additional Functions 93 f...

Page 23: ...select the scene photo you want to play back 1 2 2 2 Joystick During playback use the joystick to select the tab corresponding to the type of recoding you want to play back movies or photos and the me...

Page 24: ...date format and time zone For your convenience you can do so after changing the language to your preference See Changing the Time Zone 34 for details Press T When the internal clock is not set the Dat...

Page 25: ...e of 22 languages to display the camcorder s menus and on screen displays Select the language of your preference using the menu See Using the Menus 31 for details NOTES If you changed the language by...

Page 26: ...Memory Cards Compatible for Use with the Camcorder 35 for details Before using an Eye Fi card be sure to refer to Using an Eye Fi card 128 Turn off the camcorder Make sure the indicator is off Open th...

Page 27: ...be sure to refer to Using an Eye Fi card 128 IMPORTANT Memory cards have front and back sides that are not interchangeable Inserting a memory card facing the wrong direction can cause a malfunction o...

Page 28: ...See Preparing the Accessories 24 Adjusting the Position and Brightness of the LCD screen 25 LCD Brightness and LCD Screen Dimmer 137 for details Fasten the grip belt Adjust it so you can reach the zo...

Page 29: ...art AUTO 1 Press 2 Press Start recording movies 1 Press to start recording Press again to pause the recording and record the video on the memory as one scene 2 The ACCESS indicator flashes in red whil...

Page 30: ...isconnect the power source or turn off the camcorder Do not change the operating mode do not press the button or button NOTES Smart AUTO mode In mode the camcorder will automatically use the Smart AUT...

Page 31: ...the camcorder cannot focus on the subject automatically turns yellow About the zoom The camcorder features 20x optical zoom When recording movies you can also use the digital zoom See Digital Zoom 133...

Page 32: ...ke sure the camcorder has finished writing the scenes or photos on the memory before turning it off 1 Check that the indicator is off 2 Press 3 Close the LCD panel When you have finished recording Con...

Page 33: ...hen you are using a battery pack Additionally when you open the LCD panel the camcorder is ready to start recording in approximately 1 second allowing you to start recording right away The actual time...

Page 34: ...attery charge is too low the camcorder may not enter the standby mode Check that the indicator changes to orange The camcorder will power off automatically if left in standby mode for 10 minutes In th...

Page 35: ...quality or LP mode for longer recording times See Selecting the Video Quality Recording Mode 41 for approximate recording times You need to access the FUNC menu to select the recording mode but the re...

Page 36: ...87 for the approximate number of photos that can be recorded on a memory card and the print size recommended for each photo size You need to access the FUNC menu to select the photo size and quality...

Page 37: ...ing Back the Video 45 Viewing Photos 89 for details Press to set the camcorder to playback mode If a single photo appears move the zoom lever toward W Select the tab of the recordings you wish to play...

Page 38: ...nd press to stop the playback and return to the index screen Photos The selected photo is displayed 1 Move to the previous next photo 2 Select the index icon and press to return to the index screen IM...

Page 39: ...hen playing back movies depending on the recording conditions you may notice brief stops in video or sound playback between scenes The camcorder offers other advanced ways to locate and play back your...

Page 40: ...w 1 Select the photo jump icon and press 2 Select to jump 10 photos or 100 photos 3 Jump the number of photos selected back forward 4 Press to return to single photo view When you have a large number...

Page 41: ...ing Web site See Uploading Movies to Video Sharing Web Sites 124 for details See the Photo Application Instruction Manual PDF file on the Instruction Manual Photo Applications Ver 34 0 Music Data CD R...

Page 42: ...e camcorder to the TV Select the most appropriate connection according to the input terminals on your TV In decreasing order of picture quality the connections are HDMI Component video Composite video...

Page 43: ...nnection 108 for details about additional settings Composite video connection Analog standard definition connection See Connection Diagrams Connection 108 for details about additional settings 1 HTC 1...

Page 44: ...und from the built in speaker will be muted while the STV 250N Stereo Cable is connected to the camcorder Adjust the volume using the TV When you play back 16 9 movies on standard TV sets with a 4 3 a...

Page 45: ...proximate figures 32 GB built in memory FXP mode 4 hr 10 min XP mode 5 hr 45 min SP mode 9 hr 35 min LP mode 12 hr 15 min 8 GB built in memory FXP mode 1 hr XP mode 1 hr 25 min SP mode 2 hr 20 min LP...

Page 46: ...ories is recommended This product is designed to achieve excellent performance when used with genuine Canon accessories Canon shall not be liable for any damage to this product and or accidents such a...

Page 47: ...in the event of failure or other malfunction of such drive Canon USA shall have no responsibility under this limited warranty for use of the Equipment in conjunction with incompatible peripheral equi...

Page 48: ...URCHASE PRICE OF THE EQUIPMENT SOLD BY CANON USA AND CAUSING THE ALLEGED DAMAGE WITHOUT LIMITING THE FOREGOING YOU ASSUME ALL RISK AND LIABILITY FOR LOSS DAMAGE OR INJURY TO YOU AND YOUR PROPERTY AND...

Page 49: ...ior finish of the Equipment media nor does it apply to Equipment purchased outside Canada If the Equipment contains a hard disk drive Canon Canada recommends that data stored on that drive be duplicat...

Page 50: ...sans frais au Canada seulement M XICO CANON MEXICANA S DE RL DE CV Blvd Manuel vila Camacho No 138 Piso 17 Col Lomas de Chapultepec C P 11000 M xico D F M xico CANON U S A INC NEW JERSEY OFFICE 100 Ja...

Reviews: