background image

Image Effects

65

Image Effects

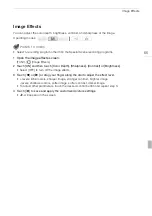
You can adjust the color depth, brightness, contrast, and sharpness of the image.

POINTS TO CHECK

• Select a recording program other than the Special Scene recording programs.

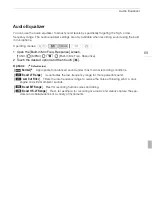
1 Open the image effects screen.

[FUNC.] 

 [Image Effects]

2 Touch [ON] and then touch [Color Depth], [Sharpness], [Contrast] or [Brightness].

• Select [OFF] to turn off the image effects. 

3 Touch  [

y

] or [

A

] or drag your finger along the dial to adjust the effect level.

• + levels: richer colors, sharper image, stronger contrast, brighter image.

- levels: shallower colors, softer image, softer contrast, darker image.

• To adjust other parameters, touch the desired control button and repeat step 3.

4 Touch  [

a

] to save and apply the customized picture settings.

Z

 will appear on the screen.

Operating modes:

Summary of Contents for VIXIA HF G10

Page 1: ...PUB DIM 1009 000 English Fran ais Espa ol st HD Camcorder Instruction Manual Cam scope HD Manuel d instruction Videoc mara HD Manual de Instrucciones...

Page 2: ...separation between the equipment and receiver Connect the equipment into an outlet on a circuit different from that to which the receiver is connected Consult the dealer or an experienced radio TV tec...

Page 3: ...ving Do not place on an unstable cart stand tripod bracket or table The product may fall causing serious injury to a child or adult and serious damage to the product A product and cart combination sho...

Page 4: ...e operating order 33 Heat The product should be situated away from heat sources such as radiators heat registers stoves or other products including amplifiers that produce heat CA 570 identification p...

Page 5: ...ld Manual controls at your fingertips The focus ring helps you achieve the focus you are looking for Furthermore you can assign certain frequently used functions to a customizable button and adjust th...

Page 6: ...oad recordings to your computer or a video sharing Web site Save or upload to the Web Standard Definition Convert your HD movies in the camcorder itself to standard definition files 0 133 High Definit...

Page 7: ...al Focus 46 Autofocus 47 Face Detection 48 Touch Track 50 Zooming 51 Using the Zoom Lever or Wireless Controller 51 Using the Touch Screen s Zoom Controls 52 Soft Zoom Control 53 Digital Tele Converte...

Page 8: ...96 Capturing a Video Snapshot Scene 96 Capturing Photos 97 6 Video Stories and Cinema Style 98 Using Story Creator to Create Video Stories 98 Creating a New Story 98 Recording a Scene within a Story 9...

Page 9: ...Video Sharing Web Sites 133 Converting Scenes into Standard Definition from the Date Index Screen 133 Connecting to the Computer and Uploading your Videos 134 Converting Scenes into Standard Definiti...

Page 10: ...quirements regarding the function described 0 Reference page number within this manual rReferences to sections of the Photo Application Instruction Manual included as a PDF file in the supplied Camcor...

Page 11: ...the following actions will cancel the self timer Pressing g when recording movies j Operating modes Brackets are used to refer to control buttons and menu options you will touch on the screen and to o...

Page 12: ...supplied with the camcorder CA 570 Compact Power Adapter incl power cord BP 808 Battery Pack WL D89 Wireless Controller incl CR2025 lithium button battery Stylus Pen HTC 100 S HDMI Cable STV 250N Ste...

Page 13: ...back movies Photo Applications Ver 35 Music Data Image Mix Data CD ROM referred in the manual as Camcorder Supplemental Disc Contains the following components Photo Application Software for saving ma...

Page 14: ...splay button 0 81 BATT INFO battery info button 0 152 4 Double memory card slot cover 5 Memory card slot X 0 33 6 Memory card slot Y 0 33 7 AV OUT terminal 0 117 119 X headphones terminal 0 71 8 COMPO...

Page 15: ...Names of Parts 15 1 MIC terminal 0 74 2 Grip belt 0 24 3 USB terminal 0 117 119 131 4 HDMI OUT terminal 0 117 118 5 REMOTE terminal 0 76 6 Built in speaker 0 88 6 2 1 5 4 3 Right side view...

Page 16: ...nal 0 20 6 Dioptric adjustment lever 0 22 7 CUSTOM customizable dial 0 83 8 CUSTOM customizable button 0 83 9 LCD touch screen 0 23 26 10 POWERED IS button 0 54 Assignable button 2 0 84 11 AF MF butto...

Page 17: ...Built in microphone 0 68 2 Zoom lever 0 51 3 Mode switch 0 27 4 Mini advanced shoe 5 ACCESS indicator 0 37 6 ON OFF CHG indicator 0 20 Green ON Orange Standby 0 43 Red Charging 0 20 7 POWER button 3 2...

Page 18: ...Names of Parts 18 1 Serial number 2 BATTERY RELEASE switch 0 21 3 Tripod socket 0 25 2 3 1 Bottom view...

Page 19: ...90 Press and hold for more than 2 seconds to switch between shooting and playback mode 3 MENU button 0 29 140 4 DISP onscreen display button 0 81 5 SET button 6 B stop button 0 86 7 PHOTO button 0 37...

Page 20: ...ord to the compact power adapter 2 Plug the power cord into a power outlet 3 Connect the compact power adapter to the camcorder s DC IN terminal 4 Attach the battery pack to the camcorder Press the ba...

Page 21: ...commend charging the battery pack in temperatures between 10 C and 30 C 50 F and 86 F If either the ambient temperature or the battery pack s temperature is outside the range of approx 0 C to 40 C 32...

Page 22: ...he lens and then turn the lens hood clockwise Be careful not to deform the lens hood Make sure that the lens hood is aligned with the thread Using the Viewfinder If it is difficult to use the LCD scre...

Page 23: ...t NOTES About the LCD and viewfinder screens The screens are produced using extremely high precision manufacturing techniques with more than 99 99 of the pixels operating to specification Less than 0...

Page 24: ...efer to Handling Precautions 0 164 Cleaning 0 167 Grip Belt and Straps Fasten the grip belt Adjust the grip belt so that you can reach the zoom lever with your index finger and the g button with your...

Page 25: ...sensor when you press the buttons You can rotate the LCD panel 180 degrees to use the wireless controller from the front of the camcorder NOTES When the camcorder cannot be operated with the wireless...

Page 26: ...om the camcorder will recognize as the main subject of the scene etc Drag While applying pressure swipe your finger up and down or left and right across the screen Used to scroll menus to browse throu...

Page 27: ...will be the same currently used for recording You can also press and hold B on the wireless controller for more than 2 seconds to switch between recording and playback mode Operating mode Mode switch...

Page 28: ...ch FUNC to access the FUNC panel and then touch the function you want to set or adjust You may need to drag your finger up and down the screen to find the control button of the desired function In mod...

Page 29: ...ouch the tab of the desired menu 4 Drag your finger up and down to bring the setting you want to change into the orange selection bar Menu items not available appear grayed out You can touch any menu...

Page 30: ...Touch 24H to use 24 hour clock or leave it unselected to use 12 hour clock AM PM 7 Touch OK to start the clock and close the setup screen NOTES You can adjust the date and time later on with the 6 Dat...

Page 31: ...UNC MENU 6 Time Zone DST Touching FUNC is necessary only when performing the procedure in a recording mode 2 Touch S to set the home time zone or V to set the time zone of your destination when you ar...

Page 32: ...ry cards with other devices such as digital recorders computers and card readers make sure that the external device is compatible with SDXC cards The table below summarizes compatibility by computer o...

Page 33: ...one in each memory card slot To use the wireless communication features of an Eye Fi card insert it into memory card slot Y Be sure you understand the information provided in Eye Fi Cards 0 33 before...

Page 34: ...order to upload them to the Web Relay Recording You can activate relay recording so if the memory you are using becomes full while recording movies the recording will continue uninterrupted on a memor...

Page 35: ...s operating mode Changing the memory used for recording movies Double Slot Recording Double slot recording allows you to record the same scene simultaneously to both memory cards This is a convenient...

Page 36: ...n while it is in progress All recordings will be erased and the memory can be used without any problem 4 Touch OK and then touch a IMPORTANT Initializing the memory will permanently erase all recordin...

Page 37: ...g first to check that the camcorder is operating correctly Preparing to Record 1 Attach a charged battery pack to the camcorder 0 20 2 Turn on the camcorder 3 Select the memory for recording 0 34 To u...

Page 38: ...icator will flash from time to time while the scene is being recorded During recording N will appear on the screen To take photos Touch PHOTO A green icon h will appear momentarily on the screen and t...

Page 39: ...o stabilize the shot while zooming in on faraway subjects telephoto Face detection 0 48 to get beautiful shots of people every time tracking the subject even if the person moves Touch Track 0 50 to tr...

Page 40: ...verify that Eye Fi cards have been approved in the country region of use See also Using an Eye Fi Card 0 136 Smart AUTO icons 1 The icon in parentheses appears under backlight conditions 2 This icon...

Page 41: ...to FUNC panel Zoom Decoration 7 menu Soft Zoom Control Zoom Speed Level Zoom Lever Zoom Speed Wireless Ctrlr Zoom Speed AF Mode Auto Slow Shutter Conversion Lens Camcorder Shake Indicator 8 menu Video...

Page 42: ...memory card slot Y will be uploaded automatically after setting the camcorder to playback mode if you are within the range of a configured network Always verify that Eye Fi cards have been approved in...

Page 43: ...icator turns back green and the camcorder is ready to record You can also pull out the viewfinder to start recording with the LCD panel closed IMPORTANT Do not disconnect the power source during stand...

Page 44: ...ins the last setting used even if you set the camcorder to mode MXP scenes will be converted to an image quality similar to that of FXP scenes Operating modes Approximate recording times Default value...

Page 45: ...o E PF24 or convert the movies to standard definition using the supplied software VideoBrowser Operating modes C 60i Standard 60 fields per second interlaced Standard frame rate of NTSC analog TV sign...

Page 46: ...e will be adjusted automatically You have the option to further adjust the focus manually as necessary 4 Turn the focus ring to adjust the focus The center of the screen will be magnified to help you...

Page 47: ...trols The peaking effect and black white picture will not appear in your recordings Autofocus When autofocus is activated the camcorder continuously adjusts the focus on the subject in the center of t...

Page 48: ...set to C 60i Standard When recording under dark conditions the focusing range narrows and the picture may appear blurred Autofocus may not work well on the following subjects or in the following cases...

Page 49: ...ng automatically on the subject s face Set assignable button 2 to Face Only AF 0 84 and press the button appears on the screen NOTES The camcorder may mistakenly detect the faces of non human subjects...

Page 50: ...ble frame will appear around the subject and track it as it moves Touch Cancel z to remove the frame and cancel the tracking NOTES Touching somewhere with a color or pattern unique to the subject will...

Page 51: ...zoom lever operates at a variable speed press gently for a slow zoom press harder for faster zooms You can also use the zoom buttons on the wireless controller Setting the Zoom Speed You can set the z...

Page 52: ...from full wide angle to full telephoto When the zoom speed is too fast approximately 2 seconds end to end the camcorder will have more trouble focusing automatically while zooming Using the Touch Scre...

Page 53: ...FUNC ZOOM 4 Touch digital tele converter and then touch a Touch again before closing the screen to deactivate the digital tele converter The center of the screen will be enlarged approximately 2 times...

Page 54: ...such as when shooting while remaining stationary and is suitable for shooting natural looking scenes Use this setting when recording movies with the optional wide converter or tele converter Off Use t...

Page 55: ...d The smaller the AGC limit the picture will be darker but will have less the noise POINTS TO CHECK Select a recording program other than the Special Scene recording programs and y Manual Exposure 1 O...

Page 56: ...speed settings Available shutter speed settings when the frame rate is set to E PF24 or 24P Available aperture value settings Because 7 ND Filter is set to O Automatic by default ND filter settings wi...

Page 57: ...icker select B Shutter Pri AE and set the shutter speed to 1 100 C Aperture Pri AE The actual range of values available for selection will vary depending on the initial zoom position When setting a nu...

Page 58: ...speed and gain to achieve the desired exposure 1 Activate the y Manual Exposure recording program FUNC Rec Programs y Manual Exposure 2 Touch the control button of the setting you wish to adjust 3 To...

Page 59: ...to shoot is noticeably brighter darker than the general brightness of the image POINTS TO CHECK Select a recording program other than M Fireworks or y Manual Exposure 1 Open the exposure adjustment sc...

Page 60: ...ve 1 Touch 5 2 Touch Highlights and then touch f Touch Normal to return the camcorder to normal Touch AE settings To use backlight correction When recording in situations in which the subject is const...

Page 61: ...r at a white object so it fills the whole screen and touch Set WB When the adjustment is completed g stops flashing and disappears The camcorder will retain the custom white balance even if you turn i...

Page 62: ...better than with Y Automatic Using a custom white balance may provide better results in the following cases Changing lighting conditions Close ups Subjects in a single color sky sea or forest Under m...

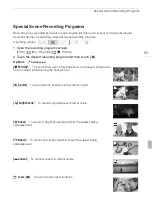
Page 63: ...g program and then touch a Options Default value Operating modes FPortrait The camcorder uses a large aperture to achieve a sharp focus on the subject while blurring the background GSports To record s...

Page 64: ...udy days or in shaded places Check the image on the screen p Low Light Moving subjects may leave a trailing afterimage Picture quality may not be as good as in other modes White points may appear on t...

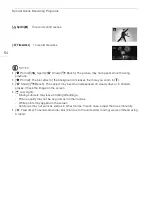
Page 65: ...olor Depth Sharpness Contrast or Brightness Select OFF to turn off the image effects 3 Touch y or A or drag your finger along the dial to adjust the effect level levels richer colors sharper image str...

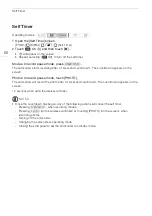
Page 66: ...cord pause mode touch PHOTO The camcorder will record the photo after a 10 second countdown The countdown appears on the screen 2 seconds when using the wireless controller NOTES Once the countdown ha...

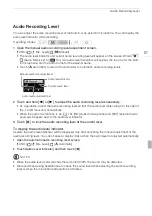
Page 67: ...ht of the 12 dB mark only occasionally When the audio mix function is on 0 70 INT built in microphone and EXT external audio source will appear next to the audio level indicator 3 Touch a to lock the...

Page 68: ...in microphone s directionality cannot be changed When an external microphone is attached to the mini advanced shoe When an external microphone is connected to the MIC terminal with 7 Audio Mix set to...

Page 69: ...sired option and then touch a Options Default value Operating modes Normal Appropriate for balanced sound under most normal recording conditions Boost LF Range Accentuates the low frequency range for...

Page 70: ...al source to the MIC terminal 2 Open the MIC Terminal Input screen FUNC MENU 7 MIC Terminal Input 3 Touch External Audio or Microphone and then touch f This step is not necessary after connecting an o...

Page 71: ...hen touch f 3 Connect the headphones to the AV OUT X terminal 4 Back in the menu touch Volume 5 Touch c or d to adjust the volume and then touch a You can also drag your finger along the Headphones ba...

Page 72: ...use the accessories refer also to the instruction manual of the accessory used 1 Open the mini advanced shoe cover 2 Attach the optional accessory to the mini advanced shoe When a compatible accessory...

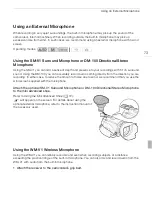
Page 73: ...om the direction you are recording In either case to reduce the amount of noise due to wind we recommend that you use the wind screen supplied with the microphone Attach the optional SM V1 Surround Mi...

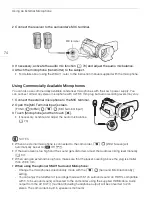
Page 74: ...one and then touch a If necessary activate and adjust the audio mix balance 0 70 NOTES When an external microphone is connected to the camcorder 7 Wind Screen will automatically be set to B Off Z If t...

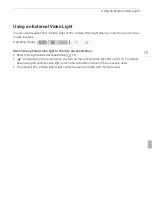
Page 75: ...Attach the optional video light to the mini advanced shoe Refer to Using the Mini Advanced Shoe 0 72 will appear on the screen when you turn on the optional video light ON or AUTO For details about us...

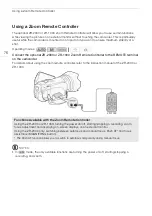
Page 76: ...r For details about using the zoom remote controller refer to the instruction manual of the ZR 2000 or ZR 1000 NOTES In mode the only available functions are turning the power on off starting stopping...

Page 77: ...r Bars Test Tone screen FUNC MENU 8 Color Bars Test Tone 2 Touch the desired option and then touch a Options Default value Operating modes B Off Select this option if you do not intend to use the colo...

Page 78: ...e exposure using the dial at the bottom of the screen or by touching inside the e frame 0 59 You can see the results immediately in the waveform monitor Displaying the Waveform Monitor during y Manual...

Page 79: ...shot screen FUNC Z Video Snapshot Alternatively you can set an assignable button to Z Video Snapshot 0 84 Skip to step 3 2 Touch A On A blue border appears on the screen Touch B Off to return to norma...

Page 80: ...seconds before g was pressed NOTES The camcorder will not record the full 3 seconds prior to pressing g if the button was pressed within 3 seconds of having turned on pre recording or having finished...

Page 81: ...t of the icons and displays that appear automatically but will not remove control buttons FUNC PHOTO etc and onscreen displays that were turned on manually for example onscreen markers or the audio le...

Page 82: ...der appears in green To fade in out Press g in record pause mode M to start recording with a fade in Press g while recording N to fade out and pause the recording NOTES When you apply a fader not only...

Page 83: ...o Tv Av When you set the recording program to B Shutter Pri AE or C Aperture Pri AE priority you can adjust the shutter speed or aperture value with the CUSTOM dial Manual Exposure When you set the re...

Page 84: ...r assignable button 2 Using an Assignable Button After you assign a function to one of the buttons press the button to activate the function Operating modes BLC Always On Turns backlight correction on...

Page 85: ...d to the memory card 4 Touch OK and then touch a Loading Camera Settings from a Memory Card 1 Insert a memory card with menu settings into memory card slot Y 2 Open the Backup Menu Settings 7 screen F...

Page 86: ...page move it toward P to show 6 scenes per page Operating modes AMemory being read BRecording date CDivision line between recording dates DDrag your finger left for the next index page EDrag your fin...

Page 87: ...ayback pause touch the screen again to hide the playback controls During playback AJump to the beginning of the scene Double tap to jump to the previous scene BJump to the beginning of next scene CPau...

Page 88: ...to play back with this camcorder movies recorded on a memory card using another device NOTES You can turn off the recording date and time display or change the information displayed with the y Data Co...

Page 89: ...arge number of recordings ARecording date BDrag your finger left to go to the next date with recordings CDrag your finger up and down to browse through the scenes recorded in the displayed date DDrag...

Page 90: ...ct the content you want to play back 1 Date Scenes organized by recording date Gallery Scenes organized by story 0 108 2 Photos Photos index screen u SD Movies only when a memory card is selected Scen...

Page 91: ...t Delete 3 Touch the desired option When you select Select perform the following procedure to select the individual scenes you want to delete before touching Yes 4 Select Yes Touch Stop to interrupt t...

Page 92: ...ion screen Edit Story Delete 3 Touch one or more of the rating buttons to select all the applicable scenes A grayed out rating button indicates that no scenes in the story have been given that particu...

Page 93: ...ve belonged to regardless of the method used to delete them Save copies of important scenes before deleting them 0 128 Observe the following precautions while the ACCESS indicator is on or flashing wh...

Page 94: ...division point to the end of the scene will appear as a new scene in the index screen NOTES When advancing reversing frames while dividing the scenes the interval between frames is about 0 5 seconds...

Page 95: ...of the scene Below it the timeline ruler shows frames taken from the scene at fixed intervals 3 Touch the desired frame in the timeline ruler to start playing back the scene from that point To change...

Page 96: ...ch B to stop the playback NOTES A video snapshot scene can be captured only during playback it cannot be captured during playback pause mode The captured video snapshot scene is saved to the same memo...

Page 97: ...ch frame captured as a separate photo 4 Touch B to stop the playback IMPORTANT When capturing photos on an Eye Fi card in memory card slot Y photos will be uploaded automatically if you are within the...

Page 98: ...Story 1 Start Story Creator mode FUNC Story Creator Alternatively you can set an assignable button to Story Creator 0 84 If the memory already contains other stories the story selection screen will a...

Page 99: ...bottom of the screen 2 Drag your finger up down to select another category and touch the orange frame on the right number of scenes To exit Story Creator mode 1 Touch FUNC and then touch Story Creato...

Page 100: ...want to add new scenes The list of story scenes will appear The orange frame on the right will show how many scenes you have recorded in each story scene category 3 Drag your finger up down to select...

Page 101: ...fore touching OK Cinema Standard offers different adjustment options than the other cinema look filters The selected cinema look filter will be applied and its number will appear on the control button...

Page 102: ...os cannot be recorded while the camcorder is set to mode When recording in mode the 8 Frame Rate setting will be set to E PF24 1 Cinema Standard 2 Vivid 3 Dream 4 Cool 5 Nostalgic 6 Sepia 7 Old Movies...

Page 103: ...decorations You can decorate scenes as they are being recorded during playback or just before converting them to standard definition Decorating Scenes while Recording 1 Open the decoration screen FUN...

Page 104: ...and its color You can also save a canvas or load a previously saved canvas D Animated Stamps Select animated stamps to add to your decoration E Captions Add the date date and time story title or stor...

Page 105: ...ns screen will appear 2 Touch Date or Time When recording a scene using Story Creator you can also select Title the story s title or Story Scene the story scene category 3 Select the desired text sett...

Page 106: ...ottom bar to adjust the overall transparency of the image as necessary 7 Touch f to mix your image with live video Mixing Your Own Images with Live Video You can use images you make on your computer f...

Page 107: ...a memory will erase any Pens and Stamps drawing canvas and image files you may have saved The image mix frames that come pre installed in the built in memory will be restored after it is initialized A...

Page 108: ...e Play by Rating screen Story Details Play by Rating 4 Touch the desired rating and touch f twice 5 Touch the story s thumbnail to start the playback All applicable scenes will be played back from the...

Page 109: ...lowing precautions while the ACCESS indicator is on or flashing Failing to do so may result in permanent data loss Do not open the double memory card slot cover Do not disconnect the power source or t...

Page 110: ...en drag your finger up down to select the scene you want to rate 3 Touch the orange box on the right to open the Edit Scene screen 4 Touch the control button of the desired rating and touch f twice to...

Page 111: ...e memory card you will need to transfer the music tracks to the memory card in advance See the NOTES section 0 113 1 Open the gallery or date index screen b Gallery or 1 Date 2 Open the Select Music s...

Page 112: ...b Gallery or 1 Date 2 Open the External Audio Input screen MENU y External Audio Input 3 Touch A On 4 Connect the external player to the camcorder s MIC terminal 5 Adjust the audio input as necessary...

Page 113: ...itialized To transfer music files from the supplied Camcorder Supplemental Disc to the memory card Windows users Use the supplied PIXELA s software For details refer to the Software Guide PDF file of...

Page 114: ...e Edit Scene screen and touch Copy or Move 4 Select the destination Drag your finger right left to select the desired story and touch its thumbnail Then drag your finger up down to select the desired...

Page 115: ...t the story whose thumbnail you want to change Drag your finger right left to bring the desired story to the front 3 Open the Story Thumbnail screen Story Details Edit Story Story Thumbnail 4 Locate t...

Page 116: ...o the front 3 Open the Edit Title screen Story Details Edit Story Edit Title 4 Use the virtual keyboard to change the title 5 Touch OK f f to return to the gallery NOTES When you import files with the...

Page 117: ...connection B do not forget the audio connections using the AV OUT X terminal 2 AV OUT X Terminal Access Open the LCD panel and terminal cover Sound from the built in speaker will be muted while the ST...

Page 118: ...AV Headphones to H AV HTC 100 S HDMI Cable supplied HDMI mini connector standard HDMI connector About the HDMITM connection The HDMI High Definition Multimedia Interface connection A is a convenient a...

Page 119: ...m as background music Connection C Composite Video Type Analog Quality Standard definition Output only Connect to a standard TV or a VCR with audio video input terminals Change the following settings...

Page 120: ...ed the camcorder Refer to the instruction manual of the connected TV 4 Turn on the camcorder and set it to or mode Play back the movies or photos NOTES To correctly play back movies recorded with x v...

Page 121: ...ard P to show 6 photos per page Operating modes AMemory being read BDrag your finger left for the next index page CDrag your finger right for the previous index page DOpen the index selection screen 0...

Page 122: ...oll bar 1 Touch the screen to display the playback controls 2 Touch g 3 Drag your finger left and right along the scroll bar and then touch f IMPORTANT Observe the following precautions while the ACCE...

Page 123: ...m the following procedure to select the individual photos you want to delete before touching Yes Touch Stop to interrupt the operation while it is in progress Some photos will be deleted nevertheless...

Page 124: ...iew 4 Touch the screen to display the playback controls then touch A to start the slideshow 5 Start the music playback on the external player Slideshow linked to the external audio 3 Start the music p...

Page 125: ...eft right until the desired date appears in the title bar 2 Open the screen to copy scenes Edit Copy f97 or Copy 497 3 Touch the desired option and then touch Yes When you select Select perform the fo...

Page 126: ...u are viewing photos recorded in the built in memory or on memory card X f or 4 appears next to the photo number 2 Touch the screen to display the playback controls 3 Open the screen to copy photos Ed...

Page 127: ...ge the camcorder s operating mode When copying photos onto an Eye Fi card in memory card slot Y photos will be uploaded automatically if you are within the range of a configured network Always verify...

Page 128: ...Power the camcorder using the compact power adapter If the camcorder is connected to the computer while it is powered only by the battery pack previously saved video files cannot be transferred back...

Page 129: ...e computer using the supplied USB cable Connection D Refer to Connection Diagrams 0 119 Camcorder When the connection is successfully established USB Connection appears on the screen 4 Save the photos...

Page 130: ...Windows Vista Windows XP and Mac OS X Your camcorder is equipped with the standard Picture Transfer Protocol PTP allowing you to transfer photos JPEG only simply by connecting the camcorder to a compu...

Page 131: ...nes you want to copy Select an option other than All for PC only Camcorder When the connection is successfully established USB Connection appears on the screen Recording Details will vary depending on...

Page 132: ...playback By default onscreen displays will be embedded in the output video signal You can change the displays by repeatedly pressing h 0 81 5 External recorder Start recording when the scene you wish...

Page 133: ...ient available space 3 Open the date index screen Check that you have selected the f tab built in memory or 4 tab memory card X To convert all the scenes recorded on a specific date drag your finger l...

Page 134: ...scene you can have the camcorder divide it into 10 minute SD movies to make uploading easier 1 Touch 5 2 Touch Auto Divide 3 Touch On and then touch f twice Connecting to the Computer and Uploading y...

Page 135: ...ory Check that you have selected the f tab built in memory or 4 tab memory card X 2 Open the Play by Rating screen Story Details Play by Rating 3 Touch the desired rating and then touch f 4 Press Z an...

Page 136: ...roval is required to use Eye Fi cards in many countries or regions Without approval use of the card is not permitted If it is unclear whether the card has been approved for use in the area please chec...

Page 137: ...ting If the LOCK switch on the Eye Fi card is set to prevent writing you will not be able to turn the wireless communication on off and the status icon will change to o To use wireless communication m...

Page 138: ...b Shade c Cloudy e Fluorescent f Fluorescent H d Tungsten Color Temperature Set 1 Set 2 z z 61 P AGC Limit z Automatic y Manual z z 55 X Focus Touch AF frame 2 manual focus Toggle on or off d peaking...

Page 139: ...Review Recording 1 z z 42 Control Button Date Index Screen SD Movies Index Screen Playback Pause 0 Copy f97 1 Copy 497 1 date Select All Scenes 125 Convert HD9SD f97 1 Convert HD9SD 497 1 date Select...

Page 140: ...z Soft Zoom Control B Off Start Stop Start Stop z z 53 Zoom Speed Level J Fast K Normal L Slow z z 51 Zoom Lever Zoom Speed I variable speed constant speed When is selected 1 16 8 z z 51 Wireless Ctr...

Page 141: ...ces with insufficient lighting Minimum shutter speed used 1 30 1 12 when the frame rate is set to E PF24 or 24P 1 15 when it is set to o PF30 The auto slow shutter can only be activated when the recor...

Page 142: ...icon 5 levels to help you be aware of excessive movement Wind Screen The camcorder automatically reduces the background sound of wind when recording outdoors Some low frequency sounds will be suppres...

Page 143: ...em Setting options 1 2 0 Select Music B Off A On 1 When A On list of music tracks 1 b Original sound Background music z z 111 External Audio Input B Off A On When A On External Player Link Toggle on o...

Page 144: ...e In the information screen of a memory card you can also check its Speed Class The Total space shown for the built in memory indicates actually usable space It may be slightly smaller than the nomina...

Page 145: ...e file name of a photo numbered 101 0107 is IMG_0107 JPG stored under the folder DCIM 101CANON 6 System Setup Menu item Setting options y CINEMA 1 2 0 Output Onscreen Displays A On B Off z z z z Langu...

Page 146: ...z Autostart Decoration A On B Off z z Power Saving Mode Auto Power Off B Off A On z z z z Quick Start Standby Off 10 min 20 min 30 min Initialize f g f Built in Mem 4 Mem Card A 7 Mem Card B z z z z 3...

Page 147: ...ggle On Off Each press of the button will turn the Powered IS function on and off Set WB Priority You can press an assignable button set to m WB Priority to switch between the current white balance an...

Page 148: ...er The remote control of the TV can only be used to play back movies or photos or mode only If the camcorder is connected to the TV while it is set to a recording mode depending on the TV used turning...

Page 149: ...nel 0 28 2 Smart AUTO 0 39 3 Face detection frame 0 48 4 Touch Track frame 0 50 5 Control button PHOTO Take a photo 0 38 97 6 Control button Return to the list of story scenes 0 99 7 Memory operation...

Page 150: ...ital tele converter 0 53 27 Frame rate 0 45 28 Remaining recording time 4 7 On the memory card f In the built in memory 3 5 Relay recording 0 34 29 Image effects 0 65 30 Backlight correction 0 60 31 M...

Page 151: ...ess communication 0 136 54 Scene number 55 Data code 0 81 143 56 Volume and background music balance controls 0 88 112 Viewing Photos 57 9 59 60 61 55 58 62 63 57 Control button MENU Open the setup me...

Page 152: ...rged one When you attach an empty battery pack the power may turn off without displaying Depending on the conditions under which the camcorder and the battery pack are used the actual battery charge m...

Page 153: ...ks not recommended by Canon for use with this camcorder cannot be charged using this camcorder If you are using a battery pack recommended by Canon for use with this camcorder there may be a problem w...

Page 154: ...memory 0 36 Movies or photos cannot be recorded properly This may occur as movies and photos are recorded deleted over time Save your recordings 0 128 and initialize the memory 0 36 Cannot record a p...

Page 155: ...k O You cannot select more than 100 scenes photos individually Select the All Scenes or All Photos option instead of Select Indicators and Onscreen Displays lights up in red Battery pack is exhausted...

Page 156: ...ensors when recording under some types of fluorescent mercury or sodium lamps To reduce the symptoms set the recording program to Programmed AE or Shutter Pri AE 0 56 This is not a malfunction No pict...

Page 157: ...et the camcorder to playback mode or remove the WM V1 Opening the LCD panel may help when the wireless connection is not strong enough During wireless transfer wireless communication may stop when the...

Page 158: ...transfer the photos on the memory card To transfer the photos in the built in memory copy them to the memory card in advance 0 125 List of Messages Accessing the memory card Do not remove the memory c...

Page 159: ...128 and initialize the memory 0 36 Transfer back the backup files and try dividing the scene again Use the supplied software VideoBrowser to save the scene and divide it on the computer Cannot enter s...

Page 160: ...blem persists use a different memory card Cannot record movies in the built in memory Initialize only using the camcorder The camcorder s built in memory was initialized using a computer Initialize th...

Page 161: ...order power the camcorder using the compact power adapter and only then connect it to the computer using the supplied USB cable Error writing on the memory card Data may be recovered if the memory car...

Page 162: ...ry already contains the maximum number of stories 98 user created stories in any one given memory Delete some stories 0 92 or change the recording memory for movies 0 34 Scene recorded using another d...

Page 163: ...card into memory card slot X Insert it into memory card slot Y Too many photos Disconnect the USB cable Disconnect the USB cable Try using a memory card reader or decrease the number of photos on the...

Page 164: ...lectromagnetic fields such as above TVs near plasma TVs or mobile phones Do not point the lens or viewfinder at strong light sources Do not leave the camcorder pointed at a bright subject Do not use o...

Page 165: ...earing the Intelligent System mark If you attach to the camcorder battery packs that are not genuine Canon battery packs will appear and the remaining battery time will not be displayed Memory Card We...

Page 166: ...gov hazardouswaste perchlorate for details Disposal When you delete movies or initialize the memory only the file allocation table is altered and stored data is not physically erased When you dispose...

Page 167: ...er rapidly between hot and cold temperatures may cause condensation water droplets to form on its internal surfaces Stop using the camcorder if condensation is detected Continued use may damage the ca...

Page 168: ...ack on a TV Screen You can only play back your recordings on TVs compatible with the NTSC system NTSC is used in the following regions countries Americas All of North America and Central America most...

Page 169: ...y with the mini advanced shoe Availability differs from area to area VL 5 Video Light VFL 2 Video Flash Light WM V1 Wireless Microphone BP 808 BP 809 B BP 809 S BP 819 BP 827 Battery Pack CG 800 Batte...

Page 170: ...ng times given in the following table are approximate and vary according to charging conditions and initial charge of the battery pack Recording and playback times given in the following tables are ap...

Page 171: ...455 min FXP 335 min 355 min 205 min 220 min 460 min XP 345 min 370 min 210 min 225 min 470 min SP 345 min 370 min 210 min 225 min 475 min LP 345 min 370 min 210 min 225 min 475 min Battery pack Recor...

Page 172: ...o light enables you to record brightly in color even in dark places It attaches to the camcorder s mini advanced shoe for cable free operation VFL 2 Video Flash Light This video flash light allows you...

Page 173: ...le to control functions such as the start and stop of recording the zoom and the focus functions without touching the camcorder This is particularly useful while the camcorder is mounted on a tripod a...

Page 174: ...D H58W Wide converter 4892B001AA Protect Filter 58 mm 2595A002AA ND4L Filter 58 mm 2596A002AA ND8L Filter 58 mm 2597A002AA VL 5 Video Light 3186B001AA VFL 2 Video Flash Light 3574B001AA WM V1 Wireless...

Page 175: ...0 frame rate are converted and recorded on the memory as 60i Recording Media Built in memory 32 GB SD SDHC SD High Capacity or SDXC SD eXtended Capacity memory card not included Maximum Recording Time...

Page 176: ...Video Recordings MXP FXP mode 1920 x 1080 pixels XP SP LP mode 1440 x 1080 pixels Size of Photos 1920 x 1080 pixels Terminals AV OUT X Terminal 3 5 mm minijack output only dual purpose terminal also f...

Page 177: ...in Weight camcorder body only 545 g 1 2 lb CA 570 Compact Power Adapter Power supply 100 240 V AC 50 60 Hz Rated output consumption 8 4 V DC 1 5 A 29 VA 100 V 39 VA 240 V Operating temperature 0 40 C...

Page 178: ...SIC_01 WAV to MUSIC_99 WAV About the image files for the image mix function The specifications of image files that can be used with the image mix function are as follows Image size 1920x1080 pixels Fi...

Page 179: ...ndensation 167 Connections to external devices 118 Copying recordings to a memory card 125 CUSTOM button 83 CUSTOM dial 83 D Data code 81 143 Date and time 30 Decoration 103 Deleting Movies 91 Photos...

Page 180: ...Remote sensor 25 REMOTE terminal 76 Resetting all camcorder settings 156 Reviewing recordings 42 S Saving recordings Transferring to a computer 128 Using external video recorders 131 Scan reverse rec...

Page 181: ...181 Z Zebra pattern 59 Zoom 51 Digital zoom 141 Soft zoom control 53 Zoom speed level 51...

Page 182: ...ishandling accident improper maintenance or failure to follow operating instructions B If the Equipment is defective as a result of leaking batteries sand dirt or water damage C If defects or damages...

Page 183: ...finish of the Equipment media nor does it apply to Equipment purchased outside Canada If the Equipment contains a hard disk drive Canon Canada recommends that data stored on that drive be duplicated o...

Page 184: ...Canada seulement M XICO CANON MEXICANA S DE RL DE CV Blvd Manuel vila Camacho No 138 Piso 17 Col Lomas de Chapultepec C P 11000 M xico D F M xico CANON U S A INC NEW JERSEY OFFICE 100 Jamesburg Road...

Reviews: