background image

19

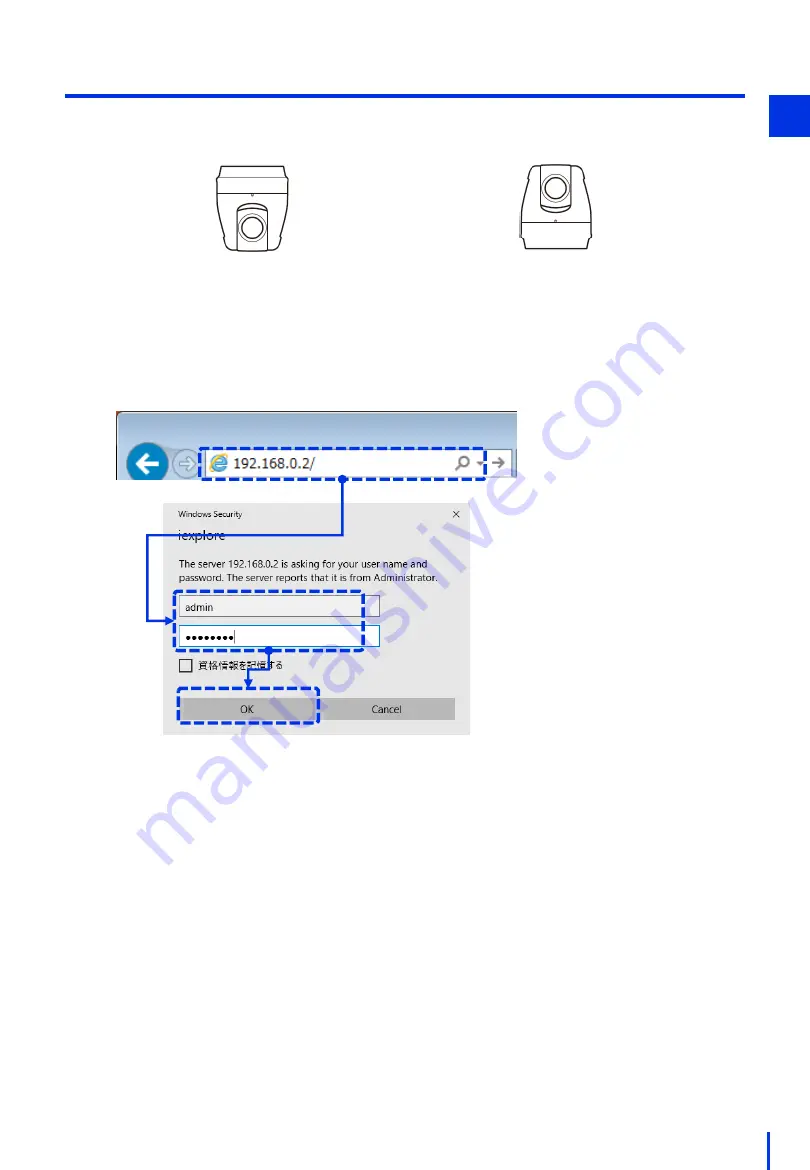
(8) Configure the Camera's Video Flip Setting

Configure the video flip setting according to the condition in which the camera is installed.

1

Suspended from the ceiling

→ Enable video flip

Placed on a desk

→ Disable video flip

Open a browser, and enter the camera's IP address "192.168.0.2" in the address bar.

Enter the user name (example: admin) and the password (example: password), and 

then click [OK].

1

Summary of Contents for VB-H45

Page 1: ...elopment and is provided only for supplemental use in verification procedures It should not be distributed to the general public Please be aware that some of the information that is included is not co...

Page 2: ...he manuals and disclaimer information for the software and cameras that are used 2 Software Versions Operation procedures and window images might vary depending on the firmware version of the network...

Page 3: ...e After Completing Work 53 3 Edit the Flowchart 34 Chapter 1 Camera Settings Required Devices 05 6 Reference Using the Camera Management Tool to Find the Camera s IP Address 16 2 Connect the Camera to...

Page 4: ...4 Camera Settings...

Page 5: ...configuring it Proceed to 1 Reset the Camera to the Factory Settings Case 2 I want to configure a camera that has the factory default settings Proceed to 2 Connect the Camera to a PC Case 3 I know the...

Page 6: ...network camera s LED comes on and the camera moves slightly in the pan and tilt directions this setting is complete 2 For VB H45 and VB S30D Mk II The following settings will be applied when you rese...

Page 7: ...92 168 0 90 Administrator name admin Administrator password password Use a LAN cable to connect the camera to the power supply port on the PoE hub and turn ON the power to the PoE hub 1 PoE hub PoE Po...

Page 8: ...er than the camera and the Windows PC Otherwise the identical IP addresses might be used 1 PoE PoE Non PoE Non PoE Camera unit Windows PC Turn ON the power to the Windows PC and the PoE hub It is ok i...

Page 9: ...etwork camera settings Change the PC s IP address to 192 168 100 100 Although the IP address can be changed to a value that is appropriate for the environment 192 168 100 xx xx 1 to 254 avoid using 19...

Page 10: ...rnet Protocol Version 4 TCP IPv4 and then click Properties 5 Right click Local Area Connection win7 or Ethernet win10 and select Properties from the menu that is displayed 4 Windows 7 Windows 10 Windo...

Page 11: ...ddress and enter the following settings IP address example 192 168 100 100 Subnet mask 255 255 255 0 Click OK 6 Windows 7 Windows 10 Close Local Area Connection Properties Win 7 or Ethernet Properties...

Page 12: ...2 Type ipconfig in the command prompt and press the Enter key 3 Check the IPv4 address Enter the administrator name and password that you want to set and then click Apply and reboot Administrator Name...

Page 13: ...void using the same IP address as any other device on the network In particular do not use the following default IP addresses of the related devices 3 1 Network Device IP Address Subnet Mask Image pro...

Page 14: ...ing up When the network camera s LED comes on and the camera moves slightly in the pan and tilt directions the startup process is complete The following message is displayed on the browser but it is s...

Page 15: ...an be changed to a value that is appropriate for the environment 192 168 0 xx xx 1 to 254 be careful to avoid using the same IP address as any other device on the network In particular do not use the...

Page 16: ...Camera s IP Address 16 1 Install the Camera Management Tool from the CD ROM that is included with the camera 1 You can use the Camera Management Tool to search for a camera with an unknown IP address...

Page 17: ...ext click Search 3 Use the Camera Management Tool to search for a camera All network cameras that are on the same network are shown The IP address is shown in the IPv4 Address column Industrial camera...

Page 18: ...admin and the password example password and then click OK 1 Access the network camera and set the JPEG compression ratio Select the Video and Audio Video menu In the JPEG section change Video Size Up...

Page 19: ...e condition in which the camera is installed 1 Suspended from the ceiling Enable video flip Placed on a desk Disable video flip Open a browser and enter the camera s IP address 192 168 0 2 in the addr...

Page 20: ...amera Camera menu In the Installation Conditions section change Video Flip to either Enable or Disable Click Apply 2 1 In the following dialog box click OK Suspended from the ceiling Disable Placed on...

Page 21: ...21 Device Connections...

Page 22: ...pe 5 PoE Hub no specific model Power supply to optional cameras required Hub with 2 or more ports required 6 LAN cable no specific model Straight Cat 6 or better recommended Minimum 2 cables required...

Page 23: ...dress 192 168 0 2 The default IP addresses for network devices are shown below The steps described in this manual assume that no changes are made to these IP addresses Network Device IP Address Subnet...

Page 24: ...nd of the cable to the PoE hub Be sure to use the center LAN port 3 Use a cable to connect the display to a display port on the image processing controller It can be connected to either port If there...

Page 25: ...k camera to the power supply port on the PoE hub 4 PoE hub PoE PoE Non PoE Non PoE Camera unit Make sure that the image processing controller is turned OFF switched to and then connect the controller...

Page 26: ...make sure that all cables are connected securely 6 Turn ON the power to the image processing controller Flip the switch to the I position Confirm that the green LED light comes on and that an image a...

Page 27: ...27 Vision Edition Settings...

Page 28: ...nfigured in Chapter 1 to register the camera 3 Edit the Flowchart Create a flowchart for the image processing Use 2D code recognition in this example 4 Configure Capture Settings and Register a Master...

Page 29: ...in window press Job Settings 1 The Job Settings window opens Press the New Job button and select New Job You can leave the job name as it is or change it to a name of your choice 2 Note If a job name...

Page 30: ...ion press the button next to JOB 1 select the JOB that was created above and then press Open 3 If the specified JOB file name is displayed as shown in the figure on the left and each button is enabled...

Page 31: ...s the camera icon button to register the camera 1 Note If the camera cannot be connected perform the following steps Confirm the camera s LED is ON Confirm the LAN cables are connected Double check th...

Page 32: ...en window press the OK button This completes the registration of the camera Detailed image capture conditions will be configured in a separate procedure 3 Note If the image is flipped refer to Chapter...

Page 33: ...u are connecting only 1 camera this step can be omitted Click Master Image Settings Under 1 Select Camera click Add 2 Click Add Select the camera to add and then click OK Camera 1 is preregistered Cli...

Page 34: ...34 3 Edit the Flowchart Click the Edit Flowchart button From the list of unit templates on the left drag drop 2D Code Reader into the flowchart area 3...

Page 35: ...is connected Use the same steps to connect the 2DCOD 002 and End units Click Disconnect at the top of the flowchart area Click CAPT 001 and then click End Make sure that the flow is disconnected Final...

Page 36: ...f the lens Print out this page at A4 size and then cut out the QR code shown below and affix it to a box or other object 1 QR code sample 1 5 m Configure the capture parameters In the Edit Flowchart w...

Page 37: ...Configure the Camera s Video Flip Setting Memo Although it is ok to turn on 180 rotation here the direction of rotation will be opposite of when setting the pan and tilt Therefore we recommend configu...

Page 38: ...hen adjust the pan tilt and zoom so that the QR code appears in the center of the screen The image zooms in more with a smaller zoom value 3 Memo Double click a value to display the window for enterin...

Page 39: ...is not required Click the Capture 1 tab The camera focuses automatically on the subject in the center of the screen and then the mode automatically changes to Manual Note If the mode does not change t...

Page 40: ...lick Add Image Select the added Master Image 001 and then click Capture Image Click Register A preview of the registered image is displayed Click OK to close the Master Image Settings window Click OK...

Page 41: ...camera is used to capture images at multiple points or when the focus mode is set to Auto in particular failing to set a delay time could cause images to be captured before focus movement is complete...

Page 42: ...code recognition region In the Edit Flowchart window double click 2DCOD 002 1 Double click Select Master Image001 Select 001 Capture Click Edit Drag to create a search region that encloses the QR cod...

Page 43: ...43 Click the Configuration tab Unselect Require data dict validation Make sure that the QR code is recognized as shown in the figure below and then click OK 3...

Page 44: ...display options such as showing the recognition results This section describes how to display the number of QR codes that are recognized on the window Configure the onscreen information settings 1 Cli...

Page 45: ...45 For Displayed Text enter Code Count Change Size to 36 Click OK 3 Click Add Value...

Page 46: ...For Value set Unit 002 2D Code Reader Code Count and Output Value Change the number of decimal places to 0 Change X to 230 Change Size to 48 Click OK Click OK to close the Onscreen Info Settings windo...

Page 47: ...K NG judgement that is displayed on the top right of the window Here configure the setting so that judgement result for the 2D code reader is displayed 1 Click Main Screen Settings For Main Screen s J...

Page 48: ...48 Operation Check...

Page 49: ...bugging in Offline Mode First perform debugging in offline mode 2 Prepare for Online Mode Set the trigger mode to Manual Trigger 3 Perform Operation in Online Mode Finally switch to online mode and st...

Page 50: ...n Offline Mode At the top of the Vision Edition main window press Edit Flowchart 1 Place the flowchart so that it can be seen in full as shown in the figure below Click the trigger to execute the JOB...

Page 51: ...main window press External Connection Settings 1 Set the Trigger setting to Manual Trigger press the Timer button and then set the Trigger Count to 1 2 Select Manual Trigger Press the Timer button Se...

Page 52: ...form Operation in Online Mode At the top of the Vision Edition main window press the offline button 1 This indicates online mode Press the OK button Click the trigger to execute the JOB The following...

Page 53: ...age processing controller 4 Procedure After Completing Work At the top of the Vision Edition main window press the online button to switch to offline mode 1 This indicates offline mode Close Vision Ed...

Page 54: ...is OFF 3 Note Unlike normal office computers this image processing controller has a mechanism for protecting the data on its main disk However data can be corrupted if the power is turned OFF while d...

Reviews: