background image

52

SETTING 

UP FUNCTIONS USING 

MENUS

The projector automatically detects the
input signal (ANALOG RGB) from the
connected computer to make the optimum
settings for the total number of dots,
tracking, and so on. 

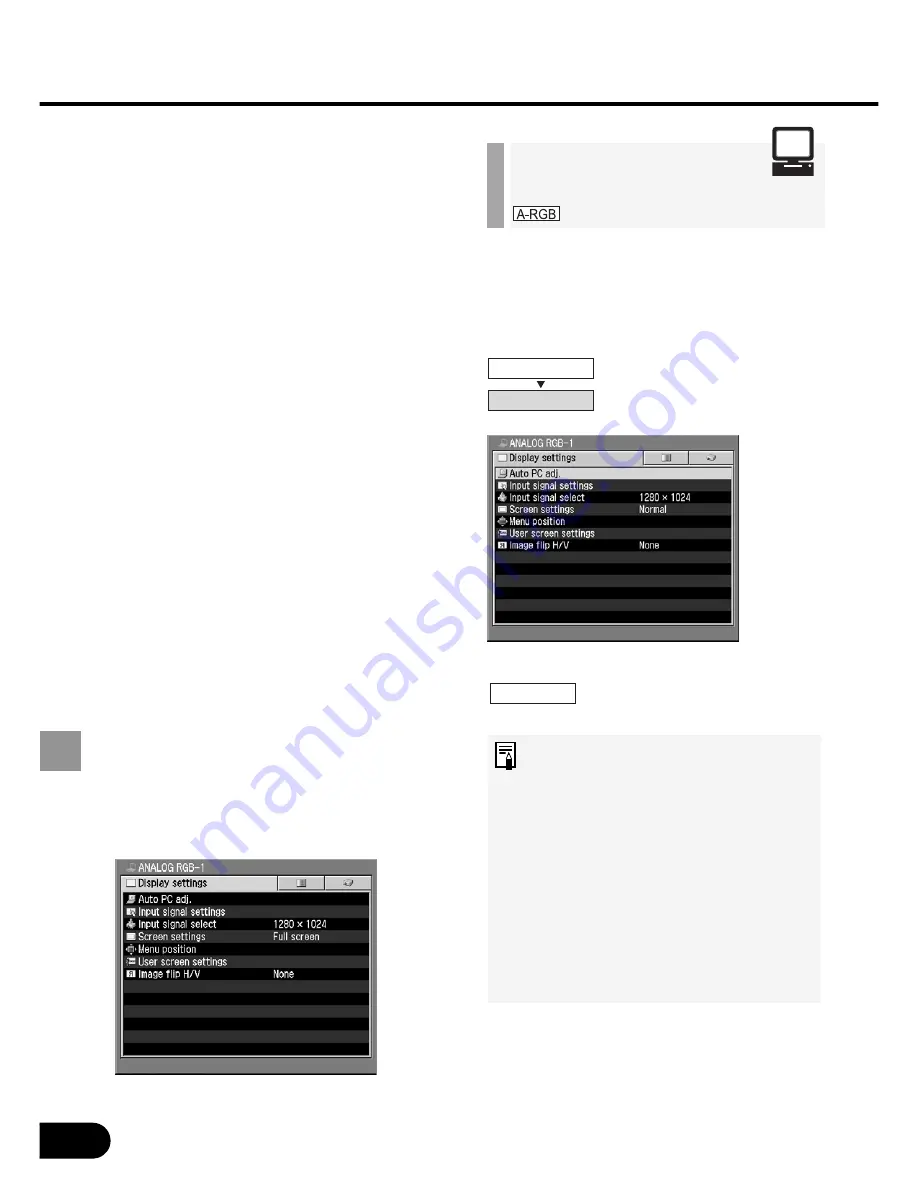
Perform the auto PC adjust-
ment function.

• Most computers can project an

image optimally using an auto PC
function.

• Signal types supported by the

computers that can use the auto
PC function are listed in the table
on page 84.

• If an image cannot be projected

correctly even with the auto PC
function, manually specify the
parameters ([Total dots] to [Verti-
cal pixels]) for the next item [Input
signal settings]. (P53 to P55)

Display Settings 
Menu

Make various settings related to input signals of
the computer and AV equipment as well as the
settings related to display.

Performing the auto pc

[Auto pc adj.] ............... P52

adjustment

Adjusting the total 

[Total dots]................... P53

number of dots

Adjusting the tracking

[Tracking] .................... P53

Adjusting the 

[Horizontal position] ....... P54

horizontal position

Adjusting the vertical 

[Vertical position] ........... P54

position

Adjusting the number 

[Horizontal pixels] .......... P55

of horizontal pixels

Adjusting the number 

[Vertical pixels] ............ P55

of vertical pixels

Selecting an input 

[Input signal select] .... P56, 57

signal type

Selecting a Screen  mode

[Screen settings] ........ P57, 58

Selecting a menu 

[Menu position]............ P58

position

Capturing a logo to be 

[Logo capture] ............. P59

displayed

Selecting a logo

[Logo position]............. P59

display position

Displaying a logo 

[No signal screen] ....... P60

(No signal input)

Displaying a logo 

[No show screen] ........ P60

(No Show)

Displaying a logo 

[Projector on]............... P61

(Projector on)

When Ceiling-mounted 

[Image flip H/V] ........... P61

or for Rear Projection 

Performing the Auto 
PC Adjustment 

Display settings

Auto PC Adj.

OK

Summary of Contents for SX20 - POWERSHOT IS SX1

Page 1: ...MULTIMEDIA PROJECTOR User s Manual U M l ...

Page 2: ... menus Fine Adjustment of Image Quality and Useful Functions Four image modes including the sRGB mode are provided to project a variety of images from your computer and DVD player with the best image quality possible You can project an image on a blackboard dark green with natural color The Six axis Color Adjustment Function allows you to make fine precise color adjustments The Memorized Color Cor...

Page 3: ...n Image from the Computer This section describes the procedure for projecting an image from the computer connected to the projector Learning the Functions Available during Projection This section describes the useful functions available during projection Read this section as required Projecting an Image from AV Equipment This section describes the procedure for projecting an image from a digital s...

Page 4: ...ration Symbols Used in This Manual Meanings of the following symbols used in this manual are as follows A precaution about operation or restriction is given here An important matter that you should be aware of before operation or a useful tip is provided here This guide shows an outline flowchart of the work necessary to make a presentation using this projector SUPPLIED MANUALS AND SYMBOLS USED IN...

Page 5: ...u and System Settings Menu have detailed contents on their title pages TABLE OF CONTENTS USES OF THIS PROJECTOR 2 LOOKING IN THE INDEX 3 SUPPLIED MANUALS AND SYMBOLS IN THIS MANUAL 4 TABLE OF CONTENTS 5 SAFETY INSTRUCTIONS 6 BEFORE USE 14 Supplied Accessories 14 Part Names 15 INSTALLING THE PROJECTOR 20 Determining the Distance to the Screen 20 PROJECTING AN IMAGE FROM THE COMPUTER 23 Connecting t...

Page 6: ...y read this manual again check operations and cable connections and try the solutions in the Troubleshooting section in the end of this booklet If the problem still persists contact the dealer where you purchased the projector or the service center CAUTION TO REDUCE THE RISK OF ELECTRIC SHOCK DO NOT REMOVE COVER OR BACK NO USER SERVICEABLE PARTS INSIDE EXCEPT LAMP REPLACEMENT REFER SERVICING TO QU...

Page 7: ... the projector in a proper position If not it may result in a fire hazard Provide appropriate space on the top sides and rear of the projector cabinet for allowing air circulation and cooling the projector Minimum clearance must be maintained If the projector is to be built into a compartment or similarly enclosed the minimum distances must be maintained Do not cover the ventilation slot on the pr...

Page 8: ...event damage due to lightning and power line surges Do not expose this unit to rain or use near water for example in a wet basement near a swimming pool etc Do not use attachments not recommended by the manufacturer as they may cause hazards Do not place this projector on an unstable cart stand or table The projector may fall causing serious injury to a child or adult and serious damage to the pro...

Page 9: ...d consult your authorized dealer or local power company Do not overload wall outlets and extension cords as this can result in fire or electric shock Do not allow anything to rest on the power cord Do not locate this projector where the cord may be damaged by persons walking on it Do not attempt to service this projector yourself as opening or removing covers may expose you to dangerous voltage or...

Page 10: ...ts the requirement for use in the country you purchased it AC Power Cord for the United States and Canada AC Power Cord used in the United States and Canada is listed by the Underwriters Laboratories UL and certified by the Canadian Standard Association CSA AC Power Cord has a grounding type AC line plug This is a safety feature to be sure that the plug will fit into the power outlet Do not try to...

Page 11: ...evision reception which can be determined by turning the equipment off and on the user is encouraged to try to correct the interference by one or more of the following measures Reorient or relocate the receiving antenna Increase the separation between the equipment and receiver Connect the equipment into an outlet on a circuit different from that to which the receiver is connected Consult the deal...

Page 12: ...for ventilation If you inhale the gas or the shards of the broken lamp enter your eyes or mouth consult the doctor immediately If a lamp explodes its shards may scatter inside the projector Ask the Canon service representative to clean and check the inside of the projector and replace the lamp DISPOSAL OF WASTE LAMP Dispose of the mercury lamp of the projector according to the local regulation jus...

Page 13: ...y keep children away from these areas Do Not Use in the Following Environments Do not install the projector in a humid or dusty place or a place where there is much oily smoke or cigarette smoke Optical parts such as a lens and mirror are stained resulting in poor picture Do not use the projector in a place where the temperature becomes very high or low Operating temperature 5 C to 35 C Storage te...

Page 14: ...o attach the ferrite core to the power cord Remote control Power cord 2m 6 6 Batteries type AAA two for remote control USB cable 1 8m 5 9 Computer connection cable DVI Mini D sub 15 pin 1 8m 5 9 Carrying bag P12 Lens cap Lens cap strap Tie the lens cap to the projector with the supplied strap For the procedure see page 92 Component cable RCA Mini D sub 15 pin 0 4m 1 3 User s Manual Quick Start Gui...

Page 15: ... 6 Speaker 7 Terminals and Connectors P19 8 Power Cord Connector P19 9 Anti theft lock hole 1 Exhaust Vent Do not block this vent Troubles or fire can result 2 Top Control P18 1 Adjustable Foot Lock Button P22 2 Adjustable Foot P22 3 Lamp Cover P77 4 Air Intake Vent 5 Air Filter P76 6 Lens cap strap insertion hole Do not block this vent Troubles or fire can result Front Back Bottom 3 6 8 7 1 2 2 3...

Page 16: ...urns the projector on or off 3 MENU button P50 Displays a menu 4 COMPUTER 1 button P28 46 Selects the image input from the DVI I RGB IN 1 terminal Pressing this button continuously allows you to select an input signal DIGITAL RGB or ANALOG RGB 1 5 COMPUTER 2 button P28 46 Selects the image input from the RGB IN 2 COMPONENT IN RGB OUT terminal Pressing this button continuously allows you to select ...

Page 17: ...e the projector replace new batteries Replace the compartment lid 7 KEYSTONE button P31 Corrects keystone distortion 8 AUTO PC button P29 When ANALOG RGB 1 or ANALOG RGB 2 is selected performs the auto PC adjustment to adjust the tracking total number of dots and image position automatically 9 OK button P51 Determines the item selected from the menu just like the left button of a mouse USB connect...

Page 18: ...erminal Pressing this button continuously allows you to select input signals VIDEO or S VIDEO 7 AUTO PC button P29 When ANALOG RGB 1 or ANALOG RGB 2 is selected performs the auto PC adjustment to adjust the tracking total number of dots and image position automatically 8 OK button P51 Determines the item selected from the menu 9 POINTER button P50 Selects the upper lower left or right item in the ...

Page 19: ...he computer or receives a component picture signal from AV equipment mini D sub 15 pin terminal Also used to output an analog RGB signal by selecting an option from the menu 5 SERVICE PORT jack Exclusively used by the service personnel it is not used normally 6 USB terminal P41 Connected to the computer with a USB cable when the remote control is used as the mouse of the computer 7 AUDIO IN termin...

Page 20: ...s in the above table have been obtained assuming that the aspect ratio is 4 3 They may vary from the actual sizes depending on the type of the projected image For the relationship between the screen size and projection distance see the table on page 85 Screen Optical axis when image is projected at right angle to the screen Zoom max Zoom min 6 0 m 19 7c 1 2 m 3 9c 2 4 m 7 9c 4 5 m 14 8c 9 1 m 29 9...

Page 21: ...e air intake vent air filter on the bottom of the projector The screen must not be exposed to direct sunlight or light from lighting equipment In a bright room it is recommended to limit ambient lighting in order to improve the image quality Note This projector can be hung from the ceiling Ceiling mounted with it turned up side down When a translucent screen is used the projector can project an im...

Page 22: ...0 degrees above and below a lamp problem can result If Keystone Distortion is Large Extending the adjustable foot too far causes keystone distortion the projected picture is trapezoidal If the distortion is large adjust the height of the pedestal of the projector The keystone distortion can be corrected using the KEYSTONE button P31 Keystone distortion of image Adjusting foot Pedestal 1 2 Lift the...

Page 23: ...g a D sub 15 pin standard terminal for monitor output use a MAC adapter Set the slide switches 1 6 on the adapter depending on the Macintosh mode as shown below To monitor output D sub 15 pin To monitor output DVI terminal To monitor output mini D sub 15 pin Some types of Macintosh Supplied computer connection cable for DVI mini D sub 15 pin Computer connection cable for DVI Computer connection ca...

Page 24: ... on the external monitor output press the LCD or VGA function key while pressing the Fn key on the keyboard of the personal computer The following table shows relationships between personal computer manufacturers and key combinations For the key combination of the computer series not listed in the above table refer to the User s Manual that came with the computer FUJITSU All series Fn F10 HITACHI ...

Page 25: ...ove the slider to select 1400 by 1050 pixels If this resolution is not available select the highest resolution under 1400 by 1050 4 Click the OK button Macintosh OSX 1 Open the Apple Menu and select System Environment Setting 2 In the System Environment Setting window click the Displays icon to display the Display window 3 Select the Display tab and select 1400 x 1050 from the Resolution list If t...

Page 26: ...e computer Buttons Used Here Remote control Top control Connect the power cord and turn on the projector Insert the power cord plug in the power cord connection socket Be sure to insert the power cord plug as far as it will go Insert the power plug The POWER indicator flashes red It stays lit when the projector is ready for power on operation 1 2 ...

Page 27: ...control Top control Caution Connect the ground terminal of the power plug to the ground level in order to use the projector safely Otherwise the operating computer may cause electromagnetic radiation problems and poor reception by TV and radio Unplug the Power Cord When the Projector is Not in Use The projector constantly consumes about 6W power even when the Power button is turned off To ensure s...

Page 28: ...inal select the COMPUTER 2 button Select a signal type If images are not displayed correctly press the button mentioned in step 3 repeatedly to select a desired input type Pressing the COMPUTER 1 button repeatedly allows you to select DIGITAL RGB and ANALOG RGB 1 alternately Pressing the COMPUTER 2 button repeatedly allows you to toggle between ANALOG RGB 2 and COMPONENT 3 4 Remote control Top con...

Page 29: ...r COMPUTER 2 button press the AUTO PC button The auto PC adjustment becomes active to display images correctly For some computers the auto PC adjustment does not work In this case you need to make settings total dots tracking horizontal vertical positions horizontal vertical pixels etc for the input signal The last used signal types are recorded for the COMPUTER 1 and COMPUTER 2 buttons respective...

Page 30: ...size If your desired image size is too large or small to adjust with the Zoom lever change the projector installation position Adjusting the Focus Turn the Focus ring to the position where the projected image looks sharpest If the projection distance is outside the range from about 1 2 m 3 9 to 9 1 m 29 9 focus adjustment may be impossible Adjust the projection distance ...

Page 31: ...t appears on the screen Correct keystone distortion Keystone distortion must be corrected while Keystone adjustment is displayed on the screen Keystone adjustment disappears 10 seconds later Press the OK button To reduce the length of the upper edge press To reduce the length of the left edge press To reduce the length of the lower edge press v To reduce the length of the right edge press 3 Remote...

Page 32: ...pect ratio of the image may change when keystone is adjusted Keystone can be adjusted vertically and horizontally within the range of 20 degrees The amount of adjustment varies depending on the combination of the amount of optical zooming input signal type and adjustment direction vertical or horizontal If the keystone distortion is too large to adjust move the projector installation position To c...

Page 33: ...n the computer screen at a 5 4 W H aspect ratio is projected with it compressed vertically or horizontally Select this to project an image displayed on the computer screen at a 5 4 W H aspect ratio SXGA or on a wide screen of Macintosh Since the image is projected with it fitted to either the width or length of the computer screen the top and bottom portions or the leftmost and rightmost portions ...

Page 34: ... reproduction sRGB Select this when you want to project an image from a sRGB compatible digital camera An image is projected in the display mode conforming to the sRGB Standard The quality of the image projected in each image mode can be adjusted as follows For the adjustment method refer to Image Adj Menu P62 Brightness Adjust this when the image is too bright or dark Contrast Adjust this to decr...

Page 35: ...nal optical components Turn off the projector at least once in 24 hours and give it a rest for about one hour When the power is turned off cooling of the lamp starts Therefore the projector cannot be turned on again for about 90 seconds 1 2 Press the POWER button A confirmation message appears on the screen To continue projection wait until the confirmation message disappears about 4 seconds or pr...

Page 36: ...off and its cooling starts When the lamp has been cooled down the POWER indicator starts flashing red and green to enter the ready status Projection will restart if the input signal is reconnected or any button on the top control or remote control is pressed Shutdown mode Select this mode to turn off the projector automatically When the projector enters this mode the lamp is turned off and its coo...

Page 37: ...pany logo can be shown while the image is blacked out P60 Remote control Let s take a look at the useful functions available when you make a presentation with a computer connected to the projector Blacking Out an Image Temporarily NO SHOW P37 Making an Image Larger Smaller D ZOOM P38 Showing the Elapsed Time P TIMER P39 Pointing to a Position with a Spotlight SPOT P39 Freezing a Image FREEZE P40 M...

Page 38: ...ozen Making an Image Larger Smaller D ZOOM Useful when Making a small graph larger during presentation Moving unnecessary information off the screen to focus on the current subject Make the projected image larger smaller Making the Image Larger Press this button repeatedly until the image becomes the desired size Making the Image Smaller Press this button repeatedly until the image becomes the des...

Page 39: ...ng the SPOT button repeatedly Moving the Pointer Move the pointer to a desired position To cancel the SPOT function press the OK button The normal screen appears Remote control Showing the Elapsed Time P TIMER Useful when You want to manage the proceedings of the presentation The timer indicating the elapsed time 00 00 to 59 59 is shown in the lower right corner just like the stopwatch Starting th...

Page 40: ...sting the Volume MUTE Useful when You want to mute the sound from the projector immediately You want to adjust the volume level of the projector speaker Mute the sound temporarily or adjust the volume level Muting the Sound MUTE icon is shown on the screen Canceling the MUTE function To cancel the MUTE function press this button again Pressing the VOL button also cancels the MUTE function Adjustin...

Page 41: ...rojector are turned off Connect the supplied USB cable between the USB terminal on the computer and the USB terminal on the projector This function is available on Windows XP Windows 2000 Windows Me or Mac OS 9 2 and later Computer Moving the Cursor You can move the mouse cursor vertically and horizontally Using the Left Button of the Mouse You can perform the click double click drag operations of...

Page 42: ...ideo cable Component cable D ter minal RCA x 3 S VIDEO terminal Supplied component cable RCA Mini D sub 15 pin AV cable D terminal DVI terminal VIDEO terminal RCA terminal DVI cable A component cable available on the market is required to connect the projector to AV equipment See memo Component cable RCA x 3 About the Component Cable The projector cannot be connected to AV equipment using only the...

Page 43: ...n off both the projector and computer Use an audio cable without a built in resistor Using an audio cable with a built in resistor turns down the sound The built in speaker is monaural The speaker issues the sound from the equipment to which an audio cable is connected To AUDIO OUT Connect with an audio cable with stereo mini jacks ...

Page 44: ...ect the projector to the AV equipment Once the projector is turned off it cannot be turned on for about 90 seconds Wait until the lamp cooling period ends and the POWER indicator lights red The projection method is basically the same as that used when the projector is connected to a computer P23 Lets take a look at only the topics specific to AV equipment Buttons Used Here ...

Page 45: ...reen and then turns lit green The Opening window is displayed for about 20 seconds along with the countdown timer Canceling the Countdown Function Performed at the Start 61 Displaying a Unique Logo on the Opening Screen 59 60 If a password entry screen appears enter the password 71 To project an image immedi ately press the OK button Remote control Top control 1 2 3 ...

Page 46: ...ages from the DVI I RGB IN 1 terminal select the COMPUTER 1 button To input images from the RGB IN 2 COMPONENT RGB OUT terminal select the COMPUTER 2 button To input image from the S VIDEO IN terminal or VIDEO IN terminal press the VIDEO S button Top control Remote control 4 ...

Page 47: ...RGB and ANALOG RGB 1 alternately Pressing the COMPUTER 2 button repeatedly allows you to toggle between ANALOG RGB 2 and COMPONENT Pressing the VIDEO S button repeat edly allows you to toggle between VIDEO and S VIDEO This projector cannot project digital contents copy protected by the HDCP technology For the input signal selection method refer to 56 and 57 Play the AV equipment The image from the...

Page 48: ...t and or right portions of a projected image may be missing depending on the selected display mode When DIGITAL RGB or ANALOG RGB 1 is selected as the input signal type the display mode is the same as that used when the projector is connected to the computer P33 4 3 16 9 J Normal VIDEO S VIDEO and COM PONENT input only Select this if you want to project an image at a 4 3 aspect ratio W H J Wide Sc...

Page 49: ... Menu This menu is used to set various functions of the projector First we will explain the typical procedure for handling menus Next we will give a detailed description of menu items Symbols Indicating Item Categories Menu items are classified into two categories menu items used to project the image from the computer and menu items used to project the image from the AV equipment SETTING UP FUNCTI...

Page 50: ...pears To close the menu window press the MENU button again Select the tab containing the item you want to set Select the Display settings Image Adj or System settings tab The selected tab contains the items handled previously To select another tab press the button repeatedly Remote control Top control 1 Top control Remote control 2 ...

Page 51: ...want to set Make a setting Make an adjustment or choice Select an item from the menu make an adjustment using the slide bar or make a setting in a different window accord ing to the purpose of setting Press the OK button The setting takes effect Some menu items take effect at the time they are selected and some take effect when the OK button is pressed When you finished setting the selected item p...

Page 52: ...he settings related to display Performing the auto pc Auto pc adj P52 adjustment Adjusting the total Total dots P53 number of dots Adjusting the tracking Tracking P53 Adjusting the Horizontal position P54 horizontal position Adjusting the vertical Vertical position P54 position Adjusting the number Horizontal pixels P55 of horizontal pixels Adjusting the number Vertical pixels P55 of vertical pixe...

Page 53: ...he Total Number of Dots Adjust the tracking when the projected image flickers due to a tracking error Increases the set value Decreases the set value This adjustment is required when the auto PC adjustment cannot project images correctly The setting is recorded for the ANALOG RGB 1 signal and ANALOG RGB 2 signal separately Adjusting the Tracking Display settings Input signal settings Total dots Di...

Page 54: ...nal and ANALOG RGB 2 signal separately Adjusting the Horizontal Position Adjust the vertical position of the screen when the projected image is shifted vertically Moves the screen up Moves the screen down This adjustment is required when the auto PC adjustment cannot project images correctly The setting is recorded for the ANALOG RGB 1 signal and ANALOG RGB 2 signal separately Adjusting the Vertic...

Page 55: ... 2 signal separately Adjusting the Number of Vertical Pixels When the horizontal size of the screen is too large or small adjust it to the screen size Increase the number of horizontal pixels Decrease the number of horizontal pixels This adjustment is required when the auto PC adjustment cannot project images correctly The setting is recorded for the ANALOG RGB 1 signal and ANALOG RGB 2 signal sep...

Page 56: ...ecting an Input Signal Type 2 When two or more types of input signals are found during execution of the auto PC adjustment function select a correct input signal type 1280 x 1024 1400 x 1050 Select an input signal type suitable for the computer from the displayed signal types Select an input signal type when the auto PC adjustment function cannot project images correctly and two or more signal typ...

Page 57: ...f round depending on the display resolution of the computer The upper lower left and or right portions of a projected image may be missing depending on the selected display mode Selecting a Screen Mode 1 When images from AV equipment is not projected correctly you can select an input signal type manually The video format is automatically set according to the input signal If images are not projecte...

Page 58: ...projected The screen mode is automat ically switched between Nor mal and Wide Screen depending on the image from the AV equipment This item is displayed when Compo nent Input is selected to allow you to select it An image is projected at a 16 9 W H aspect ratio wide screen size An image is projected at a 4 3 W H aspect ratio nor mal screen size The upper lower left and or right portions of a proje...

Page 59: ...on of the image The image on only one screen can be captured To display the captured image select Logo capture on the Projector on No signal or NO SHOW screen No image can be captured depending on the resolution and scan system you selected Capturing a Logo to Be Displayed Select a logo display position A logo can be displayed at the center or in a corner of a desired screen Select a logo display ...

Page 60: ...laying a Logo No signal screen A logo can be displayed on the screen when the image is blacked out temporarily by pressing the NO SHOW button No logo is displayed black screen No logo is displayed blue back The logo captured on the Logo capture screen is displayed User logo cannot be selected when no logo has been captured Displaying a Logo NO SHOW Display settings User screen settings No signal s...

Page 61: ...jected with it inverted vertically and horizontally When hanging the projector from the ceiling optional brackets are required Contact your Canon dealer None Normal image Ceiling mounted Rear Rear Ceiling mounted A logo can be displayed from the moment the projector is turned on to the moment it is ready for projection The factory captured Canon logo is displayed An image is projected imme diately...

Page 62: ...displayed in each image mode can be adjusted as desired The results of adjustments made by the user for each mode are saved for each of six types of input signals Selecting an Image Mode Image Adj Menu The Image adj menu is used to make various adjustments to the image to be projected Selecting an Image Mode Image mode P62 Adjusting the Brightness Brightness P63 Adjusting the Contrast Contrast P63...

Page 63: ...image mode Adjusting the Brightness When you want to make the image more or less vivid adjust the difference in tone between the lightest and darkest portions of the image The contrast increases The image becomes more vivid The contrast decreases The image becomes less vivid This setting is saved for the currently selected input signal and image mode Adjusting the Contrast Image adj Brightness Ima...

Page 64: ...plus or minus direction This setting is saved for the currently selected input signal and image mode Adjusting the Sharpness When light or dark portions of an image are obscure adjust the image Dark and obscure portions become visible Light and obscure portions become visible This setting is saved for the currently selected input signal and image mode Making a Gamma Correction Image adj Sharpness ...

Page 65: ...age mode Adjusting the Color Level The tone representation of light and dark areas is adjusted automatically The dynamic gamma function is used The dynamic gamma function is not used An image is adjusted automatically so that the optimum image quality is attained in real time This setting is saved for the currently selected input signal and image mode Using the Dynamic Gamma Function Image adj Dyn...

Page 66: ...el meter The color tone of each color becomes lighter The color tone of each color becomes darker This setting is saved for the currently selected input signal and image mode Correcting the Screen Color When an image appears too red or green adjust the color balance The reddish image is corrected The greenish image is corrected You cannot adjust the color balance when the video format is PAL PAL M...

Page 67: ...ons This setting is saved for the currently selected input signal and image mode Making Advanced Color Adjustment When you want to project a high quality image use the progressive processing function Progressive processing is performed Progressive processing is not performed This function cannot be used when the component signal is 1080i 1035i 720p 575p or 480p This setting is saved for the curren...

Page 68: ...wer consumption of the lamp Reducing the Lamp Brightness If you want to make all image settings from the beginning you can reset the current settings to the factory defaults All image settings are reset Resetting is canceled Image settings are saved for each input signal and image mode When OK is selected the settings saved for the image mode of the currently selected input signal are reset Resett...

Page 69: ...e RGB IN 2 COMPONENT IN RGB OUT terminal only when Computer 1 and ANALOG RGB are selected for the input signal Outputting an Image to a Monitor System Settings Menu This menu is used to set various functions of this projector Outputting an Image to a Monitor Terminal P69 Selecting the Power Management Mode Power management mode P70 Issuing a Beep Beep P70 Prohibiting Projector Operation Key lock P...

Page 70: ...on button is pressed The projector enters the exit mode being turned off automatically For details on Power Management Mode refer to P36 Selecting the Power Management Mode A beep can be sounded when the power is turned on off or a button on the top control or remote control is pressed A beep is issued A beep is not issued A beep is not issued when the sound has been muted by pressing the MUTE but...

Page 71: ... password Registering a Password You can prohibit use of the buttons on the top control and remote control to prevent buttons from being pressed by mistake The key lock function is not used Use of the top control is prohibited Use of the remote control is prohibited The key lock function becomes effective from the moment the OK button is pressed after selecting Main unit or Remote control Be sure ...

Page 72: ...d When you use two projectors at the same time change the channel settings to prevent the two remote controls from interfering with each other Select the channel on the projector you use and then press the OK button Selecting a Channel for the Remote Control While pressing the OK button on the remote control press the LIGHT button for 3 seconds Pressing the two buttons allows you to switch between...

Page 73: ...ian Dutch Chinese Simplified Chinese Traditional Korean Japanese Selecting a Display Language System settings Language You can reset menu item settings The system settings will be restored to the factory defaults All menu item settings of the projector are reset to factory defaults Resetting is canceled The Lamp counter and Language settings will not be reset even after resetting to factory defaul...

Page 74: ...When the time of use is 1 000 to 1 400 hours When the time of use is 1 400 hours or longer Resetting the Lamp Counter The lamp counter is reset Resetting of the lamp counter is canceled Do not reset the lamp counter except when you have replaced the lamp If reset the lamp counter cannot indicate the correct timing of lamp replacement For the lamp replacement method refer to P77 ...

Page 75: ...y wipe the projector body with a soft cloth If the projecter is heavily soiled use a small amount of detergent diluted with water damp a cloth with this solution squeeze the cloth hard wipe the projector body with this cloth and finish with a dry cloth Using volatile cleaning liquid or benzine may damage the projector body surface When using a chemical dust cloth read the instructions thoroughly T...

Page 76: ...k or injury due to the high voltage parts or rotating parts Cleaning the Air Filter Turn the projector upside down remove the cover by pushing the latch remove the air filter and clean it with a vacuum cleaner When cleaning dust off the side exhaust vent and the bottom air intake vent bring the vacuum cleaner nozzle close to them directly Clean the air filter frequently After cleaning the air filt...

Page 77: ...of use of the lamp in Lamp counter from the System settings menu P74 When replacing the lamp turn off the projector wait until the cooling fan stops remove the power plug from the AC outlet and let the projector stand for at least 1 hour You may get burned because the main unit is very hot immediately after the projector is turned off When replacing the lamp do not touch the inner glass surface Th...

Page 78: ...ad screwdriver Loosen two screws turn up the handle and remove the lamp Insert a new lamp as far as it will go and secure it with two screws After installation be sure to turn down the handle Install the lamp cover and tighten the screw Turn on the projector Bring up the menu and select System settings Lamp counter P74 Select Reset OK to reset the lamp counter Lamp Screws Handle 1 2 Screw Lamp cov...

Page 79: ...ector to cool its inside and retry projection If the same warning occurs again the projector may be defective Contact your dealer Two flashes Faulty lamp The lamp has burnt out Replace the lamp with a new one If the same warning occurs again the lamp drive circuit may be defective Contact your dealer Three flashes Faulty lamp cover The lamp cover is open Check whether the lamp cover is installed p...

Page 80: ...properly connected to the computer and AV equipment P23 42 20 seconds have not passed since the projector was turned on When the projector is turned on the Opening window is displayed for about 20 seconds To project an image immediately press the OK button on the remote control or top control P27 No image is sent from the AV equip ment Check that an image is played back on the connected dig ital c...

Page 81: ...rt Check whether the distance to the screen is proper If the distance is shorter than about 3 9 1 2 m the image cannot be brought to a focus P20 85 The projector is not placed straight in front of the screen Check whether an image is obliquely projected to the screen A slight error in the projection angle can be cor rected through keystone adjustment P21 31 The projector has been moved to a place ...

Page 82: ... to the simultaneous display mode output setting on the note book personal computer The output setting method varies among computer manu facturers Refer to the User s Manual that came with your computer Cause Countermeasure The air intake or exhaust vent is blocked Check whether the air intake or exhaust vent is blocked If the air intake or exhaust vent is blocked the temperature inside the projec...

Page 83: ...r of the projector and the remote control P16 The operating environment of the remote control is bad Check whether the infrared remote receiver of the projec tor is exposed to direct sunlight or strong light of lighting apparatus P16 The remote control code does not match the projector setting Check whether the remote control code has been changed You can confirm the Remote control setting in the ...

Page 84: ...ojector supports signals of the following types If your computer or AV equipment is compatible with any one of these signal types the auto PC function of the projector judges the type of the input signal to project an image correctly APPENDIX ...

Page 85: ... 6c 26 cm 0 85c 156s 345 x 194 8 8 m 28 9c 5 3 m 17 4c 241 cm 7 9c 27 cm 0 86c 162s 358 x 201 9 0 m 29 5c 5 4 m 17 7c 247 cm 8 1c 27 cm 0 86c 165s 366 x 206 9 1 m 29 9c 5 5 m 18 0c 250 cm 8 2c 28 cm 0 9c 167s 370 x 208 5 7 m 18 7c 261 cm 8 6c 29 cm 0 95c 174s 386 x 217 6 0 m 19 7c 274 cm 9 0c 30 cm 0 98c 184s 406 x 229 6 3 m 20 7c 288 cm 9 4c 32 cm 1 05c 193s 427 x 240 6 6 m 21 7c 302 cm 9 9c 34 c...

Page 86: ... dots Tracking Horizontal position Vertical position Horizontal pixels Vertical pixels Return Input signal select 640 x 480 800 x 600 1400 x 1050 Screen settings Full screen Normal Wide Screen True size DIGITAL RGB Screen settings Full screen Normal Wide Screen True size Display settings VIDEO S VIDEO Wide Screen Screen settings Normal Input signal select Auto NTSC PAL SECAM NTSC4 43 PAL M PAL N C...

Page 87: ...or correct H 6 axis color adjust Color balance Color level VIDEO S VIDEO COMPONENT Progressive On Off Lamp mode Normal Quiet Reset OK Cancel Image adj Terminal INPUT MONITOR OUT Power management mode Off Standby Exit Beep On Off Key lock Off Main unit Remote control Register password Entering the password Password settings On Off Remote control CH1 CH2 Language English German French Italian Spanis...

Page 88: ...al or RCA terminal For more details refer to Composite S video A signal system YC separation signal used to send a brightness signal Y and color signal C separately Connect the S video terminal of AV equipment and the S VIDEO IN terminal of this projector with an S video cable and select S VIDEO by pressing the VIDEO S button Component A signal system used to send a color signal C with it divided ...

Page 89: ...XGA 1400 dots x 1050 dots as the display resolution of the computer allows this projector to project high resolution images If your computer does not have the SXGA option select the maximum resolution among the selectable options Gamma Correction A tone adjustment system used during projection of image data The gamma correction function works effectively when portions of an image are obscure becau...

Page 90: ...90 APPENDIX Specifications Ω Ω Ω Ω Ω Ω Ω Ω Ω ...

Page 91: ...15 pin External View RGB IN 2 COMPONENT IN RGB OUT Computer Input Component Input and Monitor Input Output Terminals This terminal is used as a computer input or monitor output terminal When used as a monitor output terminal the computer analog signal input to the DVI I terminal is output Use a D sub computer cable The specification for the computer input terminal and that for the monitor output t...

Page 92: ...01 Ceiling Attachment Part No RS CL01 Ceiling Pipe 360 mm 14 2 Part No RS CL03 Ceiling Pipe 550 mm 21 7 Part No RS CL04 Ceiling Pipe 760 mm 29 9 Part No RS CL05 Ceiling Plate Part No RS CL02 Mac Adapter Part No LV AD02 DVI Cable Part No LV CA29 This part is used to hang the projector from a high ceiling This part is used to join the ceiling pipe and the ceiling attachment For more information refe...

Page 93: ...zo L Strada 6 20089 Milanofiori Rozzano MI Italy CANON Schweiz A G Industriestrasse 12 8305 Dietlikon Switzerland CANON BELGIUM N V S A Bessenveldstraat 7 1831 Diegem Belgium CANON GmbH Zetschegasse 11 A 1232 Wien Austria CANON ESPANA S A C Joaquin Costa 41 28002 Madrid Spain CANON SVENSKA AB Stensätravägen 13 S 127 88 Skarholmen 2 Sweden CANON NORGE A S Hallagerbakken 110 P O Box 2 33 Holmlia 120...

Reviews: