background image

3

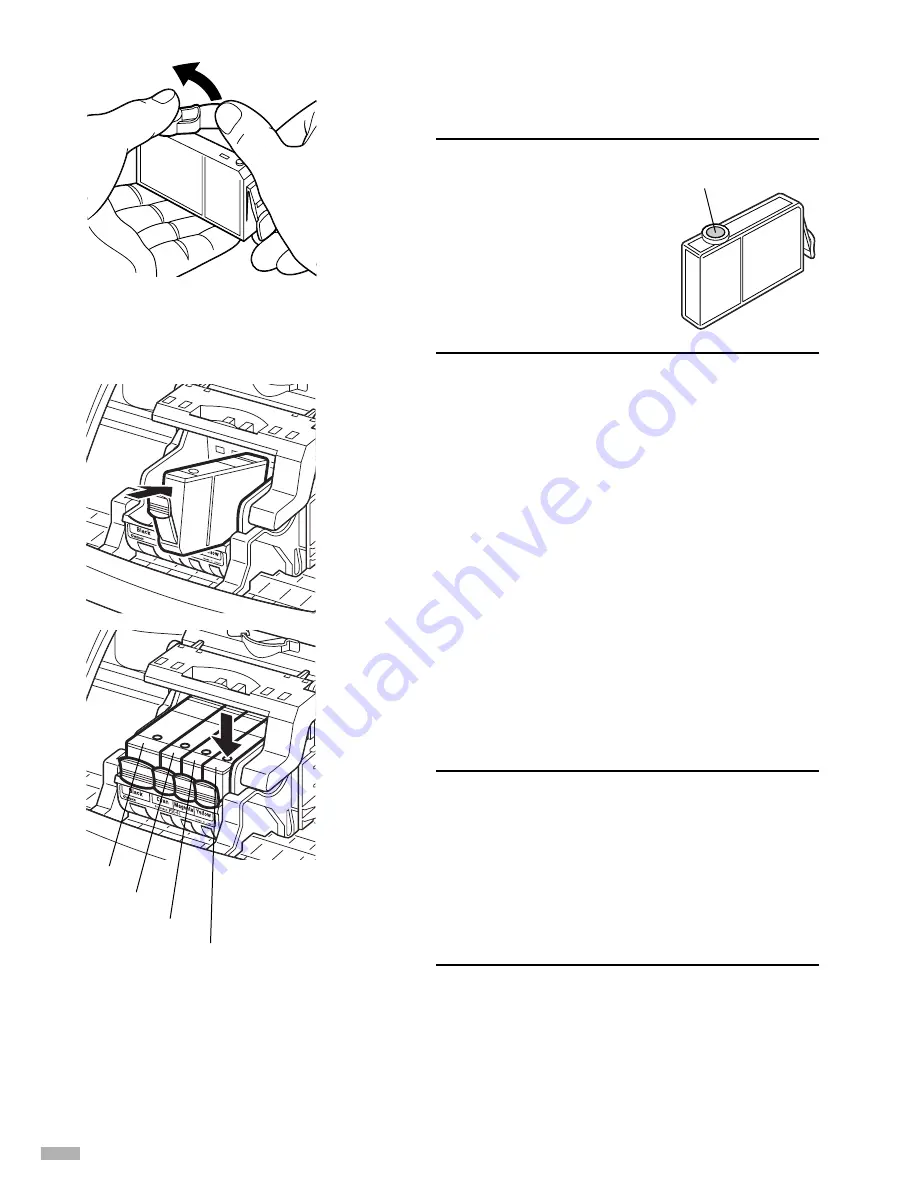
Hold the ink tank as shown in the
diagram and remove the protective
cap.

Notes

• Do not squeeze the sides

of the ink tanks as this
may cause the ink to leak
out and stain your clothes
and hands.

• Do not touch the ink port.
• Do not attempt to reattach

the protective cap once it
has been removed.

4

Insert the yellow ink tank into the right-
hand slot. Press the top until it clicks
into place.

6

5

Use the same procedure to install the
other ink tanks in their appropriate
slots.

Check the labels to make sure that each tank is in
the correct position.

Notes

• Only install the ink tanks in the positions

specified by the labels.

• If ink tanks are not installed in the right

position, colours will not be printed
correctly. Immediately reinstall the tank in
the correct position and carry out print head
cleaning. For details, refer to the User’s
Guide.

6

Close the front cover.

Wait until the POWER lamp remains fully lit
(about 60 seconds).

ink port

Black

Yellow

Magenta

Cyan

Summary of Contents for S750

Page 1: ...er 2 Installing the Print Head 4 Loading Paper 7 Installing the Printer Driver 8 Aligning the Print Head 12 Basic Operations 16 Printing with Windows 16 Printing with Macintosh 18 Print Head Maintenance 20 Notes on Handling the USB Interface for Windows Users 21 For Further Details 21 Quick Start Guide BUBBLE JET PRINTER QA7 1775 V01 BE ...

Page 2: ...es for efficiency The International ENERGY STAR Office Equipment Program is a global program that promotes energy saving through the use of computer and other office equip ment The program backs the development and dissemination of products with functions that effectively reduce energy consumption It is an open system in which business can participate voluntarily The targeted products are office e...

Page 3: ...observed for safe operation Instructions that if ignored could result in personal injury or material damage caused by incorrect operation of the equipment These must be observed for safe operation Also read the Safety Precautions in the User s Guide Observe the warnings and cautions to avoid personal injury or damage to the printer Trademark Notices Canon is a registered trademark of Canon Inc BJ ...

Page 4: ...computer to the printer using both the parallel cable AND the USB cable USB cable Windows XP Windows Me Windows 2000 Windows 98 Mac OS 8 6 or later Recommended Canon or other computer manufacturer cable up to 5 meters in length Printer cable parallel Windows NT 4 0 Windows 95 Can also be used with Windows XP Windows Me Windows 2000 and Windows 98 Should conform with Centronics IEEE 1284 and suppor...

Page 5: ...inting speeds and is recommended for use with Windows XP Windows Me Windows 2000 and Windows 98 If your computer has an earth connection make sure that this is attached If you do not intend to use the printer for a long period of time unplug the power cord from the power outlet after turning off the printer Figure A Figure B Note If the Add New Hardware Wizard or Found New Hardware Wizard screen a...

Page 6: ...et or unplug the power cord when your hands are wet Never damage modify stretch or excessively bend or twist the power cord Do not place heavy objects on the power cord Never use any power supply other than the standard power supply available in the country of purchase Using the incorrect voltage and frequency could cause a fire or electric shock Always push the plug all the way into the power out...

Page 7: ...8 Lock the print head into place by lowering the lever Do not touch the lock lever once the print head has been installed Installing the Ink Tanks For safety reasons store ink tanks out of the reach of small children Do not drop or shake ink tanks 1 Take out the yellow ink tank 2 Pull the orange tape in the direction of the arrow and remove the clear film electrical contacts print head nozzles pri...

Page 8: ...to place 6 5 Use the same procedure to install the other ink tanks in their appropriate slots Check the labels to make sure that each tank is in the correct position Notes Only install the ink tanks in the positions specified by the labels If ink tanks are not installed in the right position colours will not be printed correctly Immediately reinstall the tank in the correct position and carry out ...

Page 9: ...er s Guide for information on loading envelopes and other media 3 Load the paper aligning it with the right side of the sheet feeder You can load up to 100 sheets of plain paper Do not exceed this limit 4 Press the paper guide and slide it against the left side of the stack of paper You now need to install the printer driver Windows Go to page 8 Macintosh Go to page 10 7 4 Loading Paper Loading A4...

Page 10: ... driver cannot be correctly installed The screens below refer to Windows Me installation Screen may differ depending on the environment you are using When installing the printer driver in Windows XP Windows 2000 or Windows NT 4 0 log on to the system as a member of the Administrators group If the following screen appears automatically click Cancel and follow steps 1 to 7 to install the driver Spec...

Page 11: ...ton 4 Follow the instructions displayed on screen When the screen shown on the left is displayed click Install 5 When the screen shown on the left appears turn the printer on If the printer is recognised the printer driver will be automatically installed Note If the connection is not recognised refer to the section Notes on Handling the USB Interface for Windows Users on page 21 6 Click OK Before ...

Page 12: ...le during installation as this may result in the computer or printer not operating correctly Before installing the driver disable all virus detection programs and automatically loading programs or remove them from your system folder 1 Turn on the Mac 2 Place the Setup Software User s Guide CD ROM in the CD ROM drive 3 Double click the printer driver folder then select a language 4 Double click Ins...

Page 13: ...saved click Cancel then save the document After saving the document begin again from Step 4 7 Click Restart The computer restarts 8 Select Chooser in the Apple Menu 9 Click the icon for the printer you are using and close Chooser Before you use the printer you must carry out print head alignment on page 14 Note Refer to the User s Guide when using this printer as a network printer 11 ...

Page 14: ...ences Windows NT 4 0 Document Defaults to open the setting screen 4 Click OK 5 Click the Maintenance tab and click the Print Head Alignment icon 6 Check that paper is loaded in the printer and click OK If a message warning you not to perform other operations appears click OK 12 6 Aligning the Print Head This operation must be carried out when using the printer for the first time Aligning the print...

Page 15: ...st pattern on Column F pick the setting that produces the least noticeable vertical white stripes 10 Click Cancel This completes the printer setup The printer is now ready to use Notes Click OK to perform even more detailed adjustments If streaks appear on the printed surface when you use the printer follow the procedure below to adjust the printing 1 Check that the paper that you normally use is ...

Page 16: ...4 Check that paper is loaded in the printer and click OK If the pattern is not printed successfully open the front cover and ensure that the ink tanks are correctly installed 5 Look at the print out From the patterns in Column A select the most even least irregular pattern and enter the number 14 Aligning the Print Head Macintosh ...

Page 17: ... The printer is now ready to use Notes Click OK to perform even more detailed adjustments If streaks appear on the printed surface when you use the printer follow the procedure below to adjust the printing 1 Check that the paper that you normally use is set in the printer and then click OK 2 Select the best patterns from Columns G and H enter their numbers then click OK The best patterns will be s...

Page 18: ...prints In this section we will use WordPad for the purpose of explanation The procedures you use and the screens that appear on your computer may differ according to the application that you use Printing 16 1 Print the document from the application On the File menu click Print Check the application s users manual for the actual procedures 2 Ensure your printer is selected then click Properties 3 S...

Page 19: ... detailed explanation of the functions in the tab This may not appear when using Windows 2000 or Windows NT 4 0 If this happens click Start then select Programs Canon S750 Guide 5 Click this to change the cursor shape to By clicking on the item s name with this cursor an explanation will be displayed Notes Clicking the Print Advisor allows you to change to the most appropriate print settings simpl...

Page 20: ...ox in your application to print the document On the File menu click Print Check the application s users manual for the actual procedures 4 Specify the print settings according to your requirements For details refer to Basic Print Settings on page 19 5 Click the Print button Printing will start in a few moments 18 Printing with Macintosh Adjusting the print settings according to your needs allows y...

Page 21: ...er 2 Print Mode Select the icon closest to the type of document you want to print To specify more detailed settings for the print quality or colour select Manual and click Details 3 Print Click this to start printing Note See Balloon Help for more information about other printer driver functions Select Show Balloons in the Help menu for an explanation of each of the items in the setting screen To ...

Page 22: ...ove the print quality Ensure that the printer is turned on and follow the instructions below Windows Open the printer driver settings screen and click the Maintenance tab Click the Cleaning icon See page 12 for details on how to open the setting screen Macintosh Open the Page Setup dialog box and click the Utilities button Click the Cleaning icon When the Printer Runs out of Ink Replace the empty ...

Page 23: ...instructions on screen to install the program The User s Guide will appear once installation is complete For Macintosh 1 Load the CD ROM in your computer If Acrobat Reader 3 0 or later is not already installed double click the Acrobat Reader 4 0 folder in the CD ROM folder then double click Reader 4 0 Installer Follow the instructions on the screen to install Acrobat Reader 2 Double click the Manu...

Page 24: ...ows XP Windows 2000 Windows NT 4 0 16MB of available RAM for Windows 98 Windows NT 4 0 Windows 95 32MB of available RAM for Windows Me Windows 2000 Professional 64MB of available RAM for Windows 2000 Server 128MB of available RAM for Windows XP For Macintosh Macintosh series computer equipped with USB interface Preinstalled Mac OS 8 6 Mac OS 9 x 30MB of available hard disk space including temporar...

Page 25: ......

Page 26: ...QA7 1775 V01 12345678 CANON INC 2002 PRINTED IN THAILAND ...

Reviews: