background image

17

SOFT

HARD

RED

BLUE

MANUAL

POWER

DETAIL

AUTO

WHITE BALANCE

NEGA

B/W

INPUT

SELECT

 LOCAL
CONTROL
DISABLED

RS232C
CONTROL

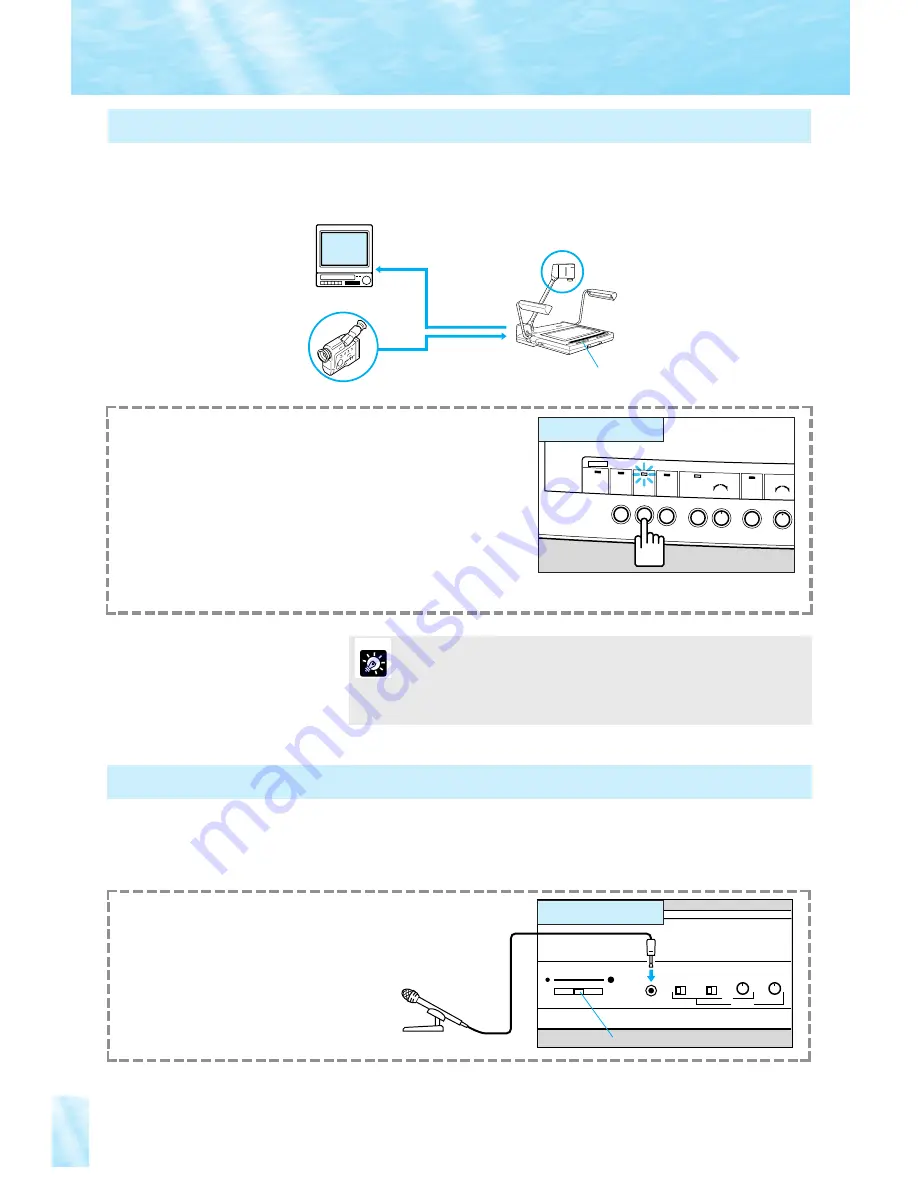
To change to pictures via external input equipment, press the
INPUT SELECT button.
The INPUT SELECT indicator lights up and then,

Pictures via the equipment connected to the VIDEO IN terminal
will be output to the VIDEO OUT terminal.

Pictures via the equipment connected to the S-VIDEO IN
terminal will be output to the S-VIDEO OUT terminal.

Sound from the equipment connected to the AUDIO IN terminal
will be output to the AUDIO OUT terminal.

To change to pictures via the camera head, press the INPUT
SELECT button again.

By connecting external input equipment, such as a VCR, video camera, etc, to the VIDEO IN or S-VIDEO IN
terminals of the RE-350, you can project pictures via this equipment on the monitor. Pictures via the camera
head and external input equipment can be changed alternately each time you press the INPUT SELECT
button. 

Changing to Pictures via External Input Equipment

MIC

1

2

3

4

SC

PHASE

H

MIC LEVEL

Use the microphone volume control knob to adjust the
volume.

Sound from the microphone can be recorded together with
pictures if outputting to a VCR.

If you connect a microphone to the MIC IN terminal of the RE-350 and connect a monitor with speakers, sound can be
output. Regardless of the selection of input equipment, sound from the microphone will be output to both R and L AUDIO
OUT terminals in monaural mode. For operation details, refer to the instruction manual of the equipment to be used.

Using a Microphone

• Regardless of the selection of input equipment, the RGB monitor projects

pictures via the camera head.

• Negative/Positive conversion and Color/Black-and-White switching will not

function with pictures via external input equipment.

• If a microphone is connected, sound from the microphone will also be output

to the AUDIO OUT terminal.

MEMO

Right side panel

Operation panel

Microphone volume control knob

RE-350

VIDEO   V

ISUALIZE

R

INPUT SELECT button

VIDEO IN

VIDEO OUT

Video Monitor

Video Camera

Camera of the RE-350

External

input

Summary of Contents for RE-350

Page 1: ...ly accessible location for future reference Veuillez lire attentivement ce mode d emploi avant d utiliser l appareil Conservez le soigneusement pour r f rence RE 350 INSTRUCTION MANUAL MODE D EMPLOI R...

Page 2: ...ration This Instruction Manual may not be copied in whole or part without prior consent of Canon The content of this manual is subject to change without notice Copyright 1996 CANON INC ALL RIGHTS RESE...

Page 3: ...ease the separation between the equipment and receiver Connect the equipment into an outlet on a circuit different from that to which the receiver is connected Consult the dealer or an experienced rad...

Page 4: ...erious injury to a child or adult and serious damage to the product A product and cart combination should be moved with care Quick stops excessive force and uneven surfaces may cause the product and c...

Page 5: ...d service personnel under the following conditions a When the power supply cord or plug is damaged b If any liquid has been spilled onto or objects have fallen into the product c If the product has be...

Page 6: ...g from Negative to Positive 14 Projecting Black and White Documents 15 Adjusting Brightness and Picture Quality 15 4 SYSTEM CONSTRUCTION 16 Outputting to a RGB Monitor 16 To Control by a Computer 16 C...

Page 7: ...t 5 seconds before turning the power ON again Turning the power ON too soon may cause a malfunction The illumination lamps do not light up immediately after the LIGHTS button is pressed To protect the...

Page 8: ...is 50 Hz Factory default is set to 1 60 In areas where the power frequency is 50 Hz set it to 1 100 In areas where the power frequency is 60 Hz set it to 1 60 See page 16 for system construction Use...

Page 9: ...age 13 To compensate automatically press the AUTO FOCUS button To compensate manually press the NEAR button or FAR button The AUTO FOCUS indicator flashes initially then lights up when compensation is...

Page 10: ...the right hand illumination lamp first then the left hand illumination lamp Press the arm lock release lever and raise the arm until it stops Direct the camera head towards the document table Remove t...

Page 11: ...the supplied unit cover on the RE 350 when the unit is not in use The unit cover has a pocket to store cords MEMO Place the unit horizontally when storing it If the unit is stored vertically it may f...

Page 12: ...the cables See page 16 for connecting equipment For details of operation refer to the instruction manual of the equipment to be used If your computer has AV compatability you can input images to the c...

Page 13: ...POWER The power of the RE 350 should be turned OFF when the unit is not used Disconnect the power cord if the unit will not be used for extended periods MEMO White balance will be automatically adjust...

Page 14: ...as a dark cloth hair etc 2 Intangible objects such as candle light smoke etc 3 Objects having a glossy surface telephone receiver glassware etc 4 Objects viewed through glass Use the backlight to pro...

Page 15: ...to white or vice versa Also if the image is already in color you can convert from primary colors to complementary colors Negative positive conversion is only possible with pictures via the camera hea...

Page 16: ...te modes is possible only when projecting pictures via the camera head Therefore color pictures via external input equipment cannot be switched to black and white see page 17 And also color pictures o...

Page 17: ...he equipment to be used Computer Video monitor VCR RGB monitor Computer S video cable RCA pin cable RGB cable RCA pin cable Rear panel RS 232C cable Power cord Outputting to a RGB monitor To AUDIO IN...

Page 18: ...T SELECT button Changing to Pictures via External Input Equipment MIC 1 2 3 4 SC PHASE H MIC LEVEL Use the microphone volume control knob to adjust the volume Sound from the microphone can be recorded...

Page 19: ...record audio together with pictures via the camera head onto a video tape For details of operation refer to the instruction manual for the equipment to be used Recording by VCR VCR BNC video cable To...

Page 20: ...m VIDEO IN Camera of the RE 350 VIDEO OUT EXT External input AUDIO OUT VIDEO S VIDEO RGB R G OUT EXIT AC INLET AC OUTLET 75 OFF ON 24 96 100 60 ID 0 ID 1 RS 232C SYNC OFF ON IN B R L SYNC 1 0 Rear pan...

Page 21: ...ard speed The focus lens moves toward the NEAR side at a slow speed The focus lens starts moving towards the FAR side at a standard speed The focus lens moves toward the FAR side at a slow speed The f...

Page 22: ...ct is not illuminated properly Pictures appear with flicker The electronic shutter speed selector has been set 7 incorrectly The input source cannot be changed The power of the RE 350 or other equipme...

Page 23: ...impedance 75 RGB OUT BNC connector x 4 output impedance 75 External synchronization input BNC connector x 1 input impedance 75 high impedance AUDIO IN RCA pin jack x 2 stereo AUDIO OUT RCA pin jack x...

Reviews: