


Assemble the main wing
following the assembly
instructions
3-1
to
3-8
.
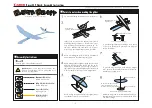
Glue the main wing firmly to
the fuselage, aligning the
center of the wing along the
top of the fuselage.
5˚
5˚
5˚
5˚
Dot towards the front.
Dot towards the front.
Dot towards the front.
G lue
G lue
Folded stands
Fold all tabs outward.
Aligning the noses flush,
glue through together
in the order shown.
Placing a ruler along the fold lines, bend the cut
strips slightly upward.
Glue parts and to the underside of
parts and respectively.
Using a ruler along the center line, fold part from the
center line to make 5˚ angle on both sides. Then curve it
carefully with your fingers to fit the curved fuselage top
where the main wings are to be attached.
Curve the main wings, + , +
respectively in the same manner as .
This curve is called camber.
Apply glue on half of the underside
of and glue onto + .
(The dots on the parts should meet
with each other.)
In the same manner,
to the other
side of .
Glue the horizontal stabilizer
to the fuselage, making sure that
the dots appearing in its center
portion line up along the top of
the fuselage.
Placing the dihedral angle gauge on the main wing,
check that the dihedral angle is 5˚.
Putting folded stands under the main wing
will be conducive to fast and thorough drying.
GLUING INSTRUCTIONS
Glue the parts together in the order indicated.
- 2 -
Racer 539 Hawk: Assembly Instructions


