


Using the Roll Unit In Take-Up Mode
Important
• For details on the roll paper compatible with winding, see "Paper Information List.".
• Before loading the roll paper to be taken up on the roll unit, set the roll unit mode to take-up device on
the printer touch screen. (See "
.")
• The following operation assumes that the roll holder is not installed on the roll unit and that roll paper is
not loaded on the roll holder. If the roll holder is installed on the roll unit, first remove the roll holder from
the roll unit, and then remove the roll paper loaded on the roll holder. (See "
Removing Rolls From the Roll Holder
.")
• Paper winding is possible until the outer diameter of the wound paper is the same as the outer diameter
of the holder stopper.
• When printing on lightweight paper or without a border, the border of the paper may get wrinkled
coming in contact with the roll holder, resulting in poor winding. If these problems occur when winding
using a 2-inch core, remove the spacer held in place by 4 hex screws on the roll holder flange, and then
wind.
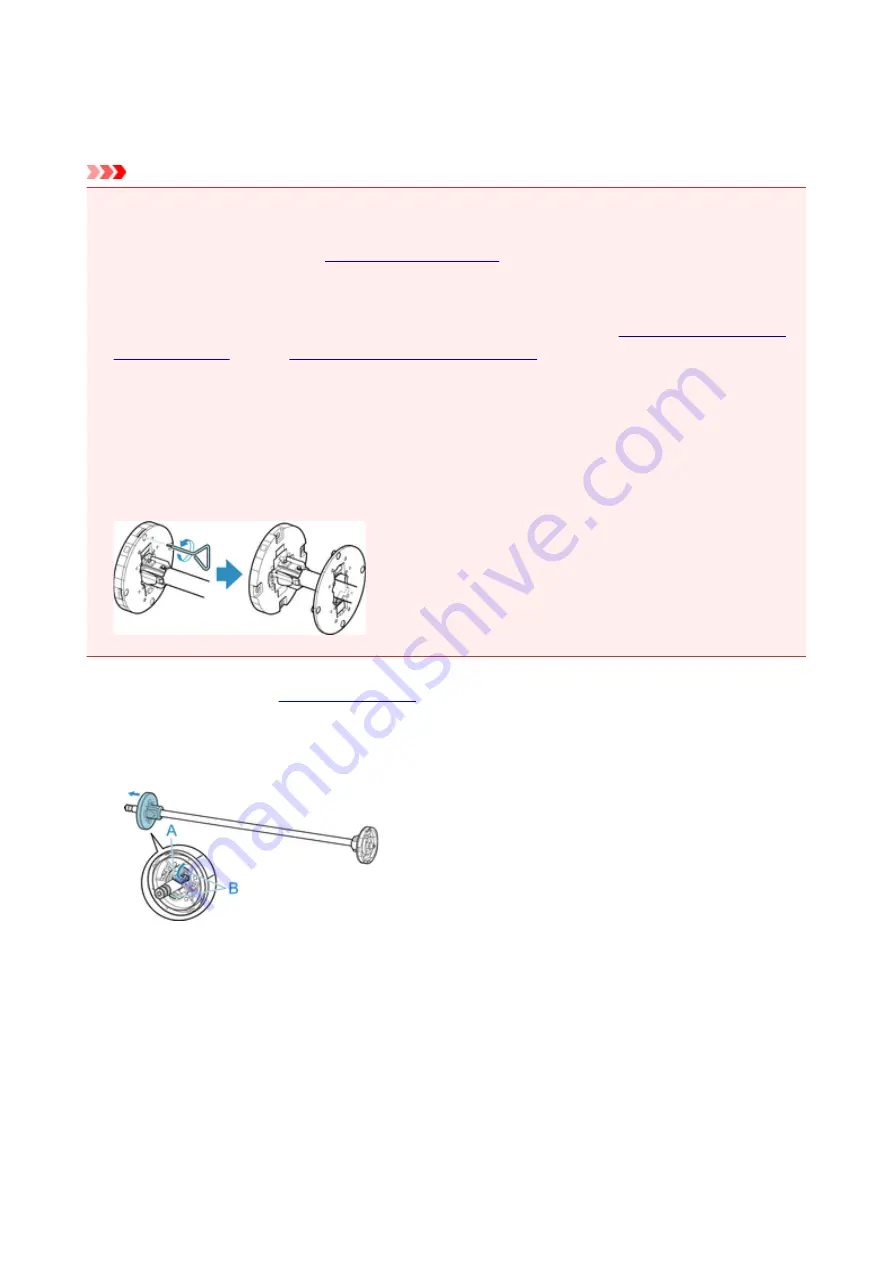
1. Store basket. (See "
2. Push holder stopper lever (A) toward shaft to release lock, and while holding in position (B),
remove holder stopper from roll holder.
3. If taking up roll paper whose paper core has an inner diameter of 3 inches (76.2 mm), insert
3-Inch Paper Core Attachment in roll holder and holder stopper.
Align the 3-Inch Paper Core Attachment tabs (A) with the holes on the roll holder or holder stopper (B)
and insert firmly.
111
Summary of Contents for PRO-6000
Page 18: ...7051 863 7052 864 8200 865 9000 866 9110 867 B20A 868 B510 869...
Page 83: ...6 Tap ON 83...
Page 94: ...94...
Page 130: ...130...
Page 137: ...Tap B to display the preview screen Touch the Back button to return to the previous screen 137...
Page 152: ...For more on setting items on the operation panel Setting Items on Operation Panel 152...
Page 196: ...The resending setting is completed 196...
Page 210: ...Optional accessories Roll Holder Set 210...
Page 236: ...For Mac OS Follow the instructions on the Canon website to redo setup 236...
Page 272: ...Adjusting Feed Amount Adjusting Feed Amount Adjusting Vacuum Strength 272...
Page 276: ...6 Tap paper to adjust A test pattern is printed for adjustment and adjustment is finished 276...
Page 295: ...Ink Tanks Ink Tanks Replacing Ink Tanks Checking Ink Tank Levels When to Replace Ink Tanks 295...
Page 309: ...Note If the ink lamp is not lit reload the tank 7 Close ink tank cover 309...
Page 311: ...Note Tap Order ink now to view the ink supplier information 311...
Page 333: ...333...
Page 336: ...Cutter Blade Cutter Blade Replacing the Cutter Blade 336...
Page 355: ...Other Maintenance Preparing to Transfer the Printer Reinstalling the Printer 355...
Page 365: ...Specifications Printer Specifications Specifications Print Area 365...
Page 366: ...Printer Specifications Specifications Print Area 366...
Page 374: ...Safety Safety Precautions Regulatory Information WEEE EU EEA 374...
Page 391: ...Basic Printing Workflow Printing procedure Canceling print jobs Pausing Printing 391...
Page 410: ...Note The screen may differ slightly depending on the model you are using 410...
Page 412: ...Pausing Printing Pausing Printing 412...
Page 494: ...Printing from Printer Printing from USB Flash Drive 494...
Page 558: ...558...
Page 564: ...6 Enter quantity to print in Copies and select Yes 564...
Page 567: ...6 Select Delete on displayed screen 567...
Page 578: ...5 Select Edit 6 In Edit job box dialog box enter name in Job box name and select OK 578...
Page 579: ...579...
Page 581: ...Note Enter the password if it is enabled for a saving box Jobs saved in the box are listed 581...
Page 584: ...Note Enter the password if it is enabled for a saving box 5 Select print job 584...
Page 585: ...The details of the saved document appears 585...
Page 587: ...5 Select saved job and select Edit 6 Select Change 587...
Page 588: ...7 Enter name and select OK 588...
Page 610: ...4 Lift up the release lever 5 Pull the paper straight out from the front of the printer 610...
Page 617: ...Replacing the Cutter Blade 617...
Page 665: ...Installation Problems Removing Printer Software 665...
Page 691: ...Note To stop printing press the Stop button 691...
Page 701: ...1201 Cause The ink tank cover is open What to Do Close the ink tank cover 701...
Page 702: ...1210 Cause The ink tank cover is open What to Do Close the ink tank cover 702...
Page 729: ...1500 Cause The ink in the ink tank is running low What to Do Prepare a new ink tank 729...
Page 765: ...3330 Cause Print data may be corrupt What to Do Check the print job 765...
Page 767: ...3332 Cause Unsupported JPEG data format What to Do Print from a PC 767...
Page 768: ...3333 Cause Unsupported JPEG data format What to Do Print from a PC 768...


