background image

13

6

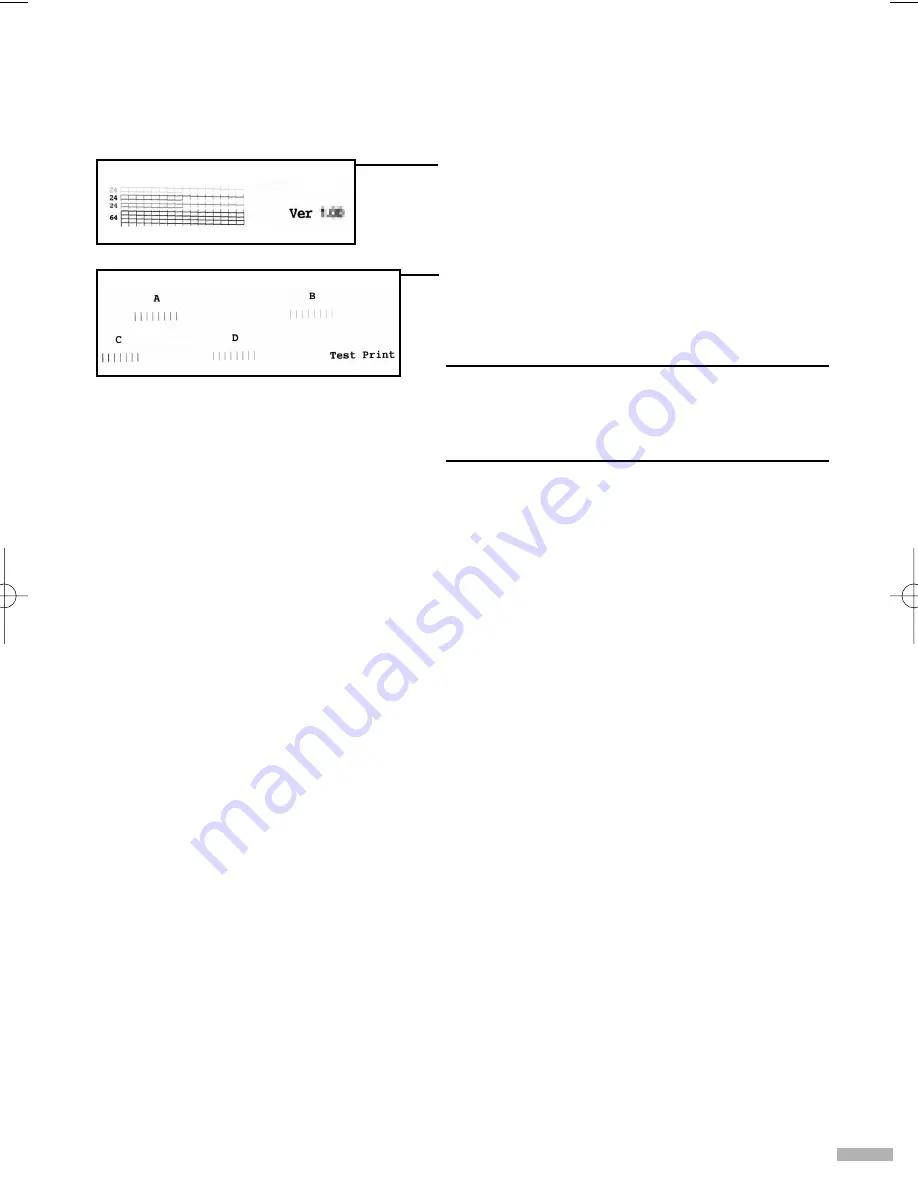
Examine the printed nozzle check
pattern to check if all colours (yellow,
magenta, cyan, and black) are printed
and all lines are drawn completely.

If this pattern is not printed completely, clean the
print head. Refer to Section “Examining the
Nozzle Check Pattern” of the User’s Guide on
page 80 for how to check the printed nozzle check
pattern.

If ruled lines are horizontally misaligned, you
have to adjust the print head position. Refer to
Section “Aligning the Print Head” of User’s
Guide on page 86.

Note

If ruled lines are printed irregularly, adjust the
print head position. They will be printed
correctly.

S200_QSG.qxd  9/21/01 4:32 PM  Page 13

Summary of Contents for PowerShot S200

Page 1: ...stalling the BJ Cartridge 4 Loading Paper 6 Installing the Printer Driver 7 Printing the Nozzle Check Pattern 11 Basic Operations 14 Printing with Windows 14 Printing with Macintosh 16 Print Head Main...

Page 2: ...or efficiency The International ENERGY STAR Office Equipment Program is a global program that promotes energy saving through the use of computer and other office equip ment The program backs the devel...

Page 3: ...These must be observed for safe operation Instructions that if ignored could result in personal injury or material damage caused by incorrect operation of the equipment These must be observed for safe...

Page 4: ...rface 2 Remove the tape from the printer as shown Ensure to remove the tape inside the printer 3 Attach the paper rest to the sheet feeder 4 Attach the output tray as shown 2 Setting Up 1 Preparing th...

Page 5: ...ars when carrying out the following operations click Cancel and turn off the computer 2 Connecting the Printer to the Computer Use a USB cable USB cable Recommended Canon or other computer manufacture...

Page 6: ...stretch or excessively bend or twist the power cord Do not place heavy objects on the power cord Never use any power supply other than the standard power supply available in the country of purchase Us...

Page 7: ...tach the protective cap once it has been removed 5 Place the BJ Cartridge in the holder 5 6 Lock the BJ Cartridge into place by lowering the lever Do not touch the lock lever once the print head has b...

Page 8: ...To avoid paper jams fan the stack to remove static cling then align the edges of the stack by tapping it on a flat surface 4 Load the paper aligning it with the right side of the sheet feeder You can...

Page 9: ...utton 5 Installing the Printer Driver Installing the Printer Driver Windows Notes Do not disconnect the cable or remove the CD ROM during the installation The driver cannot be correctly installed The...

Page 10: ...en click Install 6 When the screen shown on the left appears plug the printer in If the printer is recognised the printer driver will be automatically installed Note If the connection is not recognise...

Page 11: ...tallation as this may result in the computer or printer not operating normally Before installing the driver disable all virus detection programs and automatically loading programs or remove them from...

Page 12: ...s to be saved click Cancel then save the document After saving the document begin again from Step 4 7 Click Restart The computer restarts 8 Select Chooser in the Apple Menu 9 Click the icon for the pr...

Page 13: ...s Me Windows 98 Properties Windows XP Windows 2000 Printing Preferences to open the Printer Properties dialog box 5 Click the Maintenance tab and then click the Nozzle Check icon 6 When the confirmati...

Page 14: ...heck pattern If ruled lines are horizontally misaligned you have to adjust the print head position Refer to Section Aligning the Print Head of User s Guide on page 85 Note If ruled lines are printed i...

Page 15: ...int head Refer to Section Examining the Nozzle Check Pattern of the User s Guide on page 80 for how to check the printed nozzle check pattern If ruled lines are horizontally misaligned you have to adj...

Page 16: ...click Windows Me Windows 98 OK Windows XP Windows 2000 Print Printing will start in a few moments Basic Operations If you detect smoke unusual smells or strange noises around the printer immediately u...

Page 17: ...ns in this settings tab This may not appear when using Windows 2000 If this happens click Start then select Programs Canon S200 Guide 5 button Click this to change the cursor shape to By clicking on t...

Page 18: ...box in your application to print the document On the File menu click Print Check the application s users manual for the actual procedures 4 Specify the print settings according to your requirements F...

Page 19: ...document you want to print To specify more detailed settings for the print quality or colour select Manual and click Details 3 Print button Click this to start printing Notes See Balloon Help for more...

Page 20: ...Blurring Occurs or If a Specific Colour Does Not Print Perform print head cleaning to improve the print quality Ensure that the printer is pluged in and follow the instructions below Windows Open the...

Page 21: ...connected using the USB cable and that the printer is turned on 2 Select Start Settings and Control Panel In Windows XP after clicking the Start button select Control Panel Select Printers and Other H...

Page 22: ...raded to Windows 2000 15MB of available hard disk space for Windows 98 Windows Me 25MB of available hard disk space for Windows 2000 16MB of available RAM for Windows 98 32MB of available RAM for Wind...

Page 23: ......

Page 24: ...QA7 1690 V01 XX2001XX CANON INC 2001 PRINTED IN THAILAND...

Reviews: