background image

18

Preparing to Download Images

„

Items to Prepare

• Camera and computer

• Canon Digital Camera Solution Disk supplied with the camera

• Interface cable supplied with the camera

1.

Install the software.

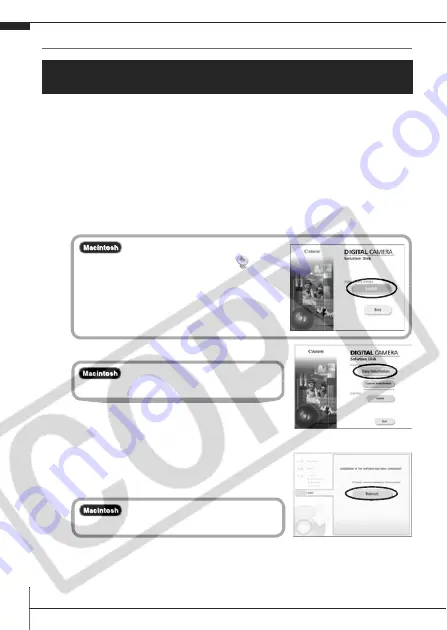
1. Place the Canon Digital Camera Solution Disk in the 

computer’s CD-ROM drive.

2. Click [Easy Installation].

Proceed with the installation while 
reviewing installation settings.

3. When the installation is complete, 

click either the [Finish] or [Restart] 
button that appears.

4. Remove the Canon Digital Camera Solution Disk from the 

CD-ROM drive when your normal desktop screen appears.

Ensure that you install the software first before connecting the 
camera to the computer.

 Double-click the [Canon 

Digital Camera Installer] icon 

 in 

the CD-ROM window. When the 
installer panel appears, click [Install].

 Select [Easy Installation] and 

click [Next].

 When the installation is 

finished, click [Exit].

Summary of Contents for PowerShot A530

Page 1: ...us and Settings Printing Downloading Images to a Computer Basic CDI E220 010 2006 CANON INC PRINTED IN MALAYSIA Camera User Guide Please Read This First This guide explains how to prepare the camera a...

Page 2: ...anguage Shooting Playback Erasing Menus and Settings Handling precautions references to the various shooting and playback functions Printing Installing the software Downloading images to a computer Us...

Page 3: ...g the Memory Card 1 Insert the memory card until it clicks into place 2 Close the memory card slot battery cover Preparations See the Advanced Guide Battery Handling p 102 Ensure that the memory card...

Page 4: ...th your finger until the memory card clicks and then release it You can use SD memory cards and MultiMediaCards with this camera These cards are collectively called memory cards in this guide SD stand...

Page 5: ...menu p 13 Setting the Display Language 1 Set the mode switch to playback 2 Hold down the FUNC SET button and press the MENU button 3 Use the or button to select a language and press the FUNC SET butt...

Page 6: ...the shutter button halfway to focus When the camera focuses the camera beeps twice and the indicator lights green 2 Press the shutter button fully to shoot The shutter sound will play and the image w...

Page 7: ...hooting Functions Selecting a Shooting Mode 1 Set the shooting mode dial to the desired mode a In the and modes use the or button b to select a shooting mode Shooting Modes See the Advanced Guide Revi...

Page 8: ...mode uses an optimal white balance setting to reduce bluish tones and record images with a natural hue The exposure is regulated to use the flash as little as possible Kids Pets Allows you to capture...

Page 9: ...forms a color specified in the LCD monitor into another color Creative zone You can freely select camera settings such as the exposure and aperture value to suit your shooting purposes The shutter spe...

Page 10: ...Rec menu Auto with red eye reduction The flash fires automatically and fires the red eye reduction lamp each time Auto The flash fires automatically Flash on with red eye reduction The red eye reducti...

Page 11: ...ash recharging begins the lamp blinks orange and the LCD monitor turns off When recharging ends the orange lamp turns off and the LCD monitor turns on The time required for flash recharging will chang...

Page 12: ...ting 84 x 63 mm 3 3 x 2 5 in Minimum shooting distance 30 cm 12 in PowerShot A530 Maximum wide angle setting 60 x 45 mm 2 4 x 1 8 in Minimum shooting distance 5 cm 2 0 in Maximum telephoto setting 94...

Page 13: ...images more rapidly but shows them less clearly 1 In the playback mode use the or button to select an image to erase a and press the button b 2 Confirm that Erase is selected and press the FUNC SET b...

Page 14: ...ton cUse the or button to select a menu item Some items may not be selectable in some shooting modes dUse the or button to select an option for the menu item You can select further options with the ME...

Page 15: ...ot be selectable in some shooting modes dUse the or button to select an option Menu items followed by an ellipsis can only be set after pressing the FUNC SET button to display the next menu Press the...

Page 16: ...e printer s power 1 Since this camera uses a standard protocol PictBridge you can use it with other PictBridge compliant printers in addition to Canon brand printers 2 You can also use card photo prin...

Page 17: ...will light blue The displayed icon will vary according to the printer model 3 Select an image to print using the or button b and press the button c The button will blink blue and printing will start S...

Page 18: ...See the Software Starter Guide for details Downloading Images to a Computer Supplied Software Install It Do Not Install It Downloading Method Computer Procedure Camera Procedure Computer Procedure OS...

Page 19: ...Windows 2000 Windows XP 256 MB or more Interface USB Free Hard Disk Space Canon Utilities ZoomBrowser EX 200 MB or more PhotoStitch 40 MB or more Canon Camera TWAIN Driver 25 MB or more Canon Camera...

Page 20: ...le reviewing installation settings 3 When the installation is complete click either the Finish or Restart button that appears 4 Remove the Canon Digital Camera Solution Disk from the CD ROM drive when...

Page 21: ...ble in all the way 2 Set the camera s mode switch to playback and turn on the power The camera and computer will be able to communicate Always grasp the sides of the connector when disconnecting the i...

Page 22: ...mall versions of the downloaded images will display in the ZoomBrowser EX Main Window By default the downloaded images are saved into subfolders according to their shooting dates If the window to the...

Page 23: ...the images using the camera or the computer By default the downloaded images are saved into the Pictures folder Thumbnails small versions of the downloaded images will display in the ImageBrowser Bro...

Page 24: ...nk blue while downloading is in progress The display will return to the Direct Transfer menu when the download is complete To cancel the download press the FUNC SET button All Images Transfers and sav...

Page 25: ...yback Advanced Guide p 73 Press the MENU button to return to the Direct Transfer menu Only JPEG images can be downloaded as wallpaper for a computer On the Windows platform the files are automatically...

Page 26: ...o human or animal eyes Store this equipment out of the reach of children and infants Avoid dropping or subjecting the camera to severe impacts Do not touch the flash portion of the camera if it has be...

Reviews: