3
ENGLISH
3
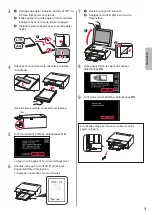
a
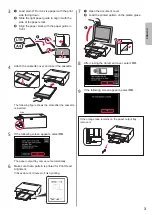
Load plain LTR or A4 size paper with the print
side facing down.
b
Slide the right paper guide to align it with the
side of the paper stack.
c
Align the paper stack with the paper guide in
front.
a
b
c
4
Attach the cassette cover and insert the cassette
.
The following igure shows the state after the cassette
is inserted.
Side
5
If the following screen appears, select
OK
.
The paper output tray comes out automatically.
6
Make sure that a pattern is printed for Print Head
Alignment
.
It takes about
4
minutes to inish printing.
7
a
Open the document cover
.
b
Load the printed pattern on the platen glass
.
a
b
8
After closing the document cover, select
OK
.
9
If the following screen appears, select
OK
.
If the orange tape remains on the paper output tray,
remove it.
Summary of Contents for PIXMA TS9140
Page 1: ...Canon Pixma TS9140 Black 2231C007AA...
Page 20: ...1 1 Windows 2 1 2 a b b a 3 4 5 ON 6 7 Canon Canon 8 OK 3 1 A A...
Page 21: ...2 2 a b a b 3 Y 4 5 4 6 4 Print Head Alignment 1 a b a b 2 LTR A4...
Page 22: ...3 3 a LTR A4 b c a b c 4 5 OK 6 Print Head Alignment 4 7 a b a b 8 OK 9 OK...
Page 27: ...8 1 2 a b a b 3 a b a b 4 1 2 3 4 5 Color...
Page 28: ...1 1 Windows 2 1 2 a b b a 3 4 5 ON 6 7 Canon Canon 8 OK 3 1 A A...
Page 29: ...2 2 a b a b 3 Y 4 5 4 6 4 Print Head Alignment 1 a b a b 2 LTR A4...
Page 30: ...3 3 a LTR A4 b c a b c 4 5 OK 6 Print Head Alignment 4 7 a b a b 8 OK 9 OK...
Page 35: ...8 1 2 a b a b 3 a b a b 4 1 2 3 4 5 Color...
Page 36: ...8 1 2 a b a b 3 a b a b 4 1 2 3 4 5 Color...
Page 41: ...3 3 A4 LTR a b c a b c 4 5 OK 6 Print Head Alignment 4 7 a b a b 8 OK 9 OK...
Page 42: ...2 2 a b a b 3 Y 4 5 4 6 4 Print Head Alignment 1 a b a b 2 A4 LTR...
Page 43: ...1 1 Windows 2 1 2 a b b a 3 4 5 ON 6 7 Canon Canon 8 OK 3 1 A A...
Page 44: ...RMC Regulatory Model Code K10455...
Page 46: ...3D...


