background image

7

ENGLISH

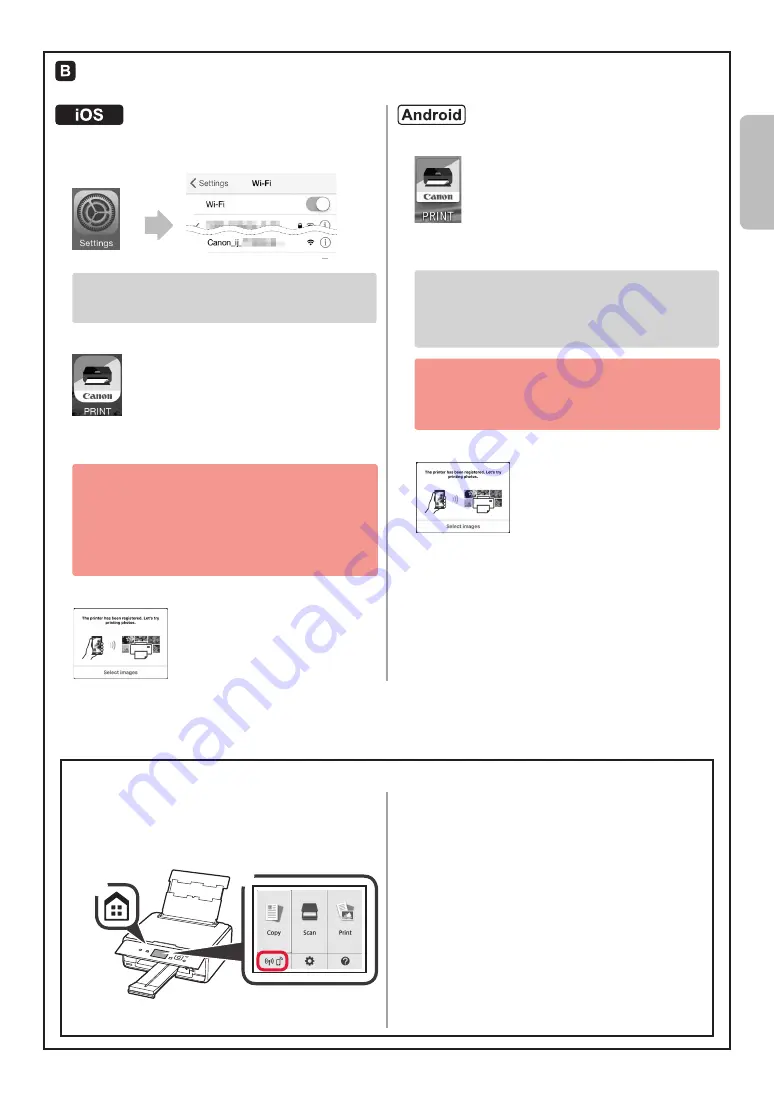
Procedures below vary depending on iOS or Android. Select your operating system and proceed to its procedure.

Tap 

Settings

 on the HOME screen, and then tap 

Canon_ij_XXXX

 on the Wi-Fi settings.

If 

Canon_ij_XXXX

 does not appear on the list, see 

"Preparation of the Printer" below to operate the 

printer, and then repeat step 

a

.

Tap the installed application software.

Follow the on-screen instructions to register the 

printer.

Follow the on-screen instructions to proceed 

with the setup.

If you select 

Auto Select Conn. Method 

(recommended)

 on the connection method 

selecting screen, the appropriate connection 

method is selected automatically depending on your 

environment.

Make sure that the following screen appears.

Tap the installed application software.

Follow the on-screen instructions to register the 

printer.

If a message saying "

Printer is not registered. 

Perform printer setup?

" does not appear, see 

"Preparation of the Printer" below to operate the 

printer, and then wait for a while until a message 

appears.

Follow the on-screen instructions to proceed 

with the setup.

The appropriate connection method is selected 

depending on your environment.

Make sure that the following screen appears.

Preparation of the Printer

The connection with your smartphone is now complete. You can print from your 

smartphone.

To print photos, load photo paper. Proceed to "Loading Photo Paper" on page 8.

Press the 

HOME

 button on the printer.

Use the 

{

}

[

, or 

button to select the icon 

on the lower left of the HOME screen, and then 

press the 

OK

 button.

a

b

Use the 

[

 or 

]

 button to select 

Yes

 or 

No

, and 

then press the 

OK

 button.

Use the 

{

 or 

}

 button to select 

LAN settings


Wireless LAN

 > 

Wireless LAN setup

 > 

Easy wireless connect

 in order, and then press 

the 

OK

 button.

Use the 

[

 or 

]

 button to select 

Yes

, and then 

press the 

OK

 button.

Return to the operation of your smartphone.

Summary of Contents for PIXMA TS5060

Page 1: ...Gu a de inicio Getting Started...

Page 2: ...1 2 Instalaci n de la impresora p gina 1 Conexi n con el ordenador y con el tel fono inteligente o la tableta p gina 5 Installing the Printer page1 Connecting with Computer and Smartphone Tablet page5...

Page 3: ...acking materials such as tape and protective film on the LCD from outside the printer 2 a Hook the hollows on the both sides of the printer with your fingers and open the scanning unit cover b Remove...

Page 4: ...he Y shape air hole blocked B Do not touch A B 4 Insert the ink tank into the print head holder and push it down firmly until it snaps into place After the lamp lights up install the next ink tank 5 C...

Page 5: ...cover 5 Pull out the paper output tray 6 Use the or button to select OK and then press the OK button 7 When the pattern for print head alignment is printed select Yes and press the OK button 8 Follow...

Page 6: ...wireless router USB cable Use the or button to select Do not connect on the connection method selecting screen and then press the OK button The setup is now complete You may not connect your smartpho...

Page 7: ...xplorer on the taskbar c Select This PC or Computer on the left side of the opened window d Double click the CD ROM icon on the right side of the window If the contents of the CD ROM appear double cli...

Page 8: ...off when no operation is made for 10 minutes Press one of the buttons on the operation panel except for the ON button to display the screen If the following screen appears Check the icon on the lower...

Page 9: ...a message saying Printer is not registered Perform printer setup does not appear see Preparation of the Printer below to operate the printer and then wait for a while until a message appears Follow t...

Page 10: ...b 4 Close the feed slot cover Read the message on the printer s screen and register the information of the loaded paper 5 Pull out the paper output tray Loading Photo Paper 1 Make sure the printer is...

Page 11: ...les de empaquetado como la cinta y la pel cula protectora de la pantalla LCD del exterior de la impresora 2 a Coloque sus dedos en las hendiduras a ambos lados de la impresora y abra la cubierta unida...

Page 12: ...erte el dep sito de tinta en el soporte del cabezal de impresi n y empuje hacia abajo firmemente hasta que encaje en su sitio Cuando la luz se encienda instale el siguiente dep sito de tinta 5 Comprue...

Page 13: ...n 5 Extraiga la bandeja de salida del papel 6 Utilice el bot n o para seleccionar OK y a continuaci n pulse el bot n OK 7 Cuando se imprima el modelo de la alineaci n del cabezal de impresi n seleccio...

Page 14: ...ilice el bot n o para seleccionar No conectar Do not connect en la pantalla de selecci n del m todo de conexi n y pulse el bot n OK Ha finalizado la configuraci n No puede conectar su tel fono intelig...

Page 15: ...his PC u Equipo Computer en el margen izquierdo de la ventana abierta d Haga doble clic en el icono del CD ROM que se encuentra en el margen derecho de la ventana Si aparece el contenido del CD ROM ha...

Page 16: ...o se utiliza durante 10 minutos la pantalla se apaga Para mostrar la pantalla pulse cualquier bot n en el panel de control excepto el bot n ACTIVADO ON Si aparece la siguiente pantalla Compruebe el co...

Page 17: ...rinter is not registered Perform printer setup consulte la secci n Preparaci n de la impresora a continuaci n para hacer funcionar la impresora y espere un momento hasta que aparezca un mensaje Siga l...

Page 18: ...anura de alimentaci n Lea el mensaje en la pantalla de la impresora y registre la informaci n del papel cargado 5 Extraiga la bandeja de salida del papel Carga de papel fotogr fico 1 Aseg rese de que...

Page 19: ...Videoteca sobre procedimientos How To Video Library RMC Regulatory Model Code K10445...

Page 20: ...CANON INC 2016 XXXXXXXX Acceda al sitio web Leer el Manual en l nea Preguntas m s frecuentes Visit the Website Read Online Manual Frequently Asked Questions PRINTED IN XXXXXXXX QT6 1476 V01...

Reviews: