background image

2

3

3

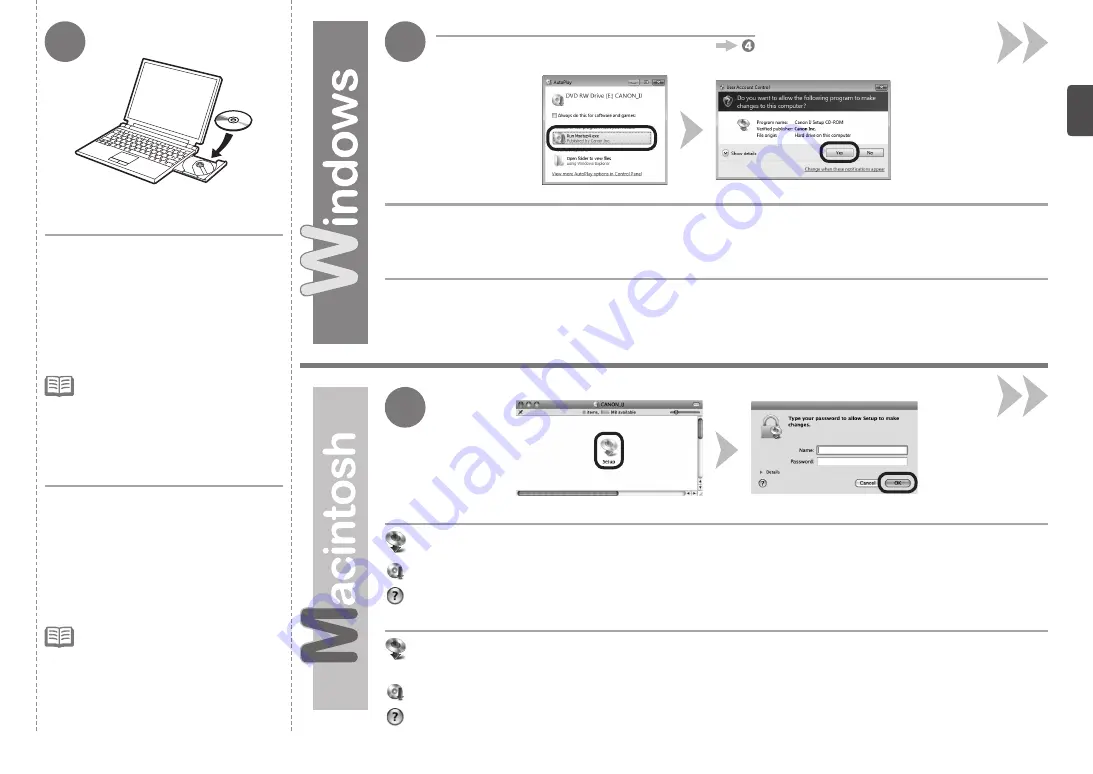
Windows 7/Windows Vista

Windows XP

Haga clic en 

Ejecutar Msetup4.exe (Run Msetup4.exe)

 en la pantalla 

Reproducción automática (AutoPlay)


y, a continuación, haga clic en 

Sí (Yes)

 o en 

Continuar (Continue)

 en el cuadro de diálogo 

Control de 

cuentas de usuario (User Account Control)

.

Si vuelve a aparecer el cuadro de diálogo 

Control de cuentas de usuario (User Account Control)

 en los pasos siguientes, haga clic 

en 

Sí (Yes)

 o en 

Continuar (Continue)

.

1.  Compruebe que el equipo esté 

apagado.

2.  Encienda el ordenador.

3.  Introduzca el 

CD-ROM de 

instalación (Setup CD-ROM)

 en la 

unidad de CD-ROM.

Si usa Windows, el programa de instalación se 

inicia automáticamente.

Para Windows

Si el programa no se inicia 

automáticamente, haga doble clic 

en el icono del CD-ROM en 

Equipo 

(Computer)

 o 

Mi PC (My Computer)

Cuando aparezca el contenido del CD-

ROM, haga doble clic en 

MSETUP4.

EXE

.

Si la carpeta del CD-ROM no se abre automáticamente, haga doble clic en el icono del CD-ROM del escritorio.

Si no sabe su nombre o contraseña de administrador, haga clic en el botón el Ayuda y, a continuación, siga las instrucciones que 

aparezcan en pantalla.

Haga doble clic en el icono 

Setup

 de la carpeta del CD-ROM para pasar a la pantalla siguiente. Introduzca 

el nombre de administrador y la contraseña; a continuación, haga clic en 

OK

.

1.  Make sure that the machine has 

turned off.

2.  Turn on the computer.

3.  Insert the 

Setup CD-ROM

 into the 

CD-ROM drive.


If you are using Windows, the setup program 

starts automatically. 

Click 

Run Msetup4.exe

 on the 

AutoPlay

 screen, then click 

Yes

 or 

Continue

 on the 

User Account Control


dialog box.

If the 

User Account Control

 dialog box reappears in following steps, click 

Yes

 or 

Continue

.

For Windows

If the program does not start 

automatically, double-click the CD-ROM 

icon in 

Computer

 or 

My Computer

When the CD-ROM contents appear, 

double-click 

MSETUP4.EXE


Double-click the 

Setup

 icon of the CD-ROM folder to proceed to the following screen. Enter your 

administrator name and password, then click 

OK

.

If you do not know your administrator name or password, click the help button, then follow the on-screen instructions.

If the CD-ROM folder does not open automatically, double-click the CD-ROM icon on the desktop.

Summary of Contents for PIXMA MX410 Series

Page 1: ...mano para utilizarlo como referencia en el futuro Guía de inicio Equipo multifunción para oficina Canon Inkjet Léame en primer lugar Make sure to read this manual before using the machine Please keep it in hand for future reference Getting Started Canon Inkjet Office All In One Read Me First ...

Page 2: ... Protected Setup P 46 Configuración inalámbrica mediante WCN Windows Connect Now P 49 Instalación del software 2 P 50 Registro Macintosh 2 P 56 Información 2 P 59 13 Mantenimiento P 62 14 Especificaciones P 64 10 Software de aplicación P 40 Symbols Used in This Document Microsoft is a registered trademark of Microsoft Corporation Windows is a trademark or registered trademark of Microsoft Corporat...

Page 3: ...lámbrica e instalación del software Instalación del software Instalación del software Instalación finalizada Configuración de recepción de faxes Network Connection Wireless Connection USB Connection Machine Preparation Software Installation Software Installation Installation Complete Machine Installation Flow Wireless Connection Setup Software Installation Using from Additional Computers when the ...

Page 4: ...uía avanzada Proporciona consejos para solucionar los problemas que puedan surgir al utilizar el equipo Solución de problemas Solución de problemas de configuración de red Getting Started this manual Describes basic operations and media and gives an introduction to other functions available Describes various operating procedures to make full use of machine Describes troubleshooting tips for proble...

Page 5: ...r inalámbrico El cable de configuración de red suministrado se necesita temporalmente para la configuración inalámbrica Cable de configuración de red When using the machine over a wireless connection a commercial access point or router that supports IEEE802 11n g b is required Devices Required for Wireless Connection Access point or wireless router Network setup cable The supplied network setup ca...

Page 6: ...d también se puede utilizar para la conexión USB 1 Cartuchos FINE FINE cartridges Color Negro 2 Cable de alimentación 3 Cable de línea telefónica 4 Cable de configuración de red Preparation Do not install the machine where an object may fall on it In addition do not place any object on the top of the machine It may fall into the machine when opening covers resulting in malfunction Paper Output Tra...

Page 7: ...es protectores del exterior del equipo La forma y la posición de la cinta y los materiales protectores pueden variar respecto a las que se muestran aquí 1 Open the Paper Output Tray A 2 Make sure the Document Cover B is closed then lift to open the Scanning Unit Cover C 3 Fix it with the Scanning Unit Support D Remove all the protective materials and orange tape from the outside of the machine The...

Page 8: ... cubierta ligeramente 2 Pliegue el soporte de la unidad de escaneado 3 Cierre después la unidad de escaneado cubierta con cuidado Remove both the orange tape E and the protective material F carefully 1 Lift the Scanning Unit Cover slightly 2 Fold the Scanning Unit Support 3 Close the Scanning Unit Cover gently ...

Page 9: ...tomático mediante el cable de línea telefónica 2 No utilice un adaptador de clavija de línea telefónica doble para conectar el equipo y el teléfono en paralelo Puede que el equipo no funcione correctamente Connect one end of supplied telephone line cable G to the lower connector labeled L on the machine and then connect the other end to the telephone jack on the wall H If you cannot send faxes aft...

Page 10: ...ación pulse el botón OK Si desea cambiar el idioma de la pantalla LCD pulse el botón Atrás Back M en el panel de control para volver a la pantalla Selección idioma Language selection Insert the power cord into the connector on the left side of the machine and into the wall outlet firmly Do NOT connect the network setup cable USB cable at this stage Make sure that the Document Cover is closed Press...

Page 11: ...nga antes de retirar el cable de alimentación 1 Pulse el botón ACTIVADO ON para apagar el equipo 2 Asegúrese de que todas las luces del panel de control estén apagadas Cuando sea necesario desconectar el equipo When this screen is displayed proceed to the next step When it is necessary to turn off the machine Be sure to follow the procedure below Operating noise may continue for up to 30 seconds u...

Page 12: ...color en sus ranuras y correspondientes Si el soporte de cartucho FINE FINE Cartridge Holder no se mueve compruebe que el equipo esté encendido Para conocer todos los detalles consulte de a en la página 8 de 1 Preparación 1 Make sure the Document Cover A is closed then lift to open the Scanning Unit Cover D 2 Fix it with the Scanning Unit Support E Install the FINE Cartridges When you lift the Sca...

Page 13: ...te con tinta de la cinta protectora retirada No toque las partes metálicas de los cartuchos FINE FINE Cartridges Si los toca puede que el equipo no imprima correctamente Open the Ink Cartridge Locking Cover on the right side Pinch I firmly and pull up the cover After removing the Black FINE Cartridge from its box pull the orange protective tape J in the direction of the arrow and remove it careful...

Page 14: ...bien iluminado Instale el cartucho FINE FINE Cartridge negro en la ranura derecha y el cartucho FINE FINE Cartridge de color en la ranura izquierda Place the Black FINE Cartridge into the right slot Push down of the Ink Cartridge Locking Cover until it snaps into place View the Ink Cartridge Locking Cover straight on and check that it is locked correctly not at an angle Do not knock the FINE Cartr...

Page 15: ...tuchos FINE FINE Cartridges estén correctamente instalados Si no se utiliza el equipo durante unos 5 minutos se desconectará la pantalla LCD Pulse cualquier botón excepto el botón ACTIVADO ON para restaurarla Insert the Color FINE Cartridge into the left FINE Cartridge Holder in the same way as the Black FINE Cartridge 1 Lift the Scanning Unit Cover slightly 2 Fold the Scanning Unit Support 3 Clos...

Page 16: ...btener más información sobre cómo manipular el papel consulte Carga de papel en el manual en pantalla Guía básica después de finalizar la instalación Open the Paper Support A Move the Paper Guides B to both edges Load Paper Load paper in the center of the Rear Tray C Load paper in portrait orientation with the printing side facing up Slide the left and right Paper Guides against both edges of the ...

Page 17: ...cepción de faxes Puede cambiar el modo de recepción después de finalizar la instalación Para obtener más información consulte Establecimiento del modo de recepción en el manual en pantalla Guía básica Set Up for Fax Reception Read this section only when using the fax features If not using the fax features go to 5 Select Connection Method on page 18 Depending on your needs select one of the followi...

Page 18: ...el equipo detecta el patrón de sonido de fax Su proveedor del servicio telefónico debe ofrecer DRPD Póngase en contacto con él para obtener más información del servicio When a voice call arrives When a fax call arrives The fax is received automatically The call cannot be answered Responses to Calls in Each Mode FAX only mode TEL priority mode The telephone s ringtone sounds The fax is received aut...

Page 19: ...da Para obtener más información sobre la configuración avanzada del modo de recepción consulte el manual en pantalla Guía básica después de finalizar la instalación Press the FAX button A then press the Menu button B Use the or button C to select Receive mode set then press the OK button Select a receive mode then press the OK button Select No then press the OK button The selected receive mode is ...

Page 20: ...oporcionado con el mismo o póngase en contacto con el fabricante Si el dispositivo admite una conexión inalámbrica compruebe si es compatible con IEEE802 11n g b Select Connection Method Connect to a computer with a USB cable Connect to computers without using cables Use from multiple computers Wireless Connection USB Connection Intended Use Connection Method Go to 6 Set Up a USB Connection Softwa...

Page 21: ...sistema consulte 14 Especificaciones Para los usuarios de habla hispana en EE UU Consulte la hoja Información adicional para usuarios españoles para instalar la versión en español del software To use the machine by connecting it to a computer software including the drivers needs to be copied installed to the computer s hard disk The installation process takes about 20 minutes The installation time...

Page 22: ...scuchando el ruido de funcionamiento Aún no conecte el equipo al ordenador mediante el cable USB Si ya está conectado desconecte el cable USB del ordenador If the USB cable is connected before the software is installed If the dialog box closes proceed to 1 Remove the USB cable connected to your computer 2 Click Cancel 3 Proceed to For Windows 7 1 Remove the USB cable connected to your computer 2 P...

Page 23: ...de administrador haga clic en el botón el Ayuda y a continuación siga las instrucciones que aparezcan en pantalla Haga doble clic en el icono Setup de la carpeta del CD ROM para pasar a la pantalla siguiente Introduzca el nombre de administrador y la contraseña a continuación haga clic en OK 1 Make sure that the machine has turned off 2 Turn on the computer 3 Insert the Setup CD ROM into the CD RO...

Page 24: ... cualquier instrucción en pantalla para llevar a cabo la instalación del software Seleccione Utilizar la impresora mediante USB Use the printer via USB y a continuación haga clic en Siguiente Next Click Easy Install The drivers application software and on screen manuals are installed Click Install If you want to select particular items to install click Custom Install Follow any on screen instructi...

Page 25: ...y Program haga clic en Aceptar Agree Si hace clic en No aceptar Do not agree Extended Survey Program no se instalará Esto no afecta al funcionamiento del equipo USB Port Important Information for the Installation If the serial number is not displayed on the registration screen input the number found inside the machine If the power is on the FINE Cartridge Holder will move when the Scanning Unit Co...

Page 26: ...rdelo en un lugar seguro Los botones que muestre Solution Menu EX pueden variar en función del país o la región de adquisición Para Windows Se iniciará Solution Menu EX Para Macintosh Solution Menu EX se iniciará al hacer clic en OK en el cuadro de diálogo Canon Solution Menu EX Click Exit to complete the installation It is necessary to restart the computer before scanning using the Operation Pane...

Page 27: ...uipo y el ordenador a la LAN en el mismo segmento de red Para realizar la configuración utilizando WPS Wi Fi Protected Setup vaya a la página 46 Para realizar la configuración utilizando WCN Windows Connect Now vaya a la página 49 Set Up a Wireless Connection Internet Access point or wireless router etc An Ad hoc connection which establishes a direct connection to the computer over a wireless conn...

Page 28: ...do acceder a la red Si aparece dicho mensaje configure el software de seguridad para que permita siempre el acceso Para obtener información sobre los requisitos del sistema consulte 14 Especificaciones Software Installation 1 To use the machine by connecting it to a computer software including the drivers needs to be copied installed to the computer s hard disk The installation process takes about...

Page 29: ...iguración de red Si el programa no se inicia automáticamente haga doble clic en el icono del CD ROM en Equipo Computer o Mi PC My Computer Cuando aparezca el contenido del CD ROM haga doble clic en MSETUP4 EXE Para Windows If the network setup cable is connected before the software is installed If the dialog box closes proceed to 1 Remove the network setup cable connected to your computer 2 Click ...

Page 30: ...ministrador y la contraseña a continuación haga clic en OK Haga clic en Instalación simple Easy Install Se instalarán los controladores el software de aplicación y los manuales en pantalla Si desea seleccionar unos elementos concretos para instalarlos haga clic en Instalación personalizada Custom Install Click Run Msetup4 exe on the AutoPlay screen then click Yes or Continue on the User Account Co...

Page 31: ...s instrucciones que aparezcan en pantalla y continúe con la instalación Haga clic en Salir Exit en la pantalla de finalización de la instalación y a continuación vuelva a empezar desde y asegúrese de seleccionar Utilizar la impresora con conexión LAN inalámbrica Use the printer with wireless LAN connection en Click Install Select Use the printer with wireless LAN connection then click Next Follow ...

Page 32: ...al ordenador mediante el cable de configuración de red Para Macintosh Siga las instrucciones que aparezcan en pantalla y haga clic en Siguiente Next El puerto USB se encuentra junto a la parte posterior central del equipo Make sure that any of the lamps on the mode buttons A lights then click OK When the Set Up New Printer screen appears click Next If the Detected Printers List screen appears clic...

Page 33: ... clic en Conectar Connect Vaya a en la página 32 SSID Identificador del punto de acceso específico Clave de red También se conoce como clave de codificación clave WEP o contraseña WPA WPA2 clave previamente compartida Contraseña para evitar el acceso no autorizado a la red If the Detected Access Points List or Access Points screen appears If this screen does not appear perform on page 32 2 Enter t...

Page 34: ...Cable retire el cable de configuración de red y a continuación haga clic en Siguiente Next Si aparece la pantalla Config Automática Automatic Setup haga clic en OK y a continuación ejecute Vaya a Información 1 en la página 36 Vaya a Registro Macintosh 1 en la página 33 If the Confirm Connection Access Point screen appears Make sure that the target access point is displayed then click Yes If you ar...

Page 35: ...lic en Registrar impresora Register Printer Vaya a Vaya a en la página 34 Mac OS X v 10 4 11 v 10 6 x v 10 5 x Seleccione Canon MX410 series canonijnetwork y haga clic en Añadir Add Vaya a en la página 35 This section describes how to register the machine on a Macintosh computer Windows users go to Information 1 on page 36 When the Register Printer and Scanner screen appears click Register Printer...

Page 36: ...anon MX410 series a la lista de impresoras Seleccione Canon IJ Network en el menú desplegable elija Canon MX410 series en la lista de impresoras y a continuación haga clic en Añadir Add Vaya a en la página 35 Click More Printers in the Printer Browser window When the Printer List window appears click Add When the You have no printers available screen appears click Add Make sure that Canon MX410 se...

Page 37: ...ntinuación vaya a Información 1 en la página 36 Cuando aparezca la pantalla Registrar impresora y escáner Register Printer and Scanner haga clic en Registrar escáner Register Scanner Select Canon MX410 series on the Canon IJ Network Scanner Selector EX screen then click OK Click Next on the Register Printer and Scanner screen Next go to Information 1 on page 36 When the Register Printer and Scanne...

Page 38: ...a clic en Aceptar Agree Si hace clic en No aceptar Do not agree Extended Survey Program no se instalará Esto no afecta al funcionamiento del equipo Click Next Follow any on screen instructions to proceed with the software installation Information 1 If the serial number is not displayed on the registration screen input the number found inside the machine Important Information for the Installation I...

Page 39: ...ada Custom Install en y a continuación seleccione Controlador de impresora XPS XPS Printer Driver en la pantalla Instalación personalizada Custom Install Para conocer todos los detalles sobre las prácticas funciones del controlador de impresora XPS XPS Printer Driver consulte el manual en pantalla Guía avanzada Click Exit to complete the installation For Macintosh Remove the Setup CD ROM and keep ...

Page 40: ...alación del software consulte Instalación del software 2 en la página 50 Ordenadores adicionales de la misma red Permite que el ordenador utilice el equipo If the machine is already connected to a wireless connection it can be used from additional computers on the same network For details on the software installation procedure refer to Software Installation 2 on page 50 Other settings are not requ...

Page 41: ...desde 7 Configuración de una conexión inalámbrica en la página 25 para configurar una conexión inalámbrica Vaya a la página 25 Change from USB to Wireless Connection USB Connection Wireless Connection To change to a wireless connection from a USB connection start over from 7 Set Up a Wireless Connection on page 25 to set up a wireless connection Go to page 25 ...

Page 42: ...nicamente de las páginas deseadas mediante su selección en la vista preliminar Impresión de partes seleccionadas de varias páginas después de editarlas Para conocer todos los detalles sobre Easy WebPrint EX consulte el manual en pantalla Guía básica Solution Menu EX is a gateway to functions and information that allow you to make full use of the machine For example Various application software are...

Page 43: ...Photo Print y seguidamente en Impresión fotográfica Photo Print C Se inicia Easy PhotoPrint EX Para obtener más información sobre cómo iniciar Solution Menu EX consulte 10 Software de aplicación en la página 40 Try Using the Machine Load paper in the Rear Tray A in portrait orientation with the printing side facing up Make sure that the Paper Output Tray B is open If printing starts while the Pape...

Page 44: ...onsulte el manual en pantalla Guía avanzada Haga clic en Diseño Imprimir Layout Print y a continuación seleccione un diseño para la imagen Es posible que el equipo haga ruido al suministrar el papel Esto es normal Select a folder containing images then select an image you want to print When an image is selected the number of copies is set to 1 Click Select Paper then select the Paper Size and Medi...

Page 45: ...hacer copias en blanco y negro Cuando el equipo esté preparado para copiar el botón Negro Black y el botón Color se iluminarán Cierre la cubierta de documentos con cuidado sujetándola firmemente porque es pesada Open the Document Cover B then place the document face down and align it with the Alignment Mark C Load A4 or Letter sized plain paper Make sure that the Paper Output Tray A is open If pri...

Page 46: ...umentos D hacia ambos bordes Para obtener información sobre los documentos admitidos y la configuración de la calidad de imagen la densidad brillo etc consulte el manual en pantalla Guía básica Press the FAX button A This section explains how to send a fax in black and white from the ADF Auto Document Feeder B Send Faxes Make sure that the telephone line type is set correctly For the setting proce...

Page 47: ...e Especificación de la configuración básica del fax en el manual en pantalla Guía básica Cuando el equipo esté preparado para copiar el botón Negro Black y el botón Color se iluminarán Insert the document until a beep sounds then slide the left and right Document Guides against both ends of the document Place the document face up Use the Numeric buttons E to enter the fax number Press the Black bu...

Page 48: ...eccionar Config dispositivo Device settings Utilice el botón o B para seleccionar Configuración de LAN LAN settings y a continuación pulse el botón OK Wireless Setup Using WPS Wi Fi Protected Setup Use the Menu button A to select Device settings Read this section only when setting up a wireless connection by using the WPS Wi Fi Protected Setup For details on WPS refer to the manual of your access ...

Page 49: ...OK Seleccione WLAN activa inactiva WLAN active inactive y a continuación pulse el botón OK Cuando se active la conexión inalámbrica la luz de Wi Fi C se encenderá en azul Select Wireless LAN setup then press the OK button Select WPS then press the OK button Select Wireless LAN active then press the OK button Select WLAN active inactive then press the OK button When wireless connection is enabled t...

Page 50: ...ulse el botón OK para llevar a cabo de nuevo la instalación y establezca el nuevo código PIN que aparezca en la pantalla en el punto de acceso Si aparece otro error consulte el manual impreso Solución de problemas de configuración de red Select Push button method then press the OK button Press and hold the WPS button on the access point for about 5 seconds then press the OK button on the machine w...

Page 51: ...ce settings 2 Seleccione Configuración de LAN LAN settings y a continuación pulse el botón OK 3 Seleccione Config LAN inalám Wireless LAN setup y a continuación pulse el botón OK 4 Seleccione WCN y a continuación pulse el botón OK 5 Conecte la unidad flash USB al puerto de impresión directa conector USB B a la derecha de la parte frontal del equipo y a continuación pulse el botón OK button 6 Cuand...

Page 52: ... intentando acceder a la red Si aparece dicho mensaje configure el software de seguridad para que permita siempre el acceso Para obtener información sobre los requisitos del sistema consulte 14 Especificaciones Software Installation 2 To use the machine by connecting it to a computer software including the drivers needs to be copied installed to the computer s hard disk The installation process ta...

Page 53: ...e habla hispana en EE UU Consulte la hoja Información adicional para usuarios españoles para instalar la versión en español del software Make sure that any of the lamps on the mode buttons A lights and that the Wi Fi lamp B lights blue It is not necessary to connect the machine to the computer with the network setup cable Easy WebPrint EX Easy WebPrint EX is Web print software that is installed on...

Page 54: ...zcan en pantalla Haga doble clic en el icono Setup de la carpeta del CD ROM para pasar a la pantalla siguiente Introduzca el nombre de administrador y la contraseña a continuación haga clic en OK Si la carpeta del CD ROM no se abre automáticamente haga doble clic en el icono del CD ROM del escritorio Turn on the computer then insert the Setup CD ROM into the CD ROM drive If you are using Windows t...

Page 55: ...se the printer with wireless LAN connection y a continuación haga clic en Siguiente Next Siga cualquier instrucción en pantalla para llevar a cabo la instalación del software Haga clic en Instalar Install Click Easy Install The drivers application software and on screen manuals are installed If you want to select particular items to install click Custom Install Select Use the printer with wireless...

Page 56: ...exión LAN inalámbrica Use the printer with wireless LAN connection en Cuando aparezca la pantalla Detección de impresora Printer Detection haga clic en Siguiente Next Asegúrese de que todas las luces de los botones de modo A se iluminan y a continuación haga clic en OK If the Printer Connection screen appears instead of the screen above the connection method is not correctly selected in For Window...

Page 57: ...logo Configuración de una nueva impresora Set Up New Printer Consulte el manual impreso Solución de problemas de configuración de red Asegúrese de que no exista ningún problema y a continuación haga clic en Volver a detectar Redetect When the Setup Completion screen appears click Complete or OK Go to Registration Macintosh 2 on page 56 Go to Information 2 on page 59 When the Detected Printers List...

Page 58: ...lic en Registrar impresora Register Printer Vaya a Vaya a en la página 57 Mac OS X v 10 4 11 v 10 6 x v 10 5 x Seleccione Canon MX410 series canonijnetwork y haga clic en Añadir Add Vaya a en la página 58 This section describes how to register the machine on a Macintosh computer Windows users go to Information 2 on page 59 When the Register Printer and Scanner screen appears click Register Printer...

Page 59: ... menú desplegable elija Canon MX410 series en la lista de impresoras y a continuación haga clic en Añadir Add Vaya a en la página 58 Asegúrese de que se ha agregado Canon MX410 series a la lista de impresoras Click More Printers in the Printer Browser window When the Printer List window appears click Add When the You have no printers available screen appears click Add Make sure that Canon MX410 se...

Page 60: ...ción haga clic en Aceptar OK Haga clic en Siguiente Next en la pantalla Registrar impresora y escáner Register Printer and Scanner A continuación vaya a Información 2 en la página 59 When the Register Printer and Scanner screen appears click Register Scanner Select Canon MX410 series on the Canon IJ Network Scanner Selector EX screen then click OK Click Next on the Register Printer and Scanner scr...

Page 61: ...del equipo Si está encendido el soporte de cartucho FINE FINE Cartridge Holder se desplazará cuando se abra la unidad de escaneado cubierta A Click Next Follow any on screen instructions to proceed with the software installation Information 2 If the serial number is not displayed on the registration screen input the number found inside the machine Important Information for the Installation If the ...

Page 62: ... finalizado Para obtener información sobre Solution Menu EX y el manual en pantalla consulte la página 40 Para empezar a utilizar el equipo consulte la página 41 If you can agree to Extended Survey Program click Agree If you click Do not agree the Extended Survey Program will not be installed This has no effect on the machine s functionality If the Extended Survey Program screen appears Click Exit...

Page 63: ...rolador de impresora XPS XPS Printer Driver en la pantalla Instalación personalizada Custom Install Para conocer todos los detalles sobre las prácticas funciones del controlador de impresora XPS XPS Printer Driver consulte el manual en pantalla Guía avanzada Now that the machine is setup on your wireless connection you can install the software and drivers on additional computers on the same networ...

Page 64: ...ubierta se queda abierta durante más de 10 minutos el soporte del cartucho FINE FINE Cartridge Holder se desplaza a la derecha automáticamente After a period of use the inside of the machine may become stained with ink To avoid staining your hands or clothes with ink it is recommended that you clean the Ink Cartridge Locking Cover A and the inside of the tray B with a facial tissue or the like as ...

Page 65: ...on Optical resolution horizontal X vertical max 1200 X 2400 dpi Interpolated resolution max 19200 X 19200 dpi Gradation Input Output Gray 16 bit 8 bit Color 48 bit 24 bit RGB each 16 bit 8 bit Network Specifications Communication protocol TCP IP Wireless LAN Supported Standards IEEE802 11n IEEE802 11g IEEE802 11b Frequency bandwidth 2 4 GHz Channel 1 11 or 1 13 Frequency bandwidth and available ch...

Page 66: ...áx 19200 ppp x 19200 ppp Gradación Entrada Salida Gris 16 bits 8 bits Color 48 bits 24 bits RGB cada uno 16 bits 8 bits Especificaciones de red Protocolo de comunicación TCP IP LAN inalámbrica Estándares compatibles IEEE802 11n IEEE802 11g IEEE802 11b Ancho de banda de frecuencia 2 4 GHz Canal 1 11 o 1 13 El ancho de banda de frecuencia y los canales disponibles varían en función del país o la reg...

Page 67: ...con registro o Mac OS Plus Macintosh después de actualizar de Mac OS X v 10 5 o inferior a Mac OS X v 10 6 instale el software incluido con la impresora de inyección de tinta Canon Se necesita Internet Explorer 7 o posterior Windows o Safari 4 o posterior para Mac OS X v 10 5 o posterior para instalar Easy WebPrint EX Especificaciones de fax Línea aplicable Red telefónica conmutada pública PSTN Pu...

Page 68: ... Tenga en cuenta que desde esa página tendrá que seleccionar el producto y a continuación hacer clic en el vínculo Support by Email situado bajo Service Support Email Tech Support www usa canon com support The following ink cartridges are compatible with this machine Getting Help from Canon This option provides live telephone technical support free of service charges Monday Friday excluding holida...

Reviews: