


1
ENGLISH
1. Checking Included Items
□ Power cord
□ Safety and Important Information
□ Getting Started (this manual)
□ Setup CD-ROM
for
Windows
PC
□ Cartridge
□ Ink bottle
2. Removing Packing
Materials
1
Remove the packing materials (such as
orange
tape) from outside the printer.
2
a
Open the scanning unit / cover.
b
Remove the orange tape and the protective
material and discard them.
a
b
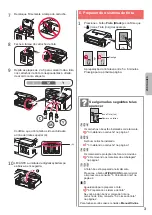
3. Installing the Cartridge
1
Open the cartridge locking cover
.
2
Take out the
C
(color) cartridge from the package
and remove the label.
3
Remove the protective tape.
Do not touch.
4
Insert the
C
(color) cartridge on the left.
Do not bump it against the
surrounding parts.
5
Repeat steps
2
to
4
to insert the
B
(black)
cartridge on the right.
6
Close the cartridge locking cover and push it
down.
7
Press down both joint buttons
.


