background image

17

P

re

p

ar
ati
o

n

E

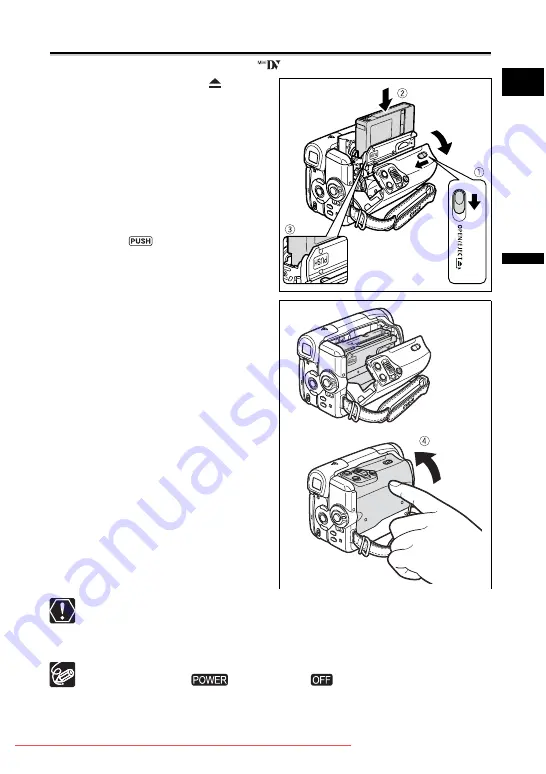
Step 2: Loading a Cassette

Use only videocassettes marked with the 

 logo.

1. Slide the OPEN/EJECT 


switch 

and open the cassette 
compartment cover.

The cassette compartment opens 
automatically.

2. Load the cassette.

• Load the cassette with the window 

facing the grip belt.

• Unload the cassette by pulling it straight 

out.

3. Press the 

 mark on the 

cassette compartment until it 
clicks.

4. Wait for the cassette compartment 

to retract automatically and close 
the cassette compartment cover.



Do not interfere with the cassette compartment while it is opening or closing 
automatically, or attempt to close the cover before the cassette compartment 
has fully retracted.



Be careful not to get your fingers caught in the cassette compartment cover.

If the camcorder is connected to a power source, cassettes can be loaded/
unloaded even if the 

 switch is set to 

.

Downloaded From VideoCamera-Manual.com Manuals

Summary of Contents for MVX430

Page 1: ...o a PC Trouble Do s Don ts Additional Information Mini Digital Video Cassette Digital Video Camcorder Instruction Manual Please read also the following instruction manual electronic version on PDF file For further details refer to the installation guide Digital Video Software Downloaded From VideoCamera Manual com Manuals ...

Page 2: ...NEL WARNING TO REDUCE THE RISK OF FIRE OR ELECTRIC SHOCK DO NOT EXPOSE THIS PRODUCT TO RAIN OR MOISTURE CAUTION TO REDUCE THE RISK OF ELECTRIC SHOCK AND TO REDUCE ANNOYING INTERFERENCE USE THE RECOMMENDED ACCESSORIES ONLY CAUTION DISCONNECT THE MAINS PLUG FROM THE SUPPLY SOCKET WHEN NOT IN USE CA 570 identification plate is located on the bottom Downloaded From VideoCamera Manual com Manuals ...

Page 3: ...ess controller are used to refer to menu items displayed on the screen Card or Memory card refers to an SD memory card or a MultiMediaCard MMC Screen refers to the LCD and the viewfinder screen Option or feature that applies or is available only with this model About the Joystick and the Joystick Guide The mini joystick allows you to control many of the camcorder s operations and to select and cha...

Page 4: ...d Mac OS are trademarks of Apple Computer Inc registered in the United States and other countries HDV is a trademark of Sony Corporation and Victor Company of Japan Limited JVC Other names and products not mentioned above may be registered trademarks or trademarks of their respective companies Recording movies Playing back movies Recording still images Playing back still images Operating Modes Swi...

Page 5: ...Widescreen TV Recording 16 9 35 Tips for Better Recording 36 Playback Playing Back a Tape 37 Playing Back a Memory Card 39 Adjusting the Volume 40 Playing Back on a TV Screen 41 Advanced Functions Recording Programs Using the Recording Programs 43 Using the Program AE Mode 46 Recording Adjusting the Exposure Manually 47 Adjusting the Focus Manually 48 Using the LED Light 50 Using the Self Timer 51...

Page 6: ...Analog Signals into Digital Signals Analog Digital Converter 92 Audio Dubbing 94 Recording from the Tape on a Memory Card 96 Printing Printing Still Images 97 Selecting the Print Settings 100 Printing with Print Order Settings 102 Connecting to a PC Transferring Video Recordings to a Computer 104 Transferring Memory Card Images to a Computer 106 Selecting Images for Transfer Transfer Order 109 Tro...

Page 7: ... Lithium Button Battery CR1616 WL D85 Wireless Controller Lithium Button Battery CR2025 for the Wireless Controller STV 250N Stereo Video Cable PC A10 SCART Adapter SS 900 Shoulder Strap IFC 300PCU USB Cable DIGITAL VIDEO SOLUTION DISK For Windows For Macintosh WA 27 Wide Attachment Downloaded From VideoCamera Manual com Manuals ...

Page 8: ...indicator 30 CHARGE indicator 14 Battery attachment unit 14 Serial number Memory card slot 18 Backup battery compartment 22 BATTERY RELEASE button 14 DV terminal 85 89 92 104 Terminal cover USB terminal 97 106 DC IN terminal 14 Left side view Right side view Downloaded From VideoCamera Manual com Manuals ...

Page 9: ...Stereo microphone switch 4 Viewfinder 19 Start stop button 27 30 Dioptric adjustment lever 19 Lock button D EFFECTS button 58 P SET button 98 TAPE CARD switch 4 WIDE SCR button 35 LCD screen 23 LCD BACKLIGHT button 23 Joystick 3 Front view Back view Downloaded From VideoCamera Manual com Manuals ...

Page 10: ...lever 33 Cassette compartment cover 17 PHOTO button 30 AV terminal 41 87 92 94 Speaker 40 MIC microphone terminal 52 LIGHT button 50 Strap mount 19 Cassette compartment 17 Tripod socket 36 Top view Bottom view Downloaded From VideoCamera Manual com Manuals ...

Page 11: ...on 37 REW button 37 FF button 38 button 38 STOP button 37 PAUSE button 38 button 38 SLOW button 38 button 38 AUDIO DUB button 94 TV SCREEN button 67 ZERO SET MEMORY button 73 WIRELESS CONTROLLER WL D85 START STOP PHOTO ZOOM CARD DATE SEARCH REW PLAY FF STOP PAUSE SLOW AUDIO DUB ZERO SET MEMORY TV SCREEN Downloaded From VideoCamera Manual com Manuals ...

Page 12: ...mode 35 Wind screen 69 Audio mode 66 Remaining card capacity for still images 32 Remaining card capacity for movies 32 Remote sensor mode 67 Camcorder shake warning 64 LED light 50 AF AE locked during still image recording 30 AF frame 78 Remaining battery charge The battery symbol indicates the charge status of the battery pack When starts flashing in red replace the battery pack with a fully char...

Page 13: ...ard Rewind Fast forward playback Rewind playback 38 x2 x2 Playback at twice normal speed 38 x1 x1 Playback at normal speed 38 Slow playback 38 Frame advance playback Frame reverse playback 38 Playback pause 38 Date search 74 Zero set memory 73 Audio dubbing 94 When playing back a still image from a memory card Image number 67 Current image Total number of images Still image size 75 Movie size 75 P...

Page 14: ...e LCD panel 2 Hold down the BATTERY RELEASE button and pull out the battery from the ridge on its bottom part Charging the Battery Pack 1 Connect the power cord to the adapter 2 Plug the power cord into a power outlet 3 Open the front terminal cover and connect the power adapter to the camcorder s DC IN terminal The CHARGE indicator starts flashing The indicator will stay on when the charging is c...

Page 15: ... terminal or to the power adapter You may hear some noise from the power adapter during use This is not a malfunction Do not disconnect and reconnect the power cord while charging a battery pack Charging may stop The battery pack may not be charged correctly even if the CHARGE indicator is continuously on The battery pack may also not be charged correctly when a power outage occurs during charging...

Page 16: ...HARGE indicator will start flashing rapidly and the charging will stop A lithium ion battery pack can be charged at any charge state Unlike conventional battery packs you do not need to completely use or discharge it before charging To conserve battery power turn off the camcorder instead of leaving it in record pause mode We recommend that you prepare battery packs 2 to 3 times longer than you th...

Page 17: ...he cassette compartment until it clicks 4 Wait for the cassette compartment to retract automatically and close the cassette compartment cover Do not interfere with the cassette compartment while it is opening or closing automatically or attempt to close the cover before the cassette compartment has fully retracted Be careful not to get your fingers caught in the cassette compartment cover If the c...

Page 18: ...he camcorder Removing the Card Do not forcefully remove the memory card without first pushing it in 1 Set the switch to Make sure that the CARD access indicator is not flashing before you turn off the camcorder 2 Open the cover 3 Push the memory card to release it Remove the memory card 4 Close the cover Before using them make sure to initialize all memory cards with this camcorder 84 Memory cards...

Page 19: ...just the dioptric adjustment lever Fastening the Grip Belt Adjust the grip belt so that you can reach the zoom lever with your index finger and the start stop button with your thumb Attaching the Shoulder Strap Pass the ends through the strap mount and adjust the length of the strap SS 900 Shoulder strap Downloaded From VideoCamera Manual com Manuals ...

Page 20: ...f you zoom to telephoto the picture will not be in focus The wide attachment may obstruct the remote sensor the range of the wireless controller narrows or may cause a shadow to appear on the picture when recording with the assist lamp Filters cannot be used with the wide attachment If dust accumulates on the wide attachment or on the camcorder lens clean both lenses gently with a blower brush Do ...

Page 21: ...eless Controller Point it at the camcorder s remote sensor when you press the buttons The wireless controller may not work properly when the remote sensor is subjected to strong light sources or direct sunlight If the wireless controller does not work check if the remote sensor is set to OFF 67 When the camcorder cannot be operated with the wireless controller or when it can only be operated at ve...

Page 22: ... battery to retain the settings 1 Open the memory slot backup battery compartment cover 2 Pull out the backup battery holder using a flat screwdriver or a similar tool 3 Insert the backup battery in the holder with the side facing down 4 Insert the battery holder and push it in until it clicks then close the cover The backup battery has a life span of about a year flashes in red to inform you that...

Page 23: ... on the viewfinder screen Rotating the panel by 180 degrees is also useful if you wish to include yourself when recording with the self timer 51 LCD Backlight You can switch the brightness of the LCD screen between normal and bright by pressing the LCD BACKLIGHT button This is useful for outdoor recordings Press the LCD BACKLIGHT button The brightness changes with each press of the button This set...

Page 24: ...SETUP menu and press Then select the LANGUAGE option and press 5 Select a language and press to save the changes 6 Press the FUNC button to close the menu If you have mistakenly changed the language follow the mark next to the menu item to change the setting The displays and that appear on screen while changing the print settings and the direct transfer settings will not change regardless of the l...

Page 25: ...e zone with the next to the area Setting the Date and Time 6 Select the DATE TIME option and press A selection frame will be displayed around the date and the selection arrows around the day will flash 7 With the joystick change the day as required and move to the next field The selection arrows will flash around the next field of the date time Set the month year hours and minutes in the same way ...

Page 26: ...r automatically adjusts the clock Time Zones and Difference from GMT UTC London GMT UTC Wellington WELLGTN 12 Paris 1 Samoa 11 Cairo 2 Honolulu 10 Moscow 3 Anchorage 9 Dubai 4 Los Angeles L A 8 Karachi 5 Denver 7 Dacca 6 Chicago 6 Bankok 7 New York 5 Singapore 8 Caracas 4 Tokyo 9 Rio de Janeiro RIO 3 Sydney 10 Fernando de Noronha FERNANDO 2 Solomon 11 Azores 1 Downloaded From VideoCamera Manual co...

Page 27: ...you do not remove the cassette you can record the next scene without producing any noise or blank sections between the recordings even if you turn the camcorder off Bright light may make it difficult to use the LCD screen In such case use the viewfinder instead When recording near loud sounds such as fireworks drums or concerts the sound may become distorted or may be recorded not in the actual so...

Page 28: ... no effect on the recorded image and does not constitute a malfunction Screen Displays during Recording Time Code Indicates the recording time in hours minutes and seconds Remaining tape Indicates the remaining time of the tape in minutes moves during recording END flashes when the tape reaches the end When the time left is less than 15 seconds the remaining tape time may not appear Depending on t...

Page 29: ...momentarily towards and release it The camcorder rewinds the tape plays back the last few seconds and returns to record pause mode Record Search In record pause mode 1 Set the mode switch to 2 If the joystick guide does not appear on screen press to display it 3 Hold the joystick pushed towards to search back towards the beginning of the recording or pushed towards to search forward towards the en...

Page 30: ...you press the PHOTO button on the wireless controller the still image is recorded immediately 6 Press the PHOTO button fully and the focusing frame disappear and you hear a shutter sound The CARD access indicator flashes Recording Movies on a Memory Card 1 Holding the lock button on the switch pressed down set the switch to CAMERA 2 Set the TAPE CARD switch to 3 Open the lens cover move the lens c...

Page 31: ... appear out of focus for a moment while the camcorder is focusing When the subject is too bright OVEREXP starts flashing In such case use the optional FS H27U ND filter Sound for movies recorded on the memory card will be monaural We recommend using a memory card with a transfer rate of more than 2 MB sec after initializing it with this camcorder With memory cards not initialized with this camcord...

Page 32: ...ard Access Display appears to indicate that the camcorder is writing on the memory card Movie size 75 Indicates the movie size Card Access Display appears and the display moves to indicate that the camcorder is writing on the memory card Remaining Card Capacity for Movies Indicates the remaining time in hours and minutes At less than 1 minute the remaining time will be displayed in 10 second steps...

Page 33: ...wireless controller will be the same as with the camcorder when one of the fixed zoom speed levels is selected or fixed at SPEED 3 when VARIABLE is selected When the zoom speed is set to VARIABLE the zoom speed will be faster in the stop and record pause modes Overusing the zoom feature when recording movies can result in recordings that may have an unsettled feel or cause discomfort on playback M...

Page 34: ... the and modes 1 Press the FUNC button to open the FUNC menu 2 With the joystick select the icon and press 3 Select the CAMERA SETUP menu and press Then select the ZOOM SPEED option and press 4 Select a setting option and press to save the changes 5 Press the FUNC button to close the menu The fastest zoom speed can be achieved with the VARIABLE setting Among the fixed zoom speeds SPEED 3 is the fa...

Page 35: ...ll display normally video in 4 3 aspect ratio will appear with black side bars On the viewfinder screen Widescreen video will appear in the letterbox display video in 4 3 aspect ratio will display normally When you turn off the image stabilizer you will get a larger horizontal angle of view Select the TV TYPE according to the type of television you connect the camcorder to wide 16 9 or normal 4 3 ...

Page 36: ...we recommend recording with the sun at your back When using a tripod do not leave the viewfinder exposed to direct sunlight as it may melt due to concentration of the light by the lens Do not use tripods with fastening screws longer than 5 5 mm as it may damage the camcorder The camcorder cannot be mounted on tripods with fixed non retractable camera positioning pins Lean against a wall Put the ca...

Page 37: ...the tape Push again to pause the playback 6 Push the joystick towards to stop the playback To use the viewfinder close the LCD panel About the screen display During playback the time code gives the hours minutes seconds and frames The remaining tape time may not appear when the time left is less than 15 seconds If the playback picture is distorted clean the video heads using a Canon Head Cleaning ...

Page 38: ... hold it to play back continuous frame advance frame reverse Press the PLAY button on the wireless controller or push the joystick towards to return to normal playback SLOW Slow Forward Slow Reverse Plays back at about 1 3 the normal speed Press the button on the wireless controller during normal or reverse playback Press the PLAY button on the wireless controller or push the joystick towards to r...

Page 39: ...or is stopped the first frame of the movie appears as a still image Push the joystick towards or or press the REW FF button on the wireless controller for 8x fast forward fast rewind playback Images not recorded with this camcorder uploaded from a computer except the sample images 61 edited on a computer and images whose file names have been changed may not be played back correctly Do not turn off...

Page 40: ...ton to open the FUNC menu 2 With the joystick select the speaker volume icon 3 Adjust the volume as required 4 Press the FUNC button to save the setting and close the menu If you turn off the volume completely the volume display will change to When the stereo video cable is connected to the AV terminal the speaker sound will be muted 63 SPEAKER VOLUME Joystick Speaker FUNC button Downloaded From V...

Page 41: ...PE option and press 4 Select a setting option and press to save the changes WIDE TV TV sets with 16 9 aspect ratio NORMAL TV TV sets with 4 3 aspect ratio 5 Press the FUNC button to close the menu TVs with SCART Terminal Refer also to the TV or VCR instruction manual 1 Turn off all devices before starting the connections 2 Connect the PC A10 SCART Adapter to the TV or VCR s terminals MENU 63 VCR S...

Page 42: ...rminal Refer also to the TV or VCR instruction manual 1 Turn off all devices before starting the connections 2 Connect the stereo video cable to the camcorder s AV terminal and the audio terminals on the TV VCR Connect the white plug to the white AUDIO terminal L left the red plug to the red AUDIO terminal R right and the yellow plug to the yellow VIDEO terminal 3 If connecting to a TV set the inp...

Page 43: ...achieving a focus on the subject while blurring other distracting details Snow Use this mode to record in bright ski resorts It prevents the subject from being underexposed Spotlight Use this mode to record spotlit scenes Sports Use this mode to record sports scenes such as tennis or golf Beach Use this mode to record on a sunny beach It prevents the subject from being underexposed Fireworks Use t...

Page 44: ...e the menu The symbol of the selected recording program appears Do not change the recording program while recording as the brightness of the image may change abruptly Portrait The blur effect of the background increases the more you zoom to telephoto The picture may not appear smooth when played back Sports The picture may not appear smooth when played back Night Moving subjects may leave a traili...

Page 45: ...n cloudy days or in shaded places Check the image on the screen The picture may not appear smooth when played back Fireworks To avoid camcorder shake we recommend using a tripod Use a tripod when recording in mode as the shutter speed slows down Downloaded From VideoCamera Manual com Manuals ...

Page 46: ...g program you can point and shoot as in mode however you have the option of changing some settings Available only in the and modes Set the mode switch to and select the PROGRAM AE recording program 44 If the optimal exposure cannot be obtained try the following actions Manually adjust the exposure 47 Use the LED light 50 Downloaded From VideoCamera Manual com Manuals ...

Page 47: ... on the screen When you operate the zoom during exposure lock the brightness of the image may change Exposure Adjustment During exposure lock 4 Adjust the brightness of the image as necessary To return to automatic exposure push the joystick towards EXP once more The exposure adjustment indicator will disappear and EXP will turn white again 5 Push the joystick towards BACK to save the exposure set...

Page 48: ...ecessary Push the joystick towards for a farther focal distance or push it towards for a closer focal distance To return to autofocus push the joystick towards FOCUS once more MF will disappear and FOCUS will turn white again 6 Push the joystick towards BACK to save the focus adjustment The setting resets to autofocus when you set the mode switch to Readjust the focus when you have turned off the ...

Page 49: ... it 2 Keep the joystick pushed towards FOCUS for more than 2 seconds At first MF will appear on the screen and then it will be replaced by the symbol 3 Push the joystick towards BACK to save the focus adjustment In the infinity focus mode If you operate the zoom or the joystick or if you turn the camcorder off the infinity focus will be canceled and the camcorder will return to manual focus Downlo...

Page 50: ...modes Press the LIGHT button appears on the screen The LED light turns on and off with each press of the button Do not point the LED light at persons while they are driving Do not look at the LED light for a long time Do not use the LED light close to people s eyes LIGHT button Twin LED light Downloaded From VideoCamera Manual com Manuals ...

Page 51: ...TIMER option and close the menu appears 3 Press the PHOTO button first halfway to activate the autofocus and then fully The camcorder will record the image after a 10 second countdown 2 seconds when using the PHOTO button of the wireless controller The countdown appears on the screen To cancel the self timer select the SELF TIMER OFF option or a different drive mode in mode Once the countdown has ...

Page 52: ...hones with their own power supply You can connect almost any stereo microphone equipped with a 3 5 mm plug but the audio level will be different than with the built in microphone When an external microphone is connected the wind screen setting will automatically reset to OFF MIC terminal Downloaded From VideoCamera Manual com Manuals ...

Page 53: ...the current settings are displayed 2 With the joystick select the icon of the function you want to change 3 Select a setting option from the bottom bar With some settings you will need to press or make further selections with the joystick In such cases a joystick icon next to the bottom bar or small arrows around the setting option will be displayed as an additional operation guide 4 Press the FUN...

Page 54: ...effect IMAGE EFFECT OFF VIVID NEUTRAL SOFT SKIN DETAIL 57 Self Timer SELF TIMER OFF SELF TIMER ON 51 Drive mode SINGLE CONT SHOOT HISPEED CONT SHOOT AEB SELF TIMER 79 51 Digital Effects D EFFECT OFF FADER EFFECT CARD MIX 58 D EFFECT OFF FADER EFFECT D EFFECT OFF BLK WHT Still image recording STILL IMG REC OFF S FINE 640x480 S NORMAL 640x480 77 Movie size 320x240 160x120 75 MOVIE REC OFF 320x240 16...

Page 55: ...e when you select SET 5 Point the camcorder at a white object zoom in until it fills the whole screen and press Keep the camcorder zoomed at the white object until step 6 is completed flashes and stops flashing when the adjustment is completed 6 Press the FUNC button to save the setting and close the menu AUTO Settings are automatically set by the camcorder DAYLIGHT For recording outdoors on a bri...

Page 56: ...UNC button without pressing When you have set the custom white balance Depending on the light source may keep flashing The result will still be better than with the auto setting Reset the white balance when the lighting condition changes Turn off the digital zoom Custom white balance may provide better results in the following cases Changing lighting conditions Close ups Subjects in a single color...

Page 57: ...e setting and close the menu The symbol of the current setting is displayed SOFT SKIN DETAIL To obtain the best effect use this function when recording a person in close up Note that areas similar to the skin color may lack in detail IMAGE EFFECT OFF Records with no effect VIVID Emphasizes the contrast and color saturation to record in crisp colors NEUTRAL Tones down the contrast and color saturat...

Page 58: ...nclude faders effects and Card Mix Faders 60 Begin or end scenes with a fade to or from black Fade Trigger FADE T Wipe WIPE Corner Wipe CORNER Jump JUMP Flip FLIP Puzzle PUZZLE Zigzag ZIGZAG Beam BEAM Tide TIDE Downloaded From VideoCamera Manual com Manuals ...

Page 59: ... availability of the various Digital Effects depends on the operation mode Available Not available When recording simultaneously on the tape and memory card Only when the TV type is set to NORMAL TV Black and White BLK WHT Sepia SEPIA Art ART Mosaic MOSAIC Ball BALL Cube CUBE Wave WAVE Color Mask COLOR M Mirror MIRROR Movies Still Images Faders Effects BLK WHT only Card Mix Downloaded From VideoCa...

Page 60: ...ymbol of the selected fader will appear on screen 4 Press the D EFFECTS button The symbol changes to green Pressing the D EFFECTS button again deactivates the fader mode 5 Fade in Press the start stop button in record pause mode Fade out Press the start stop button in record mode mode 5 If the joystick guide does not appear on screen press to display it 6 Fade in In playback pause mode push the jo...

Page 61: ...e menu the symbol of the selected effect will appear on screen 4 Press the D EFFECTS button The symbol turns green and the effect is activated From the playback pause mode start playing the tape before pressing the D EFFECTS button Pressing the D EFFECTS button again deactivates the effect Combining Images Card Mix You can choose one of the sample images from the collection on the supplied disk pi...

Page 62: ...ith the recording and push the joystick to adjust the mix level 6 Adjust the mix level press and close the menu appears 7 Press the D EFFECTS button turns green and the combined image appears Still images cannot be recorded on the memory card while using the Card Mix function Turn off the digital effect when you do not use it The camcorder retains the setting even if you turn it off or change the ...

Page 63: ...Select a setup menu and press 4 Select a menu item and press 5 Select a setting option and press to save the changes 6 Press the FUNC button to close the menu Items that are not available appear grayed out Pressing the FUNC button at any time closes the menu You can also open the menu directly on the setup menus screen by holding the FUNC button pressed for more than 2 seconds The menu will not ap...

Page 64: ...m in beyond the optical zoom range With the digital zoom the image is digitally processed so image resolution will deteriorate the more you zoom in The digital zoom indicator will appear in light blue from 20x up to 80x 18x up to 72x with the and extend further in dark blue from 80x to 800x 72x to 720x with the The digital zoom cannot be used with the Night recording program IMG STAB The image sta...

Page 65: ...ure bracketing is selected CARD OPERATIONS 1 After opening the menu from the index screen VCR SETUP 2 only REC MODE You can choose between SP standard play and LP long play LP extends the tape usage by 1 5 times Tapes recorded in LP mode cannot be used for audio dubbing Depending on the nature and usage condition of the tape picture and sound recorded in LP mode may be distorted We recommend using...

Page 66: ... MODE Switches the audio recording mode 16bit records in high sound quality Select 12bit if you plan to dub audio later DISPLAY SETUP BRIGHTNESS Adjusts the brightness of the LCD screen Adjust the LCD brightness with the joystick OUTPUT CH L R L L R R AUDIO DUB 2 AUDIO IN MIC IN 94 WIND SCREEN AUTO OFF 69 12bit AUDIO STEREO1 STEREO2 MIX FIXED MIX VAR 95 MIX BALANCE 95 AUDIO MODE 16bit 12bit BRIGHT...

Page 67: ...n better frame the picture better by referring to the level marker DEMO MODE The demonstration mode displays the camcorder s main features It starts automatically when you leave the camcorder turned on without loading a recording media for more than 5 minutes using the power adapter To cancel the demo mode once it has begun press any button turn off the camcorder or load a recording media SYSTEM S...

Page 68: ...le number of the last recorded image will be assigned If a higher file number already exists on the memory card the consecutive number will be assigned This is useful for organizing images on a computer We recommend setting FILE NOS to CONTINUOUS D TIME SET DATE FORMAT Changes the displayed date format includes date format for printing T ZONE DST 25 DATE TIME DATE FORMAT Y M D 2006 1 1 AM12 00 M D...

Page 69: ...for audio dubbing only when AUDIO DUB is set to MIC IN or mode 1 Set the mode switch to mode only 1 Select the microphone as the input for audio dubbing Open the FUNC menu Select MENU AUDIO SETUP AUDIO DUB MIC IN and close the menu 2 Open the FUNC menu select the icon and press 3 Select the AUDIO SETUP menu and press Then select the WIND SCREEN option and press 4 Set it to OFF and press to save th...

Page 70: ...he position of the magnified area To further enlarge the image move the zoom lever toward T To shrink the image below 2 times magnification move the zoom lever toward W will appear for images that cannot be enlarged 2 Select the magnified area 3 To cancel the magnification move the zoom lever toward W until the frame disappears The position of the magnified frame cannot be selected with the wirele...

Page 71: ...ct the DISPLAY SETUP menu and press Then select the DATA CODE option and press 3 Select a setting option and press to save the changes then close the menu 4 mode Play back a tape and press the WIDE SCR button mode Select the still image and press the WIDE SCR button Pressing the WIDE SCR button again makes the data code disappear The data code will not display the next time you turn on the camcord...

Page 72: ... rewinds fast forwards the tape plays back the last few seconds of the recording and stops the tape Operating the joystick will cancel the search End search cannot be used once you unload the cassette If there are blank sections between recordings or sections recorded in different recording modes on the same tape the end search function may not work properly You cannot use end search to locate the...

Page 73: ...n the wireless controller at the point you wish to return to later 0 00 00 appears To cancel press the ZERO SET MEMORY button again 2 If you were playing back a tape rewind the tape If you were recording after you finish turn the switch to PLAY and then rewind the tape appears The tape stops automatically at 0 00 00 The tape counter changes to time code If the time code has not been recorded conse...

Page 74: ...ess controller to begin searching Press more than once to search for further date changes up to 10 times Press the STOP button to stop searching Recordings shorter than 1 minute per date time zone cannot be located with this function Date search may not function if the data code is not correctly displayed Downloaded From VideoCamera Manual com Manuals ...

Page 75: ...ry card you may not be able to download images to a computer Windows more than 1800 images Macintosh more than 1000 images In such case use a card reader Connection to a PictBridge compatible printer will not work when the memory card contains more than 1800 images For best performance we recommend to keep the number of images on the memory card less than 100 Users of Windows XP When you plan to c...

Page 76: ... the desired still image quality The number on the right indicates the approximate number of images that can be recorded on the memory card at the current image size quality setting You can press again to go back to select the image size step 3 5 Press the FUNC button Selecting the Movie Size Available only in the and modes 1 Press the FUNC button 2 Select the movie size symbol The symbol of the c...

Page 77: ...ng symbol The symbol of the current setting is displayed 3 Select the still image quality 4 Press the FUNC button 5 While you are recording a movie press the PHOTO button The still image is recorded on the memory card while the screen continues to show the video recording The quality of the still image is slightly lower than a still image of the same size recorded in the mode Still images cannot b...

Page 78: ...CAMERA SETUP FOCUS PRI Select a setting option and close the menu 3 Hold the PHOTO button half pressed ON AiAF One or more AF frames are automatically selected ON CENTER An AF frame will appear at the center of the screen AiAF Depending on the shooting conditions one or more AF frames out of the 9 AF frames available will automatically be selected and focused on Center Of 9 AF frames the center on...

Page 79: ...number of frames per second will be lower when camcorder shake warning is displayed on the screen Single Records a single still image when you press the PHOTO button Continuous Shooting Captures a quick series of still images while you press the PHOTO button For the number of frames per second refer to the table on the next page High Speed Continuous Shooting AEB Auto Exposure Bracketing The camco...

Page 80: ... the PHOTO button halfway 2 Press the PHOTO button fully Three still images in different exposures are recorded to the memory card Make sure that there is sufficient space on the memory card Downloaded From VideoCamera Manual com Manuals ...

Page 81: ...en the first scene is displayed as a still image 2 Use the joystick to move between the images Move the to the image you wish to view 3 Move the zoom lever toward T The index screen is cancelled and the selected image is displayed Card Jump Function You can locate images without displaying them one by one The number displayed next to the memory card icon indicates the current image number out of t...

Page 82: ...stick towards to erase the image In mode The image erase menu appears only when you press the FUNC button while reviewing a still image immediately after recording it 4 Select ERASE and press to erase the image and close the menu Erasing All Images Available only in the mode 1 Open the FUNC menu select the icon and press 2 Select the CARD OPERATIONS menu and press Then select the ERASE ALL IMAGES ...

Page 83: ...till image immediately after recording it 2 Set it to PROTECT ON press and close the menu appears and now the image cannot be erased To cancel the protection select PROTECT OFF Protecting during Index Screen Display Available only in the mode 1 Move the zoom lever toward W Up to 6 images appear 2 Open the menu select the CARD OPERATIONS menu and press Pressing the FUNC button from the index screen...

Page 84: ...fore using them with this camcorder Available only in the mode 1 Open the FUNC menu select the icon and press 2 Select the CARD OPERATIONS menu and press Then select the INITIALIZE option and press 3 Select YES and press 4 In the confirmation screen select YES to initialize the memory card The card initialization will take a moment When the initialization is completed the camcorder will return to ...

Page 85: ...device with a DV Terminal Refer also to the instruction manual of the digital video device Recording Available only in the mode 1 Load a recorded cassette 2 Connected device Load a blank cassette or disc and set the device to record pause mode 3 Locate the scene you wish to copy and pause playback shortly before the scene 4 Play back the tape 5 Connected device Begin recording when the scene you w...

Page 86: ...ble or turn the camcorder off and back on again Proper operation cannot be guaranteed for all digital video devices equipped with a DV terminal If the operation does not work use the AV terminal In some cases and depending on the connected digital device the data code may not be displayed Use the AV terminal instead to display the data code In some cases and depending on the connected digital devi...

Page 87: ...assette 3 Open the FUNC menu select the record pause icon and press 4 Select EXECUTE and press In record pause mode and during recording you can check the picture on the screen 5 Connected device Play back the tape 6 If the joystick guide does not appear on screen press to display it 7 Push the joystick towards when the scene you wish to record appears Recording starts Push the joystick towards ag...

Page 88: ...s as a still image and the remaining card capacity for still images and other card information appears on screen If you press the PHOTO button on the wireless controller the still image is recorded immediately 6 Press the PHOTO button fully When recording a movie 5 Press the start stop button when the scene you wish to record appears Pressing the start stop button again stops recording When connec...

Page 89: ...cted device Load the recorded cassette or disc 3 Open the FUNC menu select the record pause icon and press 4 Select EXECUTE and press to start the search 5 Connected Device Play back the tape or disc In record pause mode and during recording you can check the picture on the screen 6 If the joystick guide does not appear on screen press to display it 7 Push the joystick towards when the scene you w...

Page 90: ...ty for still images and other card information appears on screen If you press the PHOTO button on the wireless controller the still image is recorded immediately 5 Press the PHOTO button fully When recording a movie 4 Press the start stop button when the scene you wish to record appears Pressing the start stop button again stops recording Blank sections may be recorded as anomalous picture If the ...

Page 91: ...ontrol signals for protection of software COPYRIGHT PROTECTED PLAYBACK IS RESTRICTED appears for a few seconds and the camcorder displays a blank blue screen You cannot playback the contents of the tape During recording If you try to record from software that contains copyright control signals for protection of software COPYRIGHT PROTECTED DUBBING RESTRICTED appears You cannot record the contents ...

Page 92: ... Connecting the Devices Turn off all devices before starting the connections Unload the tape from the camcorder Check the type and orientation of the DV terminal and make sure you connect the DV cable properly Refer also to the instruction manual of the connected device VIDEO AUDIO R L Signal flow Commercially available DV cable Signal flow STV 250N Stereo Video Cable supplied Digital video device...

Page 93: ...upplied SCART Adapter PC A10 is for output only For normal use set AV DV to OFF If it is set to ON digital signals cannot be input via the camcorder s DV terminal We recommend powering the camcorder from a household power source Connecting the camcorder to the computer you can also use the analog digital conversion to transfer analog recordings to your computer as digital signals The required equi...

Page 94: ...d press Then select the AUDIO DUB option and press 3 Set it to AUDIO IN or MIC IN and press to save the changes then close the menu 4 Locate the scene you wish to start audio dubbing 5 Press the PAUSE button on the wireless controller 6 Press the AUDIO DUB button on the wireless controller AUDIO DUB and appear 7 Press the PAUSE button on the wireless controller to begin dubbing Microphone Speak in...

Page 95: ...he balance of both sounds Available only in the mode 1 Open the FUNC menu select the icon and press 2 Select the AUDIO SETUP menu and press Then select the 12bit AUDIO option and press 3 Select a setting option and press to save the changes STEREO1 Plays back the original sound STEREO2 Plays back the added sound MIX FIXED Plays back Stereo 1 and Stereo 2 at the same level MIX VAR Plays back Stereo...

Page 96: ...still image quality can be selected 1 Selecting the still images quality Press the FUNC button Select the still image quality symbol followed by a setting option and press the FUNC button 2 Press the PHOTO button halfway when the scene you wish to record appears The captured scene appears as a still image and the remaining card capacity for still images and other card information appears on screen...

Page 97: ... if does not appear the camcorder is not correctly connected to the printer In such case disconnect the cable from camcorder and printer turn off camcorder and printer turn both back on and reconnect the camcorder to the printer will appear for images that cannot be printed We recommend powering the camcorder from a household power source Refer also to the instruction manual of the printer The cam...

Page 98: ...USY may appear before the camcorder displays the print setting menu 2 Select the print settings 100 3 Select the PRINT option and press Printing starts The print setting menu disappears when the printing is completed If you wish to continue printing select another still image Images not recorded with this camcorder uploaded from a computer edited on a computer and images whose file names have been...

Page 99: ...does not resume automatically select CONTINUE and press If CONTINUE cannot be selected select STOP press and retry printing Refer also to the printer manual for details If the error still persists and printing does not restart follow the procedure below 1 Disconnect the USB cable 2 Turn the switch of the camcorder to and back to PLAY 3 Reconnect the USB cable When you have finished printing 1 Disc...

Page 100: ...ize The image s top bottom and sides may be cropped slightly VIVID VIVID NR and NR can be selected with Canon PIXMA SELPHY DS printers Canon printers The PAGE LAYOUT setting depends on the paper size selected When PAPER SIZE is set to 10 x 14 8 cm select as the layout 2 4 9 or 16 UP when PAPER SIZE is set to A4 select as the layout 4 UP Canon PIXMA SELPHY DS printers You can also print on the spec...

Page 101: ...4 Select a layout option and press Including the Date in the Print 1 In the print setting menu select the date icon and press 2 Select a date print option and press Setting the Print Effect Image Optimize This function uses the camcorder s recording information to optimize the image data yielding high quality prints 1 In the print setting menu select the print effect icon and press 2 Select a sett...

Page 102: ...Select the number of copies and press To cancel the print order set the number of copies to 0 4 Press the FUNC button Selecting in Index Screen Display 1 Move the zoom lever toward W Up to 6 images appear 2 Open the menu select the CARD OPERATIONS menu and press Pressing the FUNC button from the index screen will open the menu directly in the setup menus screen 3 Select the PRINT ORDER option and ...

Page 103: ...without having set the print order 4 Make sure that PRINT is selected and press Printing starts The print setting menu disappears when printing is complete Depending on the connected printer you can select style or paper settings before step 4 Cancel Printing Printing Errors 99 Restarting Printing Open the FUNC menu and select MENU PRINT Press and close the menu Select RESUME or CONTINUE in the pr...

Page 104: ...ng system Windows Movie Maker with Windows XP and Windows ME iMovie with Mac OS 9 and later The appropriate driver A driver is included with Windows operating systems later than Windows 98 Second Edition and Mac operating systems later than Mac OS 9 The driver is installed automatically when you connect the camcorder to the computer 1 Start your computer 2 Set the camcorder to mode 3 Check the AV ...

Page 105: ...nd that no other IEEE1394 device is connected to the computer Depending on the video editing software you use you may need to set the switch of the camcorder to a mode other than PLAY Refer also to the instruction manual of the editing software We recommend powering the camcorder from a household power source while it is connected to the computer Refer also to the instruction manual of the compute...

Page 106: ...mory card change the position of the TAPE CARD switch or turn off the camcorder and computer while data is being transferred to the computer while the camcorder s CARD access indicator is flashing Doing so may damage the memory card s data Operation may not work correctly depending on the software and the specifications settings of your computer The image files on your memory card and the image fi...

Page 107: ... 4 Press the button SELECT TRANSFER The selected image is transferred to and displayed on the computer To continue transferring select another image WALLPAPER The selected image is transferred to the computer and displayed on the desktop Pressing the FUNC button brings you back to the transfer menu ALL IMAGES Transfers all images to the computer NEW IMAGES Transfers only those images that have not...

Page 108: ... OK and press When transferring with the button the camcorder retains the transfer setting even if you change the position of the switch When the camcorder is connected to the computer and the screen to select images displays press the FUNC button The transfer menu will appear Downloaded From VideoCamera Manual com Manuals ...

Page 109: ...appear 2 Open the menu select the CARD OPERATIONS menu and press Pressing the FUNC button from the index screen will open the menu directly in the setup menus screen 3 Select the TRANSFER ORDER option and press 4 Select the image you want to transfer and press appears on the image To cancel the transfer order press again 5 Press the FUNC button Erasing All Transfer Orders 1 Open the FUNC menu sele...

Page 110: ...e battery pack is damaged Use a different battery pack Problem Solution Buttons will not work Turn on the camcorder 27 Load a cassette 17 Camcorder will not focus Autofocus does not work on that subject Focus manually 48 Adjust the viewfinder with the dioptric adjustment lever 19 Lens is dirty Clean the lens 121 Viewfinder picture is blurred Adjust the viewfinder with the dioptric adjustment lever...

Page 111: ...e cassette 17 Cassette is protected flashes on the screen Change the position of the protect switch 118 Sound is distorted When recording near loud sounds such as fireworks drums or concerts sound may become distorted Sound is recorded in a lower level than the actual level When recording near loud sounds such as fireworks drums or concerts sound may be recorded not in the actual sound level Probl...

Page 112: ...ert a new memory card 67 If you are using an SD memory card make sure the card protection tab is set to allow recording Memory card cannot be played back Set the switch to PLAY and the TAPE CARD switch to 39 Insert a memory card 18 Image cannot be erased Image is protected Cancel the protection 83 flashes red Card error occurred Turn off the camcorder Remove and reinsert the memory card Initialize...

Page 113: ... HAS BEEN DETECTED appears for approx 4 seconds and starts flashing If a cassette is loaded the warning message REMOVE THE CASSETTE appears and starts flashing Remove the cassette immediately and leave the cassette compartment open Leaving the cassette in the camcorder may damage the tape A cassette cannot be loaded when condensation is detected Resuming use It takes about 1 hour until the water d...

Page 114: ...y back a tape recorded in HDV standard INPUT SIGNAL NOT SUPPORTED You attempted to input video signal in HD standard through the DV terminal CHECK THE CASSETTE REC MODE You attempted to perform audio dubbing on a tape recorded in a mode other than the SP mode 94 CHECK THE CASSETTE AUDIO MODE You attempted to perform audio dubbing on a tape recorded in 16 bit or 12 bit 4 channel sound 94 CHECK THE ...

Page 115: ... paper is not correctly inserted the wrong paper size is inserted or the ink cannot be used with the selected paper NO PAPER There is no paper If the printer is equipped with a photo paper cassette specify the paper feed location using the Paper Feed switch PAPER JAM The paper jammed during printing Select STOP to cancel printing After removing the paper set some paper again and press the resume b...

Page 116: ... on If the error persists consult your dealer or a Canon Service Center listed in the Contact List provided with the printer or the printer manual COMMUNICATION ERROR The printer is experiencing a data transmission error Cancel printing disconnect the USB cable and turn off the printer After a while turn the printer back on and reconnect the USB cable When you are printing using the button check t...

Page 117: ...y between hot and cold temperatures may cause condensation to form on its internal surfaces 113 Battery Pack Charged battery packs continue to discharge naturally Therefore charge them on the day of use or the day before to ensure a full charge Attach the terminal cover whenever a battery pack is not in use Contact to metallic objects may cause a short circuit and damage the battery pack Dirty ter...

Page 118: ...pes from time to time if they are stored for a long time Do not leave the cassette in the camcorder after use Do not use spliced tapes or nonstandard cassettes as they may damage the camcorder Do not use tapes that have been jammed as video heads may become dirty Do not insert anything into the small holes of the cassette or cover them with cellophane tape Handle cassettes with care Do not drop or...

Page 119: ...memory card backwards into the slot may damage the memory card or the camcorder Do not remove the label from the memory card or affix other labels on the memory card Lithium Button Battery Do not pick up the battery using tweezers or other metal tools as this will cause a short circuit Wipe the battery with a clean dry cloth to ensure proper contact Keep the battery out of reach of children If it ...

Page 120: ... quality we recommend cleaning the video heads frequently with the Canon DVM CL Digital Video Head Cleaning Cassette or a commercially available dry cleaning cassette Do not use wet type cleaning cassettes as this may damage the camcorder Tapes already recorded with dirty video heads may not be played back correctly even when you clean the video heads Downloaded From VideoCamera Manual com Manuals...

Page 121: ...reen using a blower brush or a commercially available cleaning cloth for glasses Using the Camcorder Abroad Power Sources You can use the compact power adapter to operate the camcorder and to charge battery packs in any country with power supply between 100 and 240 V AC 50 60 Hz Consult the Canon Service Center for information on plug adapters for overseas use Playback on a TV Screen You can only ...

Page 122: ...0 Wrist Strap Shoulder Strap TL H27 Tele converter WD H27 Wide converter FS H27U Filter Set BP 208DG BP 208 Battery Pack TV Computer VCR MiniDV Video Cassette WL D85 Wireless Controller Card Adapter PictBridge compliant printers IFC 300PCU USB Cable Card Reader Writer DVD Recorder or other DV equipped Digital Device SDC 128M SDC 512M SD memory card MultiMediaCard PC A10 SCART Adapter WA 27 Wide At...

Page 123: ...mp WD H27 Wide converter This lens decreases focal length by a factor of 0 7 giving you a wide perspective for indoor shots or panoramic views When the Wide converter is attached a shadow may appear in the picture when you record with the assist lamp FS H27U Filter Set Neutral density and MC protector filters help you to control difficult lighting conditions Use of genuine Canon accessories is rec...

Page 124: ...rrying Case A handy camcorder bag with padded compartments and plenty of space for accessories This mark identifies genuine Canon video accessories When you use Canon video equipment we recommend Canon brand accessories or products bearing the same mark Downloaded From VideoCamera Manual com Manuals ...

Page 125: ...inch wide TFT color approx 123 000 pixels Viewfinder 0 33 inch TFT color approx 113 000 pixels Microphone Stereo electret condenser microphone Lens f 3 0 60 mm F 1 8 3 6 20x power zoom 35 mm equivalent Tape 16 9 with image stabilizer 43 7 874 mm 16 9 no image stabilizer 40 3 806 mm 4 3 recording 48 1 962 mm Card still images approx 40 1 802 mm f 3 0 54 mm F 1 8 3 3 18x power zoom 35 mm equivalent ...

Page 126: ...nt printer the camcorder s image data at the time of shooting is used and optimized yielding extremely high quality prints Input Output Terminals AV Terminal 3 5 mm minijack Video 1 Vp p 75 ohms unbalanced Audio output 10dBV 47 kohms load 3 kohms or less input 10dBV 40 kohms or more only DV Terminal Special 4 pin connector IEEE 1394 compliant USB Terminal mini B MIC Terminal 3 5 mm stereo minijack...

Page 127: ...igital zoom 33 Direct printing 97 Direct transfer 107 Drive mode 79 DV IEEE1394 terminal 85 DV dubbing 89E E Easy mode 43 Effects 59 End search 72 Erasing still images 82 Exposure lock adjustment 47 F Faders 58 File numbers 67 Fireworks recording program 43 Focus 48 Focus priority 64 Focusing frame 31 FUNC menu 54 G Grip belt 19 H High speed continuous shooting 79 I Image effects 57 Image stabiliz...

Page 128: ...ard 18 Self timer 51 Serial number 8 Setup menus 64 Shoulder strap 19 Slide show 81 Snow recording program 43 SP mode 65 Speaker 40 Sports recording program 43 Spotlight recording program 43 Still image quality size 75 Still image review 65 Still images 30 Sunset recording program 43 T Telephoto 33 Time code 28 Time zone 25 Transfer order 109 Transferring still images to a computer 106 Tripod 36 T...

Page 129: ...tomer Care 09 489 0470 www canon co nz Canon Singapore Pte Ltd 1 HarbourFront Avenue 04 01 Keppel Bay Tower Singapore 098632 Tel 65 6799 8888 Fax 65 6799 8882 Canon Hongkong Company Ltd 19 F The Metropolis Tower 10 Metropolis Drive Hunghom Kowloon Hong Kong Canon Latin America Inc Sales Enquiries 703 Waterford Way Suite 400 Miami FL 33126 USA 0057W168 PUB DIE 257 0000N 0 0 CANON INC 2005 PRINTED I...

Reviews: