background image

5-6

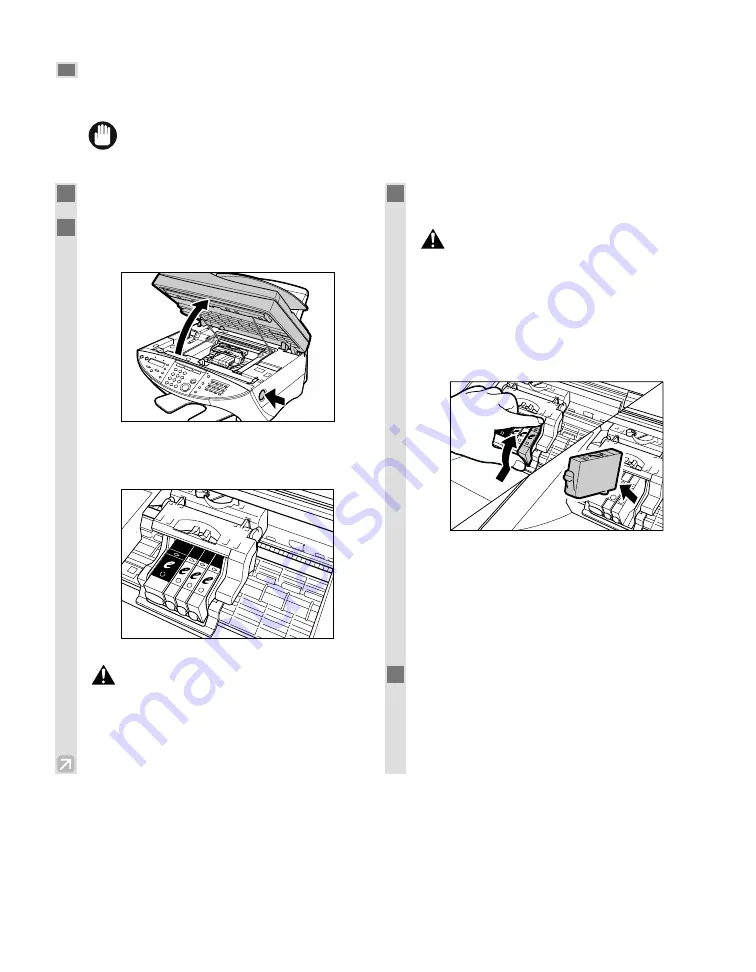
Replacing an Ink Tank

This section describes how to replace an Ink Tank in an installed Printhead (Cartridge). Before replacing an Ink
Tank, be sure to read the section When to Replace an Ink Tank. (

p. 5-5)

• Do not replace Ink Tanks while the machine is printing or performing another operation.

IMPORTANT

1

Make sure the power is turned on.

2

Push the Open button and lift up the
scanning unit.

• The holder automatically moves to the center of

the machine.

• Do not try to manually move or stop the

holder since this may damage the
machine.

• Do not touch any metal parts since this

may adversely affect operation of the
machine and/or affect print quality.

3

Press on the tab to release the empty Ink
Tank, then remove it from its slot.

• Do not remove the Printhead (Cartridge)

from the machine.

• Do not remove several Ink Tanks

together. Remove and replace each one
individually to ensure that they are
inserted in the correct slot. Inserting
them in the wrong slot will cause colors
to print incorrectly.

• Discard the old Ink Tank immediately according to

the local laws and regulations for disposal of
consumables. You may want to place it in a bag to
keep any residual ink from spilling.

• Spilled ink can stain any surface; protect yourself

and your work area.

4

To install the new Ink Tank, 

Quick Start

Guide.

CAUTION

CAUTION

Summary of Contents for MultiPASS F30

Page 1: ...f this publication may be reproduced transmitted transcribed stored in a retrieval system or translated into any language or computer language in any form or by any means electronic mechanical magneti...

Page 2: ...opy Exposure 4 4 Special Features 4 5 Repeating an Image over the Paper 4 5 Creating a Mirror Image 4 7 Shrinking an Image to Fit onto the Paper 4 8 Chapter 5 Maintenance Periodic Cleaning 5 1 Cleanin...

Page 3: ...for details on the topic of the previous sentence Fax Guide Refer to the MultiPASS Fax Guide for details on the topic of the previous sentence MultiPASS Refer to the MultiPASS Suite for Windows Softwa...

Page 4: ...hinner or other inflammable substances If inflammable substances come into contact with electrical parts inside the machine it may result in a fire or electrical shock Do not block or cover the ventil...

Page 5: ...rn off the power and unplug the machine wait at least five seconds before you plug it in again Plug the machine into a standard 120V AC 60Hz three prong grounded outlet Operate the machine only from t...

Page 6: ...ur hand Failing to do so may result in personal injury Do not press down hard on the ADF or the platen glass cover when using the platen glass to scan thick books This may damage the platen glass and...

Page 7: ...chine MULTI PURPOSE TRAY and TRAY COVER Holds plain paper and other print media DOCUMENT OUTPUT SLOT Documents come out here PLATEN GLASS COVER Open to place a document on the platen glass SCANNING UN...

Page 8: ...ect Button Selects paper size and paper type Exposure Button Adjusts the copy exposure Image Quality Button Selects the resolution setting the machine uses to copy Copy Button Switches standby display...

Page 9: ...standby display in Fax Mode is Fax Guide Copy Mode When the machine is turned on the Copy Mode standby display appears Scan Mode When you start scanning by using your PC the machine switches automati...

Page 10: ...Size W L Quantity Thickness Weight Platen Glass Thick paper Documents with uneven surfaces Photographs Small documents e g business cards postcards Special types of paper Book Max 8 5 11 7 in Max 216...

Page 11: ...e illustration below shows the scanned area of a document Make sure your document s text and graphics are within this area When using legal size documents with the F50 model load them into the ADF F50...

Page 12: ...mark at the upper left corner of the guide plate Use the guide plate on the upper side and left side of the platen glass to position a document F50 Model F30 Model If your document is 4 6 size align t...

Page 13: ...uments on a flat surface to even the stack 3 Adjust the document guides to the width of the document 4 Gently insert the top of the document face up into the ADF until you hear a beep The document is...

Page 14: ...11 in 215 9 279 4 mm Legal 8 5 14 in 215 9 355 6 mm A4 8 27 11 69 in 210 297 mm U S Commercial No 10 9 5 4 1 in 241 3 104 1 mm European DL 8 66 4 33 in 220 110 mm Letter and A4 8 5 11 in 215 9 279 4...

Page 15: ...l of a photograph Banner Paper BP 101 Specifically designed for printing one continuous sheet in a banner format The connected sheets are divided by perforations and you can print from two to six shee...

Page 16: ...side of the paper stack If the print media has a print side set it in the multi purpose tray with the print side facing upwards The capacity of the output tray is 50 sheets of paper To prevent paper...

Page 17: ...ver printing in this area can adversely affect the print quality or the paper feed precision Paper Envelope 0 13 3 4 mm 0 13 3 4 mm 1 04 26 5 mm 0 12 3 mm 0 13 3 4 mm 0 13 3 4 mm 1 04 26 5 mm 0 12 3 m...

Page 18: ...right and close the scanning unit 3 Arrange the stack of envelopes on a firm clean surface and press down firmly on the edges to make the folds crisp Press all the way around the envelopes to remove...

Page 19: ...f the multi purpose tray Pinch the paper guide then slide it snugly against the left edge of the stack Insert the envelopes with the print side up flaps should not be visible Feed the left side of the...

Page 20: ...ve dried completely cover the printed sides with a sheet of plain not coated paper before storing This is recommended even if you place the sheets in a clear file or plastic holder When loading Transp...

Page 21: ...area of Banner Paper To prevent ink from running over the edges of the sheet print within the margins shown above Printing on Banner Paper may require considerable amounts of ink so use new Ink Tanks...

Page 22: ...sheet and press gently down on the sheet Pinch the paper guide then slide it snugly against the left edge of the stack Press gently down on the sheet until paper feeding starts Make sure the sheets b...

Page 23: ...pying press Stop Reset For the F50 model you may need to remove the other documents from the ADF and then press Resume The jammed document in the ADF will be ejected automatically If the paper in the...

Page 24: ...copying color photos onto Glossy Photo Paper H RES For color copying onto High Resolution Paper TRANS For copying onto Transparencies PHOTO For copying onto Photo Paper Pro It is suitable for copying...

Page 25: ...t from the following 25 MIN 78 LGL LTR 95 A4 LTR 100 212 4 6 LTR 400 MAX 3 Press Set Ex 78 LTR TEXT PLAIN PRESET RATIO 78 LGL LTR PRESET RATIO 100 1 Press Enlarge Reduce twice Ex Ex 2 Use the numeric...

Page 26: ...y scanned with 64 levels of gray rather than just two black white B W DRAFT Suitable for high speed copying at a lower resolution In color mode you can select from the following COLOR NORMAL Suitable...

Page 27: ...PEAT to print multiple copies of an image on a single sheet You can select the number of times you want to repeat the original image Scanned Area of a Document The scanned area of a document differs b...

Page 28: ...Image quality p 4 4 Exposure p 4 4 Please note that you cannot change settings during copying 5 Press Menu 6 Press Set twice 7 Use F or E to select the number of vertical repetitions Ex You can selec...

Page 29: ...B W to turn on its light 4 Set copy features if you wish You can set the features below Copy quantity p 4 2 Paper size and paper type p 4 2 Enlarging reducing p 4 3 Image quality p 4 4 Exposure p 4 4...

Page 30: ...ite copy make sure the Color B W light is off To make a color copy press Color B W to turn on its light 4 Set copy features if you wish You can set the features below Copy quantity p 4 2 Paper size an...

Page 31: ...milar materials for cleaning they can stick to the components or generate static charges Use a soft cloth to avoid scratching the components Never use volatile liquids such as thinners benzene acetone...

Page 32: ...adversely affect operation of the machine and or affect print quality 3 Use a clean soft dry lint free cloth to remove any ink or paper debris from the machine s interior shaded area especially aroun...

Page 33: ...int free cloth to wipe up paper dust from the shaded area If the scanner components are dirty the documents you send or copy will also be dirty 4 When you are finished close the feeder cover by pressi...

Page 34: ...ing the Ink Tank with a used one causes trouble with the printhead It will also make it difficult to determine the correct time to change the Ink Tanks The ink in the Ink Tanks is difficult to clean u...

Page 35: ...Tank for over six months If your output is blank If your printouts appear to be missing a color If one of the messages below appears in the LCD C INK EMPTY Cyan Ink Tank is empty M INK EMPTY Magenta I...

Page 36: ...al parts since this may adversely affect operation of the machine and or affect print quality 3 Press on the tab to release the empty Ink Tank then remove it from its slot Do not remove the Printhead...

Page 37: ...Printhead Cartridge may be damaged Contact the Canon Customer Care Center to have the Printhead Cartridge replaced NOTE 3 Perform deep printhead cleaning HEAD REFRESHING setting p 5 8 2 Perform norma...

Page 38: ...rinted Cleaning the Printhead below Printhead Position If the pattern is not uniform Quick Start Guide If lateral lines are visible Quick Start Guide 1 Press Menu 2 Use F or E to select PRINTER SETTIN...

Page 39: ...he jam is cleared and you press Resume Removing the Jammed Paper from the Paper Output NOTE Clearing Jams Troubleshooting Troubleshooting Chapter 6 1 Gently pull any jammed paper out of the paper outp...

Page 40: ...up the scanning unit 3 Gently gather the jammed paper to the center of the opening and then remove it Be careful not to touch the components inside the machine 4 Close the scanning unit and turn on t...

Page 41: ...en press Resume The jammed document in the ADF will be ejected automatically NOTE Troubleshooting 4 Raise the paper release lever and slide the paper under the roller toward the left of the machine 5...

Page 42: ...jam in the ADF There is a paper jam You opened the scanning unit during an operation The Black Ink Tank in the Printhead Cartridge is empty Action Replace the Ink Tank p 5 6 Clear the paper jam or wha...

Page 43: ...g the printhead may have become too hot The Printhead Cartridge isn t installed correctly The Yellow Ink Tank in the Printhead Cartridge is empty Action Load paper in the multi purpose tray Quick Star...

Page 44: ...ets of paper may be sticking together Be sure to fan the paper stack before loading it in the multi purpose tray This keeps the sheets of paper from sticking together Quick Start Guide The multi purpo...

Page 45: ...aten glass or load it into the ADF correctly p 2 3 Make sure the feeder cover is closed The Printhead Cartridge or Ink Tanks may not be installed properly Make sure the Printhead Cartridge and Ink Tan...

Page 46: ...nthead Quick Start Guide The printout contains blurred or smudged ink The print media you are using may not be supported by the machine Make sure you are using the recommended print media p 3 1 You ma...

Page 47: ...e machine and the LCD will return to standby mode If the Alarm light remains lit contact the Canon Customer Care Center The Printhead Cartridge moves but ink does not appear The Printhead Cartridge or...

Page 48: ...ay be slowing its printing speed at the end of each line to protect the printhead Stop your print operation and wait several minutes to allow the machine to cool Then start your operation again The pr...

Page 49: ...is plugged in and turned on If the LCD remains blank turn off the power and unplug the machine wait five seconds then plug it in again If you have a problem with your machine and you cannot solve it b...

Page 50: ...menus from the F50 model in the Copy Mode NOTE NOTE Understanding the Menu System 7 Summary of Settings Summary of Settings Chapter 7 To select the desired menu complete the procedure as shown on the...

Page 51: ...RESHING 4 ROLLER CLEANING 2 ALIGN PRINT HEAD VERT LINE PATTRN CHANGE V VALUE LAT LINE PATTERN CHANGE L VALUE 3 BOTTOM MARGIN Description Selects a cleaning function Prints the nozzle check pattern to...

Page 52: ...UAGE 2 AUDIBLE TONES 1 KEYPAD VOLUME 2 ALARM VOLUME Description Selects the language of the LCD messages Sets the volume of the machine s sounds Selects the keypad touch beep volume Selects the alarm...

Page 53: ...tion FCC Part 15 Class B IC Other FCC Part 68 IC Energy Star compliant ADF p 2 1 Multi Purpose Tray Capacity p 3 1 Printable Areas p 3 4 Scanned Area p 2 2 Copier Density Adjustment 9 levels Reduction...

Page 54: ...ight p 3 1 Recommended Print Media p 3 2 Print Speed Color Printing fast 12 pages minute Black Printing fast 17 pages minute Based on Canon standard pattern Maximum Print Width 8 in 203 2 mm Resolutio...

Page 55: ...JAMMED message 6 4 CHECK PAPER SIZE message 6 4 CHECK PRINTER message 6 4 Cleaning 5 1 inside the ADF 5 3 inside the machine 5 2 machine s exterior 5 1 periodic 5 1 printhead 5 7 5 8 roller 5 3 scann...

Page 56: ...al film names G Glossy Photo Cards 3 2 Photo Paper 3 2 Guide document 1 4 paper 3 6 H Handling safety instructions 1 3 HEAD CLEANING setting 7 2 HEAD REFRESHING setting 7 2 High Gloss Photo Film 3 2 H...

Page 57: ...ding problems 6 6 guide 3 6 guidelines 3 3 3 7 jam 6 1 loading 3 5 printable area 3 4 requirements 3 1 Paper Select button 1 5 Paper size setting 4 2 Paper thickness lever 1 4 Paper type setting 4 2 P...

Page 58: ...de iii Specialty print media See also individual print media names 3 7 to 3 9 guidelines 3 7 Specifications A 1 Standby display 1 6 Copy Mode 1 6 Scan Mode 1 6 Start button 1 5 Stop Reset button 1 5 S...

Reviews: