7
Adjustment
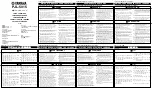
q
Adjust the forward/backward slide
(Adjustable range: 0 - 180 mm)
¡
Loosen the four bolts on the top of the adjustment
unit using a hexagon wrench (3 mm) and adjust the
slider of the adjustment unit. After the adjustment,
tighten the four bolts which were loosened.
w
Adjust the vertical slide (Adjustable range: +4° - –2°)
¡
Remove the left and right cover plates of the wall plate.
¡
Loosen the four bolts
A
located inside the setting plate using a hexagon wrench (6 mm).
¡
Adjust the vertical slide with the two bolts
B
located inside the setting plate using a hexagon wrench (6 mm)
(Adjust the left and right bolts so that their ends touch equally against the wall plate.)
¡
Tighten the four bolts
A
which were loosened using the hexagon wrench (6 mm).
¡
After adjustment, attach the left and right cover plates again.
e
Adjust the horizontal rotation (Adjustable range: +5° - –5°)
¡
Loosen the two bolts
A
located on the top of the adjustment unit using a hexagon wrench (3 mm) so that
adjustment can be carried out.
¡
Turn the adjustment knob
B
located on the left side of the adjustment unit to adjust the horizontal rotation.
¡
Tighten the two bolts
A
which were loosened using the hexagon wrench (3 mm).
* “
A
” marks appear on the setting plate to indicate the locations of the bolts and adjustment knob.
Bolts
A
Adjustment knob
B
Bolts
B
Bolts
A
4°
2°
Bolts x 4
0 - 7.09 inches
(0 - 180 mm)
5°
5°
■
Installation Procedure