background image

11-8

Maintenance

Chapter 11

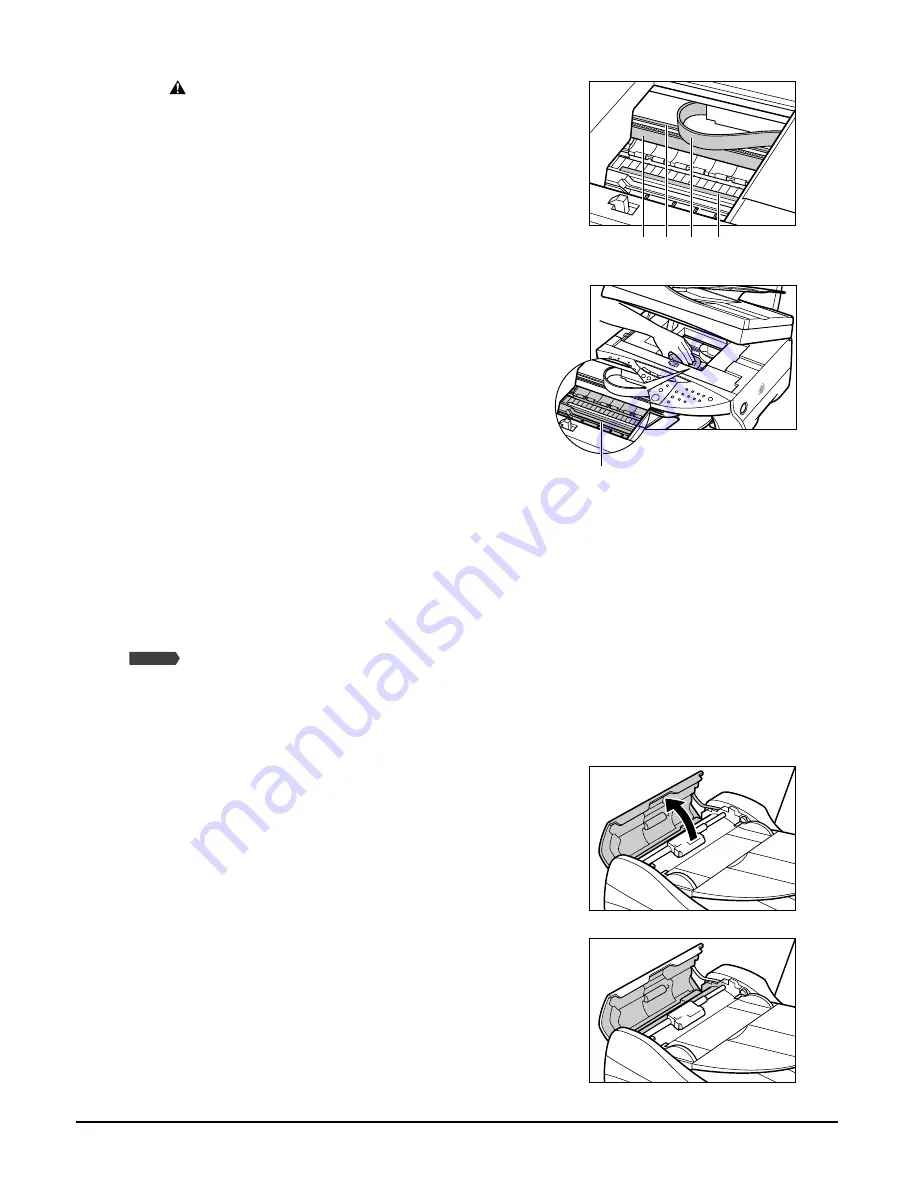
CAUTION

• Do not touch the round shaft 

A

, transparent 

film 

B

, film cable 

C

, ink absorber (sponge 

part) 

D

, or any metal parts.

3

Use a dry cloth to wipe away any stray drops 
of ink, scraps of paper, and dust, especially 
from the black panel 

E

.

4

Close the scanning unit until it locks into 
place.

5

Reconnect the power cord and turn on the 
power.

 Cleaning the ADF area

Follow this procedure to clean the ADF area:

1

Turn off the power and disconnect the 
power cord from the wall outlet.

2

Open the feeder cover.

3

Use a clean, soft, dry, lint-free cloth to wipe 
up paper dust from the shaded area.

C D

B

A

E

Fax Model

Summary of Contents for LASER CLASS 730i

Page 1: ...User s Guide...

Page 2: ...Preface...

Page 3: ...tered trademarks trademarks or service marks of their respective owners As an ENERGY STAR Partner Canon Inc has determined that this product meets the ENERGY STAR guidelines for energy efficiency Supe...

Page 4: ...s instructions on functions that can be performed directly from your machine as well as detailed information on memory cards Refer to this guide for in depth instructions not included in the Quick Ref...

Page 5: ...t Refer to the Set Up Sheet for more details Quick Reference Guide Refer to the Quick Reference Guide for more details Software Guide Refer to the Software Guide included in the CD ROM for more detail...

Page 6: ...copying 5 1 Adjusting the image quality resolution 5 2 Adjusting the exposure density 5 2 Reducing or enlarging a copy 5 3 Using preset copy ratios 5 3 Using custom copy ratios 5 3 Copying an image t...

Page 7: ...ng your machine 11 7 Cleaning the exterior 11 7 Cleaning the interior 11 7 Cleaning the scanning area 11 7 Cleaning inside the machine 11 7 Cleaning the ADF area 11 8 Cleaning the roller 11 9 12 Troub...

Page 8: ...or electrical shock CAUTION Do not place the machine on top of a carpet or rug which has long pile The threads may get inside the machine and cause a fire Place the machine on a flat stable vibration...

Page 9: ...r local power company Do not allow the power cord to be near objects that emit heat The outer cover of the power cord may melt resulting in fire or electrical shock Make sure the power cord is fully e...

Page 10: ...of other controls may result in damage and will often require extensive work by a qualified technician to restore the product to normal operation If the machine has been dropped or damaged If the mach...

Page 11: ...s such as jewelry and watches Containers of water or other liquids such as glasses vases or pot plants If water etc does spill inside the machine turn off the power immediately disconnect the power co...

Page 12: ...equivalent Use one line per machine DDD DIRECT DISTANCE DIAL LINE or IDDD INTERNATIONAL DIRECT DISTANCE DIAL LINE IF YOU COMMUNICATE OVERSEAS NOTE Canon recommends an individual line following industr...

Page 13: ...g of equipment Information regarding Authorized Service Facility locations can be obtained by calling the Canon Customer Care Center 1 800 423 2366 Rights of the telephone company Should the equipment...

Page 14: ...uch business other entity or individual To automatically enter this information into your machine follow the instructions on p 7 1 or p 8 1 of this guide Users in Canada Pre installation requirements...

Page 15: ...uations Repairs to certified equipment should be coordinated by a representative designated by the supplier Any repairs or alterations made by the user to this equipment or equipment malfunctions may...

Page 16: ...Preface XV CANON CANADA INC 1 800 OK CANON 24 HOURS A DAY SEVEN DAYS A WEEK http www canon ca...

Page 17: ...XVI Preface...

Page 18: ...copier scanner fax The software provided with your machine will allow you to perform a variety of tasks from your computer effortlessly and efficiently Printer Print crisp clear color or black white...

Page 19: ...ase a USB cable less than 16 8 ft 5 m to connect your machine to a computer Paper output tray Printhead Multi purpose tray Document tray Power cord Documentation Set Up Sheet Quick Reference Guide Mul...

Page 20: ...er cover 1 Open button e Document guides 2 Paper output tray r Multi purpose tray 3 Card slot t Tray cover 4 Indicator light y Automatic sheet feeder 5 Operation panel u Document tray 6 Platen glass i...

Page 21: ...g operation y 2 2 2 2 and 3 3 3 3 keys Scroll through selections select the number of copies and the photograph file number 2 also clears an entry and 3 enters a space between characters u Set key Sel...

Page 22: ...structed to do so in this guide or when not using the machine for a long period of time one month or more This will avoid unnecessary ink consumption 4 Scan key Scans a document to your computer accor...

Page 23: ...1 6 Introduction Chapter 1...

Page 24: ...at are not suitable for the ADF Multipage documents of the same size thickness and weight Size W L Max 8 2 14 in 216 356 mm Max 8 2 11 4 in 216 297 mm Max 8 2 39 in 216 mm 1 m Min 4 8 5 8 in 105 148 m...

Page 25: ...er scans use the platen glass Follow this procedure to load your document in the ADF 1 Lift the document cover 2 Place your document face down on the platen glass Align the upper left corner of your d...

Page 26: ...Left Printer driver setting Media Type Plain Paper Use for All functions The machine supports the above paper sizes in portrait orientation Envelopes Size U S Commercial No 10 9 2 4 8 in 241 105 mm E...

Page 27: ...time 2 minutes Use for Printing from your computer copying Load the paper with the whiter side facing up Do not use the loading support sheet provided with the package Remove each sheet as soon as it...

Page 28: ...e borders to produce a photograph without any white borders Size 4 6 in 101 6 152 4 mm Quantity 20 sheets Paper thickness lever position Left Printer driver setting Media Type Photo Paper Pro Drying t...

Page 29: ...ossed or treated surfaces Hold the print media as closely as possible to its edges and try not to touch the printing surface Printing quality will deteriorate if the printing surface is damaged or bec...

Page 30: ...low Setting the paper thickness lever The paper thickness lever adjusts the gap between the printhead and the print media to suit the print media s thickness Before printing be sure to set the paper t...

Page 31: ...ype 1 Press Copy or Fax 2 Press Paper Select 3 Use 2 2 2 2 or 3 3 3 3 to select the print media size Select LTR for letter size print media LGL for legal size print media 4 6 for card size print media...

Page 32: ...tothewidthofthestack w IMPORTANT Make sure the stack does not exceed the paper limit mark B or tab C Otherwise a paper jam may occur 3 Replace the tray cover over the multi purpose tray 1 Make sure th...

Page 33: ...in 3 mm 4 Place the stack of envelopes print side up in the multi purpose tray q Pinch the paper guide A and adjust to the width of the stack w Feed the left side of the envelope return address portio...

Page 34: ...he right For details see p 3 5 2 Remove the tray cover and multi purpose tray and place the machine near the edge ofatablesothatthepapercanflowoverthe edge as it exits the machine 3 Cut the banner pap...

Page 35: ...3 10 Print media handling Chapter 3...

Page 36: ...with 64 MB and 128 MB memory cards Photographs on memory cards that are not compatible with the camera may be unreadable or the image data may be damaged Format the memory card with a digital camera...

Page 37: ...y card In Windows 2000 if you turn off the machine the Unsafe Removal of Device screen will be displayed In this case click OK This will not affect your machine or computer s operation If you insert m...

Page 38: ...move the memory card or turn off the machine when the indicator light is blinking as this may damage the data in the memory card IMPORTANT If an error occurs during printing e g paper runs out do not...

Page 39: ...too large You can set vivid photo printing to make your photographs appear more vibrant For details see p 4 14 For each printing method except DPOF you can set date printing from the machine For deta...

Page 40: ...print in a larger format If appears in the index see p 12 13 Follow this procedure to print an index 1 Load the correct print media in the multi purpose tray For details on print media and how to load...

Page 41: ...the index is different from the ID numbers assigned by the digital camera Printing all frames This printing method prints individually all photographs stored in a memory card Follow this procedure to...

Page 42: ...Go to step 13 If you selected PHOTO PAPER PRO in step 10 11 Press Set 12 Use 2 2 2 2 or 3 3 3 3 to select borderless printing Select OFF to print the photographs with borders ON to print the photogra...

Page 43: ...ails on print media and how to load it see pp 3 1 3 7 2 Insert the memory card as described on p 4 2 3 Press Photo Print 4 Press Menu 5 Press Set 6 Use 2 2 2 2 or 3 3 3 3 to select SINGLE FRAME 7 Pres...

Page 44: ...TO PAPER PRO in step 14 15 Press Set 16 Use 2 2 2 2 or 3 3 3 3 to select borderless printing Select OFF to print the photograph with a border ON to print the photograph without a border 17 Press Set U...

Page 45: ...t see pp 3 1 3 7 2 Insert the memory card as described on p 4 2 3 Press Photo Print 4 Press Menu 5 Press Set 6 Use 2 or 3 3 3 3 to select FRAME RANGE 7 Press Set 8 Use the numeric keys to enter the fi...

Page 46: ...TO PAPER PRO in step 14 15 Press Set 16 Use 2 2 2 2 or 3 3 3 3 to select borderless printing Select OFF to print the photographs with borders ON to print the photographs without borders 17 Press Set U...

Page 47: ...ting 1 Load the correct print media in the multi purpose tray For details on print media and how to load it see pp 3 1 3 7 2 Insert the memory card as described on p 4 2 3 Press Photo Print When you i...

Page 48: ...3 3 3 to select borderless printing Select OFF to print the photographs with borders ON to print the photographs without borders 11 Press Set 12 Press Start NOTE Printing is enlarged or reduced autom...

Page 49: ...elect VIVID PHOTO PRINT 4 Press Set 5 Use 2 2 2 2 or 3 3 3 3 to select ON to enable vivid photo printing or OFF to disable it 6 Press Set When vivid photo printing is enabled the LCD with display VIVI...

Page 50: ...in standby or sleep mode Insert only one memory card at a time into the machine When switching between memory cards of the same type or inserting a memory card into a different card slot press ON OFF...

Page 51: ...Press Copy Fax or Scan to select a mode other than photo print mode To avoid damage to data being accessed on a memory card you cannot overwrite data in photo print mode 13 Insert a memory card into t...

Page 52: ...gs for your document Press Color for color copying or B W for black white copying below Press Paper Select to select the print media size and type p 3 6 Press Image Quality to select the scanning reso...

Page 53: ...ess Set NOTE Whenusing COLORFAST ifthecoloroutputisdifferentfromthatexpected select COLORNORMAL or COLOR FINE and try copying again Adjusting the exposure density Exposure density is the degree of dif...

Page 54: ...om the following 25 MIN 78 LGL LTR 95 A4 LTR 100 212 4 6 LTR 400 MAX 3 Press Set Using custom copy ratios Refer to Making copies on p 5 1 and in step 4 adjust the copy ratio as follows 1 Press Enlarge...

Page 55: ...media size see p 3 6 Follow this procedure to reduce and copy two originals onto one page 1 Load the document on the platen glass or ADF 2 Press Copy 3 Use the numeric keys to enter the number of cop...

Page 56: ...e image will be slightly cropped at the edges When borderless copying is selected the LCD will display 100 Follow this procedure to make a borderless copy 1 Load the document on the platen glass 2 Pre...

Page 57: ...ith the MANUAL setting do the following 1 Set the print media size you will be copying on to p 3 6 2 Decide the number of times you want to copy the image You can have a maximum of four vertical repea...

Page 58: ...gs for your document step 4 p 5 1 5 Press Menu 6 Press Set 7 Use 2 2 2 2 or 3 3 3 3 to select IMAGE REPEAT 8 Press Set 9 Use 2 2 2 2 or 3 3 3 3 to select AUTO or MANUAL If you selected AUTO in step 9...

Page 59: ...ay when ironed onto fabric Follow this procedure to make a mirror copy 1 Load the document on the platen glass or ADF 2 Press Copy 3 Use the numeric keys to enter the number of copies 4 Adjust any nec...

Page 60: ...the print media size see p 3 6 Follow this procedure to copy an entire image onto a page 1 Load the document on the platen glass or ADF 2 Press Copy 3 Use the numeric keys to enter the number of copi...

Page 61: ...5 10 Copying Chapter 5...

Page 62: ...he top right corner of the LCD 2 Use the numeric keys to enter the character Press the key repeatedly until the character you want appears To enter two characters that are under the same key Press the...

Page 63: ...mple of how your sender information will print on a fax sent from your machine NOTE You can set the sender information to print inside or outside the image area TTI POSITION p 13 3 For color sending t...

Page 64: ...y year and time in 24 hour format Enter only the last two digits of the year 7 Press Set 8 Use 2 2 2 2 or 3 3 3 3 to select UNIT TELEPHONE 9 Press Set 10 Use the numeric keys to enter your fax telepho...

Page 65: ...type NOTE You can print the USER S DATA LIST to check the current setting p 10 5 Follow this procedure to set the telephone line type 1 Press Menu 2 Use 2 2 2 2 or 3 3 3 3 to select USER DATA 3 Press...

Page 66: ...6 Press Set 7 Use 2 2 2 2 or 3 3 3 3 to select DAYLGHT SAV TIME 8 Press Set 9 Use 2 2 2 2 or 3 3 3 3 to select ON to enable daylight saving or OFF to disable it If you selected OFF in step 9 10 Press...

Page 67: ...hen daylight saving ends 20 Press Set twice 21 Use 2 2 2 2 or 3 3 3 3 to select the week when daylight saving ends Select from the following FIRST WEEK SECOND WEEK THIRD WEEK FOURTH WEEK LAST WEEK fou...

Page 68: ...the number simply press the one touch speed dialing key assigned to that number Coded speed dialing Register a fax telephone number for coded speed dialing p 7 4 then to dial the number simply press C...

Page 69: ...max 120 digits including spaces and pauses For details on how to enter or delete numbers see p 6 1 7 Press Set twice 8 Use the numeric keys to enter a name for the one touch speed dialing key max 16 c...

Page 70: ...step 6 use 2 to delete the registered number then use the numeric keys to enter the new number To change a registered name In step 8 use 2 to delete the registered name then use the numeric keys to e...

Page 71: ...Set twice 8 Use the numeric keys to enter the fax telephone number you want to register max 120 digits including spaces and pauses For details on how to enter or delete numbers see p 6 1 9 Press Set...

Page 72: ...tep 8 use 2 to delete the registered number then use the numeric keys to enter the new number To change a registered name In step 10 use 2 to delete the registered name then use the numeric keys to en...

Page 73: ...g key Use 2 2 2 2 or 3 3 3 3 to select an empty key 01 to 10 To register a group under a coded speed dialing code Press Coded Dial then use the numeric keys to enter an empty two digit code 00 to 99 7...

Page 74: ...dby mode NOTE For a list of the entries you have made print the group dialing list p 7 9 Changing or deleting an entry Follow the procedure for registering groups p 7 6 and do the following To delete...

Page 75: ...ess Coded Dial then use the numeric keys to enter the two digit code assigned to the group you want to dial see Coded speed dialing above If you use speed dialing to send a fax press Start after diali...

Page 76: ...RTS LISTS 4 Press Set 5 Use 2 2 2 2 or 3 3 3 3 to select SPEED DIAL LIST 6 Press Set 7 Use 2 2 2 2 or 3 3 3 3 to select the list you want to print Select from the following 1 TOUCH LIST CODED DIAL LIS...

Page 77: ...7 10 Speed dialing Chapter 7...

Page 78: ...aten glass or ADF For details on how to load documents see p 2 2 2 Press Fax 3 Adjust any necessary settings for your document Press Color for color sending or B W for black white sending p 8 3 Press...

Page 79: ...eet 2 Load the document in the ADF For details on how to load documents in the ADF see p 2 2 3 Press Fax 4 Adjust any necessary settings for your document Press Color for color sending or B W for blac...

Page 80: ...g from the ADF you can enable the COLOR DIRECT TX setting p 13 4 that will send a color document in black white if the recipient s fax machine does not support color faxing Adjusting the image quality...

Page 81: ...e number using the numeric keys One touch speed dialing Register a number for one touch speed dialing so that you only have to press one key to dial that number For details on registering and using on...

Page 82: ...cancelautomaticredialing Waituntilthemachinestartsredialing thenpress Stop Reset Follow the instructions in the LCD NOTE You can also delete the document from memory For details see p 8 8 Customizing...

Page 83: ...If you selected OFF in step 10 11 Press Set 12 Press Stop Reset If you selected ON in step 10 11 Press Set twice 12 Use the numeric keys to enter the number of times you want the machine to redial 13...

Page 84: ...ss Color for color sending or B W for black white sending p 8 3 Press Image Quality to select the fax resolution p 8 3 Press Exposure to select the scan exposure p 8 4 4 Enter the fax numbers you want...

Page 85: ...3 to select MEMORY REFERENCE 4 Press Set twice NOTE You can also print this list from the DOC MEMORY LIST setting in the REPORTS LISTS menu p 13 6 Printing or deleting a document in memory Follow thi...

Page 86: ...details in the LCD as follows A Transaction number TX RX NO A transaction number between 0001 and 4999 is a document to be sent A transaction number between 5001 and 9999 is a received document B Mark...

Page 87: ...e dialing for their services If your machine is connected to a rotary pulse line follow this procedure to set the machine temporarily for tone dialing 1 Press Fax 2 Press Hook or lift the handset if y...

Page 88: ...to your machine will not ring FAX ONLY MODE to automatically receive faxes only Voice calls will be disconnected DRPD if you have subscribed to a DRP Distinctive Ring Pattern service offered by some...

Page 89: ...ode to control precisely how your machine handles incoming calls You can adjust the time the machine takes to check whether a call is a fax or voice call the length of time the machine rings when it i...

Page 90: ...ally FAX ONLY MODE Choose this mode if you have a dedicated telephone line for fax use only you only want to receive faxes automatically with your machine You will need to connect your machine to a de...

Page 91: ...You will need to set DRPD p 9 1 connect a telephone to your machine Set up Sheet When you receive a fax call The machine will ring according to the ring pattern you have chosen and receive the fax au...

Page 92: ...g Pick up the handset and if you hear a beep press Start on the machine to receive the fax If you are far from your machine dial 25 the remote receiving ID on your telephone and hang up When you recei...

Page 93: ...n answering machine to your machine Set Up Sheet When you receive a fax call The machine will receive the fax automatically When you receive a voice call The answering machine will record any voice me...

Page 94: ...y when an error occurs You can also set the machine to print the first page of the document under the transmission report to remind you of the contents of the document p 10 3 RX Reception REPORT Print...

Page 95: ...s disable the ACTIVITY REPORT setting Follow this procedure to adjust this setting 1 Press Menu 2 Use 2 2 2 2 or 3 3 3 3 to select USER DATA 3 Press Set 4 Use 2 2 2 2 or 3 3 3 3 to select FAX SETTINGS...

Page 96: ...3 3 3 3 to select the setting you want Select PRINT ERROR ONLY to print a report only when a transmission error occurs OUTPUT YES to print a report every time you send a document OUTPUT NO to disable...

Page 97: ...DATA 3 Press Set 4 Use 2 2 2 2 or 3 3 3 3 to select FAX SETTINGS 5 Press Set 6 Use 2 2 2 2 or 3 3 3 3 to select REPORT SETTINGS 7 Press Set 8 Use 2 2 2 2 or 3 3 3 3 to select RX REPORT 9 Press Set 10...

Page 98: ...ck the current settings of your machine as well as the registered sender information p 6 2 Follow this procedure to print the USER S DATA LIST 1 Press Fax 2 Press Menu 3 Use 2 2 2 2 or 3 3 3 3 to sele...

Page 99: ...10 6 Reports and lists Chapter 10...

Page 100: ...led ink tanks is not covered by Canon s warranty To ensure optimum printing results and to avoid printing problems Canon recommends using original Canon ink tank only Ink tanks compatible with the mac...

Page 101: ...d replace each one individually IMPORTANT Discard the empty ink tank immediately according to local laws and regulations for disposal of consumables Handle ink tanks carefully to avoid staining clothi...

Page 102: ...If there is no improvement The printhead is misaligned Print the nozzle check pattern p 11 4 This pattern allows you to check if the ink is coming out of the printhead nozzles correctly and if the pr...

Page 103: ...consumes a small amount of ink Cleaning too often reduces the amount of ink in the ink tanks You can also clean the printhead from your computer Software Guide Follow this procedure to clean the prin...

Page 104: ...er size plain paper in the multi purpose tray 2 Press Menu 3 Use 2 2 2 2 or 3 3 3 3 to select MAINTENANCE 4 Press Set 5 Use 2 2 2 2 or 3 3 3 3 to select ALIGN PRINT HEAD 6 Press Set The machine prints...

Page 105: ...e machine will print a vertical pattern 12 In column L on the printout note which box has the most solid image Note the value next to this box and use 2 2 2 2 or 3 3 3 3 to enter it 13 Press Set 14 Re...

Page 106: ...clean the interior of the machine these can damage the machine s components Cleaning the exterior Wipe the machine s exterior with a clean soft lint free cloth moistened with water or diluted dishwas...

Page 107: ...and dust especially from the black panel E 4 Close the scanning unit until it locks into place 5 Reconnect the power cord and turn on the power Cleaning the ADF area Follow this procedure to clean the...

Page 108: ...ss Menu 3 Use 2 2 2 2 or 3 3 3 3 to select MAINTENANCE 4 Press Set 5 Use 2 2 2 2 or 3 3 3 3 to select ROLLER CLEANING 6 Press Set 7 When cleaning has finished repeat this procedure twice more Then loa...

Page 109: ...11 10 Maintenance Chapter 11...

Page 110: ...of the MP Toolbox cannot be completed 1 To prepare for forced re installation on the Windows desktop double click My Computer Open the CD ROM icon then double click MP English Toolbox Setup FrcInst e...

Page 111: ...n the machine For details on BIOS settings refer to your computer s documentation Problems printing from your computer See below if you have tried unsuccessfully to print from your computer or if you...

Page 112: ...Set up the server to allow your system access to the shared printer Printing stops in the middle 1 Has the machine been printing continuously over a long period If so the printhead will overheat To p...

Page 113: ...ing the printhead p 11 3 2 Are you printing on coated paper In the Properties dialog box on the Main tab click High in Print Quality Printout is rubbed or stained 1 Is the paper thickness lever set co...

Page 114: ...ing If it is blinking see p 12 18 3 Is the document loaded correctly Check that the document is loaded correctly on the platen glass or ADF p 2 2 4 See Paper does not feed properly on p 12 3 5 Are the...

Page 115: ...repeater try connecting the USB cable directly to the computer If you can scan documents successfully after connecting the USB cable directly to the computer the USB hub or repeater may be broken Repl...

Page 116: ...n applications and try again Memory may be insufficient Quit other open applications and try again 2 Does the hard disk have enough available space Check that the hard disk has enough available space...

Page 117: ...the position of the photographs and the way they are positioned fulfill the following requirements There should be a gap of at least 8 inch 1 cm between the edge of the platen glass and photographs Th...

Page 118: ...LCD Have you followed the procedure for that receive mode correctly FAX TEL AUTO SW Fax calls are received automatically and the telephone rings for voice calls There are no procedures to follow for r...

Page 119: ...f received fax is poor 1 Are you using recommended print media For recommended print media see p 3 1 2 Print the nozzle check pattern Maintaining the printhead p 11 3 Print the nozzle check pattern p...

Page 120: ...istered with fax numbers If you are using one touch or coded speed dialing check that the fax number is correctly registered Chapter 7 9 Is the number dialed correct Check the number and try dialing a...

Page 121: ...t recognized when inserted into the machine s slot or if the image data is not being read Memory card is not recognized 1 Is the memory card securely inserted into the machine s slot 2 Is the memory c...

Page 122: ...N or photo print mode is selected a write protect error may be displayed Turn the machine off then on again Removable disk does not appear in Windows Explorer This behavior can occur if you map a netw...

Page 123: ...up and a message is displayed in the LCD While the Alarm light blinks the machine is initializing and you will not be able to use it Wait until the Alarm light stops blinking If nothing is displayed i...

Page 124: ...the print media size is set to a setting other than LTR LGL or A4 or if black ink or paper has run out Removing jammed paper If CLEAR PAPER JAM is displayed in the LCD follow this procedure to clear t...

Page 125: ...If documents jam in the ADF or do not feed properly DOC TOO LONG is displayed in the LCD You do not need to turn off the power when clearing document jams 2 Gently gather the jammed paper to the cent...

Page 126: ...e roller towards the feeder cover 5 Pull out the jammed page from the ADF 6 Lower the paper release lever A then close the feeder cover If Stop Reset is pressed during scanning and the document remain...

Page 127: ...t will turn off If the error remains turn off the machine and disconnect the power cord Wait 15 seconds then reconnect the power cord and turn on the power If you cannot clear a paper jam Turn off the...

Page 128: ...line p 6 4 The receiving fax machine did not answer within 55 seconds after all automatic redialing attempts Contact the other party and have them check their fax machine You can try to send the docu...

Page 129: ...he paper jam and reload paper in the multi purpose tray Then press Start or Resume p 12 15 COVER OPEN You opened the scanning unit during an operation Close the scanning unit DATA IN MEMORY CANNOT TUR...

Page 130: ...o print mode the photograph data is too large to print from your machine Print the photograph from your computer The machine s memory is full because it has received too many documents or a very long...

Page 131: ...t does not support color faxing Try sending again in black white Alternatively enable the COLOR DIRECT TX setting p 13 4 TX nnnn SCANNING P nnn MEMORY FULL PLEASE WAIT The machine is sending a documen...

Page 132: ...unplug it immediately and contact the Canon Customer Care Center Do not attempt to disassemble or repair the machine yourself IMPORTANT Attempting to repair the machine yourself may void the limited...

Page 133: ...12 24 Troubleshooting Chapter 12...

Page 134: ...2 2 or 3 3 3 3 to select the setting you want 8 Press Set 9 Follow these guidelines to scroll through and register settings Use 2 2 2 2 or 3 3 3 3 to scroll through settings To register a setting or...

Page 135: ...ontal repetitions 1 2 3 4 4 MIRROR IMAGE Prints a mirror image of the original p 5 8 5 ENTIRE IMAGE Prints the original image to fit the selected print media size p 5 9 Name Description Setting Detail...

Page 136: ...INSIDE IMAGE 2 TELEPHONE MARK Selects the mark to appear before the fax telephone number printed on faxes you send FAX TEL 6 OFFHOOK ALARM Enables disables the alarm that alerts you if the handset is...

Page 137: ...s 7200bps 4800bps 2400bps 6 COLOR DIRECT TX Enables disables sending of color documents to fax machines that do not have color faxing capability OFF ON 4 RX SETTINGS 1 ECM RX Enables disables Error Co...

Page 138: ...loaded ON OFF REDUCE DIMENSION Selects the direction of the reduction VERTICAL ONLY HORIZ VERTICAL 8 RX START SPEED Selects the speed at which the machine starts receiving 33600bps 14400bps 9600bps 7...

Page 139: ...IST p 8 8 2 PRINT DOCUMENT Prints a document in memory p 8 8 3 DELETE DOCUMENT Deletes a document in memory p 8 8 Name Description Setting Details 1 ACTIVITY REPORT Prints an ACTIVITY REPORT p 10 2 2...

Page 140: ...8 FILE NO Selects the file number 0001 to 9999 NUMBER OF PRINTS Selects the number of copies 1 to 99 COPIES SELECT PAPER SIZE Selects the print media size for the photograph LTR 4 6 5 7 A4 SELECT PAPE...

Page 141: ...pe for the photographs PHOTOPAPERPRO PLAIN PAPER BORDERLESS PRINT If you select PHOTO PAPER PRO enables disables borderless printing for the photographs OFF ON 2 VIVID PHOTO PRINT Enables disables to...

Page 142: ...conditions Liquid Crystal Display LCD Display languages Applicable standards ADF capacity Multi purpose tray capacity Temperature 59 81 5 F 15 27 5 C Humidity 20 80 20 2 English French Spanish Portug...

Page 143: ...13 4 in 203 2 347 6 mm 4 6 size 3 4 5 4 in 94 8 144 4 mm 5 7 size 4 4 6 4 in 120 2 169 8 mm A4 size 8 11 8 in 203 2 289 mm NOTE Borderless printing allows you to make prints with no margins However i...

Page 144: ...570 Magenta BCI 3eM approx 440 Yellow BCI 3eY approx 380 1500 characters per page normal text at standard and plain paper mode with XP printer driver Based on printing the ISO JIS SCID No 5 pattern a...

Page 145: ...act flash Except Microdrive Type I II Smart media Memory stick SD memory card Multimedia card Plain paper Photo Paper Pro PR 101 PC 101S Photo Paper Plus Glossy PP 101 Matte Photo Paper MP 101 Photo P...

Page 146: ...sion reception 250 pages Based on ITU T No 1 Chart standard mode Approx 5 3 seconds page Based on ITU T No 1 Chart standard mode Fax resolution Dialing Networking B W STANDARD 203 pels in 98 lines in...

Page 147: ...A 6 Specifications Appendix Telephone specifications Connection Telephone answering machine CNG detecting signal data modem Specifications subject to change without notice...

Page 148: ...PERSIZE FAX message 12 19 Characters entering 6 1 CHECK DOCUMENT message 12 20 CHECK PAPER SIZE message 12 20 CHECK PRINTER message 12 20 Cleaning ADF 11 8 11 9 exterior 11 7 inside machine 11 7 11 8...

Page 149: ...e Quality key 1 4 In Use Memory light 1 4 Index printing 4 5 Indicator light 1 3 Ink tank 1 2 guidelines 11 1 replacing 11 2 when to replace 11 1 INSERT PHOTO CARD message 12 21 INVALID KEY SETTING me...

Page 150: ...oading 3 7 to 3 9 recommended 3 1 to 3 4 setting size 3 6 setting type 3 6 Printer cover 1 3 Printhead 1 2 aligning 11 5 11 6 cleaning 11 4 11 7 holder 1 3 maintaining 11 3 Printing problems 12 2 to 1...

Page 151: ...Speed dialing lists 7 9 methods 7 1 registering 7 2 7 3 using 7 8 Start key 1 5 Stop Reset key 1 5 Switchboard dialing through 8 10 Symbols entering 6 1 Telephone line cord 1 2 type 6 4 Telephone pro...

Page 152: ...PERSIZE FAX message 12 19 Characters entering 6 1 CHECK DOCUMENT message 12 20 CHECK PAPER SIZE message 12 20 CHECK PRINTER message 12 20 Cleaning ADF 11 8 11 9 exterior 11 7 inside machine 11 7 11 8...

Page 153: ...ding 8 3 Image Quality key 1 4 In Use Memory light 1 4 Index printing 4 5 Indicator light 1 3 Ink tank 1 2 guidelines 11 1 replacing 11 2 when to replace 11 1 INSERT PHOTO CARD message 12 21 INVALID K...

Page 154: ...nting 4 1 guidelines 3 4 loading 3 7 to 3 9 recommended 3 1 to 3 4 setting size 3 6 setting type 3 6 Printer cover 1 3 Printhead 1 2 aligning 11 5 11 6 cleaning 11 4 11 7 holder 1 3 maintaining 11 3 P...

Page 155: ...OPY menu 13 2 Speed dialing lists 7 9 methods 7 1 registering 7 2 7 3 using 7 8 Start key 1 5 Stop Reset key 1 5 Switchboard dialing through 8 10 Symbols entering 6 1 Telephone line cord 1 2 type 6 4...

Reviews: