background image

Basic Printing

23

7

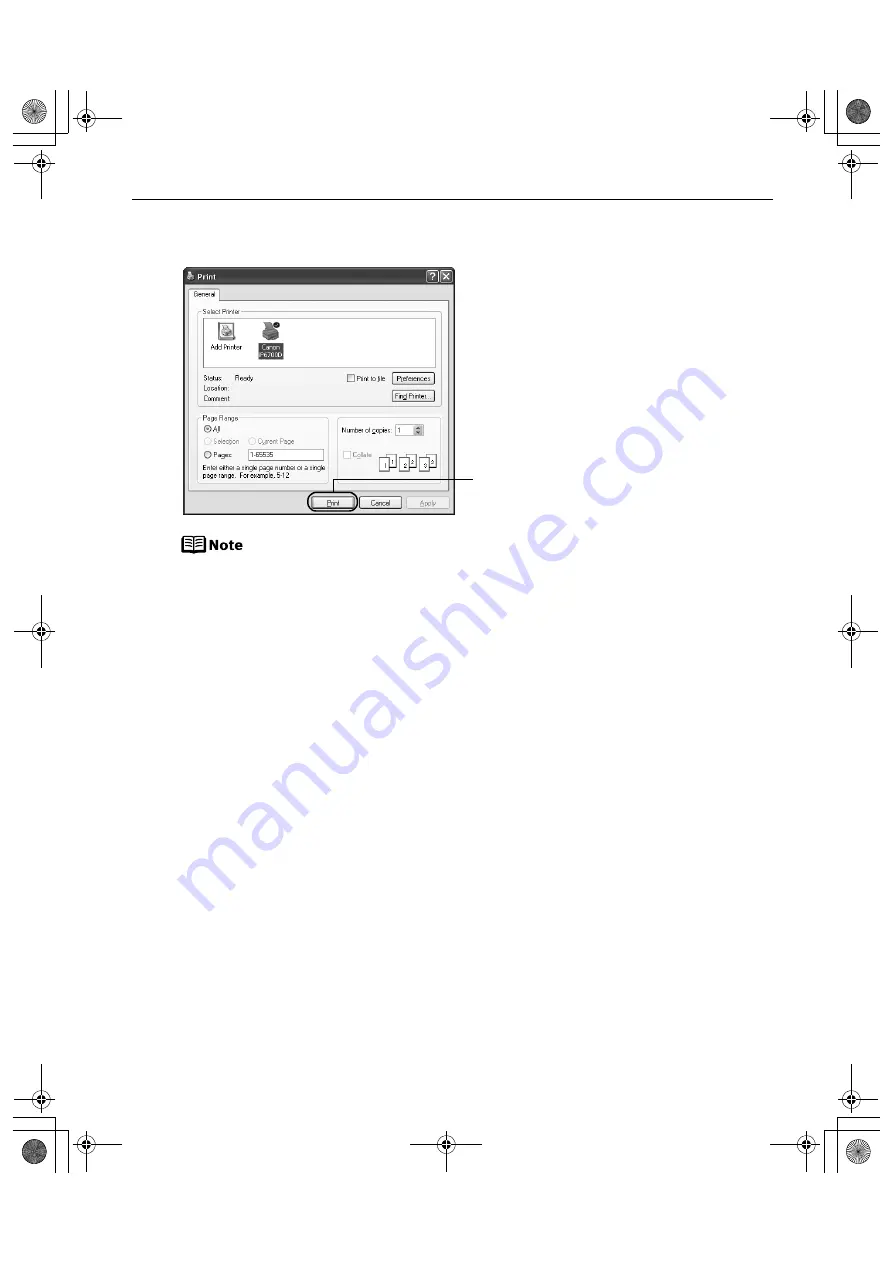
Print the document.

You can cancel a print job in progress by simply pressing the 

Stop/Reset

button on the printer.
See “Canceling Printing

Canceling Printing

Canceling Printing

Canceling Printing” on page 27.

(1) Click 

Print

 or 

OK

.

iP6700D_QSG_US.book  Page 23  Thursday, April 13, 2006  11:10 AM

Summary of Contents for iP6700D - PIXMA Color Inkjet Printer

Page 1: ...ississauga Ontario L5T 1P7 Canada Canon Latin America Inc 703 Waterford Way Suite 400 Miami FL 33126 U S A Canon Mexicana Boulevard Manuel Avila Camacho No 138 PB y Pisos 15 16 y 17 Colonia Lomas de C...

Page 2: ...A Inc has determined that this product meets the ENERGY STAR guidelines for energy efficiency Getting Help from Canon Getting Help from Canon Getting Help from Canon Getting Help from Canon Help Us He...

Page 3: ...Photo Printer Photo Printer Photo Printer Photo Printer Quick Start Guide Quick Start Guide Quick Start Guide Quick Start Guide iP6700D_QSG_US book Page i Thursday April 13 2006 11 10 AM...

Page 4: ...le information No representation is made regarding the accuracy thereof About Consumables Consumables ink tanks FINE Cartridges are available for 5 years after production has stopped Trademarks Window...

Page 5: ...Becomes Faint or Colors are Incorrect 32 Troubleshooting Troubleshooting Troubleshooting Troubleshooting Cannot Install the Printer Driver 34 Cannot Connect to PC Properly 35 Print Results Not Satisf...

Page 6: ...age Setup dialog box or Print dialog box click in the lower left corner Clicking provides detailed information about each setting When the Help window appears select your desired topic Turning on the...

Page 7: ...is turned off About the Power Plug When removing the power plug after turing off the printer be sure to check that the POWER lamp is not lit If the power plug is removed from the wall outlet with the...

Page 8: ...to jam or malfunction Folded curled or wrinkled paper Damp paper Excessively thin paper less than 64 gsm or 17 lb Excessively thick paper more than 105 gsm or 28 lb non Canon genuine paper Picture po...

Page 9: ...dable in the cassette Changing the paper source to feed different types sizes of paper If you load plain paper in the cassette and photo paper in the auto sheet feeder changing the paper source allows...

Page 10: ...sing the paper source to match the location of the printer You can use just the auto sheet feeder or cassette according to the location of the printer For example if you intend to install the printer...

Page 11: ...he curl without curling the reverse side and then load the paper How to flatten paper curl refer to Media is curled Media is curled Media is curled Media is curled on page 38 2 Prepare to load paper Y...

Page 12: ...aper by about half approximately 5 mm 0 2 inches Do not touch the printed surfaces until the ink dries For specific drying times refer to the instructions packaged with your media 2 Align the paper st...

Page 13: ...ption of the printer driver settings see Printing with Printing with Printing with Printing with Windows Windows Windows Windows on page 20 Printing with Macintosh Printing with Macintosh Printing wit...

Page 14: ...ting with Macintosh Printing with Macintosh on page 24 Always load paper in portrait orientation Loading paper in landscape orientation can cause the paper to be jammed 1 Load the paper into the auto...

Page 15: ...ia Canon provides for use with its various printers see Using Specialty Media Using Specialty Media Using Specialty Media Using Specialty Media on page 18 Refer to Printing Media in the User s Guide f...

Page 16: ...more in length extend the cassette When loading 5 x 7 or smaller sized paper nonstandard size paper less than 203 mm 8 inches in length do not extend the cassette Legal sized paper 2 13 x 3 39 54 0 x...

Page 17: ...hes in height in the cassette However do not stack more than 50 sheets in the paper output tray 2 Align the paper stack against the right side of the cassette 3 Slide the paper guides to fit the loade...

Page 18: ...uide Do not touch the printed surfaces until the ink dries For specific drying times refer to the instructions packaged with your media 1 Set the cover on the cassette 2 Insert the cassette into the p...

Page 19: ...or Comm Env 10 in Page Size For a detailed description of the printer driver settings see Printing with Printing with Printing with Printing with Windows Windows Windows Windows on page 20 Printing wi...

Page 20: ...n cause paper jams 1 Load the paper into the cassette with the print side facing DOWN Do not extend the cassette Load the paper lengthways regardless of the direction of the document You can load up t...

Page 21: ...0 or Printing with Macintosh Printing with Macintosh Printing with Macintosh Printing with Macintosh on page 24 Always load paper in portrait orientation Loading paper in landscape orientation can cau...

Page 22: ...Quality Media High Resolution Paper Glossy Photo Paper Matte Photo Paper Photo Paper Plus Double Sided Photo Paper Plus Glossy Photo Paper Plus Semi Gloss Photo Paper Pro Fine Art Paper Photo Rag Phot...

Page 23: ...hoto Paper Photo Paper Plus Double Sided 1 Letter up to 10 sheets 5 x 7 up to 10 sheets Letter up to 10 sheets 5 x 7 up to 10 sheets Photo Paper Plus Double Sided Photo Paper Plus Glossy 1 Letter up t...

Page 24: ...heets 13 mm or 0 52 inches in height can be loaded in the auto sheet feeder and cassette respectively Select Plain Paper from Media Type in the printer driver For a detailed description of printing me...

Page 25: ...Select Print from the application software s File menu The Print dialog box opens When the cassette lamp is lit paper is fed from the cassette When the auto sheet feeder lamp is lit paper is fed from...

Page 26: ...et on the Main tab You can control the print quality in the Custom dialog box For details about other printer driver functions click Help or Instructions to view the Help or Printer Driver Guide Instr...

Page 27: ...l a print job in progress by simply pressing the Stop Reset button on the printer See Canceling Printing Canceling Printing Canceling Printing Canceling Printing on page 27 1 Click Print or OK iP6700D...

Page 28: ...d on the Setup CD ROM For details on how to use Easy PhotoPrint refer to the Photo Application Guide 1 Turn on the printer See Turning on the Printer Turning on the Printer Turning on the Printer Turn...

Page 29: ...tware s File menu The Print dialog box opens 3 Select the desired paper size from Paper Size 4 Click OK 2 Confirm that iP6700D is selected in Format for 2 Select Quality Media from the pop up menu 3 S...

Page 30: ...trations with strong color definition Printing a composite document Select when printing documents consisting mainly of text Detailed Setting Select to fine tune the Print Quality and Halftoning setti...

Page 31: ...while printing with the Stop Reset button on the printer 1 Press the Stop Reset Stop Reset Stop Reset Stop Reset button while printing Printing is canceled and paper is fed out You can also cancel a p...

Page 32: ...p the Print Center and double click on the name of your printer in the Printer List to open a list of print jobs in progress 2 Select an undesired document and click the Delete Delete Delete Delete ic...

Page 33: ...x can usually be opened by selecting Print from the File menu 2 Ensure that the name of your printer is selected Then click Preferences Preferences Preferences Preferences or Properties Properties Pro...

Page 34: ...can make a Borderless Print easily and quickly just by selecting a photograph taken with a digital camera and the paper type on which to print Also it has tools to correct red eye caused by the camer...

Page 35: ...comes Faint or Colors are Incorrect on page 32 For details refer to Replacing an Ink Tank in the Direct Printing Guide To maintain optimal print quality use an ink tank within six months of its first...

Page 36: ...e Direct Printing Guide If the ink tank lamp is unlit press the mark on the ink tank to fully insert it Make sure that all packaging material is peeled off the ink tank Refer to Replacing an Ink Tank...

Page 37: ...rrors Print Results Not Satisfactory or Contains Errors Print Results Not Satisfactory or Contains Errors on page 36 Troubleshooting Printer Hardware Troubleshooting Printer Hardware Troubleshooting P...

Page 38: ...1 Click Start and select My Computer 2 Double click the CD ROM icon For non Windows XP open the My Computer window and then double click the CD ROM icon Double click the CD ROM icon on your desktop to...

Page 39: ...2 0 Hi Speed connection Obtain the latest version of the OS update program and install it on your PC The USB 2 0 Hi Speed driver operates properly Obtain the latest version of the USB 2 0 Hi Speed dri...

Page 40: ...heck the print side of the paper Follow the instructions packaged with your specialty media for loading and handling Incorrect paper type On the Main tab of the printer driver ensure that the Media Ty...

Page 41: ...he Media Type selected matches the paper loaded In the Print dialog box of the printer driver select Quality Media form the pop up menu and then ensure that the Media Type selected matches the paper l...

Page 42: ...Prevent paper abrasion is selected in the printer properties dialog box Windows or selected from Custom Settings in the Canon IJ Printer Utility dialog box Macintosh the setting is also applied under...

Page 43: ...shing speeds Refer to Getting the Ink Level Information in the Direct Printing Guide Ink tank is not installed in the correct position If an ink tank lamp is flashing even though ink remains in that i...

Page 44: ...er Name in the Printer List 4 Click to select an undesired document and click The print job is deleted Cannot Print to End of Job Incorrect page size is selected Ensure that the page size setting matc...

Page 45: ...t is used high temperature high humidity low temperature low humidity some types of plain paper may not feed correctly If this happens reduce the number of pages loaded to about the half the recommend...

Page 46: ...ing according to the interface you are using on the Ports tab or the Details tab or reinstall the printer driver Faulty connection Ensure that the printer cable is securely connected to the computer I...

Page 47: ...clear the error so you can continue printing Before the ink absorber becomes completely full contact the Customer Care Center When you experience this error you will need to call for servicing to repl...

Page 48: ...m setting 5 18 ppm Standard 6 5 ppm Color printing Max Speed Custom Setting 5 17 ppm Standard 4 9 ppm Print width 203 2 mm max 8 0 inches for Borderless Printing 215 9 mm 8 5 inches Interface USB USB...

Page 49: ...umidity 5 to 95 RH no condensation Power supply AC 110 120 V 50 60 Hz AC 220 240 V 50 60 Hz Power consumption Standby Approx 2 0 W Printing Approx 17 W OFF Approx 0 8 W Dimensions with the Paper Suppo...

Page 50: ...Paper Fast Photo Photo Paper Pro Plain Paper Only A4 Letter Layout Default Selections based on the printer setting Borderless Bordered N up 2 4 9 16 1 35 up 2 1 Layout compatible with Canon brand stic...

Page 51: ...4 USB Windows XP SP1 SP2 PentiumII 300 MHz 3 Windows 2000 Professional SP2 SP3 SP4 Windows Millennium Edition Windows 98 98 Second Edition Interface Operating System Processor RAM Hard Disk Space 4 US...

Page 52: ...riodically unplug the printer and use a dry cloth to wipe off any dust or dirt collected on the plug and the power outlet If the printer is placed at a location exposed to a lot of dust smoke or high...

Page 53: ...rce other than the one rated for the printer in the country where you purchased the printer AC 110 120 V 50 60 Hz AC 220 240 V 50 60 Hz Working around the printer Never put your hands or fingers in th...

Page 54: ...f the following measures Reorient or relocate the receiving antenna Increase the separation between the equipment and receiver Connect the equipment into an outlet on a circuit different from that to...

Page 55: ...ASF Without limiting the foregoing dropping the Product scratches and abrasions will be presumed to have resulted from misuse abuse or failure to operate the Product as set forth in the user s manual...

Page 56: ...ctive Product to the Canon USA repair facility The defective Product must be returned in the shipping carton in which the replacement Product was packed and include the reference number A COPY OF YOUR...

Page 57: ...avoid 4 Media Type 19 22 25 O Opening the Printer Properties Dialog Box Directly from the Start Menu Windows 29 Opening the Printer Properties Dialog Box from Your Application Program Windows 29 P Pa...

Page 58: ...s 20 Turning off the Printer 3 Turning on the Printer 2 U Uninstalling the printer driver 42 Using Specialty Media 18 Using the Auto Sheet Feeder and the Cassette 5 Using the Bundled Software 30 W War...

Page 59: ...A Inc has determined that this product meets the ENERGY STAR guidelines for energy efficiency Getting Help from Canon Getting Help from Canon Getting Help from Canon Getting Help from Canon Help Us He...

Page 60: ...ississauga Ontario L5T 1P7 Canada Canon Latin America Inc 703 Waterford Way Suite 400 Miami FL 33126 U S A Canon Mexicana Boulevard Manuel Avila Camacho No 138 PB y Pisos 15 16 y 17 Colonia Lomas de C...

Reviews: