background image

10


10


Installation Location and Handling

Moving the Machine

If you intend to move the machine, even to a 

location on the same floor of your building, 

contact your local authorized Canon dealer 
beforehand. Do not attempt to move the machine 

yourself.

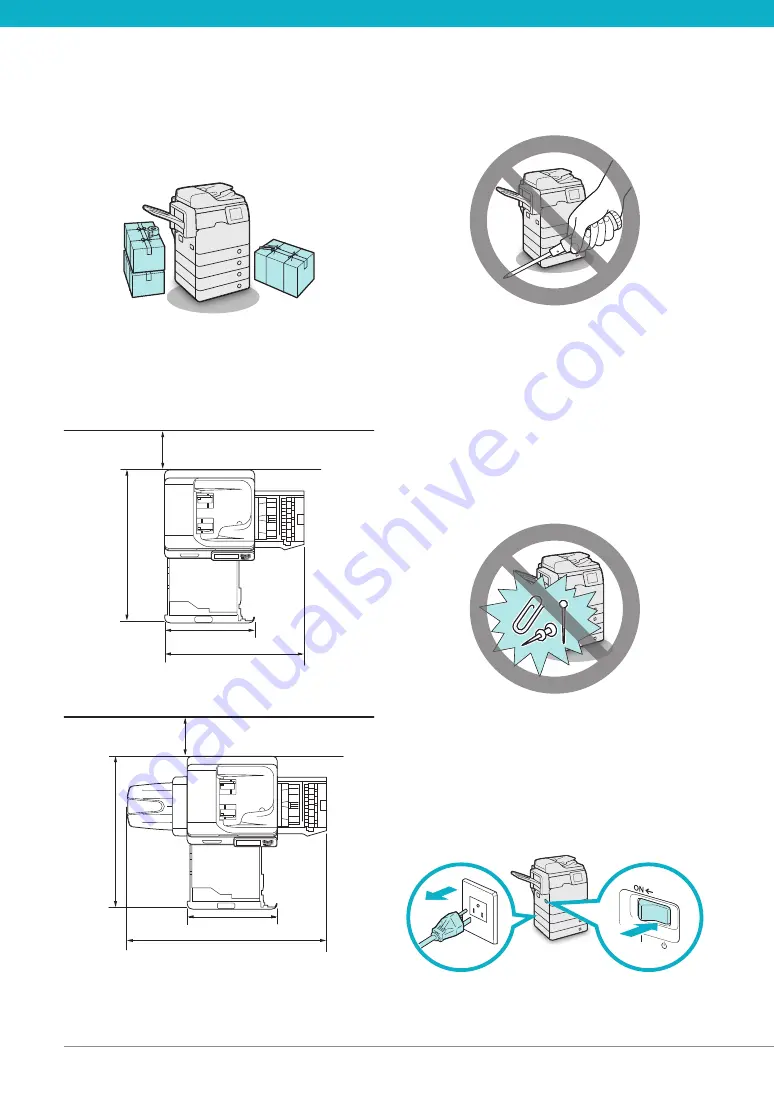
Provide Adequate Installation Space

Provide enough space on each side of the machine for 
unrestricted operation.

When no optional products are attached:

When the Staple Finisher-R1 is attached:

Handling Precautions

Do not attempt to disassemble or modify the 

machine.

Some parts inside the machine are subject to 

high-voltages and temperatures. Take adequate 
precautions when inspecting the inside of the 
machine. Do not carry out any inspections that are 

not described in the manuals for this machine.

Be careful not to spill liquid or drop any foreign 

objects, such as paper clips or staples inside the 
machine. If a foreign object comes into contact 

with electrical parts inside the machine, it might 

cause a short circuit and result in a fire or electrical 
shock.

If there is smoke, or unusual noise, immediately 

turn the main power switch OFF, disconnect 
the power cord from the power outlet, and 
then call your local authorized Canon dealer. 

Using the machine in this state may cause a fire 
or electrical shock. Also, avoid placing objects 
around the power plug so that the machine can be 
disconnected whenever necessary.

Summary of Contents for imageRUNNER ADVANCE 400iF

Page 1: ...pter 4 Routine Maintenance Chapter 5 Specifications This guide explains the procedures from unpacking the machine through power cord connection Be sure to read the manual before using the machine The remarks for important safety instructions are described in User s Guide Read the manual also Keep the manual for future reference Appendix ...

Page 2: ...ribes all the functions of the machine Also provided with a search function that is useful for finding and checking information Includes Practical Workflows which introduces flows of practical operations using functions of the machine Driver Installation Guide Provides instructions on installing the printer fax and other drivers Printer Driver Installation Guide Mac Printer Driver Installation Gui...

Page 3: ... inside the iRADV_500iF_Manual folder to display the e Manual Depending on the operating system you are using a security protection message may appear In this case allow the content to be displayed If the e Manual CD ROM Does Not Start The CD ROM auto run function may be disabled In this case you must perform the following procedure Windows XP Vista 1 Click Start on the taskbar click My Computer 2...

Page 4: ...ving the Machine 10 Provide Adequate Installation Space 10 Handling Precautions 10 ItemsIncludedwiththeMachine 12 CarryingtheMachinetotheInstallationSiteandRemovingthePackingMaterials 13 InstallingtheFilters 14 AttachingtheDuplexTrayandtheTrayRib 15 InstallingtheDrumUnit 16 InstallingtheTonerCartridge 19 LoadingPaperintothePaperDrawer 21 AttachingthePrecautionLabel 23 ConnectingthePowerCord 24 Set...

Page 5: ...4 e LoadingPaper 40 Loading Paper into a Paper Drawer 40 Adjusting a Paper Drawer to Hold a Different Paper Size 41 ReplacingtheTonerCartridge WasteTonerContainer 43 Replacing theToner Cartridge 43 Replacing theWasteToner Container 45 ReplacingtheDrumUnit 48 RoutineCleaning 52 Cleaning the Platen Glass and Underside of the Feeder 52 Manual Feeder Cleaning 52 Consumables 55 WhenanErrorMessage Error...

Page 6: ...ERGY STAR Program 72 IPv6 Ready Logo 72 Information Security Standard IEEE 2600 72 Copyright 72 Third Party Software 72 The Software Subjected to the Other Conditions 73 Disclaimers 73 Legal Limitations on the Usage ofYour Product and the Use of Images 73 Users in the U S A 73 Users in Canada 75 Utilisation au Canada 75 Super G3 76 ImportantSafetyInstructions 77 Installation 77 Power supply 77 Han...

Page 7: ...to operate the machine correctly and avoid damage to the machine or property Indicates a clarification of an operation or contains additional explanations for a procedure Reading these notes is highly recommended Indicates an operation that must not be performed Read these items carefully and make sure not to perform the described operations Keys and Buttons Used inThis Manual The following symbol...

Page 8: ...demarks MEAP and the MEAP logo are trademarks of Canon Inc This product contains the Universal Font Scaling Technology or UFST under license from Monotype Imaging Inc UFST is a trademark of Monotype Imaging Inc registered in the United States Patent and Trademark Office and may be registered in certain jurisdictions Apple EtherTalk LocalTalk Mac Macintosh Mac OS and Safari are trademarks of Apple ...

Page 9: ...ystems Incorporated All rights reserved Protected by U S Patents 6 185 684 6 205 549 7 213 269 7 272 628 7 278 168 Patents pending in the U S and other countries All instances of the name PostScript in the text are references to the PostScript language as defined by Adobe Systems Incorporated unless otherwise stated The name PostScript also is used as a product trademark for Adobe Systems implemen...

Page 10: ... 10 ItemsIncludedwiththeMachine 12 CarryingtheMachinetotheInstallationSiteandRemovingthePackingMaterials 13 InstallingtheFilters 14 AttachingtheDuplexTrayandtheTrayRib 15 InstallingtheDrumUnit 16 InstallingtheTonerCartridge 19 LoadingPaperintothePaperDrawer 21 AttachingthePrecautionLabel 23 ConnectingthePowerCord 24 ...

Page 11: ...ine Be sure that the curtains do not block the machine s ventilation slots or louvers or interfere with the electrical cord or power supply Avoid poorly ventilated locations This machine generates a slight amount of ozone etc during normal use Although sensitivity to ozone etc may vary this amount is not harmful Ozone etc may be more noticeable during extended use or long production runs especiall...

Page 12: ...ine s leveling feet Do not remove the machine s leveling feet after the machine has been installed If you put weight on the front of the machine while the drawers or units within the machine are pulled out the machine may fall forward To prevent this from happening make sure that the machine s leveling feet are in place Select a Safe Power Supply Plug the machine into a 120 V AC outlet Make sure t...

Page 13: ...peratures Take adequate precautions when inspecting the inside of the machine Do not carry out any inspections that are not described in the manuals for this machine Be careful not to spill liquid or drop any foreign objects such as paper clips or staples inside the machine If a foreign object comes into contact with electrical parts inside the machine it might cause a short circuit and result in ...

Page 14: ...e during extended use or long production runs especially in poorly ventilated rooms It is recommended that the room be appropriately ventilated sufficient to maintain a comfortable working environment in areas of machine operation For safety reasons Press Energy Saver when it will not be used for a long period of time such as overnight As an added safety measure turn OFF the main power switch and ...

Page 15: ... Unpacking the Machine check each item against this list as you remove each item from the accessories box except for the drum unit Filters Duplex Tray Tray Rib Drum Unit Paper Size Labels Precaution Labels Power Cord Telephone Line CD ROM 5 Paper Manual 3 ...

Page 16: ... Removing the Packing Materials 01 See the included READ THIS SHEET FIRST before carrying the machine to the installation site 02 Remove all shipping tape from the flap side edges 03 Open the feeder remove the protective sheet and take out the drum unit ...

Page 17: ...14 Installing the Filters 01 Install the filters on the right side of the machine ...

Page 18: ...he Drum Unit 01 Lift the control panel 02 Attach the duplex tray by inserting its tabs into the slots on the machine Be careful not to accidentally insert the tabs into the slot circled in the illustration 03 Insert the front tabs of the tray rib into the slots first and then press down on its left end so that the rear tabs snap into the slots 04 Lower the control panel back in place ...

Page 19: ...l panel 2 Open the front cover 02 Open the right cover Always open the right cover during installation to prevent damage to the drum unit 03 1 1 Toner Container Lock Lever Turn the toner container lock lever counterclockwise 90 degrees 04 Remove the waste toner container ...

Page 20: ...t for a long time as the print quality may deteriorate Do not expose the drum unit to direct sunlight or strong light Condensation water droplets on the inside or outside may form on the drum unit when it is brought into an environment with a sudden change in temperature or humidity When moving a new drum unit to a location with change in temperature leave the drum unit in the protective bag at th...

Page 21: ...g the rails on the machine 10 1 1 Drum Unit Lock Lever Turn the drum unit lock lever clockwise to its original position 11 Reinsert the removed waste toner container 12 1 1 Toner Container Lock Lever Turn the toner container lock lever clockwise to its original position 13 Close the right cover Be careful not to get your fingers caught as this may result in personal injury ...

Page 22: ...lever counterclockwise so that the arrow marks on the lever and its axis face each other 02 Remove the toner cartridge from its protective bag 03 Remove the protective cap Do not touch the tip of the toner cartridge or subject it to shock by hitting it Doing so may cause the toner cartridge to leak ...

Page 23: ... it into the machine with your other hand 05 1 1 Toner Cartridge Lock Lever Turn the toner cartridge lock lever clockwise so that the arrow marks on the lever and its axis face each other 06 Close the front cover 1 Close the front cover of the main unit 2 Lower the control panel back in place Be careful not to get your fingers caught as this may result in personal injury ...

Page 24: ...open button on the paper drawer 02 Grip the handle and pull out the paper drawer until it stops 03 2 1 1 Lever 2 Side Guide Squeeze the lever on the side guide Without releasing the lever slide the side guide leftward or rightward to align it with the mark for the desired paper size 04 2 1 1 Lever 2 Front Guide Squeeze the lever on the front guide Without releasing the lever slide the front guide ...

Page 25: ...are not to cut your hands on the edges of the paper 07 Gently push the paper drawer back into the machine until it clicks into place in the closed position When returning the paper drawer to its original position be careful not to get your fingers caught as this may result in personal injury 08 Peel off the paper drawer label and affix the label to the part of the paper drawer indicated in the ill...

Page 26: ...en affix the label to the part indicated in the illustration On this part the English label is already affixed Affix your selected label over the existing label If the desired language is English you do not need to affix a new label 03 Gently close the feeder Close the feeder gently to avoid catching your hands as this may result in personal injury ...

Page 27: ...the Optional Finisher See the installation manual supplied with the optional finisher to attach the finisher to the machine then connect the power cord 01 Connect the power cord to the socket on the left side of the machine and to the wall outlet ...

Page 28: ...and Registrating the Machine 2 MainPowerandEnergySaverKey 26 How toTurn ON the Main Power 26 Energy Saver Key 27 Shutting Down the Machine 27 UsingtheSetupGuidetoConfiguretheMachine 28 ChangingSpecifiedSettings 32 ...

Page 29: ... machine is turned ON from Default Screen after Startup Restoration on the Settings Registration screen See e Manual Settings Registration If this machine is connected to a powered off Macintosh computer by USB cable the computer may turn on automatically when this machine does In this case disconnect the USB cable from the machine You may also be able to solve this problem by using a USB hub betw...

Page 30: ...cessed or a MEAP application is running while the machine is shutting down To safely turn OFF the machine s main 01 power press the main power switch located on the left side of the machine to the side Do not turn the main power OFF while using the Fax I Fax function Sending or receiving I fax or fax documents cannot be done when the main power is turned OFF The machine may take some time to compl...

Page 31: ... keyboard layout press OK Mixing the Toner 03 Press Start After the toner finishes mixing press OK Registering the Paper That You Are 04 Going to Load 1 Select the paper source that you want to load the paper type for press Set You can select the desired envelope type by pressing Envelope In addition you can enter the paper size by pressing Custom Size Instead of entering values you can also selec...

Page 32: ...he difference in hours up to 12 hours from GMT 0 hours A time zone is a region throughout which this time difference is the same Daylight Saving Time In some countries time is temporarily advanced throughout the summer season This practice is called Daylight Saving Time Enter the current date and time using numeric keys press OK Enter the day and the month using four digits including zeros The tim...

Page 33: ...s Setting Country Region 08 Select the country region where the machine is located press Next Registering Your Machine s Fax 09 Number You can register the fax number your machine uses when sending faxes This number is printed on the document that you fax to the receiving party Enter the fax number using numeric keys press Next Registering the Unit Name 10 You can register the unit name for fax do...

Page 34: ... Select the line type press OK Specifying the System Manager 12 Settings You can register the System Manager Information settings Confirm or change the authentication information press Next enter information if necessary press OK Closing the Setup Guide 13 You can close the Setup Guide and then restart the machine After confirming that there are no jobs currently in progress press OK You can also ...

Page 35: ...e Touch Panel Display Information on the paper loaded in the paper source Settings Registration Preferences Paper Settings Registering the Paper Size and Type for a Paper Source Date time Settings Registration Preferences Timer Energy Settings Current Date and Time Network settings Network TCP IP Network Setup Procedures Protocol Settings Fax number of the machine Settings Registration Function Se...

Page 36: ...33 Before Using This Machine 3 PartsandTheirFunctions 34 ExternalView 34 InternalView 35 Feeder 35 Control Panel Parts and Functions 36 BackingUp ExportingData 38 ...

Page 37: ...anel Parts and Functions on p 36 Paper Drawer 1 Paper Drawer 1 holds up to 550 sheets of paper 21 lb bond 80 g m2 Output Tray Prints are output to this tray if the optional Staple Finisher R1 is not attached USB Port 1 Use the USB port to connect USB memory external hard disks and other devices to the machine Right Cover of the Main Unit Open this cover when clearing a paper jam inside the main un...

Page 38: ... Originals placed in the feeder are scanned here Platen Glass Place originals here when scanning books heavyweight originals transparencies etc Right Cover of the Main Unit Open this cover when clearing a paper jam inside the main unit Fixing Unit If paper is jammed in the fixing unit remove the jammed paper carefully Feeder Feeder Cover Open this cover to remove jammed paper Slide Guides Adjust t...

Page 39: ... Indicator Flashes or lights if there is an error in the machine When the Error indicator flashes follow the instructions that appear on the touch panel display When the Error indicator maintains a steady red light contact your local authorized Canon dealer Processing Data Indicator Flashes or blinks green when the machine is performing operations and maintains a steady green light when fax data i...

Page 40: ...his Manual e Manual 37 Adjusting the Angle of the Control Panel The angle of the control panel is adjustable as shown below 1 Adjustable Range Do not apply excess force to the control panel when adjusting its angle ...

Page 41: ...ting Information User Setting Information DataYou Can Import Export Individually You can save load data individually In addition you can exchange data with this machine and other machines which do not support the Import Export All function Data References Address Lists e Manual Remote UI Device Settings Forwarding Settings Address Book Send Function Favorite Settings Printer Settings Paper Informa...

Page 42: ...placingtheDrumUnit 48 RoutineCleaning 52 Cleaning the Platen Glass and Underside of the Feeder 52 Manual Feeder Cleaning 52 Consumables 55 WhenanErrorMessage ErrorCodeIsDisplayed 57 When an Error Message Is Displayed 57 When an Error Code Is Displayed 57 Service Call Message 58 ContactingYour Local Authorized Canon Dealer 58 Setting the Limited Functions Mode from the Service Call Message Screen 5...

Page 43: ... particularly well before loading it Never place paper or any other items in the empty part of the drawer next to the paper stack Doing so may cause paper jams When you are printing in the Staple mode do not remove the output sheets that are waiting to be stapled Printing and stapling resume after you clear the paper jam The following paper sizes can be loaded into Paper Drawers 1 2 3 and 4 Paper ...

Page 44: ...paper 21 lb bond 80 g m 2 can be loaded in Paper Drawers 1 and 2 If there are instructions on the paper package about which side of the paper to load follow those instructions When the paper is loaded into the paper drawer the side facing up is the one printed on If problems such as poor print quality or paper jams occur try turning the paper stack over and reloading it For more information on the...

Page 45: ... guide backward or forward to align it with the mark for the desired paper size Adjust the guides correctly Failure to do so may cause paper jams or dirty prints or make the inside of the machine dirty Load the appropriate size paper into 04 the paper drawer 1 2 3 1 Make sure that the paper size setting of the paper drawer matches the size of the paper to load in the paper drawer 2 Load the paper ...

Page 46: ...xplosions to clean up spilled toner Doing so may cause a malfunction in the vacuum cleaner or result in a dust explosion due to static discharge Keep toner out of the reach of small children If toner is ingested consult a physician immediately If toner gets onto your hands or clothing wash it off immediately with cold water Washing it off with warm water will set the toner and make it impossible t...

Page 47: ...nderneath and then remove it completely while keeping it level Do not burn or throw used toner cartridge into open flames as this may cause the toner remaining inside the cartridges to ignite resulting in burns or a fire If the toner cartridge cannot be pulled out check that the knob is turned all the way to the appropriate position Do not touch the tip of the toner cartridge or subject it to shoc...

Page 48: ...reen with instructions on how to replace the waste toner container appears on the touch panel display You can follow the procedure described below to replace the waste toner container Even if you do not replace the waste toner container immediately you can perform printing for a while The number of prints you can make depends on the content you print However if you continue printing an error will ...

Page 49: ...out the waste toner container 01 from the front of the machine 1 Lift the control panel 2 Open the front cover Turn the 02 toner container lock lever counterclockwise 90 degrees to unlock the waste toner container Toner Container Lock Lever Remove the waste toner container 03 When removing the waste toner container be careful not to tilt it as the toner may spill and get onto your hands or clothin...

Page 50: ... lock lever clockwise 90 degrees to lock the container Toner Container Lock Lever Close the front cover 09 1 Close the front cover of the main unit 2 Lower the control panel back in place When closing the cover for the waste toner container be careful not to get your fingers caught as this may result in personal injury ...

Page 51: ...e to the drum unit Turn the 04 toner container lock lever counterclockwise 90 degrees to unlock the waste toner container Toner Container Lock Lever Remove the waste toner container 05 When removing the waste toner container be careful not to tilt it as the toner may spill and get onto your hands or clothing Press 01 The name of the part that needs to be replaced is displayed Open the front cover ...

Page 52: ...09 marking pull the drum unit out slightly upward Remove the drum unit from its 10 protective bag Do not touch or expose the cylindrical blue green part to light for a long time as the print quality may deteriorate Do not expose the drum unit to direct sunlight or strong light Condensation water droplets on the inside or outside may form on the drum unit when it is brought into an environment with...

Page 53: ...um unit slides properly along the rails on the machine Lock the drum unit by turning the 13 drum unit lock lever clockwise until it stops Drum Unit Lock Lever Remove the cap from the container 14 opening and attach it to the protrusion on the side of the container Be careful not to spill the waste toner when detaching the cap Insert the waste toner container 15 Turn the 16 toner container lock lev...

Page 54: ...ury Close the front cover 18 1 Close the front cover of the main unit 2 Lower the control panel back in place When closing the cover for the waste toner container be careful not to get your fingers caught as this may result in personal injury Press Close 19 Press Yes 20 Press Yes to start initializing the drum unit If you want to initialize the drum unit at a later time or if you have not yet repl...

Page 55: ... thinner or other solvents for cleaning Doing so may result in damage to the plastic parts Cleaning the Platen Glass and Underside of the Feeder If the platen glass or the underside of the feeder is dirty the original may not be scanned clearly Clean the platen glass and the underside of the feeder by following the procedure below Clean the platen glass and the 01 underside of the feeder with a cl...

Page 56: ...ith a soft dry cloth Spin the rollers with your hand while cleaning them Clean the transparent plastic parts of 04 the inner cover and inside it a total of three places with a water moistened cloth Then wipe the area with a soft dry cloth Lift the feeder 05 Clean the 06 feeder scanning area the left side of the platen glass and the white strip of plate under the feeder with a water moistened cloth...

Page 57: ...ning them Close the cover under the feeder 09 When closing the cover be careful not to get your fingers caught as this may result in personal injury Gently lower the feeder 10 When lowering the feeder be careful not to get your fingers caught as this may result in personal injury Gently close the feeder cover 11 When closing the cover be careful not to get your fingers caught as this may result in...

Page 58: ...Genuine Toner imageRUNNER ADVANCE 500iF 400iF GPR 48 Black Toner Do not burn or throw used toner cartridges into open flames as this may cause the toner remaining inside the cartridges to ignite resulting in burns or a fire Do not store toner cartridges in places exposed to open flames as this may cause the toner to ignite resulting in burns or a fire If you accidentally spill or scatter toner car...

Page 59: ...Unit Staple Cartridge Finisher Staple Cartridge name Shape Staple Finisher R1 Staple P1 Genuine Supplies Canon has developed and manufactured Toner Parts and Supplies specifically for use in this machine For optimal print quality and for optimal machine performance and productivity we recommend that you use Genuine Canon Toner Parts and Supplies Contact your Canon Authorized Dealer or Service Prov...

Page 60: ...rrors see e Manual Problem Solving When an Error Code Is Displayed If a job or operation does not complete successfully the error code is displayed on the Details screen for Log on the Status Monitor Cancel screen You can check the error code in the following locations Details screen for Log on the Status Monitor Cancel screen When a job or operation is not completed normally Results row of the Co...

Page 61: ...rvice Call Message Screen on p 59 When a service call message is displayed on the bottom of the screen Even if a message prompting you to call your service representative appears on the bottom of the screen some functions may still be available For more information on the available functions see e Manual Problem Solving ContactingYour Local Authorized Canon Dealer If a screen prompting you to cont...

Page 62: ...anel display Setting the Limited Functions Mode from the Service Call Message Screen When Limited Func Mode is displayed follow the procedures below If you turn OFF the main power switch when there is a job waiting to print that job is erased If you set Limited Functions Mode to On from the Service Call Message screen Limited Functions Mode in Management Settings Settings Registration is also set ...

Page 63: ... By following the instructions in the applicable section you can clear staple paper jams For details on these procedures see the e Manual Locations of Paper Jams Problem Solving Locations of Paper Jams Main Unit Paper Drawer Cassette Module AA1 Optional 1 2 3 1 2 1 2 3 Feeder Staple Finisher R1 Optional ...

Page 64: ...t 62 Feeder 64 Cassette Module AA1 65 Envelope Cassette E1 65 Staple Finisher R1 65 Copy Card Reader F1 66 Super G3 FAX Board AH2 66 Send Function 67 E Mail and I Fax Features 68 Network Environment 69 Software Specifications 69 Printer Settings 69 ...

Page 65: ...to 24 lb bond 81 to 90 g m Recycled Color Pre Punched and Heavy 1 25 to 28 lb bond 91 to 105 g m Multi Purpose Tray Weight 17 lb bond to 67 lb cover 64 to 181 g m Type Plain 1 17 to 21 lb bond 64 to 80 g m Plain 2 22 to 24 lb bond 81 to 90 g m Recycled Color Pre Punched Bond Heavy 1 25 to 28 lb bond 91 to 105 g m Heavy 2 29 lb bond to 34 lb cover 106 to 128 g m Labels Transparency and Envelopes Ac...

Page 66: ...1 sheet minute imageRUNNER ADVANCE 500iF imageRUNNER ADVANCE 500iF imageRUNNER ADVANCE 400iF LGL xx xx LTR xx xx STMT xx xx EXEC xx xx Except when paper is fed from the multi purpose tray The copy speed may vary depending on the settings for paper type paper size and the sending method When continuously copying adjustments for machine temperature or image quality may cause machine operations to pa...

Page 67: ... xx 1180 mm x 932 mm when the multi purpose tray is extended Feeder Item Specifications Original Feeding Mechanism Automatic Document Feeder Size and Weight of Originals Size LGL LTR and STMT Weight 1 sided 2 sided scanning 13 lb bond to 34 lb bond 50 to 128 g m Full Color Originals xx lb bond to 34 lb bond 64 to 128 g m STMT originals can be placed either vertically or horizontally when they are ...

Page 68: ... 540 mm x 500 mm Weight Approximately 17 lb 7 7 kg Staple Finisher R1 Item Specifications Paper Size Weight Type Size LGL LTR STMT EXEC Custom size xx x xx to 8 1 2 x 14 99 mm x 139 7 mm to 215 9 mm x 355 6 mm and Envelopes Weight 17 lb bond to 67 lb cover 64 to 181 g m Type Plain 1 17 to 21 lb bond 64 to 80 g m Plain 2 22 to 24 lb bond 81 to 90 g m Recycled Color Pre Punched Bond Heavy 1 25 to 28...

Page 69: ...irection Face up Store Replay Replay Power Source From the main unit Dimensions H x W x D 1 5 8 x 3 1 2 x 3 3 4 40 mm x 88 mm x 96 mm excluding the attachment kit and cable Weight Approximately 7 1 oz 200 g including the attachment kit and cable Super G3 FAX Board AH2 Item Specifications Telephone Line Used 1 Public Switched Telephone Network Scan Line Density Scan Transmission Normal 8 pels 2 mm ...

Page 70: ...2 Windows Server 2008 R2 SP2 Windows 7 Solaris 10 Mac OS X 10 4 x 10 5 x 10 6 x Red Hat Linux 9 Interface 1000BASE T 100BASE TX 10BASE T Color Mode Automatic Color Select Full Color Grayscale Automatic Color Select Full Color Black and White Full Color Grayscale Black and White Original Type Text Text Photo Photo Other Preview Browse Windows SMB File Server Optional PDF XPS OOXML Functions PDF Com...

Page 71: ...able after setting RX conditions of the destination Format E mail TIFF JPEG PDF XPS OOXML Power Point I Fax Black and White TIFF MH MR 1 MMR 1 I Fax Color TIFF Profile C 1 1 Available after setting RX conditions of the destination Original Size E mail LTR STMT I Fax LGL 2 LTR STMT 2 2 Sent as LTR Server Software Microsoft Exchange 2003 SP2 Microsoft Exchange 2007 SP2 Sendmail 8 14 4 Lotus Domino R...

Page 72: ... 136 Scalable fonts Printable Area PCL5e PCL6 Reduced to 1 6 4 23 mm from the top bottom left and right edges of the paper PostScript 3 Reduced to 1 6 4 mm from the top bottom left and right edges of the paper With 12 5 8 x 17 11 16 size paper you cannot print in the areas 1 6 4 mm mm from the top and bottom edges of the paper and 1 4 7 5 mm mm from the left and right edges of the paper When print...

Page 73: ...70 70 Replacing the Toner Cartridge Waste Toner Container ...

Page 74: ...an experienced radio TV technician for help Use of shielded cables are required to comply with Class B limits in Subpart B of Part 15 of the FCC Rules Do not make any changes or modifications to the equipment unless otherwise specified in this manual If you make such changes or modifications you could be required to stop operation of the equipment If your equipment malfunctions please contact your...

Page 75: ...and or software modules are subject to conditions a through c below a UFST Copyright 1989 1996 1997 2003 2004 2008 all rights reserved by Monotype Imaging Inc b Copyright Unpublished Work of Novell Inc All Rights Reserved c Portions of this software are copyright 2007 The FreeType Project www freetype org All rights reserved Third Party Software This Canon product the PRODUCT includes third party ...

Page 76: ...y included with your product contains Perchlorate Material and may require special handling See http www dtsc ca gov hazardouswaste perchlorate for details Legal Limitations on the Usage ofYour Product and the Use of Images Using your product to scan print or otherwise reproduce certain documents and the use of such images as scanned printed or otherwise reproduced by your product may be prohibite...

Page 77: ...ing a compatible modular jack that is Part 68 compliant This equipment may not be used on coin service provided by the telephone company Connection to party lines is subject to state tariffs In Case of Equipment Malfunction Should any malfunction occur which cannot be corrected by the procedures described in the e Manual disconnect the equipment from the telephone line cable and disconnect the pow...

Page 78: ... Notice This product meets the applicable Industry Canada technical specifications Before installing this equipment users should ensure that it is permissible to be connected to the facilities of the local telecommunications company The equipment must also be installed using an acceptable method of connection In some cases the company s inside wiring associated with a single line individual servic...

Page 79: ... ligne individuelle d abonné qui a été installée par la compagnie au moyen d un jeu de connecteurs homologués rallonge téléphonique L attention de l utilisateur est attirée sur le fait que le respect des conditions mentionnées ci dessus ne constitue pas une garantie contre les dégradations de qualité du service dans certaines circonstances L indice d équivalence de la sonnerie IES sert à indiquer ...

Page 80: ...machine As these instructions are intended to prevent injury to the user or other persons or destruction of property always pay attention to these instructions Also since it may result in unexpected accidents or injuries do not perform any operation unless otherwise specified in the manual Improper operation or use of this machine could result in personal injury and or damage requiring extensive r...

Page 81: ...op paper clips staples or other metal objects inside the machine Also do not spill water liquids or flammable substances alcohol benzene paint thinner etc inside the machine If these items come into contact with a high voltage area inside the machine it may result in a fire or electrical shock If these items are dropped or spilled inside the machine immediately turn OFF the main power switch and d...

Page 82: ...is connected for a long period of time in a damp dusty or smoky location dust can build up around the power plug and become damp This may cause a short circuit and result in a fire Clean the machine using a slightly dampened cloth with a mild detergent mixed with water Do not use alcohol benzene paint thinner or other flammable substances Check detergent for flammability prior to use If flammable ...

Page 83: ...es or mouth If the toner gets into your eyes or mouth wash them immediately with cold water and immediately consult a physician When removing jammed originals or paper which has become jammed inside the machine take care not to cut your hands or injure yourself on the edges of the originals or paper If you cannot remove the paper contact your local authorized Canon dealer When removing a used tone...

Page 84: ...ut the cartridges into a bag to prevent the toner remaining inside the cartridges from scattering and dispose of them in a location away from open flames Telephone Equipment When using telephone equipment incorporated into this machine basic safety precautions should always be followed to reduce the risk of fire electrical shock or injury to persons including the following 1 Do not use this machin...

Page 85: ...ecommended in any manual distributed with the Product Nor does this warranty extend to any Product on which the original identification marks or serial numbers have been defaced removed or altered ANY SOFTWARE THAT IS DISTRIBUTED WITH THE PRODUCT AND HAS AN ASSOCIATED END USER AGREEMENT IS LICENSED WARRANTED AND PROVIDED ACCORDING TO THE TERMS OF THAT AGREEMENT INCLUDING ANY LIMITATIONS AND DISCLA...

Page 86: ...NDITIONS OF WARRANTY Defective parts must be returned to Canon or an Authorized Service Provider with all necessary documentation and will become the property of Canon THIS WARRANTY APPLIES TO PRODUCTS SOLD AND USED IN THE U S A AND CANADA ONLY TERMS OF imageWARE REMOTE SERVICE ...

Page 87: ...rization by you for the Canon Seller to establish and perform during the period of provision of Service HTTPS HTTP communications using your internet and internal network bandwidth for transmissions to and from the CDS Server iv authorization by you for the Product itself or a Canon serviceperson to download or update firmware and purchased MEAP application software data for internet based activat...

Page 88: ......

Page 89: ...ur regional dealer CANON LATIN AMERICA INC 703 Waterford Way Suite 400 Miami Florida 33126 U S A CANON AUSTRALIA PTY LTD 1 Thomas Holt Drive North Ryde Sydney N S W 2113 Australia CANON CHINA CO LTD 15F Jinbao Building No 89 Jinbao Street Dongcheng District Beijing 100005 China CANON SINGAPORE PTE LTD 1 HarbourFront Avenue 04 01 Keppel Bay Tower Singapore 098632 CANON HONGKONG CO LTD 19 F The Metr...

Reviews: