background image

3

∙ When using the 

stand

-> Assemble the stand on which you will install the printer by referring to the 

Printer Stand Setup Guide (separate manual)

.

∙ When not using the 

stand

-> Proceed to 

"Installing the Printer"

.

1

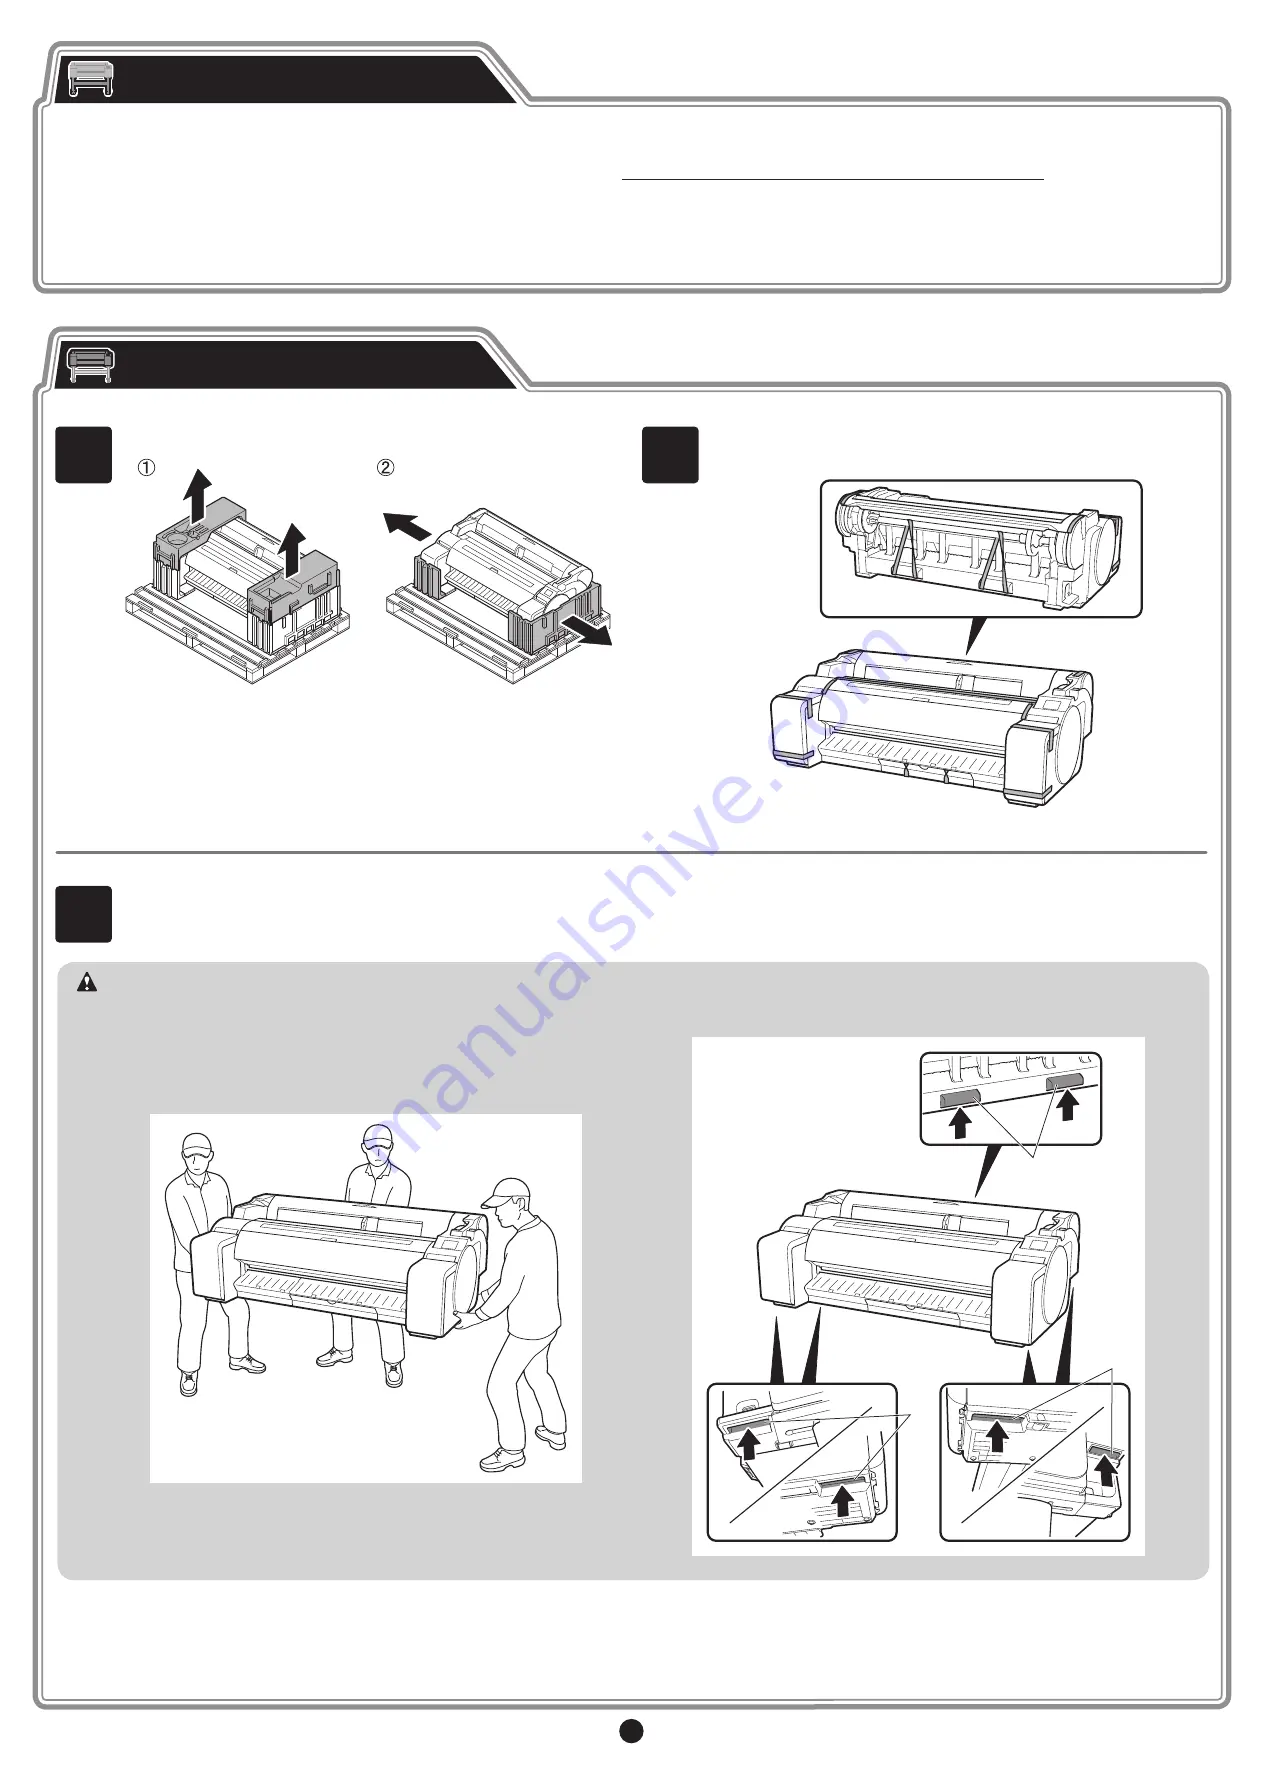
Remove the packaging material.

2

Remove all of the tape and other packaging material.

Remove the tape

 affixed to the 

roll holder.

Assembling the Stand

Installing the Printer

3

Have 3 people lift up the printer. Have 1 person grasp the carrying handles at the bottom of each side, and 1 person grasp the handles in the middle 

of the rear side.

• Moving the printer requires at least 3 people, holding it on the left, right, 

and rear sides. Be careful to avoid back strain and other injuries due to 

the weight of the printer.  

<Printer weight (printer only)> 

∙ 

TM-305: Approx. 108 lb (49 kg) 

∙ 

TM-300: Approx. 106 lb (48 kg) 

∙ 

TM-205: Approx. 91 lb (41 kg) 

∙ 

TM-200: Approx. 91 lb (41 kg)

• When moving the printer

, firmly grasp the carrying handles 

(A) under 

each side and at the rear side. Holding the printer at other positions is 

dangerous and cause injury and damage if the printer is dropped.

Caution

A

A

A

Summary of Contents for imagePROGRAF TM-305

Page 1: ...nstructions in this Setup Guide show the TM 305 printer Note that your printer may look different from these illustrations in some cases However the basic operations are the same If an error message a...

Page 2: ...elated to replacing paper ink tanks and the print head Printer Stand Setup Guide Describes how to assemble the stand This may not be included depending on your region and selected purchase options Ele...

Page 3: ...e carrying handles at the bottom of each side and 1 person grasp the handles in the middle of the rear side Moving the printer requires at least 3 people holding it on the left right and rear sides Be...

Page 4: ...ation and proceed to Turning On the Printer 5 Affix the printer to the stand Use an allen wrench to secure the printer with 2 M4 hex screws on each side from the underside of the supporting plate When...

Page 5: ...nter using a screwdriver 2 Plug the power cord into the outlet Turning On the Printer 3 Turn on the printer 4 When the language selection screen appears on the touch screen select a language Then if t...

Page 6: ...until it clicks 1 Instructions on ink tank installation are shown on the touch screen Open the ink tank covers as instructed by grasping the handles 2 While pushing the tip of the ink tank lock lever...

Page 7: ...irt on the electrical contacts B of the carriage A B 4 Remove the print head from the bag by holding the tab parts A A A 5 Remove the orange protective cap A and then remove the other orange protectiv...

Page 8: ...hat the part covered by the protective caps does not touch the carriage A B 7 Pull the print head locking cover down toward the front to lock the print head in place 8 Push the print head lock lever a...

Page 9: ...ert the paper straight into the feed slot with the printed side facing up so that the right edge of the paper is aligned with the paper alignment guide A on the right side of the roll paper cover Inse...

Page 10: ...k indicator and maintenance cartridge capacity indicator to drop some amount Starter ink tanks are for first time installation It is recommended that you purchase replacement ink tanks quickly 8 When...

Page 11: ...ime and the print head is adjusting Proceed to Connecting to the Printer on p 12 The paper starts feeding and then the printer automatically starts charging the ink for the first time and adjusting th...

Page 12: ...instructions on the screen 3 Click Download to download the setup file and then run the file If a warning screen about downloading appears select Do not block Allow etc and then proceed to the next st...

Page 13: ...ing the touch screen of the printer A Accessory pocket Can be used to store accessories such as the 3 inch paper core attachment The accessory pocket is included with the stand Refer to Attach the Acc...

Page 14: ...e that no debris becomes adhered to the contacts on the print head and the carriage and then reinstall the print head The paper has been loaded at an angle Push the release lever away from you and rel...

Reviews: