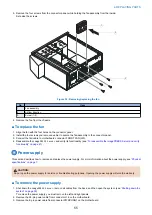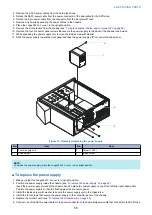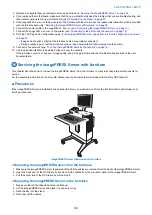
4. Slide the bracket all the way onto the shelf and lock it by moving the latch toward the front panel.
IMPORTANT:
Avoid striking the DIMMs as you replace the hard disk drive bracket.
NOTE:
You will encounter slight resistance as you slide the bracket onto the shelf. The resistance is caused by two tension points on the
bottom of the bracket. The resistance helps control the bracket’s movement during removal and installation.
5. Secure the hard disk drive bracket to the hard disk drive shelf using the screws that you removed earlier.
6. Connect one end of the hard disk drive data cable to the hard disk drive and the other end to SATA1(J41) on the motherboard
“Removing the motherboard” on page 42
7. Connect the power cable to the hard disk drive.
8. Reassemble the
imagePRESS Server
“To reassemble the imagePRESS Server and verify functionality” on page
)
9. If you replaced the hard disk drive with a new hard disk drive, install system software (see
“Installing System Software” on
If a startup error displays on the Fiery QuickTouch when you power on the
imagePRESS Server
, check the connections.
10. Verify functionality. (see
“To reassemble the imagePRESS Server and verify functionality” on page 61
)
DVD drive
The DVD drive is installed in the front of the chassis. The drive is used to install system software and archive data on writable
media.
■ To remove the DVD drive
1. Shut down the imagePRESS Server, remove all cables from the back, and then open the system (see
)
To access the DVD drive, you must remove the left, right, and front panels from the chassis.
2. Remove the data/power cables from the dual connector on the back of the DVD drive.
If you are removing the cable assembly to replace it with a new cable assembly, detach the other ends of the cables from
the motherboard and the power supply.
4. REPLACING PARTS
60
Summary of Contents for ImagePRESS Server H350 V2
Page 8: ...Introduction 1 Introduction 2 Specifications 7 ...
Page 17: ...INSTALLING HARDWARE 2 Installing Hardware 11 ...
Page 26: ...USING THE IMAGEPRESS SERVER 3 Using the imagePRESS Server 20 ...
Page 35: ...REPLACING PARTS 4 Replacing parts 29 ...
Page 86: ...INSTALLING SYSTEM SOFTWARE 6 Installing System Software 80 ...
Page 91: ...TROUBLESHOOTI NG 7 Troubleshooting 85 ...
Page 104: ...INSTALLATION PROCEDURE 8 Installation 98 Removable HDD Kit B5 108 ...

