Chapter 1
1-41
1.1.1.6.14 Stain on image 264mm behind high-density image due to intensive use of B/W mode
0031-8837
[ Verified by Canon Inc. ]
Symptom
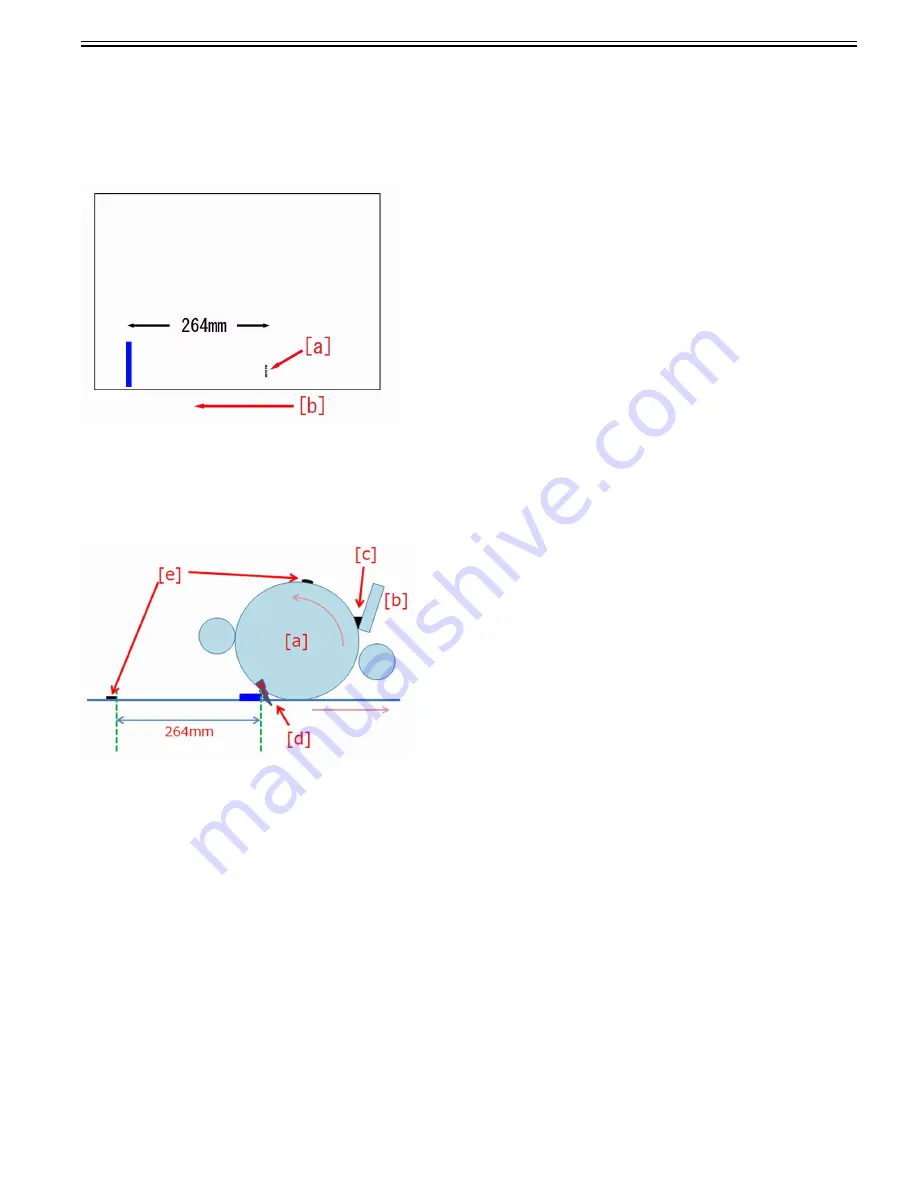
If more than 50,000 sheets of output is made in black and white mode, stain [a] may appear on image 264mm behind high-density image.
The arrow [b] indicates the feed direction.
The symptom is more likely to occur with linty paper or when a same size is used repeatedly.
Cause
Frequent use of black and white mode allows paper lint to accumulate gradually at the nip of the drum cleaning blade [b] that is contacting with the drum [a].
Especially the front side and the rear side corresponding to the paper edges are prone to pile up more lint.
At the part where paper lint is piled up, toner passes through the drum cleaning blade and stagnates at the back side [c] of the blade.
When a high-density image is transferred primarily, discharging phenomenon [d] is generated at a spot where there is a difference of density of toner.
The part of the drum where the discharge phenomenon was generated is developed with the toner [e] piled up at the back of the drum cleaning blade, and it is
transferred to the paper after the high-density image went around the drum once and results in the symptom.
Service work
1) Refer to the service manual "Parts Replacement and Cleaning > Image Formation Sytem > Removing the Drum (Bk) > Procedure" to remove the drum (Bk).
[Caution] Underlay some sheets of paper and the like beneath before laying the drum (Bk).
2) Disconnect the connector [4], remove the 6 screws [2] to remove the drum cleaning unit.
Fit the 2 bosses [3] to attach it back.
[Caution]
-Cover the drum (Bk) with a drum protection sheet or paper (of 5 sheets or more) to block out light.
-As the drum cleaning unit [1] is covered with toner, underlay some sheets of paper and the like and turn the unit upside down on the sheets.
Summary of Contents for imagePRESS C800 Series
Page 1: ...Dec 2 2014 Troubleshooting Guide imagePRESS C800 Series...
Page 2: ......
Page 6: ......
Page 8: ......
Page 9: ...Chapter 1 Correcting Faulty Images...
Page 10: ......
Page 14: ......
Page 114: ...Chapter 1 1 100 7 2 Select the envelope type press OK...
Page 165: ...Chapter 1 1 151 3 Pull the Tray all the way out...
Page 167: ...Chapter 1 1 153 5 Remove the Waste Toner Container...
Page 172: ...Chapter 1 1 158 2 Pull out the staple cartridge holding it by the green tab...
Page 180: ...Chapter 1 1 166 5 Push in the new staple case until it clicks to insert it...
Page 181: ...Chapter 1 1 167 6 Close the Cover for the saddle stitch staple cartridge...
Page 199: ...Chapter 1 1 185 b 1 Take out the Waste Toner Container 1...
Page 201: ...Chapter 1 1 187 b 2 Install the Waste Toner Joint 1 to the Waste Toner Container 2...
Page 206: ...Chapter 1 1 192 b 9 Remove the Prism 1 1 Screw 2 1 Hook 3...
Page 207: ...Chapter 1 1 193 b 10 Clean the toner adhered to the 2 A parts on the prism...
Page 208: ...Chapter 1 1 194 b 11 Clean the toner adhered to the A part of the Waste Toner Container...
Page 210: ...Chapter 1 1 196 2 Pull out the punch waste tray...
Page 217: ...Chapter 1 1 203 3 Discard the staple waste...
Page 239: ...Chapter 1 1 225 3 Press Memory Media 4 Select the target memory media...
Page 250: ...Chapter 1 1 236 Select Share files and folders using SMB Windows Select the account to be used...
Page 255: ...Dec 2 2014...
Page 256: ......


