background image

18

Important Safety Instructions

To ensure the safe operation of this scanner, be sure to read the 
safety warnings and precautions described below.

Installation Location

The performance of this scanner is affected by the environment in 
which it is installed. Make sure that the location where the scanner is 
installed meets the following environmental requirements.
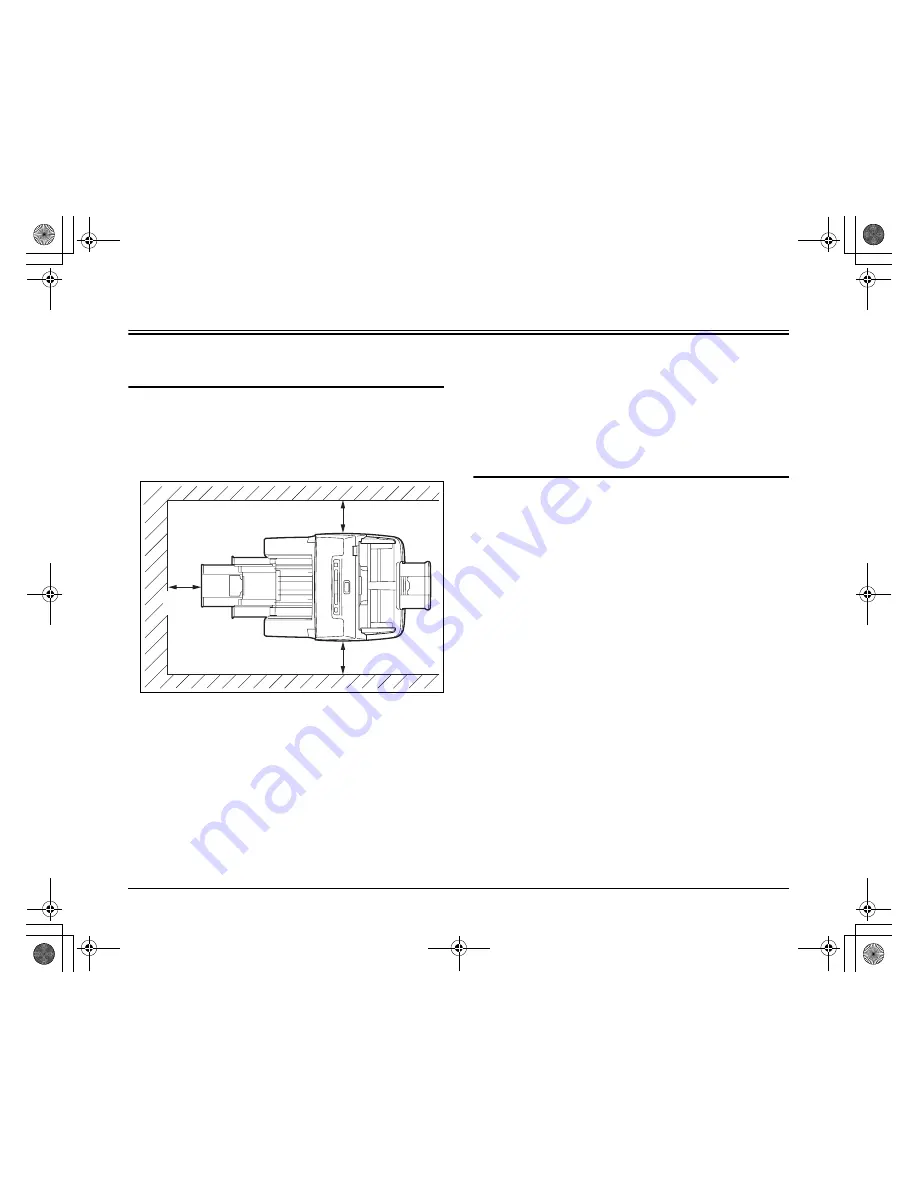
Provide adequate space around the scanner for operation, 
maintenance, and ventilation.

Provide adequate space in front of the scanner for documents 
output after being scanned.

Avoid installing the machine in direct sunlight. If this is unavoidable, 
use curtains to shade the scanner.

Avoid locations where a considerable amount of dust accumulates 
as dust may adversely affect the inside of the scanner.

Avoid warm or humid locations, such as in the vicinity of a water 
faucet, water heater, or humidifier. Avoid locations where ammonia 
gas is emitted. Avoid locations near volatile or flammable materials, 
such as alcohol or paint thinner.

Avoid locations that are subject to vibration.

Avoid exposing the scanner to rapid changes in temperature. If the 
room in which the scanner is installed is cold but rapidly heated, 
water droplets (condensation) may form inside the scanner. This 
may result in a noticeable degradation in scanning quality. The 
following conditions are recommended for optimal scanning quality:
Room temperature: 10 °C to 32.5 °C (50 °F to 90.5 °F)
Humidity: 20% to 80% RH

Avoid installing the scanner near equipment that generates a 
magnetic field (e.g. speakers, televisions, or radios.)

AC Adapter

Connect only to a power outlet of the rated voltage and power 
supply frequency (120 V, 60 Hz or 220-240 V, 50/60 Hz depending 
on your region).

Do not connect other electrical equipment to the same power outlet 
to which the scanner is connected. Also, when using an extension 
cord, make sure that the extension cord is rated for the current 
requirements of the scanner.

Never try to take the AC adapter apart or modify it in any way, as 
this is dangerous.

The power cord may become damaged if it is often stepped on or if 
heavy objects are placed on it.

Do not use the power cord while it is coiled.

Do not pull directly on the power cord. When disconnecting the 
power cord, grasp the plug and remove it from the outlet.

Keep the area around the power cord clear of objects so that the 
power cord can be disconnected easily in an emergency.

Do not use an AC adapter other than the one provided with the 
scanner. Do not use the AC adapter provided with the scanner with 
other products.

If you have any questions regarding the power supply, contact your 
local authorized Canon dealer or service representative for further 
information.

100mm 

(3.94")

100mm (3.94")

100mm (3.94")

0-00-DR-M160_RG_UK.book  Page 18  Thursday, June 9, 2011  8:04 PM

Summary of Contents for imageFORMULA DR-M160

Page 1: ...nce Guide Please read this manual before operating this scanner After you finish reading this manual store it in a safe place for future reference 0 00 DR M160_RG_UK book Page 1 Thursday June 9 2011 8...

Page 2: ...ompanying documentation and you also shall not have any third party do so 2 BACK UP COPY You may make one copy of the SOFTWARE solely for a back up purpose or copy the SOFTWARE onto the permanent stor...

Page 3: ...r found to be illegal by any court or tribunal of competent jurisdiction such provision shall be null and void with respect to the jurisdiction of that court or tribunal and all the remaining provisio...

Page 4: ...NT SUR LE BROUILLAGE RADIO LECTRIQUE For 120 V models Cet appareil num rique respecte les limites de bruits radio lectriques applicables aux appareils num riques de Classe B prescrites dans la norme s...

Page 5: ...ompany names herein may be the trademarks of their respective owners However the TM and symbols are not used in this document Copyright Copyright 2011 by CANON ELECTRONICS INC All rights reserved No p...

Page 6: ...pe A Type B Length 1 8 m Warranty Card U S A and Canada only Before Use Europe only Feed Tray Items included in this manual are subject to change without notice You must keep the machine s packaging a...

Page 7: ...ations are also included on the supplied Setup Disc For details on installing these applications refer to the Readme txt file eCopy PDF Pro Office Nuance Communications PDF creation editing software I...

Page 8: ...ult your local authorized Canon dealer Use the USB interface provided as standard with your computer However normal operation is not guaranteed with all USB interfaces even if present as standard equi...

Page 9: ...f the menu does not start up execute setup exe from the disc For Windows 7 Vista If the following screen appears click Yes or Permissions 2 Click Typical Installation About Installation of the Third P...

Page 10: ...ement and click I accept the terms in the license agreement and then Next if you agree to it 6 Click Install 7 When the driver installation is complete click Finish 8 Click Next 0 00 DR M160_RG_UK boo...

Page 11: ...d click Yes to accept it 10 Click Next 11 Specify whether to install the plug in for SharePoint and click Next 12 When CaptureOnTouch installation is complete click Finish 13 Click Next 0 00 DR M160_R...

Page 12: ...in the license agreement and then Next if you agree to it 15 Click Next 16 When CapturePerfect installation is complete click Finish 17 Select the language you want to use and click Next 18 Click Next...

Page 13: ...13 Setup Guide 19 When the User Manual installation is complete click Finish 20 Click Exit to finish installing the software 0 00 DR M160_RG_UK book Page 13 Thursday June 9 2011 8 04 PM...

Page 14: ...ner to the computer before installing the software Before connecting the scanner to the computer verify that the power of the scanner is OFF If the power is ON turn it OFF To the power outlet AC adapt...

Page 15: ...use When the scanner is properly connected to the computer the CaptureOnTouch icon appears on the taskbar as follows If the taskbar icon appears as the scanner is not properly connected to the compute...

Page 16: ...l electronic manual will be registered to the following location when the software is installed Symbols Used in This Manual The following symbols are used in this manual to explain procedures restrict...

Page 17: ...time Bypass mode 29 Placing Cards 30 Scanning with CaptureOnTouch 31 What is CaptureOnTouch 31 Starting and Exiting CaptureOnTouch 31 Scan First 32 Select Scan Job 34 Operating the scanner with the o...

Page 18: ...ng quality The following conditions are recommended for optimal scanning quality Room temperature 10 C to 32 5 C 50 F to 90 5 F Humidity 20 to 80 RH Avoid installing the scanner near equipment that ge...

Page 19: ...om the power outlet Then contact your local authorized Canon dealer or service representative to have the unit serviced Do not drop the scanner or subject it to impact or strong shock Should the scann...

Page 20: ...are using it as this may result in personal injury Be extra careful of neckties and long hair If anything becomes caught in the scanner immediately disconnect the power cord to stop the scanner Be car...

Page 21: ...ed in the CaptureOnTouch or scanner driver settings this function detects the content of documents and determines the scanning resolution automatically Folio Scan You can scan folded documents The sca...

Page 22: ...1 is assigned to Scan First which allows you to easily scan a document by just following the instructions on the screen Auto Start The scanner is equipped with an auto start function which enables sca...

Page 23: ...ocuments are output here D Eject Tray Support This opens when scanning thin documents Scanned documents are arranged in the tray by supporting and lifting up the document eject tray from the bottom E...

Page 24: ...nt Unit Open this when cleaning the inside of the scanner or replacing rollers K Eject Support Open this when loading long documents L Document Eject Extension Support If required pull this out to mat...

Page 25: ...r changes C Start Button This executes the job displayed in the Job No Indicator D Stop Button This stops active jobs E DFR Button This is lit when a document double feed is detected Pressing this but...

Page 26: ...o subsequent documents Always clean the internal parts of the scanner after scanning such documents When scanning a two sided document that is printed on thin paper the image on the opposite side of e...

Page 27: ...e cards to be fed vertically they may not be ejected properly and cards that get jammed may be damaged when you remove them Embossed cards may not be able to be scanned correctly depending on the type...

Page 28: ...ent eject tray 2 Pull out the eject support When placing long documents pull out the document eject extension support to match the length of those documents Also stand the eject stopper at the end of...

Page 29: ...scanning Always smooth out any folds or curls in your documents before placing them into the feeder If the leading edge of a document is curled it may cause a paper jam If feeding stops due to a syst...

Page 30: ...a time horizontally 1 Switch the scanner to Bypass mode 2 Adjust the document guides to fit the width of the card to be scanned 3 Place the card horizontally with the reverse side facing you and the...

Page 31: ...lected as the output method you can specify any of the following file formats for scanned images PDF format TIFF format JPEG format BMP format PPTX format file format for Microsoft PowerPoint 2007 and...

Page 32: ...o use CaptureOnTouch after it is no longer resident in the system restart it by following the procedure below CaptureOnTouch will start and become resident in the system again Click Start All Programs...

Page 33: ...ngs When scanning is finished the Output settings screen appears IMPORTANT If you configure scanning conditions that consume a large amount of the computer s memory scanning may stop because of insuff...

Page 34: ...rom Attach to E mail or Print are specified you can click Open storage folder to open the folder in which the scanned images were saved Select Scan Job Register scanning settings from the scanning con...

Page 35: ...output setting items differ depending on the specified output method For details on the setting items see the Help of CaptureOnTouch Selecting a Job and Scanning 1 Place the document in the scanner S...

Page 36: ...top returns to the top screen of Select Scan Job When output methods apart from Attach to E mail or Print are specified you can click Open storage folder to open the folder in which the scanned images...

Page 37: ...erating panel buttons the CaptureOnTouch main window automatically closes 5 seconds after the output process finishes Scanner Settings By default CaptureOnTouch scans with scanning conditions that mat...

Page 38: ...blank page is specified any blank paged detected within the document is skipped during scanning Automatically straightens skewed images When a document is scanned skewed the skewed scanned images are...

Page 39: ...only B Preview Area Displays the preview images of the scanned document C Preview Controls Control the preview images and cancel or continue scanning with the following buttons C A B Tools Name Descr...

Page 40: ...rd with the operating system that supports MAPI Microsoft Messaging Application Programming Interface needs to be specified as the default program of the operating system Print Prints the scanned imag...

Page 41: ...DR M160 does not appear reinstall the scanner driver See p 9 4 Set the default paper size and click OK Hint The Configure Device Settings dialog box appears when selecting Canon DR M160 and clicking...

Page 42: ...memory If an error message appears due to insufficient memory while scanning is in progress exit the application and try scanning again using different scanning condition settings 10 If the placed doc...

Page 43: ...se an exchange roller kit and replace the worn parts with the consumable parts included in the kit feed roller and retard roller See p 54 for details about the exchange roller kit Furthermore the coun...

Page 44: ...that it is completely closed by gently pressing the left and right until you hear a click 4 Close the document eject tray Replacing the Feed Roller 1 Open the roller cover 2 Remove the feed roller Re...

Page 45: ...ller 4 Close the roller cover Replacing the Retard Roller 1 Open the roller cover 2 Pull the left lever that secures the retard roller to the scanner and remove the roller 0 07 Chapter1 fm Page 45 Wed...

Page 46: ...cover Resetting the counter 1 Start Windows and log in as a user with administrator privileges 2 Click the Start button and then click All Programs Canon DR M160 and Canon imageFORMULA Utility imageF...

Page 47: ...ing or another operation being performed To disable this setting follow the procedure below 1 Start Windows and log in as a user with administrator privileges 2 Click the Start button and then click A...

Page 48: ...y after 4 hours check box 5 Click OK to close the scanner properties Removing the Document Feed Tray When you will store or otherwise not use the scanner for a long period of time remove the document...

Page 49: ...Chapter 7 Maintenance for roller replacement procedures Problem 4 Both sides are not scanned even when the Duplex scanner driver setting is enabled Solutions In CaptureOnTouch and CapturePerfect exec...

Page 50: ...en Panel Feeding or Automatic Feeding is selected as the feeding method on the scanner driver s setting screen a scanning operation will not continue after all of the documents are fed as the scanner...

Page 51: ...llowing procedures to clear them CAUTION Be careful when removing jammed paper take care not to cut your hand on the edges of the paper 1 Remove any documents that have been left in the eject tray 2 P...

Page 52: ...il you hear a click After removing the jammed paper check to see if the last page was scanned correctly and then continue scanning Hint If a paper jam occurs when Rapid recovery system check box is ON...

Page 53: ...n Lines 150 x 150dpi 200 x 200dpi 300 x 300dpi 400 x 400dpi 600 x 600dpi Scanning Speed Conditions Core i7 2 8GHz CPU 4 GB memory A4 document size Grayscale Simplex 200dpi 60 pages min 300dpi 60 pages...

Page 54: ...replacement procedure see Replacing Consumable Parts on p 43 Contact your local authorized Canon dealer or service representative for detailed information about the replacement parts Specifications a...

Page 55: ...55 0 00 DR M160_RG_UK book Page 55 Thursday June 9 2011 8 04 PM...

Page 56: ...FORD WAY SUITE 400 MIAMI FLORIDA 33126 U S A CANON AUSTRALIA PTY LTD 1 THOMAS HOLT DRIVE NORTH RYDE SYDNEY N S W 2113 AUSTRALIA CANON SINGAPORE PTE LTD 1 HARBOUR FRONT AVENUE 04 01 KEPPEL BAY TOWER SI...

Reviews: