background image

Back

Previous Page Next Page

Contents

43

2

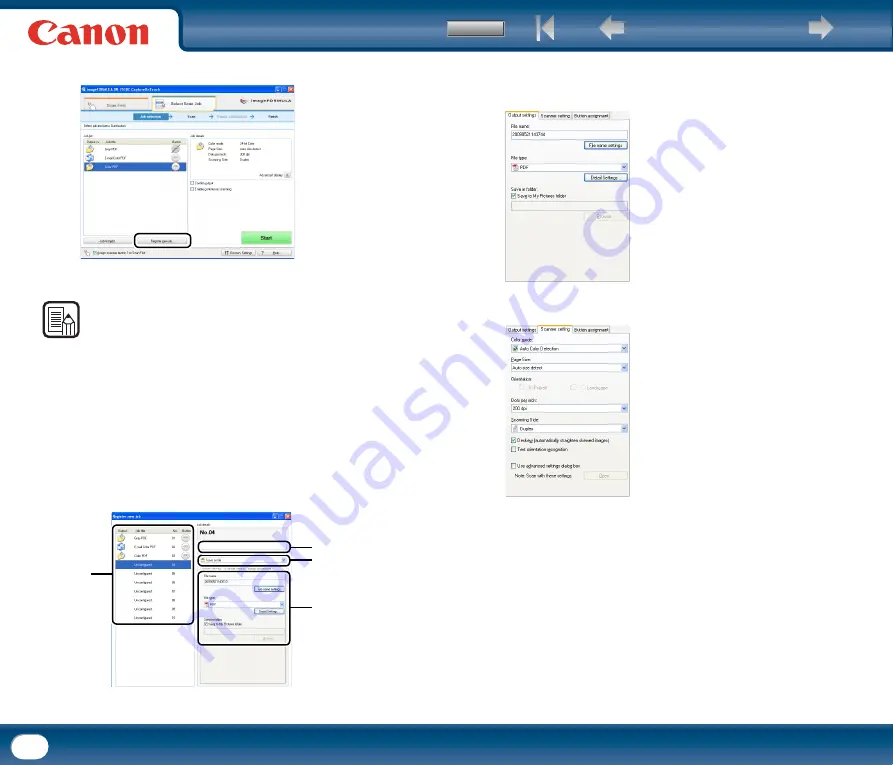
Click the [Register new job] button.

The [Register new job] dialog box appears.

NOTE

If you select a registered job and click [Job list/edit], the [Job editing] dialog box 
appears allowing you to edit the settings of the selected job.

3

Configure the job settings.

a

Select an [Unconfigured] job number from the job list. If you select a 
job that is already registered, the title bar display changes to [Job 
editing].

b

Enter the job name.

c

Specify the output method.

d

Configure the job settings.

Job settings are configured in the following three tabs.

[Output settings] tab

Configure settings for the output method. The items that appear in this tab 
differ depending on the [Output method] selected.

[Scanner setting] tab

Configure scan conditions.

a

c

d

b

Summary of Contents for imageFORMULA DR-2010M

Page 1: ...store it in a safe place for future reference 1 Introduction Contents Chapter 1 Before Using the Scanner Chapter 2 Setup Chapter 3 Basic Operation Chapter 4 CaptureOnTouch Settings Chapter 5 Other Sca...

Page 2: ...Systems Incorporated in the United States and or other countries y imageFORMULA is a trademark of CANON ELECTRONICS INC y Other product and company names herein may be the trademarks of their respecti...

Page 3: ...sure to read these items carefully to operate the machine correctly and avoid damage to the machine NOTE Indicates a clarification of an operation or contains additional explanations for a procedure...

Page 4: ...and White Scanning 58 Creating Smaller Files 59 Saving the Text Data of Documents as Search Keywords 59 Specifying Security Settings for PDF Files Windows only 59 Chapter 6 Scanner Driver Settings 60...

Page 5: ...Page Next Page Contents 5 4 Uninstalling the Software 110 Uninstalling on Windows 110 Uninstalling on Mac OS X 112 Chapter 9 Appendix 113 Specifications 113 Replacement Parts 114 External Dimensions...

Page 6: ...tion where the scanner is installed meets the following environmental requirements Provide adequate space around the scanner for operation maintenance and ventilation Provide adequate space in front o...

Page 7: ...apter as it is dangerous The power cord may become damaged if it is often stepped on or if heavy objects are placed on it Continued use of a damaged power cord and AC adapter can lead to an accident s...

Page 8: ...the scanner on a surface that is unstable or tilted or in an area subject to excessive vibrations as this may cause the scanner to fall resulting in personal injury or damage to the scanner Never plac...

Page 9: ...LTR A4 portrait orientation one sided two sided 200 dpi High Image Quality The 600 dpi optical resolution sensor incorporated in the scanner enables documents to be scanned with high image quality Ej...

Page 10: ...t from the scanned image Both sides are scanned but saving the image is skipped for scan images judged to be from a blank page Skip Blank Page Function The scanner is equipped with a Skip Blank Page f...

Page 11: ...ge of the document eject tray Document Eject Tray Open this tray when you want to stack output documents Document Feeder Place the document to scan here Document Guides Adjust these guides to fit the...

Page 12: ...k 4 or later y Microsoft Windows XP Service Pack 3 or later y Microsoft Windows XP x64 Edition Service Pack 2 or later y Microsoft Windows Vista Service Pack 1 or later y Microsoft Windows Vista x64 E...

Page 13: ...rements the scanning speed may be greatly reduced and transmission may take a long time Even if the computer satisfies the recommended specifications the scanning speed may vary depending on the speci...

Page 14: ...of the computer ON 2 Insert the Setup disc into the CD ROM drive of the computer 3 Click Typical Installation NOTE When you select Typical Installation all of the displayed software and the User Manu...

Page 15: ...en the driver installation is complete click Finish 8 Click Next 9 Read the license agreement click Yes to accept it 10Confirm the installation location click Next 11When the CapturePerfect 3 0 instal...

Page 16: ...sh 14Click Exit to finish installing the software 15Remove the Setup disc from the CD ROM drive Follow the procedure below to install the software 1 Turn the power of the computer ON 2 Insert the Setu...

Page 17: ...cense agreement and click Continue to accept it 6 Click Agree 7 Click Continue 8 Click Upgrade 9 When the confirmation screen appears enter the password of a user with administrator rights and then cl...

Page 18: ...t Technology Corp Run the following installer from the Setup disc to install PageManager PM8Installer Presto BizCard is a registered trademark of NewSoft Technology Corp Connect the scanner to the com...

Page 19: ...zes the scanner and automatically installs the required device driver IMPORTANT If you turn the power OFF wait at least 10 seconds before turning it ON again If you will not be using the scanner for a...

Page 20: ...ner is properly connected to the computer the CaptureOnTouch icon appears on the taskbar or menu bar as follows Windows taskbar Mac OS X menu bar If the taskbar icon appears as the scanner is not prop...

Page 21: ...er Jam 31 7 Other Functions 32 Setting the Long Document Mode 32 1 Documents The scanner can scan documents ranging in size from business cards and checks to LTR A4 The document sizes that this scanne...

Page 22: ...ning intensity in the application software before scanning the document It is recommended that thin documents are fed one sheet at a time Scanning the following types of documents can cause a paper ja...

Page 23: ...ocuments can be scanned with the document eject tray closed Open the document eject tray when you want to stack output documents Use the extension tray when the document hangs over the edge of the mai...

Page 24: ...es to fit the width of the document to be scanned 3 Fan the pages of the document to be scanned and shift them so that the top of the first page the bottom of the front of the document is the lowest P...

Page 25: ...or jewelry that may get caught in the scanner while you are using it This may result in personal injury Be extra careful of neckties and long hair If anything gets caught in the scanner immediately tu...

Page 26: ...acing you and the top of the document facing down See p 24 4 Use the application software to start scanning IMPORTANT After you finish scanning close the document feed tray and the document eject tray...

Page 27: ...tion fold the document in half lengthwise and place it into the feeder The DR 2010C DR 2510C will scan both sides and combine the scanned images into a single image IMPORTANT When folding the document...

Page 28: ...m size for the combined image is A3 When scanning a folded document of a size other than the standard formats set Page Size on the scanner driver settings screen to Auto detection See Paper Size Setti...

Page 29: ...ing Both Sides of Pages To scan both sides of pages Set Scanning Side to Duplex Scanning Non Standard Size Documents To scan irregular size documents To scan a document of a size other than the standa...

Page 30: ...tered user preferences and they will be reflected in the dialog boxes See Registering Scanning Conditions on p 93 By using the Job Function or the Job Scan function of CapturePerfect 3 0 you can regis...

Page 31: ...sides c and pull the front unit out and downward to open it d 3 Remove the jammed document from the document feeding side or document ejecting side IMPORTANT Make sure to pull the document out carefu...

Page 32: ...ment mode IMPORTANT By selecting the Long Document mode and setting the Paper Size on the scanner driver settings screen to Auto detection documents of up to 39 2 1 000 mm in length can be scanned Not...

Page 33: ...ent Mode 1 000 mm 5 Click Apply OK 6 Turn the scanner OFF and then ON again Setting procedure under Mac OS X 1 Start Image Capture To start Image Capture click the hard disk icon e g Macintosh HD the...

Page 34: ...e Devices menu 6 Click Scan The settings screen for the scanner driver appears 7 Click the information button The Scanner Information dialog box appears 8 Click Maintenance The Maintenance dialog box...

Page 35: ...structions CaptureOnTouch provides multiple scanning methods for you to select based on your intended purpose Scan First This method allows you to select an output method after a document is scanned a...

Page 36: ...ese buttons after loading your document 2 Starting CaptureOnTouch CaptureOnTouch resides on your system when you start your computer and a CaptureOnTouch icon appears on the taskbar menu bar in Mac OS...

Page 37: ...ain screen appears NOTE CaptureOnTouch resides on the system when it starts and the CaptureOnTouch icon appears on the taskbar menu bar In Windows you can also restart from the Windows Start menu Clic...

Page 38: ...it Color Scans the document in color Grayscale Scans the document in grayscale Black and White Scans the documents in black and white binary Page Size Specify the page size of documents When Auto size...

Page 39: ...n that appears after scanning and then configure the settings for the selected method For Select Scan Job When using Select Scan Job configure an output method for each job The output settings that ap...

Page 40: ...d When Using PaperPort only for Windows The PaperPort application supplied with this unit uses the Documents folder by default When sending the image file to PaperPort and specifying the save destinat...

Page 41: ...tinuous scanning check box 4 Click the Start button The document is scanned While scanning is in progress the number of pages scanned is displayed in addition to the scanner settings When scanning is...

Page 42: ...anned images are output This completes Scan First scanning NOTE Click Return to main screen to return to the main screen of Scan First If Save to folder is selected for the output method and you click...

Page 43: ...settings a Select an Unconfigured job number from the job list If you select a job that is already registered the title bar display changes to Job editing b Enter the job name c Specify the output me...

Page 44: ...ment to job button 1 is not available 4 Click the OK button The job is registered according to the configured settings and appears in the job list To confirm the settings of a registered job or to cha...

Page 45: ...turn to the main screen of Select Scan Job If Save to folder is selected for the output method and you click Open storage folder the folder in which the scanned image files are stored will open If the...

Page 46: ...can Job using a job button the document is scanned according to the settings for the assigned job and the scanned image is output CaptureOnTouch closes automatically 5 seconds after output processing...

Page 47: ...ouch configurations including settings registered jobs etc or restore configurations from previously backed up data Back Up button Creates a backup file reg of CaptureOnTouch configuration data You ca...

Page 48: ...the above check box is selected and an attached file exceeds the size limit a confirmation message will appear When using Scan First the confirmation message will appear after the entire document is...

Page 49: ...3 0 refer to the CapturePerfect 3 0 Operation Guide NOTE CapturePerfect 3 0 is a Windows only application Scanning with CapturePerfect The following scanning methods are available for selection from t...

Page 50: ...b can then be executed by selecting the registered job from the drop down list A and then clicking Scan Job on the toolbar B A total of 99 jobs can be registered including the following two preregiste...

Page 51: ...l the scanner driver See Installing the Software on p 13 4 Select the default page size from the drop down list NOTE Clicking Default in the properties dialog box for the ISIS driver causes the settin...

Page 52: ...ocedure with CapturePerfect scanning will not begin until you operate the Scan Panel Place the document in the scanner and operate the Scan Panel See p to feed the document and begin scanning If you s...

Page 53: ...Scan Jobs Perform the following to register jobs 1 Select Job from the Edit menu The Register Edit Delete dialog box appears NOTE The following jobs are already registered to job numbers 01 and 02 2...

Page 54: ...name and format for the image file to be attached to the e mail message Scan To Print Specify the printer to which images will be printed NOTE The Details of File Settings and JPEG compression buttons...

Page 55: ...ns cStart button Continue scanning If Feeding Option is set to Panel Feeding clicking this button starts scanning dStop button Finish Stops scanning eJob display When the Start and Stop functions are...

Page 56: ...orm background and low contrast text Set Mode on the scanner driver settings screen to Advanced Text Enhancement only for Windows or Advanced Text Enhancement II For more information on setting the sc...

Page 57: ...s Skipping Blank Pages You can set the scanning conditions to determine whether a scanned image is a blank page and skip saving the image if so Set Scanning Side on the scanner driver settings screen...

Page 58: ...ments and Documents with Dark Reverse Sides You can set the scanning conditions to reduce bleed through when scanning thin document pages and those with dark content on the back side or to remove the...

Page 59: ...Saving the Text Data of Documents as Search Keywords You can set the scanning conditions to convert the text information of a document into text data when creating a PDF file to be used when searching...

Page 60: ...nt Background Preventing Bleed Through 82 Omitting a Specific Color 83 Enhancing the Red Color 85 Rapid Recovery System 86 Double Feed Detection 88 Feeding Options 89 Prescan 91 Registering Scanning C...

Page 61: ...ere are applied when you click the Default button on the ISIS driver properties dialog box For a TWAIN driver the default value is set to LTR and cannot be changed 5 From the Scan menu select Scanner...

Page 62: ...tabs the Basic tab Brightness tab Image processing tab and Others tab Specify the settings on each tab as necessary to set the scanning conditions For details on each setting also refer to the Help OK...

Page 63: ...iver settings screen under Max OS X has a Simple Mode and an Advanced Mode In the default condition after installation of the scanner driver the screen will open in Simple Mode You can switch between...

Page 64: ...the scan mode to suit your needs Under Windows 1 In the ISIS TWAIN driver properties dialog box click the Basic tab select the scanning mode from the Mode drop down list Under Mac OS X 1 Select a suit...

Page 65: ...taining photos as grayscale images Color 24 bit Color Scans documents containing color photos as full color images Auto Color Detection Auto Color Detection Whether a document is black and white or co...

Page 66: ...the ISIS TWAIN driver properties dialog box click the Basic tab select Auto Color Detection from the Mode drop down list click Setting 2 Specify the various settings in the Auto Image Type Detection...

Page 67: ...ightness This setting adjusts the brightness when Advanced Text Enhancement only for Windows or Advanced Text Enhancement II is selected with the Black and White mode For other modes the brightness is...

Page 68: ...ting the Long Document Mode on p 32 When Auto detection is selected the Area setting in the Scan Area dialog box is disabled Depending on the application operation may become unstable when Auto detect...

Page 69: ...n the selected resolution is 300 dpi or less the Moire Reduction setting is automatically enabled to allow reduction of the moire effect a shimmering wavy pattern in scanned images This section descri...

Page 70: ...nsity setting screen The dialog box shown below is an example from Windows but the setting items are the same under Mac OS X y This screen serves for adjusting the content density used to judge whethe...

Page 71: ...d images Under Windows 1 In the ISIS TWAIN driver properties dialog box click the Basic tab select the Deskew check box Under Mac OS X 1 Select the Deskew check box This is the same in Simple Mode and...

Page 72: ...r when scanning color documents or scanning in grayscale Under Windows 1 In the ISIS TWAIN driver properties dialog box click the Basic tab select High Quality Moire Reduction from the Moire Reduction...

Page 73: ...ity More Reduction This mode prioritizes image quality and generates an image of the specified resolution from an image scanned at 600 dpi The image quality is higher but the scanning speed decreases...

Page 74: ...tab sheet the specified area may be displaced when scanning Area Window The size indicated for the Area window corresponds to the page size setting and the area within the panel indicates the current...

Page 75: ...fields When you click Preview only one document is scanned and the scanned image appears in the preview area You can make adjustments by dragging the dotted lines with the mouse while checking the ima...

Page 76: ...ghtness Check Box If the brightness of the front and back of the document pages is different select this check box to adjust only the brightness of the back side Used the Back Side Contrast Check Box...

Page 77: ...driver properties dialog box click the Brightness tab click Gamma 2 Select the Custom check box in the Gamma Settings dialog box specify the settings as necessary Under Mac OS X 1 Switch to Advanced...

Page 78: ...mouse changes the gamma curve and color of the sample image to match that point y You can also move the gamma curve by dragging it with the mouse Freehand The output value for a particular input value...

Page 79: ...Mac OS X 1 Switch to Advanced Mode and click Image Processing 2 Adjust the Edge emphasis slider to correct the outline of the scanned image NOTE Move the slider toward Soft to soften the image contour...

Page 80: ...Under Windows 1 In the ISIS TWAIN driver properties dialog box click the Image processing tab select the angle to rotate the image from the Document Orientation drop down list Under Mac OS X 1 Switch...

Page 81: ...n describes the procedure for automatically correcting the orientation of the text when scanning Under Windows 1 In the ISIS TWAIN driver properties dialog box click the Image processing tab select th...

Page 82: ...if your application program operates abnormally when it is enabled This section describes the procedure for setting to reduce bleed through when scanning thin document pages and pages with dark conte...

Page 83: ...section describes the procedure for setting to omit borders and ruled lines of a specified color red green or blue from the scanned image Under Windows NOTE When the Mode setting is 24 bit Color or Au...

Page 84: ...ext Page Contents 84 Under Mac OS X 1 Switch to Advanced Mode and click Image Processing 2 Under Color drop out select a color to ignore NOTE You can specify different settings for the front and back...

Page 85: ...TE If you select 24 bit Color or Auto Color Detection from the Mode drop down list of the Basic tab you cannot specify this setting 1 In the ISIS TWAIN driver properties dialog box click the Image pro...

Page 86: ...ide of the document This section describes the procedure for setting the system recovery method used by the scanner when document feeding stops due to a paper jam or other error during scanning Under...

Page 87: ...overy system check box NOTE If you select Rapid recovery system and a paper jam or other error causes document feeding to stop while scanning scanning stops without sending an error notification to th...

Page 88: ...ouble feeding of document pages is detected Under Windows 1 Click the Others tab select the Detect by Length or Detect by Ultrasonic for the DR 2510C only check box under Double Feed Detection click O...

Page 89: ...Ultrasonic This detection method is effective when scanning documents of different sizes It uses ultrasonic waves to detect the gap between documents when more than two sheets of paper are fed at the...

Page 90: ...e position Automatic Feeding This feeding method is good for scanning batches of same size documents scanning starts when the scanner detects loaded documents and stops when you press the Stop button...

Page 91: ...ghtness and Contrast as necessary using the sliders or up down buttons click Start to save the scanned image NOTE The Prescan dialog box is for scanning after adjusting the brightness and contrast acc...

Page 92: ...gs screen expands and the scanned image of the first page appears in the preview area 2 Adjust brightness and contrast if necessary This is the same in Simple Mode and Advanced Mode IMPORTANT The tool...

Page 93: ...Image processing tab and Others tab of the ISIS TWAIN driver properties dialog box 2 Click the Basic tab click Save 3 Enter a name for Save user preference as click OK Under Mac OS X 1 Switch to Advan...

Page 94: ...urrently using Under Windows 1 In the ISIS TWAIN driver properties dialog box click the Basic tab click About 2 Check the content of the About dialog box click OK Under Mac OS X 1 Click Info button Th...

Page 95: ...se spray cleaners to clean the scanner Precision mechanisms such as the light source may get wet and cause a malfunction Never use paint thinner alcohol or other organic solvents to clean the scanner...

Page 96: ...asses CAUTION Do not spray water or neutral detergent directly on the scanner Precision mechanisms such as the light source may get wet and cause a malfunction IMPORTANT Scratches on the sensor glass...

Page 97: ...and feeding roller from the scanner to clean them and make sure to reattach them to the scanner when cleaning is finished 9 Wipe the removed rollers with a cloth that has been dampened with water and...

Page 98: ...er jams and misfeeds may occur more often When this happens purchase an exchange roller kit and replace the feeding roller and the retard roller If misfeeds occur often check the rollers for wear and...

Page 99: ...Contents 99 Control Panel Classic View If the Control Panel is displayed with the Category View switch to Classic View 3 Double click Scanners and Cameras 4 Right click CANON DR 2510C USB or CANON DR...

Page 100: ...ck the hard disk icon e g Macintosh HD the Applications folder and then the Image Capture icon 2 Click Browse Devices in the Devices menu 3 Select the scanner you want to use and select the Use TWAIN...

Page 101: ...eeding roller follow the procedure below CAUTION Use caution when removing or attaching the feeding roller Using excessive force may cause damage or personal injury Removing the Feeding Roller 1 Open...

Page 102: ...er by moving it to the left to detach it from its shaft and pull it out of the slot Attaching the Feeding Roller 1 Insert the feeding roller into the slot inside the roller cover and align the notch o...

Page 103: ...front unit is completely closed by pushing until you hear a click To remove or attach the retard roller follow the procedure below CAUTION Use caution when removing or attaching the retard roller Usin...

Page 104: ...ler by moving it to the right to detach it from its shaft and pull it out Attaching the Retard Roller 1 Insert the retard roller into the slot inside the roller cover and align the notch on the roller...

Page 105: ...or attach the document holding guide follow the procedure below CAUTION Use caution when removing or attaching the document holding guide Using excessive force may cause damage or personal injury Remo...

Page 106: ...connected to the computer with a USB cable 2 Confirm that the scanner is turned on See the previous problem 1 if the scanner does not turn on 3 The computer s USB interface may not support the scanner...

Page 107: ...possible until it is installed If the roller has been installed correctly clean it if necessary 2 Proper scanning may not be possible when document pages stick together due to static electricity Fan...

Page 108: ...cannot be opened by CapturePerfect 3 Q A Useful tips Here are some useful tips for scanning documents Where are scanned images saved Can the save destination be changed Images are saved to the followi...

Page 109: ...open the Modify Barcode OCR dialog box where you can copy the text in the OCR Characters box Alternatively PDF files that were scanned with OCR enabled can be opened with an application such as Acrob...

Page 110: ...using the Scan Batch to Mail function Alternatively register a job with the output destination as e mail 4 Uninstalling the Software If the ISIS TWAIN driver CaptureOnTouch or CapturePerfect 3 0 are...

Page 111: ...x appears Uninstalling the ISIS TWAIN Driver and CaptureOnTouch 1 From the Programs list click Canon DR 2510C Driver Canon DR 2010C Driver or DR 2510C CaptureOnTouch DR 2010C CaptureOnTouch click Remo...

Page 112: ...es in the CapturePerfect 3 0 Setup dialog box 3 Click Finish No uninstaller is provided for Mac OS X drivers To uninstall use Finder to delete the following files Scanner Driver Library Image Capture...

Page 113: ...m x 53 9 mm or larger 140 lb bond 300g m2 0 0138 0 35 mm or less Card Size Card thickness Orientation 2 12 x 3 37 53 9 mm x 85 5 mm ISO standard 0 03 0 76 mm or less Horizontal feeding only Embossed c...

Page 114: ...es min DR 2010C DR 2010M 300 x 300 dpi 50 images min DR 2510C DR 2510M 40 images min DR 2010C DR 2010M 24 bit Color Simplex 100 x 100 dpi 25 pages min DR 2510C DR 2510M 20 pages min DR 2010C DR 2010M...

Page 115: ...Back Previous Page Next Page Contents 115 External Dimensions 11 7 298mm 19 5 490mm 6 3 160mm 6 3 160mm 9 8 245mm With the document feed tray open...

Page 116: ...O INTERFERENCE REGULATIONS For 120 V models This digital apparatus does not exceed the Class B limits for radio noise emissions from digital apparatus as set out in the Interference causing equipment...

Page 117: ...cument feeder 11 Document guides 11 Document holding guide Attaching 105 Removing 105 Documents 21 Placing 24 Double feed detection 88 Driver 13 E Extension tray 11 F Features 9 Feed Selection lever 1...

Page 118: ...lor enhancing 85 Registering scan Conditions 93 Resolution setting 68 Rotating image 80 Scan area adjusting 73 Scan mode setting 64 Scanning side settings 69 Text orientation correcting 81 Version che...

Reviews: