background image

57

L

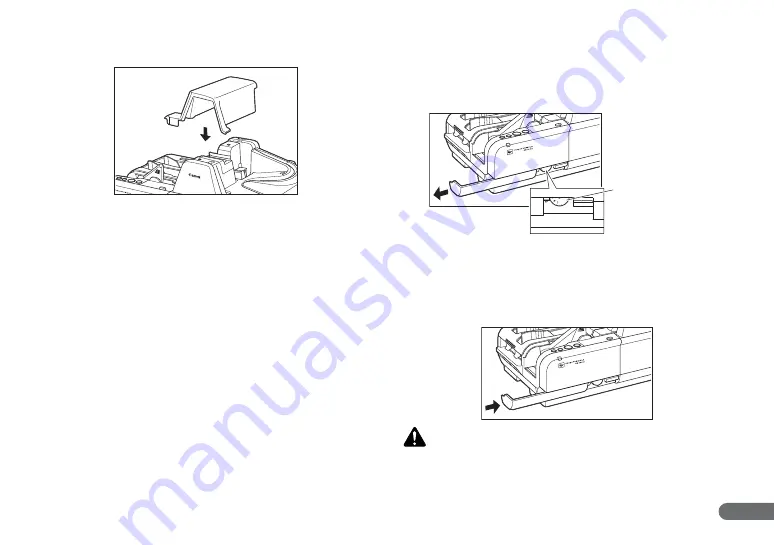
Carefully replace the Top Cover.

M

Adjust the Adjustment Dial to 5.
For more information, see “Adjusting the Separation Roller 
Gap,” on p. 57.

Adjusting the Separation Roller Gap

If double feed should occur too often, adjust the Separation Roller gap 
according to the following procedure.

A

Slide the Adjustment Dial Cover to the left.

B

Adjust the Adjustment Dial.

Turn the Adjustment Dial to the right 3 clicks.
If documents are not fed after the above operation, turn the 
Adjustment Dial back to the left 1 click.

C

Slide the Adjustment Dial Cover to the right.

CAUTION

Do not use the Adjustment Dial any other time except when adjusting 
the Separation Roller gap. Turning the Adjustment Dial too much may 
damage the scanner.

8

9

Adjustment Dial

Turn the dial to the left to 
widen the gap, and turn it 
to the right to narrow the 
gap.

Summary of Contents for imageFORMULA CR-135i II

Page 1: ...Please read this manual before operating this scanner Instructions ...

Page 2: ...imilar wizard screen appears in Windows XP 7 8 8 1 10 click Cancel A Install the software Install the Scanning Utility for CR 135i CR 190i in the setup disc provided with the CR 135i II CR 190i II See Installing the Software on p 19 B Connect the scanner to a computer Connect the CR 135i II CR 190i II and the computer with a USB See Connecting the Scanner to a Computer on p 20 C Turn ON the power ...

Page 3: ...y 90 days from the date you purchased the same as evidenced by a receipt or otherwise The limited warranty does not apply if the failure of the diskette resulted from accident abuse or misapplication of the SOFTWARE and shall not extend to anyone other than the original user of the SOFTWARE CANON CANON S AFFILIATE THEIR DISTRIBUTOR OR DEALER DISCLAIMS ALL IMPLIED WARRANTIES INCLUDING ANY WARRANTY ...

Page 4: ...s aux appareils numériques de Classe B prescrites dans la norme sur le matériel brouilleur Appareils Numériques NMB 003 édictée par l Industrie Canada International ENERGY STAR Office Equipment Program As an ENERGY STAR Partner CANON ELECTRONICS INC has determined that this machine meets the ENERGY STAR Program guidelines for energy efficiency The International ENERGY STAR Office Equipment Program...

Page 5: ...material as the original may be prosecuted in accordance with the applicable laws and regulations Paper money or bank notes domestic and foreign Postage stamps revenue stamps or other similar stamps Stock certificates bond certificates promissory notes cheques or other valuable certificates Passports licenses or other certificates or documents issued by government officials or agencies This is not...

Page 6: ... manual Operation Maintenance Guide Supplied with the scanner Electronic Manual Describes the basic operations for using the CR 135i II CR 190i II troubleshooting and maintenance For details on the settings of the CR 135i II CR 190i II refer to the Instructions electronic manual Instructions Electronic Manual This Manual Describes how to use the scanner and includes instructions for configuring th...

Page 7: ...Utility 19 Connecting the Scanner to a Computer 20 USB Connections 20 Connecting the Power Cord 21 Turning ON and OFF the Power 21 Turning ON the Power 21 Turning OFF the Power 22 Preparing the Ink Cartridge 23 About the Ink Cartridge 23 Setting the Ink Cartridge and Adjusting the Print Position 23 Software 25 How to Use the Software 25 How to Use the Scanning Utility 25 How to Use the Ranger 27 U...

Page 8: ...lers 45 Cleaning the Magnetic Heads 48 Cleaning the Ink Jet Nozzles 49 Cleaning with the Cleaning Cards United States Only 50 Maintenance 51 Replacing the Ink Cartridge 51 Replacing the Ink Disposal Tank 52 Replacing the Rollers 54 Adjusting the Separation Roller Gap 57 Specifications 58 Scanner Specifications 58 Index 59 ...

Page 9: ...non dealer or service representative to have the scanner serviced Handle the scanner with care Avoid shock and vibration to the scanner caused by reckless handling If you suspect the scanner has been accidentally damaged turn OFF the power switch immediately and disconnect the power cord from the power outlet Contact your local authorized Canon dealer or service representative to have the scanner ...

Page 10: ...ngers Do not open the Maintenance Cover while the scanner is operating Doing so may result in a malfunction or injury Do not touch the pins and contacts on the scanner s connector with your hands Doing so may result in a malfunction Do not touch anything except the operation buttons when the jogger is operating CR 190i II CR 190i II UV only or documents are being fed Do not turn the scanner upside...

Page 11: ...xtension cord make sure that the extension cord is rated for the current requirements of the scanner If you are unsure of anything relating to the power supply contact your local authorized Canon dealer or service representative for further information Never place an object on top of the power cord or step on the power cord Never bundle the power cord or wrap the cord around an object such as a ta...

Page 12: ...tput Reads MICR Characters A magnetic head is used to scan MICR characters Supports OCR Optical Character Recognition Character images such as E13B OCR A OCR B and check writer are recognized as characters by the OCR function Supports UV scanning UV models only The CR 135i II UV CR 190i II UV can scan images that are printed with UV fluorescent ink This function only scans the front side of docume...

Page 13: ...ed and must be purchased separately See About the Ink Cartridge on p 23 Eject Pocket Full Detection Scanning Utility for CR 135i CR 190i Detects when any one of the three Eject Pockets is full and stops scanning This function is available only on CR 135i II CR 190i II CR 190i II UV See Scan Procedure on p 34 Placing Additional Documents You can place additional documents while the machine is scann...

Page 14: ... Ink Cartridge on p 23 JOG Uses vibration to align the documents Jogger This button is available only on the CR 190i II CR 190i II UV Function F You can assign this button to any function from an application When using the accompanying Scanning Utility for CR 135i CR 190i switches the double feed detection ON OFF START Starts scanning operations Press and hold this button during a paper jam to eje...

Page 15: ...as one document Documents that have a rough surface Duplicate forms that have sticky edges Adjustment Dial Cover Top Cover Adjustment Dial Adjust the Separation Roller gap if feeding errors occur too frequently See Adjusting the Separation Roller Gap on p 57 Eject Stopper Pull out the Eject Stopper to prevent documents from falling off the output tray Eject Pocket Documents are separated with flap...

Page 16: ...renthesis are inches Ink Disposal Tank Pocket Connector Air Vent Power Cord Connector Connect the power cord provided with the scanner to this connector USB Connector Connect a Hi Speed USB 2 0 compatible cable See USB Connections on p 20 Exterior Dimensions 476 mm 18 7 272 mm 10 7 581 mm 22 9 with the eject stopper open 177 mm 7 137 mm 5 4 213 5 mm 8 4 ...

Page 17: ... Automatically installing the device driver See p 22 The device driver is installed automatically when Windows recognizes the CR 135i II CR 190i II IMPORTANT To have the device drivers installed automatically when the computer recognizes the CR 135i II CR 190i II the software needs to be installed before the CR 135i II CR 190i II is connected to the computer If you connect the computer and turn ON...

Page 18: ... was provided as standard with your computer Use the most recently available USB 2 0 driver provided by Microsoft Contact your local authorized Canon dealer for more detailed information Not all USB interfaces provided as standard with personal computers are guaranteed Contact your local authorized Canon dealer for more detailed information Scanning speeds are slower if your computer s standard US...

Page 19: ... install the Scanning Utility before connecting the CR 135i II CR 190i II to the computer Some functions mentioned in this manual may not be operated in some applications Installing the Scanning Utility Follow the instructions below to install the Scanning Utility and the dedicated driver NOTE The dedicated scanner driver is installed after the Scanning Utility has been installed A Turn ON your co...

Page 20: ...mputer The only way to connect the scanner to your computer is with a USB cable CAUTION Do not turn OFF the scanner or remove the interface cable when an application is running Turn OFF the computer and the scanner before changing the cable USB Connections Connect the scanner and the computer with the USB cable provided or a Hi Speed USB 2 0 cable NOTE Connect the type B plug square to the scanner...

Page 21: ... the scanner into a power outlet shared with another device If you use an extension cord make sure that the extension cord is rated for the current requirements of the scanner Follow the procedures below to turn the scanner power ON and OFF Turning ON the Power A To turn ON the scanner press the Power Switch to the position IMPORTANT When you turn ON the power the power LED lights and remains lit ...

Page 22: ...NON CR 135i USB or CANON CR 190i USB in the Imaging Device directory Turning OFF the Power A Turn OFF your computer B To turn OFF the scanner press the Power Switch to the position CAUTION Wait at least 10 seconds before turning the scanner back ON For your safety disconnect the power plug from the power outlet if you are not using the scanner for a long period of time Windows Vista ...

Page 23: ...idge according to the following procedure You can adjust the print position to two different levels IMPORTANT To set the ink cartridge turn the scanner OFF before removing the Top Cover After the ink cartridge is set replace the Top Cover and then turn the scanner back ON Finish up the unpacked ink cartridge as soon as possible More frequent cleaning of the ink cartridge is required if long time e...

Page 24: ... do so applications cannot check the ink level precisely D Push down the ink cartridge until it clicks into place IMPORTANT Make sure that the ink cartridge is securely in place E Squeeze the Print Position Adjustment Lever and move it to adjust the print position F Carefully replace the Top Cover Top 51 5 mm 2 03 from the bottom edge of the document Bottom 31 5mm 1 24 from the bottom edge of the ...

Page 25: ...e it How to Use the Scanning Utility This section describes the procedure for using the Scanning Utility Read the Help file in Scanning Utility for more information A Click Start and then click All Programs B Click Scanning Utility for CR 135i CR 190i C Start the Scanning Utility NOTE The basic operation of the Scanning Utility is noted in the Scanning Utility help file On the Help menu click Help...

Page 26: ...nditions and click OK NOTE For information about the settings for the scan conditions click Help on the Settings dialog box to open the Help file F Select the scanning method from the File menu and start scanning G When scanning is finished click Exit on the File menu to quit the Scanning Utility ...

Page 27: ...ructions below to install the Ranger A Turn ON your computer and start Windows IMPORTANT Be sure to log on as the administrator B Insert the setup disc into the Disc drive This manual assumes that D is assigned to your Disc drive C Click Start and then click All Programs The procedure in Windows XP 7 8 8 1 10 is different from the ones described in this manual Refer to the Windows XP 7 8 8 1 10 He...

Page 28: ...ating system If this is necessary make sure to restart the computer This section describes how to uninstall the Scanning Utility and the Ranger IMPORTANT Be sure to log on as the Administrator The procedure in Windows XP Vista 7 8 8 1 10 is different from the ones described in this manual Refer to the Windows XP Vista 7 8 8 1 10 Help and Support Center to uninstall the software A Click Start and t...

Page 29: ... click Continue IMPORTANT If you uninstall the Scanning Utility for CR 135i CR 190i you also need to uninstall the Canon Driver for CR 135i CR 190i If you uninstall the Ranger select the Ranger for CR 135i CR 190i D The Confirm File Deletion dialog box appears If you selected Canon Driver for CR 135i CR 190i the above dialog box appears E Click Yes and the uninstaller starts Follow the instruction...

Page 30: ...ide of the scanner may become dirty and it may cause a malfunction If you scan a document written in pencil the letters may not be scanned properly or the pencil may rub off onto the rollers and stain subsequent documents Before you scan this kind of document make a copy and then scan the copy After scanning a document written in pencil or some other soft writing material be sure to clean the scan...

Page 31: ...n envelope with thickness up to 0 5 mm 0 02 or weight up to 413 g m2 111 lb bond NOTE Disable the double feed detection function See Using Ultrasonic Double Feed Detection on p 32 If the envelope is not the first document in the batch it may cause a feeding error or a paper jam Some type of envelope may cause a feeding error or a paper jam Wrinkled or creased paper Carbon backed paper Curled paper...

Page 32: ...tion Button When the function is disabled the light of the Function Button is off Placing Documents Note the following points when placing documents on the scanner Place the front of the document toward you Do not exceed the Load Limit Mark when placing documents in the document tray This may cause feeding errors or paper jams A maximum of 250 documents can be loaded at one time 90 g m2 24 lb bond...

Page 33: ...g parts especially the rollers that feed paper through the scanner If such objects become entangled immediately disconnect the power plug from the power outlet Check the paper stack and remove all clips staples pins or any other type of metal or plastic fastener These objects may cause damage to the document a paper jam or a scanner malfunction Do not touch anything except the operation buttons wh...

Page 34: ...ogger mechanism is not available for documents of less than 150 mm 5 9 in length NOTE The jogger does not work when the shutter is open It occurs on the following conditions The STOP Button is pressed and the scanning stops There are documents on the document tray when a paper jam occurs Remove the documents from the document tray to close the shutter If the jammed document remains or the Top Cove...

Page 35: ...l of documents Scanning resumes when the documents are removed from the Eject Pocket Eject Pocket full detection This function is available only on CR 135i II CR 190i II CR 190i II UV When documents that are 120 to 139 mm in length are ejected into Eject Pocket 3 scanning may resume even if the pocket is not completely empty Make sure to remove all of the documents at one time when removing such d...

Page 36: ...matically if no operations are performed for 4 hours To enable or disable this setting follow the procedure below NOTE Depending on your country or region the Auto Power OFF function may be enabled under factory default conditions A Start Windows and log in as a user with administrator privileges B Click the Start button and then click Control Panel Hardware and Sound and Devices and Printers C Ri...

Page 37: ...37 F Click OK to close the scanner properties ...

Page 38: ...Install the Scanning Utility before connecting the scanner to the computer See Setting Up the Scanner on p 17 Cause The scanner is not correctly connected to the computer Remedy Connect the scanner to the computer correctly See Connecting the Scanner to a Computer on p 20 Cause The USB interface provided as standard with your computer is not compatible with the scanner Remedy Not all USB interface...

Page 39: ...does not clear the paper jam perform the following to remove the jammed document C Pull the Open Button and pull the Front Maintenance Cover open to the right and left D Press the Open Button and push the Back Maintenance Cover open to the back E Remove the paper that has jammed F Close the Back Maintenance Cover ...

Page 40: ...ents see Documents on p 30 Documents with rough surfaces may cause a paper feed error to occur Scan one sheet at a time in the separation OFF mode See Separation OFF Mode on p 36 Dirty or worn rollers inside the scanner may cause a paper jam Clean the rollers if they are dirty See Cleaning the Scanning Glass and Rollers on p 45 Worn rollers must be replaced Some rollers are replaceable See Replaci...

Page 41: ...he heads the MICR heads may be worn Contact your local authorized Canon dealer or service representative to have the scanner serviced The MICR text is on the back of the document Load the side with the MICR characters face up in the document tray Other Causes Some of the MICR characters are scratched or missing Splattered MICR ink or toner may also be the problem Condition The imprinter is not pri...

Page 42: ...not recognized by your computer Try the following Restart your computer If your computer has multiple USB ports try using a different USB port Disconnect the USB cable make sure the computer and scanner are turned ON and then reconnect the cable Memory becomes insufficient and scanning stops If you configure scanning conditions that use a large amount of the computer s memory scanning may stop bec...

Page 43: ... of the scanner to disfigure or discolor Never spray mild detergent or water directly on the scanning glass The spray could penetrate below the glass and contaminate the internal light source and lenses Cleaning the Main Unit Wipe the scanner with a firmly wrung cloth moistened slightly with water or mild detergent Then wipe off with a clean dry cloth Cleaning the Feed Path If dirt appears on scan...

Page 44: ...en to the back C Wipe the feed path with a firmly wrung cloth moistened slightly with water or mild detergent Then wipe off with a clean dry cloth D Close the Back Maintenance Cover E Close the Front Maintenance Cover in the order shown in the diagram below Feed Path ...

Page 45: ...ass and rollers regularly A Remove the Top Cover B Pull the Open Button and pull the Front Maintenance Cover open to the right and left IMPORTANT If you notice paper dust in the feed path when you open the Maintenance Cover clean it out with a clean dry cloth or cotton swabs C Press the Open Button and push the Back Maintenance Cover open to the back D Remove the Roller Cover ...

Page 46: ...ion A Turn the roller in position A to wipe the rollers Rollers in positions H J and L are turned by the roller in position K Turn the roller in position K to wipe the rollers Rollers in positions U to Z are turned by the roller in position M Turn the roller in position M to wipe the rollers Rollers in positions A to C are replaceable See Replacing the Rollers on p 54 F Use a clean dry cloth to cl...

Page 47: ...paper jams and double feeds two papers being fed at the same time still occur after cleaning the rollers the rollers may be worn The rollers need to be changed Some rollers are replaceable See Replacing the Rollers on p 54 If the rollers are not replaceable contact your local authorized Canon dealer or service representative to have the scanner serviced ...

Page 48: ... Front Maintenance Cover open to the right and left IMPORTANT If you notice paper dust in the feed path when you open the Maintenance Cover clean it out with a clean dry cloth or cotton swabs B Use a commercially available audio head cleaner to clean the magnetic heads The magnetic heads are located in the positions shown in the diagram below C Close the Front Maintenance Cover in the order shown ...

Page 49: ...e For more information see Replacing the Ink Cartridge on p 51 C Use the Built in Nozzle Cleaning Pad to remove the ink from around the ink jet nozzles Swipe the ink cartridge 2 or 3 times on the Built in Nozzle Cleaning Pad shown in the diagram below If the text or bitmap still appear faint after this operation replace the ink cartridge See Replacing the Ink Cartridge on p 51 D Set the ink cartri...

Page 50: ...ailable only in the United States Contact your local authorized Canon dealer or service representative for the available cleaning card A Turn OFF the scanner B Disconnect the scanner and the computer C Turn ON the scanner with pressing the START Button and the STOP Button NOTE If the scanner turned ON properly the power LED continues to flash D Press the Function Button to turn its LED off E Pull ...

Page 51: ...rtridge is set replace the Top Cover and then turn the scanner back ON Finish up the unpacked ink cartridge as soon as possible More frequent cleaning of the ink cartridge is required if long time elapses after unpacking NOTE Use a Canon ink cartridge See About the Ink Cartridge on p 23 Do not use more than one cartridge by rotation If you do so applications cannot check the ink level precisely A ...

Page 52: ...e following conditions appear you have to replace the ink disposal tank according to the following procedure When the ink cartridge is replaced When clumpy ink appears on the ink disposal tank as shown below The replacement ink disposal tank is not included with the scanner Purchase an ink disposal tank as shown below Compatible ink disposal tank 4623B002 A Open the Ink Disposal Tank Pocket ...

Page 53: ...isposal tank Doing so may cause a malfunction NOTE Be careful not to get dirty with ink When you discard the ink disposal tank put it in the plastic bag in the box of the ink disposal tank C Attach the ink disposal tank D Close the Ink Disposal Tank Pocket Ink Disposal Tank ...

Page 54: ...ure The exchange roller kit is not included with the scanner Purchase an exchange roller kit separately as shown below Compatible exchange roller kit 4623B001 A Remove the Top Cover B Remove the Roller Cover C Open the Feed Supporter to the left D Pinch the Separation Roller at the rim and the fixing lever and then remove it with pressing the Separation OFF Mode Button Feed Supporter Fixing Lever ...

Page 55: ...eed Roller at the rim and the fixing lever and then remove it F Pinch the Pickup Roller at the rim and the fixing lever and then remove it NOTE If the Pickup Roller is not removed easily because of the fixing lever position turn the Pickup Roller by hand G Attach the Pickup Roller IMPORTANT Push down the roller until it clicks into place Fixing Lever Fixing Lever ...

Page 56: ... down the roller until it clicks into place I Attach the Separation Roller with pushing the Separation OFF Mode Button Align the notch on the roller axis with the hole on the roller IMPORTANT Push down the roller until it clicks into place J Close the Feed Supporter to the right K Replace the Roller Cover ...

Page 57: ...l Cover to the left B Adjust the Adjustment Dial Turn the Adjustment Dial to the right 3 clicks If documents are not fed after the above operation turn the Adjustment Dial back to the left 1 click C Slide the Adjustment Dial Cover to the right CAUTION Do not use the Adjustment Dial any other time except when adjusting the Separation Roller gap Turning the Adjustment Dial too much may damage the sc...

Page 58: ...100 x 100 dpi 120 x 120 dpi 150 x 150 dpi 200 x 200 dpi 240 x 240 dpi and 300 x 300 dpi UV Scan mode can scan at up to 200 x 200 dpi Scanning speed 200 dpi American checks CR 135i II 135 cpm CR 190i II 190 cpm CR 135i II UV 120 cpm UV Scan mode CR 190i II UV 160 cpm UV Scan mode Automatic feeder capacity Load limit of less than 25 mm 1 0 within the load limit mark Automatic document feed capacity ...

Page 59: ...to place documents 32 Double Feed Detection 32 E Eject Pocket 15 35 Eject Stopper 15 32 Exterior Dimensions 16 F Features of the CR 135i II CR 190i II 12 Feeding Trouble 40 Flapper 35 Front Maintenance Cover 14 Function Button 14 H Handling 9 I Ink Cartridge 14 23 51 Ink Disposal Tank 53 Ink Disposal Tank Pocket 16 52 Ink Jet Nozzle 49 Installation Location 10 J JOG Button 14 34 L Load Limit Mark ...

Page 60: ... 14 Rollers 45 54 S Scanner Unit 14 15 Scanning Glass 45 Scanning Utility 19 25 Separates documents 35 Separation OFF Mode 36 Separation OFF Mode Button 15 36 Setup Disc 13 Software How to Use the Software 25 Install 19 27 Uninstall 28 Specifications 58 T Top Cover 15 Troubleshooting 38 Turning OFF the Power 22 Turning ON the Power 21 U Unpacking the scanner 13 USB Connections 20 38 USB Connector ...

Page 61: ...B AMSTELVEEN THE NETHERLANDS CANON AUSTRALIA PTY LTD 1 THOMAS HOLT DRIVE NORTH RYDE SYDNEY N S W 2113 AUSTRALIA CANON SINGAPORE PTE LTD 1 FUSIONOPOLIS PLACE 15 10 GALAXIS SINGAPORE 138522 CANON HONGKONG COMPANY LTD 19TH FLOOR THE METROPOLIS TOWER 10 METROPOLIS DRIVE HUNGHOM KOWLOON HONG KONG CANON INDIA PVT LTD 7TH FLOOR TOWER B DLF CYBER TERRACES DLF PHASE III GURGAON 122002 HARYANA INDIA PUB CE ...

Reviews: