2-18
D
ocumen
t and
P
aper
Handling
IMPORTANT
If the setting is different from the size of the loaded paper, an error
message appears, or printing is not performed correctly
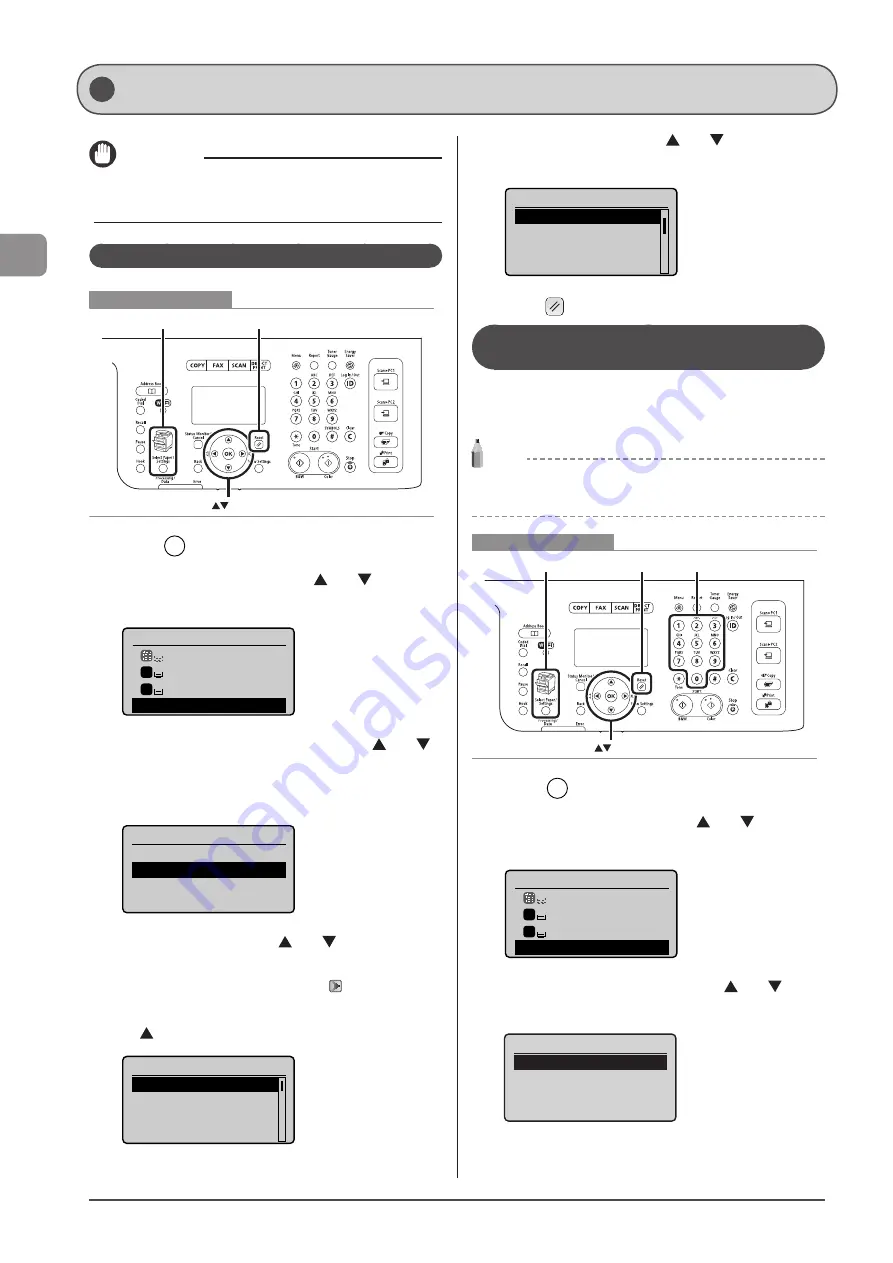
For the Paper Cassette
Reset
OK
Select Paper/Settings
Keys to be used for this operation
1
Press [
] (Select Paper/Settings).
2
Select <Paper Settings> with [ ] or [ ], and then
press [OK].
Select Paper
MP Tray
LTR:Plain 2
LTR:Plain 2
Paper Settings
1
2
3
Select <Drawer 1> or <Drawer 2> with [ ] or [ ],
and then press [OK].
<Drawer 2> is displayed only when the optional paper cassette
(Cassete 2) is installed in MF8380Cdw.
Paper Settings
Multi-Purpose Tray
Drawer 1
Drawer 2
Register Custom Paper
4
Select a paper size with [ ] or [ ], and then
press [OK].
* When registering the custom paper, see “Registering a
* The registered custom paper is listed at the top. Select it with
[
].
Paper Size
LTR
LGL
STMT
EXEC
5
Select a paper type with [ ] or [ ], and then
press [OK].
Paper Type
Plain 2 (19 lb Bond-
Recycled
Color
Heavy 1 (24 lb Bond...
6
Press [
] (Reset) to return to standby mode.
Registering the Default Paper Settings for
the Multi-purpose Tray (Manual Feed Slot)
If you want to always load the same paper in the multi-
purpose tray (manual feed slot), register the default paper
using the following procedure.
NOTE
If the default paper is registered
The setting screen is not displayed when paper is loaded.
Reset Numeric keys
OK
Select Paper/Settings
Keys to be used for this operation
1
Press [
] (Select Paper/Settings).
2
Select <Paper Settings> with [ ] or [ ], and then
press [OK].
Select Paper
MP Tray
LTR:Plain 2
LTR:Plain 2
Paper Settings
1
2
3
Select <Multi-Purpose Tray> with [ ] or [ ], and
then press [OK].
Paper Settings
Multi-Purpose Tray
Drawer 1
Drawer 2
Register Custom Paper
Setting the Paper Size and Type
Follow the procedure in this section to adjust the paper
size and type settings for the cassette and the tray.
Summary of Contents for imageCLASS MF8380Cdw
Page 24: ...xxiv...
Page 40: ...1 16 Before Using the Machine...
Page 96: ...5 14 Registering Destinations in the Address Book...
Page 126: ...6 30 Using the Fax Functions...
Page 150: ...8 16 Maintenance...
Page 180: ...10 8 Registering Setting the Various Functions...
Page 188: ......
Page 189: ......
Page 190: ......
Page 191: ......


