background image

Frame Erase

2-11

2

Special Cop

ying F

eatures

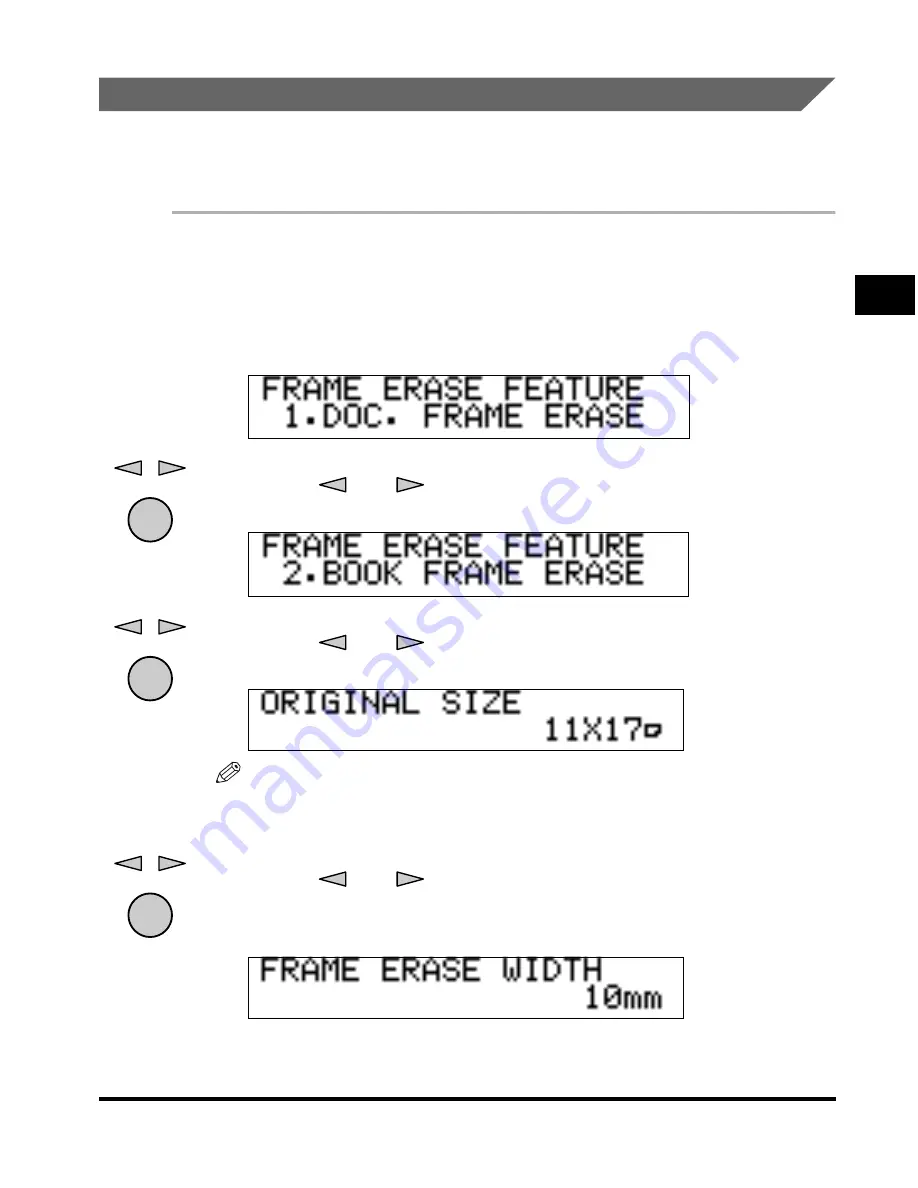
Book Frame Erase

This setting erases the dark border, as well as the center and contour lines that 
appear when copying facing pages in a book onto a single sheet of paper.

1

Place your original on the platen glass, enter the Special 
Features menu 

 open the <FRAME ERASE FEATURE> 

menu.

For details about the procedure above, see steps 1 to 3 of “Original Frame 
Erase,” on p. 2-9.

2

Press [

] or [

] to select <2.BOOK FRAME ERASE> 


press [OK]. 

3

Press [

] or [

] to select the book size of the original 


press [OK]. 

NOTE

You can set the Book Frame Erase mode only for the original sizes shown on the 
display.

4

Press [

] or [

] to set the book frame erase width in 

millimeters

 ➞

 press [OK]. 

You can also use the numeric keys to enter the book frame erase width.

When you press [OK], the standby display appears.

OK

OK

OK

Summary of Contents for Image Runner 1600 Series

Page 1: ......

Page 2: ...sic Operation Troubleshooting Reference Guide Copying Instructions Copying Guide This Document Remote User Interface Instructions Remote UI Guide Setting Up the Network Connection and the CD ROM Software Setup Guide PS PCL Printer Instructions PS PCL Printer Guide Network Connectivity and Setup Instructions Network Guide PCL Printer Driver Installation and Instructions PCL Driver Guide CD ROM CD R...

Page 3: ...Copy Functions Appendix Includes the Combination of Functions Chart and Index Chapter 1 Chapter 2 Chapter 3 Chapter 4 Considerable effort has been made to ensure that this manual is free of inaccuracies and omissions However as we are constantly improving our products if you need an exact specification please contact Canon ...

Page 4: ... Canceling Operations 1 14 Canceling a Job 1 15 Canceling with Stop 1 15 Canceling from the Monitor Screen 1 16 Copy Quantity 1 18 Specifying the Required Number of Copies 1 18 Changing the Copy Quantity 1 18 Paper Selection 1 19 Automatic Paper Selection 1 19 Manual Paper Selection 1 20 Copy Exposure and Image Quality Adjustment 1 22 Copy Exposure Manual 1 22 Image Quality Manual 1 23 Copy Exposu...

Page 5: ...le Punch Erase 2 12 2 on 1 Combination 2 15 Chapter 3 Setting Storing Specifications of the Copy Functions Copy Settings Table 3 2 Changing the Current Standard Settings 3 3 Standard Exposure 3 3 Standard Zoom Ratio 3 5 Standard Copy Quantity 3 6 Standard Frame Erase Width 3 7 Auto Collate 3 8 Rotate Collate 3 9 Sharpness 3 10 Prescan 3 12 Chapter 4 Appendix Combination of Functions Chart 4 2 Inde...

Page 6: ...el keys are expressed in this manual Key icon Key Name Start Paper Select WARNING Indicates a warning concerning operations that may lead to death or injury to persons if not performed correctly In order to use the machine safely always pay attention to these warnings CAUTION Indicates a caution concerning operations that may lead to injury to persons or damage to property if not performed correct...

Page 7: ...eproduced or transmitted in any form or by any means electronic or mechanical including photocopying and recording or by any information storage or retrieval system without the prior written permission of Canon Inc The information in this document is subject to change without notice CANON INC MAKES NO WARRANTY OF ANY KIND WITH REGARD TO THIS MATERIAL EITHER EXPRESS OR IMPLIED EXCEPT AS PROVIDED HE...

Page 8: ...vi ...

Page 9: ...the Monitor Screen 1 16 Copy Quantity 1 18 Specifying the Required Number of Copies 1 18 Changing the Copy Quantity 1 18 Paper Selection 1 19 Automatic Paper Selection 1 19 Manual Paper Selection 1 20 Copy Exposure and Image Quality Adjustments 1 22 Copy Exposure Manual 1 22 Image Quality Manual 1 23 Copy Exposure and Image Quality Automatic 1 25 Changing the Copy Zoom Ratio 1 26 Preset Zoom 1 26 ...

Page 10: ...te With the optional Finisher L1 or Inner 2 Way Tray attached you can select various finishing modes to collate the copies by copy sets Frame Erase This feature allows you to erase unwanted shadows borders and binding marks from around an original When copying directly from a book you can also erase the center line and edges on the copy To make a copy from a book use the platen glass Margin Mode T...

Page 11: ...ce see the Reference Guide If the platen glass is dirty the output quality may deteriorate Always keep the platen glass clean Do not touch the platen cover while copying Rocking the cover can distort the image being copied 1 Place your original You can set the original both vertically and horizontally Platen Glass Vertical Placement Horizontal Placement Original face down Copies are stapled here O...

Page 12: ...er the scanning speed for horizontally placed originals is somewhat slower than for vertically placed originals You can place originals horizontally when printing with a Preset Zoom such as when processing LTR to 11 x17 Horizontally placed LTR LGL and 11 x17 originals are referred to as LTR LGL and 11 x17 LGL and 11 x17 originals must be placed horizontally If AUTO SORT is set to ON the Collate or...

Page 13: ...etails about these settings see the pages from 1 19 in this chapter or Chapter 2 Special Copying Features 3 Enter the copy quantity 1 to 99 using the numeric keys NOTE For instructions on setting the number of copies see Specifying the Required Number of Copies on p 1 18 4 Press Start Copying starts IMPORTANT While copying you cannot change the copy mode settings such as the copy quantity paper si...

Page 14: ...e Reference Guide If you want to reserve a copy job while the machine is printing Place the original press Start See Reserving Copy Jobs While Printing on p 1 34 If you want to cancel a copy job Press Stop Press or to select YES or NO NOTE After you have pressed Stop several copies may be output from the machine You can also cancel a copy job from the Monitor screen See the Reference Guide If you ...

Page 15: ...t you want to print and the settings that you have programmed Platen glass Place the originals on the platen glass when scanning bound originals such as books and magazines originals on heavy or lightweight paper and transparencies Feeder when attached Place a stack of originals in the optional feeder and press Start The machine automatically scans them into memory ...

Page 16: ...the original NOTE If the top edge of the original is not aligned with the back edge of the platen glass prints may not be made correctly depending on the mode you have set The scanning speed for horizontally placed originals is somewhat slower than for vertically placed originals You can place originals horizontally when scanning with Preset Zoom mode such as when enlarging LTR to 11 17 Horizontal...

Page 17: ...n scanning books and other bound originals such as books and magazines heavy or lightweight paper originals and transparencies into memory 1 Lift up the feeder platen glass cover IMPORTANT The machine is equipped with an open close sensor of the feeder platen glass cover When placing originals on the platen glass lift the feeder platen glass cover about 30 cm If the sensor does not detach from the...

Page 18: ... down Align the top edge of your original with the back edge of the platen glass by the arrow in the top left corner Place books and other bound originals on the platen glass in the same way If you are enlarging STMT or LTR originals to LGL or 11 17 paper place the original horizontally on the platen glass and align it with the STMT or LTR marks ...

Page 19: ... thick books This may damage the platen glass and cause personal injury IMPORTANT If you are placing originals on the platen glass the size of the original is detected after the platen glass cover has been lowered Be sure to lower the platen glass cover before copying STMT originals and postcards cannot be detected Follow the instructions on the display and specify the original size or select the ...

Page 20: ...eets LGL or larger IMPORTANT Do not place the following types of originals in the feeder Originals with tears or large binding holes Severely curled originals or originals with sharp folds Clipped or stapled originals Carbon backed paper or other originals which might not feed smoothly Transparencies and other highly transparent originals Avoid scanning the same original using the feeder more than...

Page 21: ...rizontally Place your originals into the feeder as they will go until the original set indicator is lit A beep sounds when the original is set correctly IMPORTANT Do not add or remove originals while they are being scanned When scanning is completed remove the originals from the original output tray to avoid paper jams NOTE The scanned originals are output face down to the original output tray ...

Page 22: ...ck and cancel the copy jobs 1 Press Monitor The current copy job appears on the display To scroll through the list of the jobs press or NOTE To check the status of the print jobs sent from a computer see the PS PCL Printer Guide Supplied with the optional Printer Board The Monitor screen does not appear during scanning 2 Press Stop to return to the standby mode Monitor Stop ...

Page 23: ...ill be canceled NOTE If you press Stop during scanning when copying from the optional feeder the original may stop inside the feeder In such a case remove the original from inside the feeder following the procedure described in Clearing Paper Jams in the Feeder on p 7 4 in the Reference Guide If there is only one job which is being printed Press to select YES If you do not want to cancel the job p...

Page 24: ...cancel them all at once When canceling multiple jobs select and cancel one by one Canceling from the Monitor Screen You can cancel a job while it is waiting to be processed or during printing 1 Press Monitor The current copy job appears on the display 2 Press or to scroll through the job list NOTE The job numbers are displayed depending on the job status as follows With an asterisk Current job Wit...

Page 25: ...ll be canceled NOTE If you want to cancel another job repeat steps 3 to 5 You cannot select multiple jobs and cancel them all at once When canceling multiple jobs select and cancel one by one If you do not want to cancel the job press to select NO 5 Press Stop to return to the standby mode C Clear Stop ...

Page 26: ... appears on the right side of the display IMPORTANT You cannot change the copy quantity while copying Changing the Copy Quantity 1 Press Clear to clear the entered number 2 Press the numeric keys to enter the desired copy quantity 1 to 99 The copy quantity appears on the right side of the display IMPORTANT You cannot change the copy quantity while copying 1 2 3 4 5 6 7 8 0 9 I D 0 C Clear C Clear ...

Page 27: ...IMPORTANT You cannot use the Automatic Paper Selection mode when copying the following types of originals Copy these originals using the Manual Paper Selection mode Nonstandard size originals Highly transparent originals such as transparencies Originals with an extremely dark background Originals smaller than STMT NOTE The default setting is AUTO PAPER You can set whether to activate or deactivate...

Page 28: ...y selects the paper with the least margin and starts copying When the paper is selected automatically an asterisk appears on the left of the paper size indication on the display Manual Paper Selection You can make copies after manually selecting the paper size and type of paper loaded in the paper drawer or in the stack bypass IMPORTANT If you select the paper manually the Rotate print cannot be m...

Page 29: ...paper drawers indicates that the paper is set vertically and indicates that the paper is set horizontally The paper sizes shown on the display vary depending on which paper sizes are loaded in the paper drawers 3 Press Start Copying starts NOTE To cancel all settings and return the machine to the Standby mode press Reset Start ...

Page 30: ...anually adjust the exposure to the most appropriate level for the original 1 Place your original 2 Press Light or Dark to adjust the exposure Move the indicator between Light and Dark below the display Move the indicator to the left to make the exposure lighter or to the right to make the exposure darker You can adjust the exposure to nine levels indicated by the 5 LEDS as shown below Example Ligh...

Page 31: ...pies from photos printed on photographic paper or photo originals containing halftones i e printed photos IMPORTANT Combinations of these three modes Text Text Photo or Photo cannot be set at once If you select one of these modes the previously set mode is canceled If you make copies of an original containing halftones such as a printed photograph using the Photo mode moiré may occur If this happe...

Page 32: ...riate level 1 Place your original 2 Press Image Quality repeatedly until the desired type of original TEXT TEXT PHOTO or PHOTO appears 3 Press Light or Dark to adjust the copy exposure Move the indicator between Light and Dark below the display Move the indicator to the left to make the exposure lighter or to the right to make the exposure darker 4 Press Start Copying starts NOTE To adjust the cop...

Page 33: ...your original 2 Press The indicator lights and the exposure is automatically adjusted to the level best suited to the quality of the original NOTE The default setting is TEXT If you are scanning transparencies adjust the exposure by pressing Light or Dark as the automatic exposure control may not operate correctly on transparent originals 3 Press Start Copying starts NOTE To cancel all settings an...

Page 34: ...size originals to another standard paper size IMPORTANT Place your originals horizontally when enlarging STMT or LTR originals to 11 x 17 or LGL paper NOTE Placing an original horizontally means setting the original with the longer side sideways Reduce The preset copy ratio when making reduced copies is 78 LGL LTR 73 11 x 17 LGL 64 11 x 17 LTR 50 11 x 17 STMT Enlarge The preset copy ratio when mak...

Page 35: ...n the copy ratio to 100 press Direct To cancel all settings and return the machine to the Standby mode press Reset Zoom by Percentage You can reduce or enlarge original images by any copy ratio in 1 increments The available copy ratios are from 50 to 200 1 Place your original 2 Press Zoom to set the copy ratio Reduce Enlarge Start CITY CITY CITY CITY CITY Original Copy Zoom ...

Page 36: ...he Copy Zoom Ratio 1 28 1 Basic Copying Features 3 Press Start Copying starts NOTE To return the copy ratio to 100 press Direct To cancel all settings and return the machine to the Standby mode press Reset Start ...

Page 37: ... with the additional memory installed IMPORTANT Pull out the output auxiliary tray when stapling 11 x17 or LGL paper NOTE If AUTO SORT is set to ON the Collate mode is selected automatically when you place your original in the Feeder See Auto Collate on p 3 8 To turn on the Rotate Collation you need to set the Rotate Collate to ON in the Additional Functions menu See Rotate Collate on p 3 9 Option...

Page 38: ...aded both horizontally and vertically in the paper drawers The paper drawers to be used in the Rotate mode are set to ON in the DRAWER ELIGIBLTY menu See the Reference Guide If the Offset Mode Is Set The copies are automatically collated into sets arranged in page order and are shifted alternately to the front and back of the tray as follows 4 3 2 1 4 3 2 1 4 3 2 1 4 3 2 1 1 1 1 Originals Set 1 Se...

Page 39: ...equired setting for the desired collation mode 1 Place your originals 2 Press Finisher repeatedly until the indicator for the Collate mode lights NOTE If 5 AUTO SORT is set to ON the Collate or Offset Collate mode is automatically set when you place your originals in the feeder See Auto Collate on p 3 8 If you want to set Rotate Collation Set 6 SORT ROTATE to ON before making copies See Rotate Col...

Page 40: ...ANT If the optional finisher is attached the Offset Collate mode is set automatically The Offset Collate mode can be set only with the optional finisher attached 3 Press the numeric keys to enter the desired copy quantity 1 to 99 For details about entering the copy quantity see Specifying the Required Number of Copies on p 1 18 4 Press Start If the original is placed on the platen glass follow the...

Page 41: ...feeder See Auto Collate on p 3 8 3 Press the numeric keys to enter the desired copy quantity 1 to 99 For details about entering the copy quantity see Specifying the Required Number of Copies on p 1 18 4 Press Start If the original is placed on the platen glass follow the instructions that appear in the display press Start once for each original Copying starts NOTE To cancel this setting press Fini...

Page 42: ...per jam NOTE You can set different copy modes for each job Reserving Copy Jobs While Printing You can scan another original and set the copy modes for it while the machine is printing the previous job The machine begins printing the reserved copy job after finishing the output of the current job This is useful when handling multiple copy jobs 1 Place your original 2 Set the desired copy mode and q...

Page 43: ...Reserved Copying 1 35 Basic Copying Features 1 4 Once the original is scanned remove it from the machine ...

Page 44: ...terrupt Interrupt lights If you want to make copies after changing the Department ID while Department ID Management is enabled press ID enter the Department ID and password See the Reference Guide NOTE If you press Interrupt the current job being output is not interrupted until the interrupt copy starts printing 2 Place your original set the desired copy mode and quantity 1 to 99 3 Press Start The...

Page 45: ...ed remove it from the machine When the interrupt copy job is complete the interrupted printing operation resumes IMPORTANT If you want to continue making interrupt copies wait until the current interrupt copy job is complete end of printing Then repeat the process from step2 ...

Page 46: ...Interrupt Mode 1 38 1 Basic Copying Features ...

Page 47: ...al Copying Features This chapter describes the special copying features Two Page Separation 2 2 Margin Mode 2 5 Frame Erase 2 7 Original Frame Erase 2 9 Book Frame Erase 2 11 Hole Punch Erase 2 12 2 on 1 Combination 2 15 ...

Page 48: ... mode Place your original on the platen glass You cannot copy originals placed in the feeder using the Two Page Separation mode You can set the Two Page Separation mode only for the original sizes shown on the display 1 Place your original on the platen glass If you want to make copies in page order begin copying from the first facing pages and work your way forward Place your original face down S...

Page 49: ...art copying from the left page or the right page according to whether the book starts from the left or right Set the book opening according to the cover page side when placed face down on the platen glass When you press OK the ORIGINAL SIZE menu appears Special Features OK OK Cover Cover Placed Face Down on the Platen Glass LEFT OPENING RIGHT OPENING The right half of the platen glass is copied fi...

Page 50: ...ber of Copies on p 1 18 7 Press Start Copying starts If you want to continue copying in the Two Page Separation mode place your original on the platen glass press Start NOTE If you press Stop the cancel job display appears Select YES or NO using or If you press Stop after copying has started some sheets of blank paper may be output To cancel all settings and return the machine to the Standard mode...

Page 51: ...riginal image is shifted to the left right top or bottom by a selected width then copied If you are copying an original image that extends to the edge of the sheet part of that image will be cut off The Margin mode cannot be used with free size paper 1 Place your original 2 Press Special Features The Special Features menu appears 3 Press or to select 2 MARGIN SETTINGS press OK When you press OK th...

Page 52: ...in a range from 1 mm to 20 mm The default setting is 10 mm 6 Enter the desired copy quantity 1 to 99 using the numeric keys For details about entering the copy quantity see Specifying the Required Number of Copies on p 1 18 7 Press Start Copying starts NOTE If you press Stop the cancel job display appears Select YES or NO using or If you press Stop after copying has started some sheets of blank pa...

Page 53: ...he previously set mode is canceled You can set the Frame Erase mode only for the original sizes shown on the display Original Frame Erase This setting erases the dark borders and frame lines that appear around the copy when the original is smaller than the selected paper size Also it creates a blank border around the edge of the copy IMPORTANT If the machine is operating in the Original Frame Eras...

Page 54: ...e mode you cannot use the 2 on 1 Combination mode Hole Punch Erase This setting erases the shadows that appear in copies from binding holes on originals IMPORTANT If the machine is operating in the Hole Punch Erase mode you cannot use the Two Page Separation mode Do not place originals with binding holes in the feeder as this may damage the originals Original Book Frame Erase Mode Selected Book Fr...

Page 55: ...he copy Before using this mode set the width to be erased in the Additional Settings menu See Standard Frame Erase Width on p 3 7 NOTE You can set the original frame erase width in a range from 1mm to 20mm The default setting is 2 mm 1 Place your original 2 Press Special Features 3 Press or to select 3 FR ERASE SETTING press OK When you press OK the FRAME ERASE FEATURE menu appears 4 Press or to s...

Page 56: ... 5 and the selected paper size is displayed 6 Enter the desired copy quantity 1 to 99 using the numeric keys For details about entering the copy quantity see Specifying the Required Number of Copies on p 1 18 7 Press Start Copying starts NOTE If you press Stop the cancel job display appears Select YES or NO using or If you press Stop after copying has started some sheets of blank paper may be outp...

Page 57: ...E ERASE FEATURE menu For details about the procedure above see steps 1 to 3 of Original Frame Erase on p 2 9 2 Press or to select 2 BOOK FRAME ERASE press OK 3 Press or to select the book size of the original press OK NOTE You can set the Book Frame Erase mode only for the original sizes shown on the display 4 Press or to set the book frame erase width in millimeters press OK You can also use the ...

Page 58: ...dard Frame Erase Width on p 3 7 5 Enter the desired copy quantity 1 to 99 using the numeric keys For details about entering the copy quantity see Specifying the Required Number of Copies on p 1 18 6 Press Start Copying starts NOTE If you press Stop the cancel job display appears Select YES or NO using or If you press Stop after copying has started some sheets of blank paper may be output To cancel...

Page 59: ...inals with binding holes in the feeder as this may damage the originals 2 Press or to select 3 HOLE PUNCH ERASE press OK 3 Press or to select the size of the original press OK NOTE You can set the Hole Punch Erase mode only for the original sizes shown on the display 4 Press or to select the binding hole erase width in millimeters press OK You can also use the numeric keys to enter the binding hol...

Page 60: ...5 Enter the desired copy quantity 1 to 99 using the numeric keys For details about entering the copy quantity see Specifying the Required Number of Copies on p 1 18 6 Press Start Copying starts NOTE If you press Stop the cancel job display appears Select YES or NO using or If you press Stop after copying has started some sheets of blank paper may be output To cancel all settings and return the mac...

Page 61: ... Two Page Separation Original Frame Erase or Book Frame Erase modes You can set the 2 on 1 Combination mode only for the original sizes shown on the display When memory space is limited you cannot use the reduced copy function for copy paper which is larger than LTR NOTE The reduction ratio is automatically set so that the originals fit onto the selected paper size 1 Place your originals 2 Press S...

Page 62: ...ination mode select 2 OFF 5 Press or to select the size of the original press OK 6 Press or to select the paper size press OK When you press OK the display returns to the standby mode IMPORTANT You cannot use automatic paper selection in the 2 on 1 Combination mode NOTE The machine automatically selects the copy ratio depending on the selected paper size If you set the 2 on 1 Combination mode the ...

Page 63: ...ress Start once for each original When scanning is complete press OK Copying starts NOTE If you set the 2 on 1 Combination mode the machine is automatically set to the Auto Zoom mode However you can also use the Preset Zoom or Zoom by Percentage mode If you press Stop the cancel job display appears Select YES or NO using or If you press Stop after copying has started some sheets of blank paper may...

Page 64: ...2 on 1 Combination 2 18 2 Special Copying Features ...

Page 65: ... to store or change the default settings to suit your needs Copy Settings Table 3 2 Changing the Current Standard Settings 3 3 Standard Exposure 3 3 Standard Zoom Ratio 3 5 Standard Copy Quantity 3 6 Standard Frame Erase Width 3 7 Auto Collate 3 8 Rotate Collate 3 9 Sharpness 3 10 Prescan 3 12 ...

Page 66: ...ls listed in the front of this Copying Guide See Manuals for the Machine The Copy Settings menu is made up of several items Press or to scroll to the item you want and make the required settings Additional Function Available Settings Applicable page COPY SETTINGS 1 STANDARD EXPOSURE MANUAL LT DK 9 steps 5 AUTO 3 3 2 STD ZOOM RATIO 50 200 100 3 5 3 STANDARD COPY QTY 01 99 3 6 4 FRAME ERASE WIDTH 01...

Page 67: ...rd Settings is explained NOTE The Standard Setting is applied when Stop or Reset is pressed except during copying the Auto Clear function works the operation in the Additional Functions menu is finished The Standard Settings consist of the following seven settings Standard Exposure Standard Zoom Ratio Standard Copy Quantity Frame Erase Width Auto Collate Sort Rotate Sharpness Standard Exposure You...

Page 68: ...OSURE press OK When you press OK the STANDARD EXPOSURE menu appears 4 Press or to select MANUAL press OK 5 Press Light or Dark to set the desired standard copy exposure press OK For details about adjusting the copy exposure see Copy Exposure Manual on p 1 22 When you press OK the standard exposure is stored and the display returns to the COPY SETTINGS menu 6 Press Stop to return to the Standby mod...

Page 69: ...ocedure above see steps 1 and 2 in Standard Exposure on p 3 3 2 Press or to select 2 STD ZOOM RATIO press OK When you press OK the STD ZOOM RATIO menu appears 3 Press or to set the desired standard zoom ratio press OK You can also enter the standard zoom ratio using the numeric keys When you press OK the standard zoom ratio is stored and the display returns to the COPY SETTINGS menu NOTE You can s...

Page 70: ...e above see steps 1 and 2 in Standard Exposure on p 3 3 2 Press or to select 3 STANDARD COPY QTY press OK When you press OK the STANDARD COPY QTY menu appears 3 Press or to set the desired standard copy quantity press OK You can also enter the standard copy quantity using the numeric keys When you press OK the standard copy quantity is stored and the display returns to the COPY SETTINGS menu NOTE ...

Page 71: ...the procedure above see steps 1 and 2 in Standard Exposure on p 3 3 2 Press or to select 4 FRAME ERASE WIDTH press OK When you press OK the FRAME ERASE WIDTH menu appears 3 Press or to set the desired frame erase width press OK You can also enter the standard frame erase width using the numeric keys When you press OK the standard frame erase width is stored and the display returns to the COPY SETT...

Page 72: ...is attached NOTE The default setting is ON 1 Enter the Additional Functions menu open the 2 COPY SETTINGS menu For details about the procedure above see steps 1 and 2 in Standard Exposure on p 3 3 2 Press or to select 5 AUTO SORT press OK When you press OK the AUTO SORT menu appears 3 Press or to select ON or OFF press OK If you want the machine to collate automatically select ON If you do not wan...

Page 73: ...r the paper drawer to be used with the Rotate Collate mode If the Finisher L1 is attached the Rotate Collate mode is not available NOTE The default setting is ON This function is available only if the Feeder ADF J1 is attached 1 Enter the Additional Functions menu open the 2 COPY SETTINGS menu For details about the procedure above see steps 1 and 2 in Standard Exposure on p 3 3 2 Press or to selec...

Page 74: ...cs come together The world s coral reefs where brilliantly colored fish and a myriad of other creatures of the tropics come together Original Sharpness Level Adjusted Lower Sharpness Level Not Adjusted Lower Copy The world s coral reefs where brilliantly colored fish and a myriad of other tropical creatures come together Aptly nicknamed Tropical Forests under the sea these spots of breathtaking be...

Page 75: ...ss OK the SHARPNESS menu appears 3 Press or to set the desired sharpness level press OK To copy an original containing text and lines select a higher sharpness level To copy an original containing halftone images such as a photograph select a lower sharpness level When you press OK the selected sharpness level is stored and the display returns to the COPY SETTINGS menu NOTE You can set the sharpne...

Page 76: ...s The default setting is ON 1 Enter the Additional Functions menu open the 2 COPY SETTINGS menu For details about the procedure above see steps 1 and 2 in Standard Exposure on p 3 3 2 Press or to select 9 PRESCAN press OK When you press OK the PRESCAN setting menu appears 3 Press or to select ON or OFF press OK If you want to use the prescan mode select ON If you do not want to use the prescan mod...

Page 77: ...CHAPTER 4 1 4 Appendix This chapter provides the Combination of Functions Chart and Index Combination of Functions Chart 4 2 Index 4 5 ...

Page 78: ...Selection Stack Bypass Collate Rotate Collating Offset Collating Staple Interrupt Copy Reserve Copy P r e s e t Z o o m Combination available Combination unavailable Z o o m b y P e r c e n ta g e A u to m a ti c E x p o s u r e C o n tr o l R e s e r v e C o p y In te r r u p t C o p y S ta p le O ff s e t C o ll a ti n g R o ta te C o ll a ti n g C o ll a te S ta c k B y p a s s A u to m a ti c ...

Page 79: ...ti n g R o ta te C o ll a ti n g C o ll a te S ta c k B y p a s s A u to m a ti c P a p e r S e le c ti o n T e x t P h o to P h o to T e x t Preset Zoom Zoom by Percentage Automatic Exposure Control Photo Text Text Photo Automatic Paper Selection Stack Bypass Collate Rotate Collating Offset Collating Staple Interrupt Copy Reserve Copy T w o P a g e S e p a r a ti o n 2 o n 1 C o m b in a ti o n O...

Page 80: ...nch Erase Right Margin Left Margin Top Margin Bottom Margin T w o P a g e S e p a r a ti o n 2 o n 1 C o m b in a ti o n O r ig in a l F r a m e E r a s e B o o k F r a m e E r a s e H o le P u n c h E r a s e B o tt o m M a r g in T o p M a r g in L e ft M a r g in R ig h t M a r g in Combination available Combination unavailable ...

Page 81: ...lection 1 19 B Book Frame Erase 2 8 2 11 C Canceling a Job 1 15 Collate 1 31 Collate Mode 1 30 Collating Copies 1 29 Combination of Functions 4 2 Copy Exposure Manual 1 22 Copy Quantity 1 18 3 6 Copy Settings menu 3 2 Copy Settings Table 3 2 Copy Zoom Ratio 1 26 F Feeder 1 2 1 7 Frame Erase 2 7 3 7 ...

Page 82: ...M Manual Paper Selection 1 20 Margin Mode 2 5 Monitor Screen 1 14 1 16 O Offset Mode 1 30 Optional Feeder 1 12 Orientation of Originals 1 8 Original Frame Erase 2 7 2 9 P Paper Selection 1 19 Photo Mode 1 23 Platen glass 1 7 1 9 Prescan 3 12 Preset Zoom 1 26 R Reserved Copying 1 34 Rotate Collate 3 9 Rotate Mode 1 30 ...

Page 83: ...s 3 10 Slide guides Feeder 1 12 Special Features menu 2 3 Standard Exposure 3 3 Standard Settings 3 3 Staple 1 33 Staple Mode 1 31 T Text Mode 1 23 Text Photo Mode 1 23 Two Page Separation 2 2 Z Zoom By Percentage 1 27 Zoom Ratio 3 5 ...

Page 84: ......

Reviews: