Canon image Prograf iPF 685 Series Basic Manual Download Page 66

Assemble the stand (optional)

1


If you are using the optional Stand, assemble the Stand
by referring to the Printer Stand Setup Guide included
with the Stand.

Caution

The Stand must be assembled by at least two people on a flat surface. Attempting assembly by yourself
poses a risk of injury or bending the Stand.

When assembling the Stand, lock all four of the casters. Attempting to move the stand when the casters
are not locked poses a risk of injury or damage to the location site.

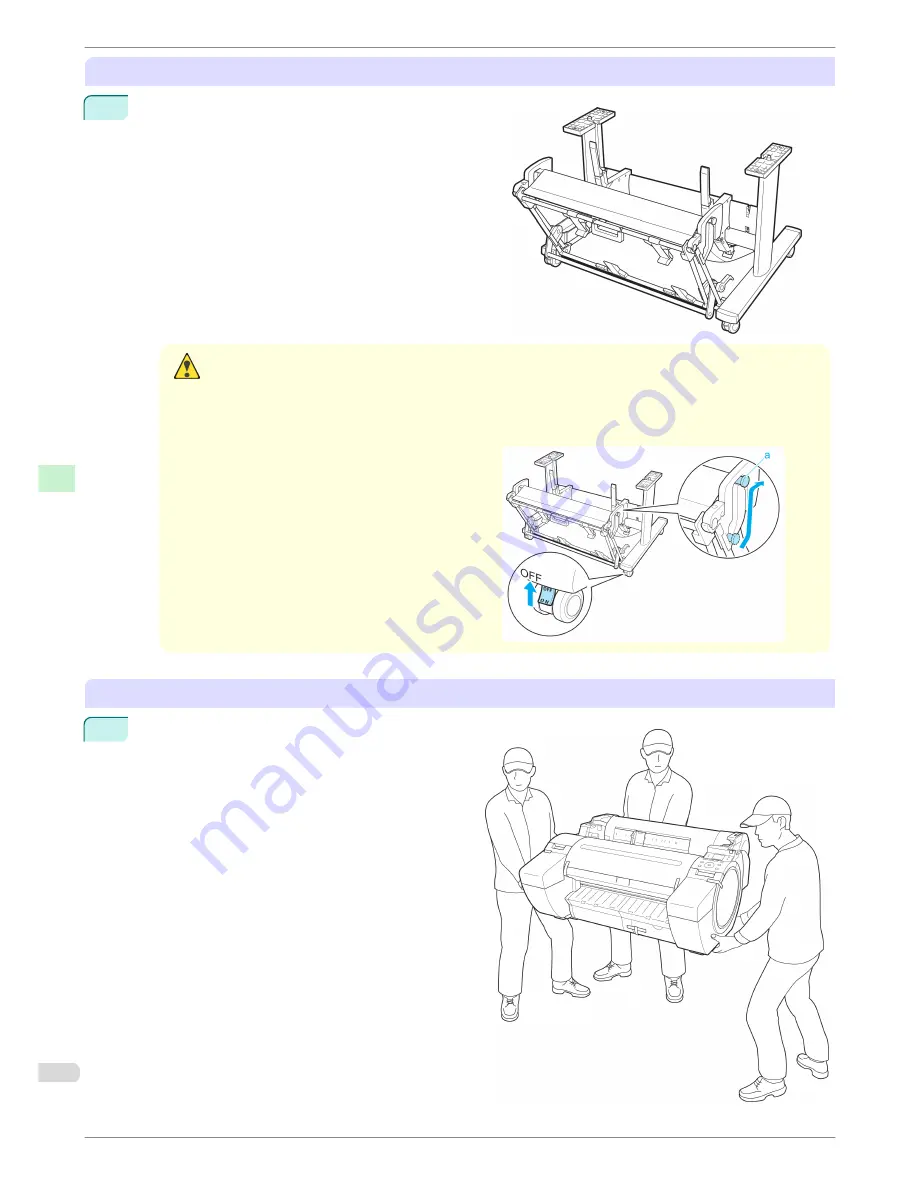
Before moving the assembled stand, lift the
support rod to the position shown (a) and un-
lock all four casters. Moving the stand with the
support rod lowered or the casters locked may
cause injury or damage the area of installation
or basket cloth.


Install the printer

1


Install the printer on a table or other flat surface.
If you will use the printer on an optional Stand, as-
semble the Stand before mounting the printer on it,
and then secure it with the Main Unit Securing
Bolts.


Reinstalling the Printer


iPF685 Series


Basic Guide


Printer Relocation

Preparing to Transfer the Printer


66

Summary of Contents for image Prograf iPF 685 Series

Page 1: ...oblems Regarding Paper 84 Printing does not start 94 The printer stops during a print job 95 Problems with the printing quality 96 Cannot print over a network 103 Installation problems 104 HP GL 2 pro...

Page 2: ...wer cable from the outlet as soon as possible to prevent fire and electrical shocks Do not install the printer near sources of strong electromagnetic fields whether equipment that generates such field...

Page 3: ...may cause personal injuries Pacemakers Warning This printer generates a low level magnetic field Anyone wearing a pacemaker who experiences discomfort while working around the printer should leave the...

Page 4: ...or matches the connection point on the printer During printing turn on the ventilation system in the room We recommend ensuring ample space for installation Legal Notices Legal Notices FCC Regulations...

Page 5: ...Windows is a trademark or registered trademark of Microsoft Corporation in the U S and or other countries Mac Mac OS Bonjour and OS X are trademarks of Apple Inc registered in the U S and other count...

Page 6: ...aper Reference Guide This guide describes about the types and specifications of the available media on the printer Setup Guide Quick Guide Basic Guide User s Guide Paper Reference Guide To view the Us...

Page 7: ...nces or Printing Preferences to display the Printing Preferences dialog box with the printer name added to the title 5 Select the Support sheet and click the User Man ual button iPF685 Series To view...

Page 8: ...ng the User s Guide or Paper Reference Guide from imagePROGRAF Print monitor are as follows 1 Install the software See Installing the Software Mac OS P 71 2 Click System Preferences icon in the Dock 3...

Page 9: ...printer in the Printer list and click Options Supplies 5 Click Utility 6 Click Open Printer Utility iPF685 Series To view the User s Guide or Paper Reference Guide Basic Guide Preface Manuals for thi...

Page 10: ...This User Manual Symbols The following symbols are used in this user manual to indicate safety information and explanations on restric tions or precautions in use Warning Indicates warning items for w...

Page 11: ...ems menus and buttons Example Click OK Keyboard keys Example Press the Tab key Cross reference Other pages or manuals that provide related information are indicated as follows in this user manual Cros...

Page 12: ...ll or fall Rolls are heavy and dropping a roll may cause injury Important When handling the roll be careful not to soil the printing surface This may affect the printing quality We recom mend wearing...

Page 13: ...ments for the roll paper core on the Roll Holder and Holder Stopper Using rolls with a 2 inch paper core Holder Stopper Left Side Roll Holder Right Side Align the tips a of the 2 Inch Paper Core Attac...

Page 14: ...y Align the tips a of 3 Inch Paper Core Attachment R with the holes b of the Roll Holder and insert it firmly 3 With the edge of the roll paper facing forward as shown insert the Roll Holder from the...

Page 15: ...oading rolls make sure the printer is clean inside the Top Cover and around the Ejection Guide If these areas are dirty we recommend cleaning them in advance See Cleaning Inside the Top Cover P 41 1 P...

Page 16: ...nge a rest the Roll Holder shaft on the Roll Ledge b At this time position the holder so that the R label c on the W label c on the Roll Holder flange is aligned with the R label d on the printer Load...

Page 17: ...is may affect the printing quality We recommend wearing clean cloth gloves when handling rolls to protect the printing surface If the paper is wrinkled or warped straighten it out before loading it Lo...

Page 18: ...roll after the paper is advanced if it is soiled or if there are cuts from scissors or the blade after removing creased edges See Specifying the Cutting Method for Rolls User s Guide Removing the Rol...

Page 19: ...roll Do not remove the roll before the barcode is printed You will be unable to keep track of the amount of roll paper left See Keeping Track of the Amount of Roll Paper Left User s Guide 5 Positionin...

Page 20: ...Holder from rolls see Removing the Roll Holder from Rolls User s Guide 8 Holding it at the positions indicated close the Roll Cover Note To load new roll paper in the printer at this point see Loadin...

Page 21: ...it Load the paper straight Loading paper askew will cause an error See Paper is crooked P 117 Note Store unused paper in the original package away from high temperature humidity and direct sunlight 1...

Page 22: ...sheet printing side up in the Paper Feed Slot with the right edge aligned with the Pa per Alignment Guide a to the right of the Roll Cov er Insert the paper until the leading edge makes con tact and y...

Page 23: ...ype of paper is automatically shown on the Display Screen Press or to select the type of paper and then press the OK button The printer now starts feeding the paper Note Refer to Paper Reference Guide...

Page 24: ...to select Eject Paper and then press the OK button 4 Press or to select Yes and then press the OK button The paper is ejected from the front of the printer 5 Holding the paper push the Release Lever b...

Page 25: ...install used ink tanks in another model of printer This will prevent correct ink level detection which may damage the printer or cause other problems We recommend using up an Ink Tank in the course o...

Page 26: ...b Note If the Tab Selection screen is not displayed press the Menu button 2 Press the OK button The Ink Menu is displayed 3 Press or to select Rep Ink Tank and then press the OK button A message on th...

Page 27: ...tic bag and seal it Note Dispose of used ink tanks according to local regulations Installing Ink Tanks 1 Before opening the pouch gently agitate the Ink Tank once or twice Agitate the ink in the Ink T...

Page 28: ...ks cannot be installed in the holder if the color or orientation is incorrect If the Ink Tank does not fit in the holder do not force it in Check the Ink Tank serial number the Ink Color La bel the co...

Page 29: ...rong direction the rotating part of the Ink Tank Lock Lever come out of place If this happens open the Ink Tank Lock Lever to return it to the proper position 5 Make sure the Ink Lamp is lit in red No...

Page 30: ...burns Important There may be ink around the nozzles of the Printhead you remove Handle the Printhead carefully during re placement The ink may stain clothing Do not open the Printhead pouch until imm...

Page 31: ...shown on the Display Screen regard ing Printhead replacement Important During Printhead replacement do not move the Carriage from the position indicated If you accidentally move the Carriage you will...

Page 32: ...ever touch the metal contacts of the Carriage This may damage the printer 3 Pull the Printhead Fixer Lever forward all the way to open it completely 4 Pull up the Printhead Fixer Cover to open it comp...

Page 33: ...remove it from the pouch Important When handling the Printhead always hold it by the grips a Never touch the nozzles b or metal con tacts c This may damage the Printhead and affect printing quality N...

Page 34: ...If ink accidentally spills wipe off the ink with a dry cloth If you need to put a Printhead somewhere temporarily before installation do not keep the nozzles and metal contacts facing down If the noz...

Page 35: ...placed and filled with ink Head Posi Adj Auto Advanced is performed if you have selected Rep P head Print On in the Control Panel menu See Menu Set tings User s Guide In this case follow the instructi...

Page 36: ...ng the Mainte nance Cartridge The Maintenance Cartridge may become damaged or ink may leak out To prevent ink from leaking from a used Maintenance Cartridge avoid dropping the cartridge or storing it...

Page 37: ...n press the OK button 4 Press or to select Repl maint cart and then press the OK button A message on the Display Screen advises you to open the Maintenance Cartridge Cover Replace the Maintenance Cart...

Page 38: ...ep the cartridge level during removal and storage If you drop a used Maintenance Cartridge or store it at an angle ink may leak and cause stains The remaining Maintenance Cartridge capacity is recorde...

Page 39: ...sed Maintenance Cartridge in the plastic bag of the new cartridge and dispose of it in accord ance with local regulations 6 Keeping the new Maintenance Cartridge level in sert it all the way in The pr...

Page 40: ...n Access the menu for Maintenance Cartridge replacement this is the end of the procedure and you do not need to press the OK key in the next step 8 Press the OK button Replacing the Maintenance Cartri...

Page 41: ...ced the roll After printing on paper that generates a lot of paper dust After printing on adhesive paper Important If the Platen inside the Top Cover becomes dirty it may soil the underside of paper W...

Page 42: ...letely wipe inside the Top Cover to clean it Wipe away any ink residue on the Platen as a whole a the Paper Retainer b Borderless Printing Ink Grooves c and Ejection Guide d Warning Never use flammabl...

Page 43: ...en and Ejec tion Guide use a damp cloth that you have wrung out completely to wipe over the Output Tray and along grooves 4 Close the Top Cover Cleaning the Printhead Cleaning the Printhead If printin...

Page 44: ...checked at fixed intervals Configure the settings on the Control Panel menu in Nozzle Check See Menu Settings User s Guide Perform cleaning as follows 1 On the Tab Selection screen of the Control Pan...

Page 45: ...rint jobs Otherwise this lamp flashes when the print job is paused or the printer is updating the firmware Off There are no active print jobs when the Data lamp is off c Message Lamp orange On A warni...

Page 46: ...ssing this button in menu items of each tab for which is displayed at left will move to the lower level of the menu item enabling you to execute menu commands or set menu values Also press this button...

Page 47: ...ecute Menu items The following section describes menu operations and how they are presented in this User Manual Accessing menus P 47 Specifying menu items P 48 Specifying numerical values P 48 Executi...

Page 48: ...button After two seconds the display reverts to the upper level menu Note If a confirmation message is displayed regarding the setting you entered follow the on screen instruc tions Specifying numeric...

Page 49: ...arding the setting you entered follow the on screen instruc tions Executing menu commands Menu commands can be executed as follows 1 Press or to select the action to execute and then press the OK butt...

Page 50: ...l Fourth Level Fifth Level Load Paper Roll Paper Cut Sheet Eject Paper Chg Paper Type 1 Roll Paper The paper type is displayed here 1 Cut Sheet The paper type is displayed here 1 Chg Paper Size Sheet...

Page 51: ...User s Guide Ink Menu First Level Rep Ink Tank Head Cleaning A Job Menu First Level Second Level Third Level Fourth Level Fifth Level Print Job Job List Choose a print job Delete Preempt Jobs 1 Stored...

Page 52: ...int A High B Standard Draft Change Settings A High B Standard Draft Mainte nance Head Cleaning Head Cleaning A Head Cleaning B Nozzle Check Replace P head Repl maint cart Head Info GL2 Set tings Quali...

Page 53: ...ributes Reset Pa lette All Palette Palette A Palette B Smoothing Software Smooth ThickenFi neLines Off On Adjust FaintLines Off On Ln wdth correct Black gray Color Processin gOption Warning Off On On...

Page 54: ...10 min 15 min 20 min 30 min 40 min 50 min 60 min 210 min Shut Down Timer Off 5 min 10 min 30 min 1 hour 4 hours 8 hours 12 hours Buzzer Off On Contrast Adj 4 3 2 1 0 1 2 3 4 Date Time 8 Date yyyy mm...

Page 55: ...Recv Off On Save Common Box Off On Show Job Log 8 Off On Prep Move Printer Standard Limited Admin Menu 8 Change Pass word 9 The screen for setting the password is displayed Init Admin Pswd 9 Adj Fine...

Page 56: ...d using Change Password in the Admin Menu Viewing and configuration is possible for administrators only 10 Not displayed if IPv6 Support is Off 11 Default setting for the time to enter the power save...

Page 57: ...e printer and check the printer status See Control Panel P 45 f Ink Tank Cover Open this cover to replace an Ink Tank See Ink Tank Cover Inside P 61 g Paper Alignment Line An orange line for alignment...

Page 58: ...e Stand is normally offered as an optional accessory but it may be provided as a standard accessory in some sales regions Side Side a Manual Pocket Store printer manuals in this pocket b Ethernet Port...

Page 59: ...acuum holes on the platen hold paper in place e Borderless Printing Ink Grooves For catching ink outside the edges of paper during borderless printing f Linear Scale The linear scale serves a key role...

Page 60: ...this part c Roll Loading Slots Slide the Roll Holder along these slots d Roll Holder Slot Load the Roll Holder into this holder slot Carriage Carriage a Angle Adjustment Lever Use this lever to fine...

Page 61: ...t and press down the lever when replacing an Ink Tank b Ink Color Label Load an Ink Tank that matches the color and name on this label c Ink Lamp Red Indicates the state of the Ink Tank as follows whe...

Page 62: ...ed if there is 80 or more free space See Checking the Remaining Mainte nance Cartridge Capacity User s Guide Depending on the state of the printer part replacement may be necessary when preparing to t...

Page 63: ...nance Cartridge except when the message for replacing it is displayed If you remove the Maintenance Cartridge while ink is being drawn out the ink may leak out If consumables must be replaced the mess...

Page 64: ...hey click into place 6 Close the Ink Tank Cover Ink is now drawn into the Maintenance Cartridge Important Do not remove the Maintenance Cartridge except when the message for replacing it is displayed...

Page 65: ...rinter covers to secure them in the re verse order of tape removal during installation 3 Remove the Stand by reversing the installation procedure when it was attached to the printer 4 Disassemble and...

Page 66: ...a risk of injury or damage to the location site Before moving the assembled stand lift the support rod to the position shown a and un lock all four casters Moving the stand with the support rod lowere...

Page 67: ...ll four of the casters of the Stand Attempting to place the printer on the Stand while the casters are not locked poses a risk of injury 2 Remove tape and packaging material attached to the printer 3...

Page 68: ...ver installation procedure varies depending on the type of connection See Installing the Software Win dows P 69 See Installing the Software Mac OS P 71 Important When the printer is connected to a net...

Page 69: ...nstallation following the instruc tions displayed If you accidentally connect the USB cable first the printer driver may not be installed correctly When the printer is connected to a network via TCP I...

Page 70: ...and connect the printer and computer with the USB cable 4 On the Finish window select Restart my comput er now and click Restart Software settings take effect after the computer re starts Installing t...

Page 71: ...a network the printer s IP address may be changed if you reinstall the printer In this case be sure to reconfigure the printer s IP address 1 After making sure the computer and printer are not connect...

Page 72: ...4 After installation click Exit Installing the Software iPF685 Series Basic Guide Software Installation Installing the Printer Driver Mac OS 72...

Page 73: ...need to print them Change the layout orientation relative to the paper You can save paper by correcting the direction in which the document is arranged on the paper if necessary Configuring Settings i...

Page 74: ...nu item for printer settings to display the Print dialog box 2 Access the Main pane 3 Select the Print Preview check box 4 After you click Print the Canon imagePROGRAF Preview window will be displayed...

Page 75: ...you to con serve paper Note If the page would exceed the roll paper width after rotation you can use this function with Scale to fit Roll Paper Width to print rotated pages Configuring Settings in Win...

Page 76: ...derless Printing check box to dis play the Information dialog box 3 Click the width of the loaded roll in the Roll Paper Width list 4 Click OK to close the Information dialog box 5 Select Fit Paper Si...

Page 77: ...in Windows 1 Access the Page Setup sheet 2 Click Size Options and register the original size 3 Select the Enlarged Reduced Printing check box 4 After you click Fit Roll Paper Width the Informa tion di...

Page 78: ...the original as specified in the source application 4 Select the Enlarged Reduced Printing check box 5 Select Fit Paper Size Fit Roll Paper Width or Scaling Configuring Settings in Mac OS 1 Access the...

Page 79: ...ding on the type of paper used for adjustment use the same type of paper as you will use for printing Use Auto Standard if you have switched to another type of paper or if you want the boundaries betw...

Page 80: ...ss or to select Auto Standard or Auto Advanced and then press the OK button A test pattern is printed for adjustment Adjustment is now finished if you have printed on a roll or a sheet of A2 size or l...

Page 81: ...rint Length is selected Note Either A High or B Standard Draft in the Adjust Length menu is applied depending on printer driver settings at the time of printing If you have selected Easy Settings in t...

Page 82: ...Standard or Fast is selected in Print Quality in the printer driver Note Always check the Adj Priority values before using Adjust Length See Selecting a Feed Amount Adjustment Method P 81 Use paper o...

Page 83: ...d Inch in 1 inch incre ments Note A test pattern is printed in black when you choose A High or in magenta if you choose B Standard Draft To cancel printing the test pattern for adjustment hold down th...

Page 84: ...n on the leading edge is left 93 The size of clear film cannot be detected 93 Roll Paper is Continuously Ejected 93 Clearing Jammed Roll Paper Clearing Jammed Roll Paper If paper from a roll becomes j...

Page 85: ...r and move the Car riage to the left or right side manually away from the jam Important Do not move the Carriage over jammed paper This may damage the Printhead 2 Clear any jammed paper from inside th...

Page 86: ...and damage the printer If paper from a roll is jammed by the Paper Feed Slot Remove the jammed paper from the Paper Feed Slot After removing the paper make sure there are no other scraps of paper in...

Page 87: ...of paper in the printer 5 Pull the Release Lever forward Clearing a Jammed Sheet Clearing a Jammed Sheet If a sheet becomes jammed Paper jam is shown on the Display Screen of the Control Panel Remove...

Page 88: ...from the jam Important Do not move the Carriage over jammed paper This may damage the Printhead 2 Clear any jammed paper from inside the Top Cover After removing the paper make sure there are no othe...

Page 89: ...damage the printer If the paper is jammed by the Paper Feed Slot Remove the jammed paper from the Paper Feed Slot After removing the paper make sure there are no other scraps of paper in the printer i...

Page 90: ...rward Clearing Jammed Paper Paper Feed Slot Clearing Jammed Paper Paper Feed Slot Follow these steps to remove any scraps left in the Paper Feed Slot after you clear jammed sheets or roll paper 1 Turn...

Page 91: ...hrough the gap of the Paper Feed Slot Push the scrap out toward the Platen 5 Remove the scrap when it is pushed out onto the Platen 6 If any scraps remain inside the paper feed slot repeat steps 4 and...

Page 92: ...sheets Cause Corrective Action The paper source selection is incorrect Press the Load button and select the paper source Paper is not cut neatly Paper is not cut neatly Cause Corrective Action The pap...

Page 93: ...tive Action Keeping a roll in the printer for a long time without printing on it may leave a depres sion on the leading edge When printing quality is most important we recommend setting TrimEdge Reloa...

Page 94: ...ons of Mac OS 2 Select the printer and then Resume Printer or Resume in the Printers menu to restart the print job The printer does not respond even if print jobs are sent The printer does not respond...

Page 95: ...as cut to straighten it The leading edge of rolls may be cut to straighten it if Trim Edge First is set to a value other than Off in the Control Panel menu See Cutting the Leading Edge of Roll Paper A...

Page 96: ...over and make sure the Carriage is not over the Platen 2 Remove any scraps of paper inside the Top Cover See Clearing Jammed Roll Paper P 84 See Clearing a Jammed Sheet P 87 3 Close the Top Cover The...

Page 97: ...ct type of paper in the Control Panel menu when loading paper See Loading Rolls in the Printer P 15 See Loading Sheets in the Printer P 21 The edges of the paper are dirty The edges of the paper are d...

Page 98: ...he Top Cover P 41 The Platen has become soiled because you have set Width Detection to Off in the Control Panel menu Set Width Detection to On in the Control Panel menu and then open the Top Cover and...

Page 99: ...ity to Particular Graphic Elements and Colors for Print ing User s Guide The type of paper specified in the printer driver does not match the type loaded in the printer Load paper of the same type as...

Page 100: ...40 mm from the leading edge The position varies depending on the Print Quality setting In this case select Scan Wait Time Area Entire area However note that printing will now take longer See Menu Sett...

Page 101: ...Cause Corrective Action In the Advanced Settings of the printer driver Monochrome Monochrome BK ink or Mon ochrome Bitmap is specified in Color Mode In the Advanced Settings of the printer driver spe...

Page 102: ...d in the printer driver does not match the type loaded in the printer Load paper of the same type as you have specified in the printer driver See Loading Rolls in the Printer P 15 See Loading Sheets i...

Page 103: ...ring the Communication Mode Manually User s Guide Cannot print over a TCP IP network Cannot print over a TCP IP network Cause Corrective Action The printer s IP address is not configured correctly Mak...

Page 104: ...iver Uninstaller to display the Delete Printer window 2 Select the printer in the list and click Delete 3 Click Yes after the Warning message is displayed 4 Make sure that the printer has been removed...

Page 105: ...imagePROGRAF Device Setup Utility to start the wizard 2 In the wizard window click Delete and then click Next 3 Follow the instructions on the screen to remove imagePROGRAF Device Setup Utility iPF685...

Page 106: ...n Auto Rotate is On in the Control Panel menu In the Control Panel set Auto Rotate to Off and print again See Menu Settings User s Guide The plotter origin is incorrect Set Detect img size to Command...

Page 107: ...Command priority or Detected size in the Control Panel menu See Menu Settings User s Guide Set Conserve Paper to On in the Control Panel menu See Menu Settings User s Guide HP GL 2 printing takes a lo...

Page 108: ...icate a problem with the printer There is a sound of suction from the Platen To prevent paper from rising paper is held against the Platen by suction from Vacuum holes under it There is a sound when a...

Page 109: ...it does not indicate a problem The Printhead nozzles are clogged Check for nozzle clogging See Checking for Nozzle Clogging User s Guide Ink Level Detection Ink Level Detection Ink level detection wil...

Page 110: ...ing ink level detection After checking the message press the button 4 After checking the message press the button 5 Press or to select Yes and then press the OK button 6 Check the message and press th...

Page 111: ...about updating ink information is shown on the Display Screen After checking the message press the button 10 Press or to select Yes and then press the OK button Ink level detection is now released iP...

Page 112: ...ment on several sheets but sheets of dif ferent types or sizes of paper were used When printing a test pattern for adjustment use sheets of the same size and type of paper in the required quantity Pre...

Page 113: ...utton 2 Change the paper size setting in the printer driver to the size loaded in the printer and try printing again Replace the loaded paper with paper of a size that matches the size setting in the...

Page 114: ...of the loaded roll does not match the width specified in Fit Roll Paper Width in the printer driver Press or to select Print and then press the OK button to resume print ing However note that this er...

Page 115: ...roll paper left when Man ageRemainRoll in the Control Panel menu is On Press or to select Print and then press the OK button to resume printing However the roll paper may run out dur ing the print job...

Page 116: ...Loading Rolls in the Printer P 15 3 If no barcode was printed on the roll specify the type of paper See Changing the Type of Paper User s Guide 4 When you have selected ManageRemainRoll On in the cont...

Page 117: ...g from the page on which the error occurred Paper is crooked Paper is crooked Cause Corrective Action Paper loaded crooked was detected when the paper was advanced Follow these steps to reload the rol...

Page 118: ...Display Screen press the OK button Printing will resume starting from the page on which the error occurred See Loading Rolls in the Printer P 15 There is a foreign object by the Output Tray ob structi...

Page 119: ...hen press the OK button to continue printing The document will be printed with a border The loaded paper is a size not compatible with borderless printing Press or to select Stop Printing and then pre...

Page 120: ...printing Insert the roll firmly until it touches the flange of the Roll Holder See Attaching the Roll Holder to Rolls P 12 Press or to select Print With Border and then press the OK button to continu...

Page 121: ...lity Press the OK button open the Ink Tank Cover and replace the Ink Tank for the color that does not have enough ink See Replacing Ink Tanks P 25 No ink left No ink left Cause Corrective Action There...

Page 122: ...ctive Action There is no Ink Tank of the indicated color in the printer Load the Ink Tank See Replacing Ink Tanks P 25 There is a problem with the Ink Tank Replace it with a new Ink Tank See Replacing...

Page 123: ...Guide 3 Clean the Printhead if the nozzles are clogged See Cleaning the Printhead P 43 4 Execute Adj Quality again See Automatic Banding Adjustment User s Guide Highly transparent film is loaded that...

Page 124: ...rinthead as follows and then execute Head Posi Adj again 1 Press the OK button to clear the error 2 Use Head Inc Adj to adjust the angle of inclination of the Printhead See Adjusting Line Misalignment...

Page 125: ...se steps to clean the Printhead 1 Stop printing by pressing or to select Stop Printing 2 Clean the Printhead See Cleaning the Printhead P 43 If the message is still displayed when printing replace the...

Page 126: ...ull You can continue to print but prepare a new Maintenance Cartridge to use when the message for replacement is displayed No Maintenance Cartridge capacity No Maintenance Cartridge capacity Cause Cor...

Page 127: ...Guide Delete unneeded jobs stored in personal boxes See Deleting Saved Jobs User s Guide Mail box full Now printing without saving data Mail box full Now printing without saving data Cause Corrective...

Page 128: ...rom the queue See Managing the Job Queue Deleting or Preempting Other Jobs User s Guide Delete unneeded jobs stored in personal boxes See Deleting Saved Jobs User s Guide Mail box full Delete unwanted...

Page 129: ...ity GL2 Wxxxx The memory is full xxxx is 0501 0903 or 0904 GL2 Wxxxx The memory is full xxxx is 0501 0903 or 0904 Cause Corrective Action The printer memory is full Because the entire print job could...

Page 130: ...curred Write down the error code and message turn off the printer and contact your Can on dealer for assistance Hardware error xxxxxxxx xxxx x represents a letter or number Hardware error xxxxxxxx xxx...

Page 131: ...or which service is required Contact your Canon dealer for assistance Unknown file Unknown file Cause Corrective Action Data sent to keep the printer up to date such as pa per information is in the wr...

Page 132: ...error xxxxxxxx xxxx x represents a letter or number 130 Ink insufficient 121 Ink tank is empty 122 Insert the maintenance cartridge 126 Insufficient paper for job 115 Leading edge detection error 118...

Page 133: ...d 116 Roll printing is selected 116 Sheet printing is selected 116 The following ink tanks cannot be recognized 122 The mail box is full 127 The paper is too small 113 The paper is too small 113 The r...

Page 134: ...If a message is displayed 36 Ink level 109 Ink level detection 109 L Large Format Printing 77 M Maintenance Cartridge 3 36 57 62 126 Menu Operations 47 Menu Structure 50 N Navigate 46 P Paper Feed Sl...

Page 135: ...iPF685 Series Basic Guide ENG CANON INC 2013...

Reviews: