Canon i 320 Simplified Service Manual Download Page 12

12 

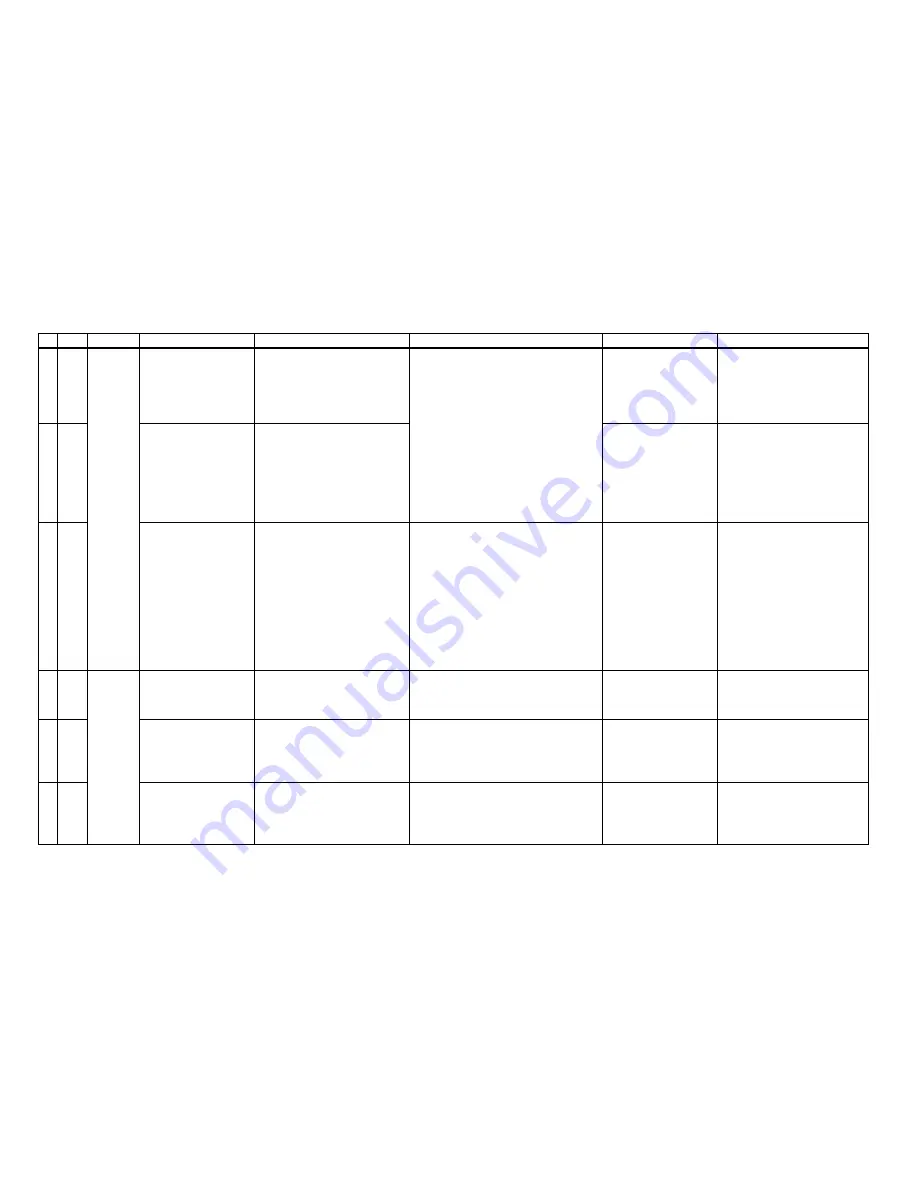
7-2.  Product Technical Information 

1) FAQ (Problems specific to the i320, and corrective actions) 


No.  Rank* Function 

Phenomenon 

Condition 

Cause 

Corrective action 

Possible Call / Claim  

No cartridge installation 
error (orange LED blinks 
6 times). 
Cartridge cannot be 
installed.   
Carriage error. 

The packing material used to fix 
the carriage at unpacking and 
installation may not have been 
removed. 

Remove the packing 
material fixing the 
carriage. 

-LED blinks in orange 6 times 
(no cartridge installation error) 
-Cannot install the cartridge 
-Cannot print 
-LED blinks in orange and green 
alternately twice (carriage error) 

Carriage error, abnormal 
noise, or paper feeding 
without printing. 

The packing material used to fix 
the print head cap at unpacking 
and installation may not have 
been removed. 

The user may have failed to remove the 
packing material at unpacking and 
installation. 
Although a caution sheet is packaged 
together with the printer, the user may not 
notice it. 
Note: Even if the packing material 
remains, no parts are damaged. 

Remove the packing 
material fixing the print 
head cap. 

-LED blinks in orange and green 
alternately twice (carriage error) 
(As this occurs at printer 
installation, the user cannot 
recognize the error.) 
-Abnormal noise 
-Cannot print 
-Paper feeding without printing 

Installatio

Abnormal cartridge 
EEPROM data error 
(orange LED blinks 7 
times).   

The problem likely occurs when 
the cartridge lever is slowly 
(carefully) lowered at print head 
installation. 

When the cartridge lever is slowly lowered 
at print head insta llation, there is a timing 
mismatch in reading the print head 
EEPROM value, preventing the EEPROM 
value from being detected correctly. 
<Print head recognition mechanism> 
The print head installation is detected by 
the contact of terminals in the following 
procedure: 

1. The existence of print head is detected. 
2. The print head EEPROM value is 
checked. 

1. Power off the printer, 
and re-power it on. 
2. Remove the print 
head, and reinstall it. 

-LED blinks in orange 7 times 
(cartridge EEPROM data error) 
(As this occurs at printer 
installation, the user cannot 
recognize the error.) 
-Cannot print 

Paper not feeding when 
lots of paper/media is 
loaded. (PC101/PR101) 

The problem may occur when 
multiple pages of PC101L and 
PR101 (A4/LTR) are loaded. 

When the amount of paper curl is large 
and multiple pages are loaded, the 
loaded page limit level in the ASF creates 
friction at paper feeding. 

1. Decrease the number 
of pages loaded in the 
ASF. 
2. Correct the paper curl. 

-Paper out error 
-Paper cannot be fed 
-Cannot print 

Multi-feeding. 

When multiple pages of PR101 
(A4/LTR) are loaded (in the high 
temperature and high humidity 
environment). 

In the high temperature and high humidity 
environment, the frictional force between 
the PR101’s front and back sides 
becomes high, and sheets stick to each 
other, contributing to multi -feeding. 

Set the paper one by one 
in the ASF. 

-Multiple pages of paper are fed 
-Paper is delivered without 
printing 

Paper   
feedability 

Envelope not feeding. 

When many envelopes are 
loaded. 
<Supplement> 
The problem may occur with the 
DL envelope. 

The paper feed roller slips on the paper at 
paper feeding.   
Note: Depending on the paper lots. 

1. Decrease the number 
of envelopes loaded in 
the ASF. 
2. Straighten out the 
paper (with a pen). 

-Paper out error 
-Paper cannot be fed 
-Cannot print 

Summary of Contents for i 320

Page 1: ...i320 SERVICE MANUAL Canon ...

Page 2: ...OR DISPLAY 4 SERVICE MODE test print EEPROM initialization destination setting 5 EXTERNAL VIEW PARTS LIST 6 TROUBLESHOOTING FLOWCHART 7 SERVICE INFROMATION APPENDIX 1 S HIPMENT INSPECTION PATTERN APPENDIX 2 i320 SERVICE TOOL QY8 1383 000 Rev 00 September 4 2002 Canon Inc ...

Page 3: ...nter PIXUS 320i 7816A016AA JAPAN 1 2 Options None 1 3 Consumables Product name Product code Sales Territory Remarks Canon Ink Tank BCI 24 Black 6881A001AA 6881A002AA 6881A003AA 6881A004AA JPN EUR USA CAN ASIA AUST Canon Ink Tank BCI 24 Color 6882A001AA 6882A002AA 6882A003AA 6882A004AA JPN EUR USA CAN ASIA AUST Canon Ink Tank BCI 24 Black Twin Pack 6881A008AA 6881A009AA 6881A010AA 6881A011AA JPN EU...

Page 4: ...ossy postcard 20 sheets or less Envelop 10 sheets or less Professional photo card PC 101 L C S 4x6 2L D W 20 sheets or less 10 sheets or less Glossy photo card 20 sheets or less T shirt transfer 1 sheet Mouse pad 1 piece Borderless printing Postcard L size paper 4x6 Detection function Cover open Available Presence of print head Available Presence of ink tank Not available Paper out Available Paper...

Page 5: ... C high brilliance Ink tank BCI 24 Bk BCI 24 Color Common with S200 S200x S300 S330 Weight Approx 60g excluding ink tanks Supply method Service part excluding ink tanks Part number QY6 0044 000 Print head life 4 000 pages Same as the printer main unit Cl 2 500 pages Bk 1 500 pages of black printing Note This print head can only be used in the i320 only and cannot be used in the old model S300 S330...

Page 6: ...ise Replace the printer as it has failed Blinking 9 times EEPROM error Replace the printer as it has failed Blinking 10 times No cartridge installed detection excluding the case of cartridge replacement during printing Replace the printer as it has failed 3 3 Warning No LED display Content Remarks Black ink low warning 1 about half amount Displayed in the status monitor only 2 Color ink low warnin...

Page 7: ...button plug in the AC cable The green lamp lights b While holding down the POWER button press the RESUME button twice and release it Each press of the RESUME button changes the LED color the LED lights in orange the first time and in green at the second time c Load A4 sized paper d Connect the printer to the computer select USB PORT using the i320 service tool QY9 0058 Refer to Appendix 2 i320 Ser...

Page 8: ...ER 100 120V 50 60HZ TWN LV TWN B QH3 3568 000 1 AC ADAPTER 220 240V 50 60HZ KRN HV KRN QY6 0044 000 K 1 PRINT HEAD C XB4 7300 607 N 4 SCREW PAN HEAD SELF TAPPING M3X6 FOR AC ADAPTER UPPER COVER UNIT Power cords are as listed below WT3 5122 000 E 1 CORD POWER 100V 120V J WT3 5131 000 E 1 CORD POWER 100V 120V WT3 5132 000 E 1 CORD POWER 220V 240V WT3 5133 000 E 1 CORD POWER 220V 240V AUS WT3 5135 00...

Page 9: ...do not print afterwards Open access cover and install head Power ON Error displayed Connect to computer Shipment inspection pattern printing Replace head and print shipment inspection pattern Correct Waste ink counter less than 7 Normal Defective Error displayed No Yes No Yes No Yes No Yes No Yes Refer to 4 SERVICE MODE regarding printing method Correct Shipment inspection pattern check items of R...

Page 10: ...k pattern printing Nozzle check pattern printing Head refreshing No Correct Correct Correct Correct Nozzle check pattern printing Nozzle check pattern printing Nozzle check pattern printing Head refreshing Refer to 4 SERVICE MODE regarding printing method Refer to 4 SERVICE MODE regarding printing method Refer to 4 SERVICE MODE regarding printing method Yes Yes Yes Yes No No ...

Page 11: ...he user 2 Install the removed AC adapter in the whole unit 3 Perform destination setting Refer to 4 SERVICE MODE for details 4 Power off the whole unit and confirm that the printer ready for shipment with the paper lifting plate of the ASF in the upper position Composition of WHOLE UNIT W O POWER SUPPLY UNIT Enclosed items Printer unit without I320 s access cover and AC adapter Rating plate for As...

Page 12: ...timing mismatch in reading the print head EEPROM value preventing the EEPROM value from being detected correctly Print head recognition mechanism The print head installation is detected by the contact of terminals in the following procedure 1 The existence of print head is detected 2 The print head EEPROM value is checked 1 Power off the printer and re power it on 2 Remove the print head and reins...

Page 13: ... COM 10 envelops The problem may occur in the address side of KH201 after continuous borderless printing to the message side in the high temperature and high humidity environment The edge of paper rises due to the large amount of curl causing the print head to rub against the printed surface of paper resulting in smearing 1 Correct the paper curl 2 Recommend the user to conduct printing in the pri...

Page 14: ...m edge of paper Lines and uneven print density appear in the trailing edge of paper Cannot print properly 13 Horizontal lines and uneven print density due to LF roller feeding at small pitch Supplement Lines and uneven print density of 1 to 2mm pitches Special paper standard mode Supplement Paper of PR series SP101 Note Comparably remarkable in the specific print pattern flesh tones and a uniform ...

Page 15: ...before all print data for one scan is stored in the print buffer Scan complement control printing complement at print data break up When the data transmission speed slows as a result of the computer s data processing capability and load the print data may break up due to the implementation of overflow scanning In this case the print data is complemented at the next scan 2 Borderless printing The p...

Page 16: ...s is heavily consumed the margin of error for remaining ink increases When performing continuous Bk solid printing With continuous printing ink flow from the tank to the ink chamber can be interrupted after which ink remains unused in the tank Display procedure Perform the following operations from the printer driver utility 1 Set the indication of the remaining ink level in Low Ink Warning Settin...

Page 17: ...Head alignment The printer has a head alignment function head position adjustment function The adjustment is needed at the initial set up by the user Head alignment This is a function to correct the displacements between the nozzle lines of the print head and incorrect print position at bi directional printing The adjustment is conducted using the printed head position adjustment pattern A Head al...

Page 18: ...tion Total area of the sample below Check item 2 Top margin Print EEPROM information Refer to 4 SERVICE MODE for details C nozzle check pattern Bk nozzle check pattern M nozzle check pattern Y nozzle check pattern Check item 3 Line Check item 4 Gray area Paper size A4 ...

Reviews: