background image

5

Load Paper

Load Paper

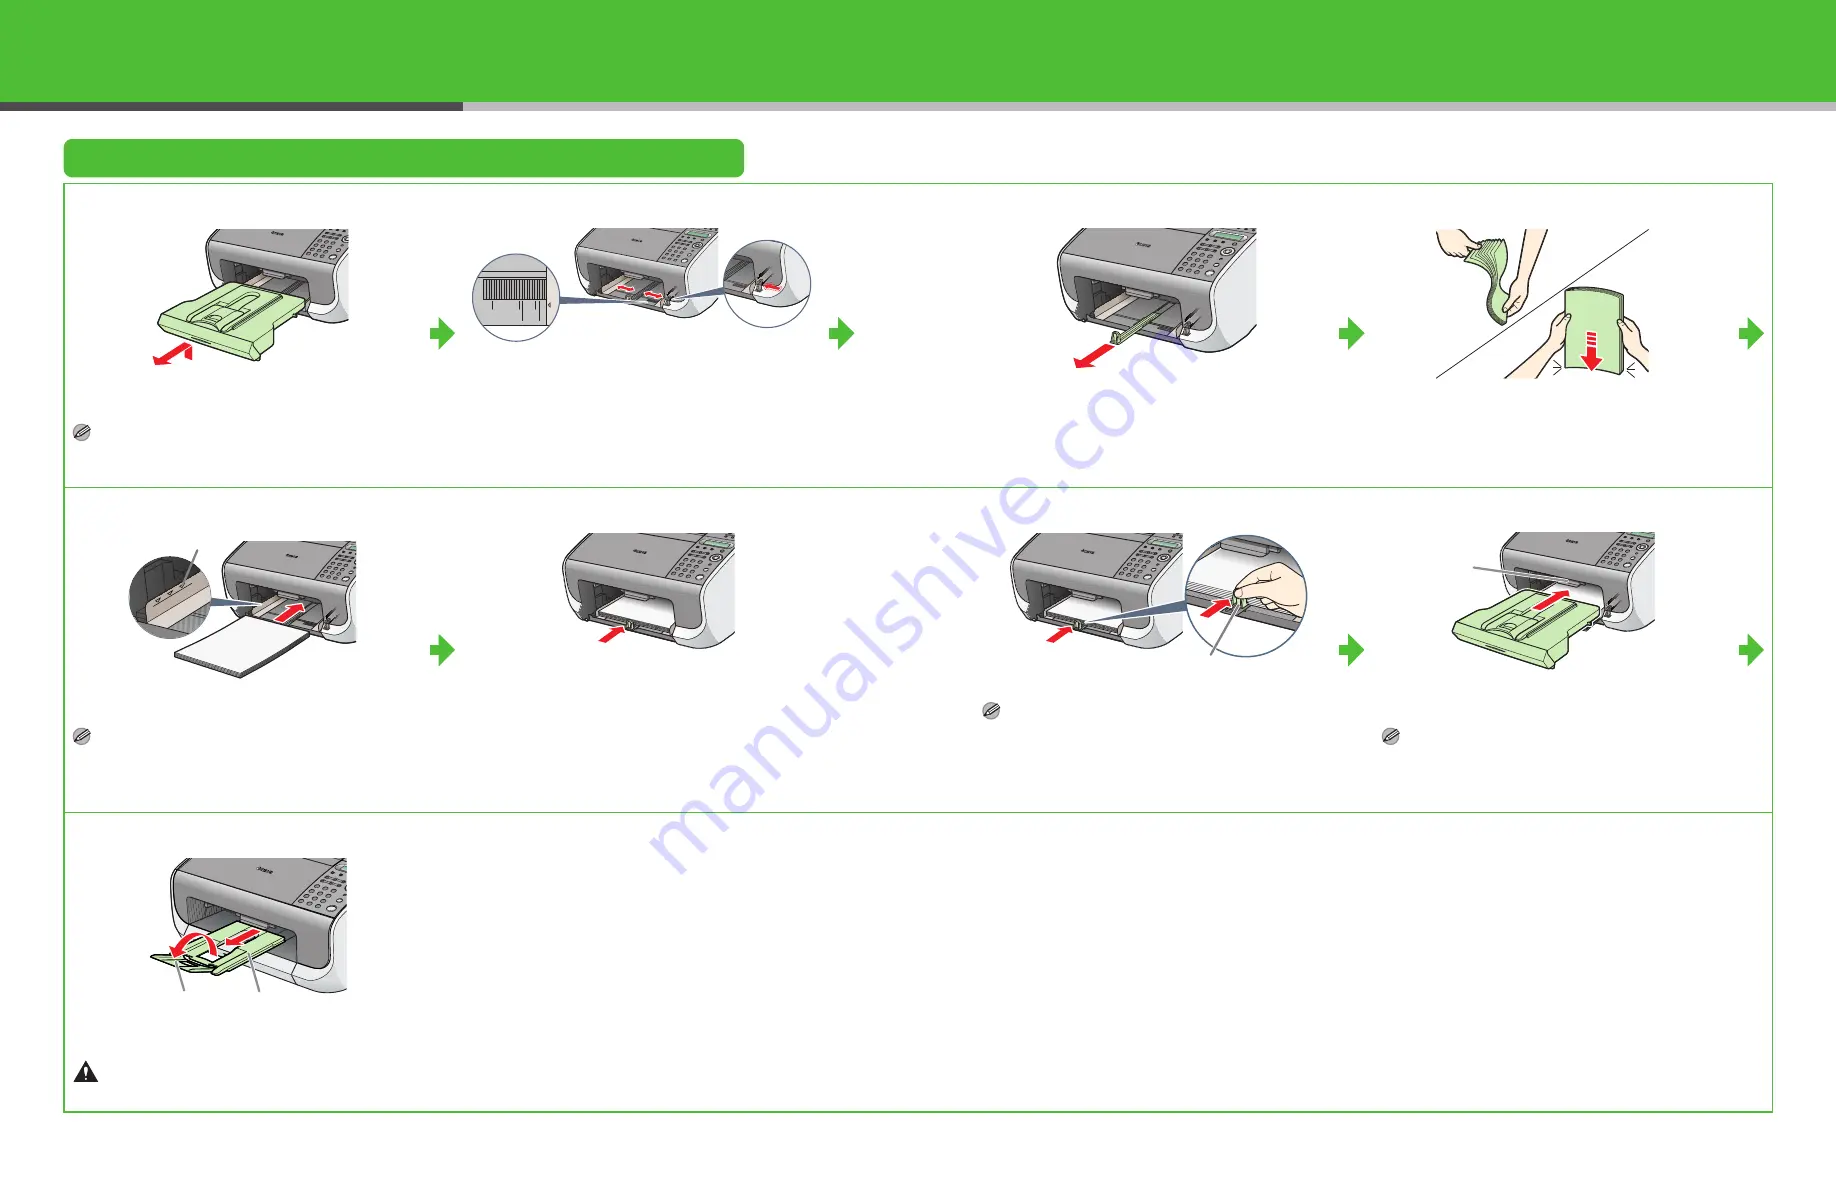
1

Lift the paper stack cover and pull it out completely.

NOTE

Make sure the back end of the cover does not catch the 
front paper guide.

2

Pinch and slide the side paper guides to the size of 
paper.

3

Pull out the paper guide rail as far as it will go.

4

Fan the paper stack and even the edges.

5

Insert the paper stack print side up.

NOTE

Make sure the stack height does not exceed the limit 
mark (A).

6

Push back the paper guide rail to the front edge of 
paper.

NOTE

– If loading paper shorter than Letter, pinch and slide the 

front paper guide (A) to match the paper size.

– If loading paper other than  Letter, make sure to set the 

correct paper size in the machine. (See Chapter 3, 
“Print Media,” in the Basic Guide.)

7

Insert the paper stack cover.

NOTE

Make sure the back end of the cover does not catch and 
lower the scanning platform (A).

8

Pull out the document delivery tray (A) and the 
extension (B).

Do not open or close the document delivery tray 
extension without extending the document delivery 
tray first.

A5

B5

EXEC

LTR

LGL

A4

A

A

A

B

A

6

Summary of Contents for FaxPhone L120

Page 1: ...lano 8 20097 San Donato Milanese MI Italy CANON LATIN AMERICA INC 703 Waterford Way Suite 400 Miami Florida 33126 U S A CANON AUSTRALIA PTY LTD 1 Thomas Holt Drive North Ryde Sydney N S W 2113 Austral...

Page 2: ...ports and lists Software Guide in User Software CD Driver set up and printing from a computer Assistance If you have a problem with your machine and you cannot solve it by referring to the manuals lis...

Page 3: ...angle 4 Open the document feeder tray 5 Open the cartridge cover by the notch A 6 Hold the cartridge by its handle A 7 Insert the cartridge in the machine as far as it will go The arrow A on the cartr...

Page 4: ...sh back the paper guide rail to the front edge of paper NOTE If loading paper shorter than Letter pinch and slide the front paper guide A to match the paper size If loading paper other than Letter mak...

Page 5: ...h pins A into the holes on the handset cradle NOTE Do not insert the pins all the way into the plugs at this point 3 Insert the plugs with the cradle into the holes on the machine 4 Carefully push the...

Page 6: ...sed properly See Install Cartridge on p 3 NO TONER CARTRIDGE is displayed Make sure that the cartridge is installed properly See Install Cartridge on p 3 PAPER SIZE ERROR is displayed Make sure that L...

Page 7: ...ppears Press to enter spaces or symbols Press to switch between input modes A Letter mode 1 Number mode Press Left Right to move the cursor Press Clear to delete the character at the cursor position H...

Page 8: ...Set twice 7 Use Up Down to select 3 USER NAME then press Set 8 Use the numeric buttons to enter the user name up to 32 characters then press Set Press to enter a space 9 Press Stop Reset to return to...

Page 9: ...Yes AnsMode Receives faxes automatically and records voice messages Do you intend to receive faxes automatically No MANUAL Does not answer any call You have to manually receive faxes FAX TEL Switches...

Page 10: ...ck My Computer Open the CD ROM icon then double click Mlnst Mlnst exe 3 Do not connect the USB cable before installing the software If you connect the USB cable before installing the software and the...

Page 11: ...lano 8 20097 San Donato Milanese MI Italy CANON LATIN AMERICA INC 703 Waterford Way Suite 400 Miami Florida 33126 U S A CANON AUSTRALIA PTY LTD 1 Thomas Holt Drive North Ryde Sydney N S W 2113 Austral...

Reviews: