background image

44

Preparing documents

Types of documents you can scan ______________

 Size

The FAXPHONE can scan standard letter, legal or A4 size documents.

 Thickness

Each sheet of the document should be of the same thickness and between 0.003 inch
and 0.005 inch (0.08 mm - 0.13 mm) thick with a paper weight between 20 to 24 lbs
(75 to 90 g/m

2

).

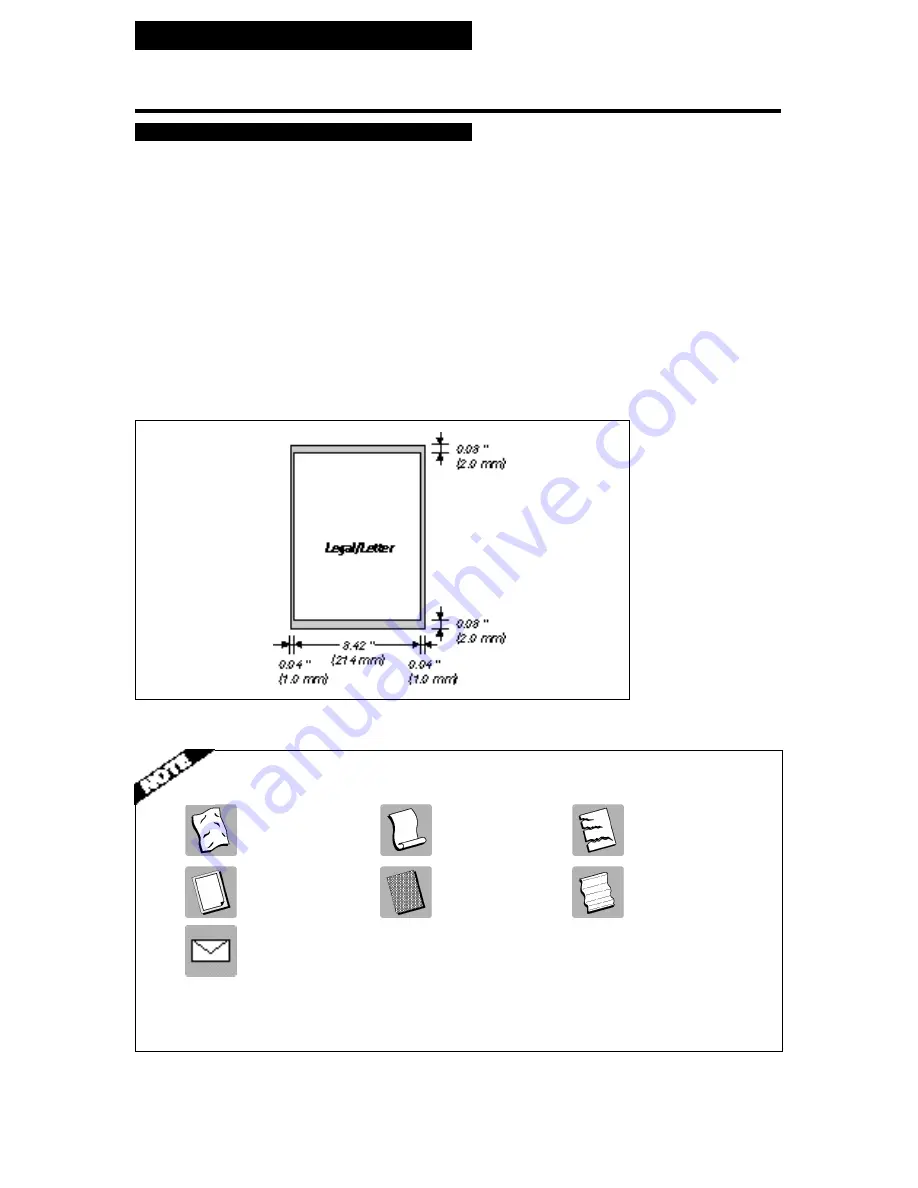
 Effective image size

The actual scanned image size for the FAXPHONE is shown below.

The 0.04 inch (1.0 mm) margin on either side of the sheet and the 0.08 inch (2.0 mm)
margin on the top and bottom are not picked up by the scanner.

Problem Documents

• Do not attempt to feed the following types of documents into the FAXPHONE:

wrinkled or

 curled or rolled paper

 torn paper

creased paper

carbon paper or

 coated paper

 onion skin or thin paper

carbon-backed paper

or glossy paper

envelopes

• Remove all staples, paper clips and the like before feeding the document.
• Make sure any glue, ink or correction fluid on the paper is completely dry before feeding the document.
• Make a photocopy of any document that will not feed into the FAXPHONE so that you can then

feed the copy.

Summary of Contents for FAXPHONE B640

Page 1: ...FAXPHONE B640 Electronic User s Manual ...

Page 2: ...Transaction number A number automatically assigned every time you send or receive a fax Transaction numbers are 4 digit decimal numbers that can help you keep track of the documents you send and receive TX RX NO XXXX Represents the transaction number when displayed on the LCD where XXXX is the 4 digit transaction number TX Stands for transmit or send RX Stands for receive NOTE A note describes imp...

Page 3: ...rite on Automatic switching between fax and voice calls The FAXPHONE recognizes incoming fax calls and automatically switches to receive mode Automatic dialing A variety of dialing methods lets you register frequently used fax numbers and phone numbers and access them by pressing one or a few buttons Error Correction Mode ECM TX RX Automatically helps correct transmission errors due to system and ...

Page 4: ...mpany If the RJ11 C jack is not present installation cannot occur 3 Order a normal business line from your telephone company s business representative The line should be a regular voice grade line or equivalent Use one line per unit DDD DIRECT DISTANCE DIAL LINE or IDDD INTERNATIONAL DIRECT DISTANCE DIAL LINE IF YOU COMMUNICATE OVERSEAS NOTE Canon recommends an individual line following industry s...

Page 5: ... designed to provide reasonable protection against harmful interference in a residential installation This equipment generates uses and can radiate radio frequency energy and if not installed and used in accordance with the instructions may cause harmful interference to radio communications However there is no guarantee that interference will not occur in a particular installation If this equipmen...

Page 6: ...g Also make sure that the total of all products plugged into the wall outlet does not exceed the current amper age of the circuit breaker 10 Do not push objects of any kind into the slots or openings on the cabinet as they may touch dangerous voltage points or short out parts which could result in a risk of fire or electric shock 11 Do not spill liquid of any kind on the FAXPHONE B640 If you spill...

Page 7: ...the equipment meets telecommunications network protective operational and safety requirements as prescribed in the appropriate Terminal Equipment Technical Requirements document s The Department does not guarantee the equipment will operate to the user s satisfaction Before installing this equipment users should ensure that it is permissible to be connected to the facilities of the local telecommu...

Page 8: ... F 10 C Over 90 5 F 32 5 C Use the FAXPHONE only within the following temperature and humidity ranges Ambient temperature 50 F to 90 5 F 10 C to 32 5 C Ambient humidity 10 to 80 RH no condensation Keep your FAXPHONE out of direct sunlight as this can damage the unit Do not lift the FAXPHONE by the operation panel Hold the FAXPHONE as shown when transporting it ...

Page 9: ...____________ Here are some other general precautions when using or working around the FAXPHONE CAUTION Avoid installing your FAXPHONE in places exposed to direct sunlight dust vibra tion high temperature or humidity or on unstable surfaces To assure proper electrical contact make sure the FAXPHONE is firmly plugged in Never pull on the cord to unplug the FAXPHONE Pull on the plug itself WARNING Do...

Page 10: ... wall jack 13 Connecting an extension phone or answering machine optional 13 Setting the TEL LINE TYPE 14 Setting up to receive faxes 15 Selecting the receiving mode 15 Fax Only Mode 16 Fax Tel Mode 17 Manual Mode 18 Ans Machine Mode 19 Distinctive Ring Pattern Detection DRPD feature 21 Types of ring patterns 21 Turning on DRPD and assigning a setting to a ring pattern 22 How DRPD responds to call...

Page 11: ...ry Sending 55 Canceling Sending 56 Redialing 56 Messages displayed during sending 57 Clearing document jams ejecting a document from the ADF 58 Delayed Sending 59 Sending other documents while the FAXPHONE is set for Delayed Sending 60 Canceling Delayed Sending 61 Sequential broadcasting 62 Sending a document to more than one location 62 Receiving documents 64 Receiving documents in Manual Mode 64...

Page 12: ...7 Periodic care 88 Cleaning the FAXPHONE exterior 88 Cleaning the glass scanning window 88 Cleaning the printer area 89 Cleaning the BJ cartridge print head 90 Replacing the BJ cartridge 91 Frequently Asked Questions 92 TRANSMITTING 92 RECEIVING 93 TELEPHONE 94 COPYING 95 PAPER LOADING PROBLEMS 95 GENERAL 95 Print quality problems 97 Error codes messages and solutions 98 In case of a power failure...

Page 13: ...e 10 Connecting the phone line 13 Connecting to the wall jack 13 Connecting an extension phone or answering machine optional 13 Setting the TEL LINE TYPE 14 Setting up to receive faxes 15 Selecting the receiving mode 15 Fax Only Mode 16 Fax Tel Mode 17 Manual Mode 18 Ans Machine Mode 19 Distinctive Ring Pattern Detection DRPD feature 21 Types of ring patterns 21 Turning on DRPD and assigning a set...

Page 14: ...or ship the unit in the future Carefully remove all items from the box It is best to have someone hold the box while you lift the FAXPHONE and its protective packaging out of the carton Paper tray Main unit BX 3 BJ FAX cartridge Paper tray cover Power cord and Telephone line FAXPHONE B640 User s Guide ...

Page 15: ... details Also save your sales receipt for proof of purchase Main unit BX 3 BJ FAX cartridge Faceplate may be installed on unit Paper tray Paper tray cover Documentation FAXPHONE B640 User s Guide this manual Quick Start Guide Registration card Warranty card Canon Cares card Telephone line Power cord Removing the shipping materials _______________ Remove the shipping materials as shown below Be sur...

Page 16: ...l indicates the use of a function envelope printing not available with this model Assembling the FAXPHONE To see how the FAXPHONE looks fully assembled see Main components of the FAXPHONE p 28 Attaching components _________________________ Paper Tray Cover Place the paper tray cover over the paper tray making sure the two tabs fit in the appropriate slots on the FAXPHONE Paper lever ...

Page 17: ...lt AC 60 Hz three wire grounded outlet 1 Plug the power cord connector into the rear of the unit 2 Plug the other end of the power cord into a properly grounded AC outlet three prong outlet There is no power switch on the FAXPHONE The power is on as long as the FAXPHONE is plugged in The faceplate may be installed on the FAXPHONE If you cannot find the faceplate check the One touch button area of ...

Page 18: ...nd to use first to make sure printing results are satisfactory Do not use punched or colored paper Do not use glossy paper Ink drying time will vary depending on the type of paper Using paper other than the above may cause jamming and or blurred printing Setting the paper size The paper size setting determines the size of the recording paper in the paper tray The factory setting is letter size If ...

Page 19: ...e left edge of the stack of paper Make sure the stack of paper does not exceed the paper limit mark on the right side of the feeder 6 Replace the paper tray cover Loading the paper Do not force the paper down into the FAXPHONE 3 Line up the right edge of the stack of paper against the right edge of the paper tray and insert it halfway into the paper tray 5 Complete inserting the stack of paper int...

Page 20: ...pying text only You may need to replace the BJ cartridge when either of the following conditions exist Your printed output is not crisp and clear and there are gaps in the characters miss ing dots even after you have cleaned the print head once or twice and you have removed and reinstalled the BJ cartridge You have been using the BJ cartridge for over one year To ensure optimum print quality Canon...

Page 21: ...sing even after trying five successive head cleanings Never remove the BJ cartridge unless you are going to replace it When left ex posed the cartridge print head dries out making it unusable Do not touch the print head area on the BJ cartridge Ink may leak out and cause stains Never shake the BJ cartridge especially after removing the protective tape from the print head If spilled the ink is very...

Page 22: ...t head cap from the BJ cartridge Installing the BJ cartridge ______________________ 2 Raise the green cartridge release lever up Make sure the paper thickness lever is set to the paper position left position 4 Pull off the protective orange tape Thickness lever ...

Page 23: ...PHONE Installing the BJ cartridge 6 Lower the cartridge release lever down until you hear a click to lock the cartridge in place Make sure the arm on the cartridge release lever is aligned with the marking on the BJ cartridge If the lever movement is not smooth release the lever and reload the cartridge To avoid cartridge misalignment and an error message to appear do not press down on the cartrid...

Page 24: ...ed the test printout should look as shown above If the printout has white streaks as shown above try cleaning the print head See Cleaning the BJ cartridge print head p 90 If the problem persists after cleaning try reinstalling the BJ cartridge You can turn off automatic test printing by changing the AUTO TEST PRINT setting See SYSTEM SETTINGS p 78 White streak ...

Page 25: ...he line to your wall telephone jack Connecting an extension phone or answering machine optional ______________________________ 1 Connect an extension phone or answering machine to the jack marked on the rear of the FAXPHONE To use a phone or answer machine on the same line with the FAXPHONE the phone and or answer machine must be attached directly to the FAXPHONE Be sure to connect an extension ph...

Page 26: ... telephone line setting as follows 1 Press FUNCTION Wait a second for TEL REGISTRATION to appear 2 Use or to select USER SETTINGS Press START COPY 3 Use or to select TEL LINE TYPE Press START COPY 4 Use or to select ROTARY PULSE 5 Press START COPY 6 Press STOP to finish SELECT MENU TEL REGISTRATION USER SETTINGS SET DATE TEL LINE TYPE TOUCH TONE ROTARY PULSE DATA ENTRY OK ...

Page 27: ... are not satisfied with the mode you select you can always change it at any time Fax Only Mode See p 16 You may want to use this mode if you have two phone lines in your office and plan to use one line for the FAXPHONE and the other line for your telephone Set the Fax Only Mode if you want to use your FAXPHONE only to receive faxes automatically and do not intend to use it as a telephone Fax Tel M...

Page 28: ...nsmission The FAXPHONE cannot receive automatically if you are making copies printing reports or registering information See p 68 1 Make sure the FAXPHONE is set to Fax Only Mode see above The FAXPHONE assumes all incoming calls are from another fax machine sending a document It receives the documents automatically Fax Only Mode Distinctive Ring Pattern Detection DRPD Feature See p 21 Some compani...

Page 29: ...nitor all incoming calls over the fax telephone line When the FAXPHONE receives an incoming call it checks to see if the call is from another fax machine trying to send a document or from someone wanting to talk to you The FAXPHONE cannot receive a document automatically if you are making copies printing reports or registering information See p 68 1 Make sure you have connected an extension phone ...

Page 30: ...up the handset of the extension phone connected to the FAXPHONE 4 If you hear a person s voice start your conversa tion If the caller wants to send a document after talking to you press START COPY on the FAXPHONE to receive the document or If you hear a slow beep or silence another fax is trying to send you a document Press START COPY on the FAXPHONE Your FAXPHONE begins receiving the document 09 ...

Page 31: ...t button on your fax after recording your message Thank you Leave 4 seconds pause at the beginning of the message the 4 seconds pause plus the outgoing message should not exceed 15 seconds Set the answering machine to answer on the first or second ring Setting Ans Machine Mode Set Ans Machine Mode when you have an answering machine connected to your FAXPHONE and you are going out Ans Machine Mode ...

Page 32: ... switches to receive mode automatically if it detects the tone If the FAXPHONE runs out of paper or ink it receives the document and stores it in memory To print out documents in memory see pp 67 and 68 4 When not in use turn the answering machine off and switch to Fax Tel Mode Manual Mode or Fax Only Mode using RECEIVE MODE ...

Page 33: ...use with a DRP service This feature is called Distinctive Ring Pattern Detection DRPD For more details on the DRP service contact your local telephone company Your telephone company may have a different name for this service Also this service may not be offered in all areas Types of ring patterns __________________________ Your telephone company will assign a distinctive ring pattern to each numbe...

Page 34: ...cond for TEL REGISTRATION to appear 2 Use or to select RX SETTINGS Press START COPY 3 Use or to select DRPD Press START COPY 4 Use or to select ON Press START COPY Wait a second for NORMAL RING to appear SELECT MENU TEL REGISTRATION RX SETTINGS ECM RX DRPD OFF ON DATA ENTRY OK NORMAL RING ...

Page 35: ...ss STOP to finish To make additional assignments start from step 5 To finish press STOP NORMAL RING NORMAL RING TEL FAX DATA ENTRY OK DOUBLE RING Distinctive Ring Pattern Detection DRPD feature When DRPD is set to ON the communication type for each ring pattern defaults to TEL except for the DOUBLE RING pattern which defaults to FAX After you select the ring pattern that has been assigned for your...

Page 36: ...__________ Using the FAXPHONE with a DRP service is almost the same as using it with a normal telephone line When you receive calls however the FAXPHONE responds somewhat differently as described below The DRP service is commonly used with automatic receiving only FAXPHONE set to Fax Only Mode Fax Only displayed on the LCD When the FAXPHONE is set for automatic receiving the FAXPHONE operates ac c...

Page 37: ...E rings the answering machine connects and then takes over the call When someone sends a fax using the number assigned for fax communication the FAXPHONE receives the document automatically FAXPHONE set to Fax Tel Mode Fax Tel displayed on the LCD The FAXPHONE monitors all incoming calls for all the numbers with DRPD The FAXPHONE answers the telephone for you and checks to see if the call is from ...

Page 38: ...l 30 Registering your name and number 32 Moving through the main menus 32 Entering a number 33 Entering a name 34 Personalizing your FAXPHONE 35 Registering the date and time 36 Registering your telephone fax number and name 37 Registering One touch Speed Dialing numbers and names 39 Registering Coded Speed Dialing numbers and names 41 ...

Page 39: ...omponents of the FAXPHONE Front view ______________________________________ Operation panel Use the operation panel buttons to operate the FAXPHONE Front cover Paper tray cover document tray Automatic document feeder ADF Document guide Speaker Paper tray ...

Page 40: ...29 2 Main components of the FAXPHONE Rear view _______________________________________ Power cord connector Telephone line jack Extension phone jack ...

Page 41: ...ort a list of registered numbers or a list of settings SEND OPTIONS Press to select a transmission mode FAXPHONE controls the Operation Panel Numeric buttons Use the numeric buttons to enter phone numbers when dialing These buttons can also be used to enter text numbers and symbols when registering names When registering your fax number press to enter a plus TONE Press to temporarily set your FAXP...

Page 42: ...Only Mode Answers calls as fax calls automatically Ans Machine Mode Receives documents and passes calls to an answering machine Fax Tel Mode Receives both documents and telephone calls Manual Mode Receives calls manually Arrow buttons VOLUME Use to scroll through menus and lists that appear on the LCD and to change settings These buttons also move the cursor in some naming operations and adjust th...

Page 43: ...th recent amendments to the FCC rules governing the use of facsimile equipment you are now required to include your fax number your name or company name and the date and time of the fax you are sending every time that you send a fax Please follow the setting instructions in this manual in order to comply with this requirement Moving through the main menus ________________ The FAXPHONE includes a m...

Page 44: ...o 20 digits for your fax number or 50 digits for a speed dialing number Be sure to enter 1 and the area code if necessary to dial a different area code Do not enter dashes slashes commas or other punctuation Use the One touch Speed Dialing buttons as follows To enter a space between numbers press SPACE If you make a mistake press CLEAR and enter the number again To erase a previously registered nu...

Page 45: ... 4 4 JKLjkl 5 5 MNOmno 6 6 PQRSpqrs 7 7 TUVtuv 8 8 WXYZwxyz 9 9 _ First press the numeric button corresponding to the character you want Press the numeric button repeatedly until the character you want appears in the display For example to enter BIG 1 1 Press the appropriate numeric button repeatedly until the desired character appears B Press 2 twice 2 The next character is in a different group s...

Page 46: ...te and time printed out by the receiving fax This informa tion is called your TTI Transmit Terminal Identification and appears at the top of the faxed document in small type In the United States you are required to include this information every time you send a fax So be sure to enter your TTI information in your FAXPHONE now By identifying the documents you send the receiving party will recognize...

Page 47: ...g and re enter the date You can also use or to move the cursor To change the date format See SYSTEM SETTINGS p 78 5 Press START COPY when you finish entering the new date Wait a second for SET TIME to appear 6 Press START COPY Registering the date and time ___________________ Follow the steps below to set the date and time for your FAXPHONE The date and time appear in the LCD display as well as on...

Page 48: ...finish entering the new time 9 Press STOP Registration ends and the FAXPHONE returns to standby Registering your telephone fax number and name Follow the steps below so that your fax number and name appear on the top of each document you send 08 15 DATA ENTRY OK 1 Press FUNCTION Wait a second for TEL REGISTRATION to appear 2 Use or to select USER SETTINGS Press START COPY SELECT MENU TEL REGISTRAT...

Page 49: ...COPY when you finish entering your fax number Wait a second for USER NAME to appear 6 Press START COPY 7 Enter your name up to 16 characters using the numeric buttons See Entering a name p 34 Correct errors by moving the cursor to the error using or and entering the correct character 8 Press START COPY when you finish entering your name 9 Press STOP Registration ends and the FAXPHONE returns to st...

Page 50: ... the party up to 16 characters the name appears on the printout of the One touch Speed Dialing list See One touch Speed Dialing list p 80 1 Press FUNCTION Wait a second for TEL REGISTRATION to appear 2 Press START COPY 3 Press START COPY 4 Use or to select the number of the One touch button you want to use for the number If a number is already registered for this One touch Speed Dialing button the...

Page 51: ... COPY to register the name 9 To assign additional One touch Speed Dialing numbers start from step 4 To finish press STOP DATA ENTRY OK 1 TOUCH SPD NAME 03 _ 03 CANON DATA ENTRY OK 04 Applying the faceplate For quick reference write the names for the One touch Speed Dialing numbers you register on the faceplate and attach it over the One touch buttons Fit the 4 tabs of the faceplate into the corres...

Page 52: ...ed Speed Dialing list p 81 1 Press FUNCTION Wait a second for TEL REGISTRATION to appear 2 Press START COPY 3 Use or to select CODED DIAL Press START COPY 4 Use or to select the two digit code you want to assign to the number 5 Enter the party s number up to 50 digits and name the same way you registered them for One touch Speed Dialing See steps 4 to 8 of registering One touch Speed Dialing See R...

Page 53: ...43 3 HANDLING DOCUMENTS 3 Preparing documents 44 Types of documents you can scan 44 Loading the document 45 Setting the resolution and density 47 ...

Page 54: ...ither side of the sheet and the 0 08 inch 2 0 mm margin on the top and bottom are not picked up by the scanner Problem Documents Do not attempt to feed the following types of documents into the FAXPHONE wrinkled or curled or rolled paper torn paper creased paper carbon paper or coated paper onion skin or thin paper carbon backed paper or glossy paper envelopes Remove all staples paper clips and th...

Page 55: ...the width of the document For legal size documents flip the extension tray open to accommodate the document 2 Insertthedocumentface downandheadfirst intotheAutomaticDocumentFeederuntilyou hearabeep The FAXPHONE automatically feeds the pages one by one from the bottom If a page jams or stops while feeding see Clearing document jams p 58 If you are experiencing difficulty feeding multipage documents...

Page 56: ...der For longer documents wait until the twentieth sheet has started feeding then load 20 more sheets 10 for legal size If you want to add pages while the FAXPHONE is sending a document insert the first new page so it overlaps the last page by about 3 4 inch 2 cm Wait until the last page is being fed into the FAXPHONE before you add new pages ...

Page 57: ...solution is 203 dpi 98 dpi When copying even if you set STANDARD the document will automatically be scanned in FINE mode FINE Press RESOLUTION until FINE appears Fine resolution is 203 dpi 196 dpi PHOTO To scan documents that contain photos use the PHOTO setting With this setting areas of the document that contain photos are automatically scanned with 64 levels of gray rather than just 2 levels bl...

Page 58: ...49 4 MAKING COPIES 4 Copying documents 50 ...

Page 59: ... 47 2 Press START COPY To make a single copy go directly to step 4 3 Enter the number of copies up to 99 using the numeric buttons To make a correction to the number of copies press CLEAR and re enter the number 4 Press START COPY To stop copying anytime press STOP Then you may need to lift the operation panel to remove the document See Clearing document jams p 58 STANDARD COPY PAGE 01 COPY PAGE 3...

Page 60: ...c Dialing 54 Memory Sending 55 Canceling Sending 56 Redialing 56 Messages displayed during sending 57 Clearing document jams ejecting a document from the ADF 58 Delayed Sending 59 Sending other documents while the FAXPHONE is set for Delayed Sending 60 Canceling Delayed Sending 61 Sequential broadcasting 62 Sending a document to more than one location 62 ...

Page 61: ... have an extension phone connected Memory Sending See p 55 If you do not want to wait for your document to be scanned page by page during sending Direct Sending use Memory Sending Memory Sending scans the docu ment into memory then dials and sends the stored image letting you take away the original immediately after scanning Dialing methods ________________________________ There are several method...

Page 62: ...ent Feeder ADF See Loading the document p 45 You can set the resolution and density See p 47 2 Dial the other party s fax number Use one of the dialing methods described earlier in this chapter see p 52 3 Press START COPY The FAXPHONE begins sending the document 1 Feed the document face down into the Automatic Document Feeder ADF See Loading the document p 45 You can set the resolution and density...

Page 63: ...stering the One touch numbers or Coded Speed Dialing numbers you can send documents as follows 1 Feed the document face down into the Automatic Document Feeder ADF See Loading the document p 45 You can set the resolution and the density p 47 2 Press the One touch Speed dialing button assigned to the number to which you wish to fax or Press CODED DIAL and enter the appropriate two digit Coded Speed...

Page 64: ...tter size pages based on the CCITT 1 Chart standard resolution at one time with Memory Sending If the memory becomes full while scanning your document MEMORY FULL is displayed on the LCD If this should happen you may need to open the operation panel to remove the document See Clearing document jams p 58 Then try divid ing the document into several sections and sending each section individually or ...

Page 65: ...sending fails eg the line was busy The time between redials is two minutes You can change the number of redials and the time between redials by changing the TX SETTINGS see p 76 If the FAXPHONE fails to get through after the second redial the FAXPHONE beeps The LCD displays REDIALING while the FAXPHONE is in the redialing process REDIALING To cancel automatic redialing You can cancel automatic red...

Page 66: ...on begins TRANSMIT After a few moments the display begins changing every 2 seconds With Memory Sending only the other party s number is displayed TX RX No XXXX ECM TX PXX 789 3456 CANON INC After the document is sent the FAXPHONE beeps once and the display tells you when the transmission has ended TRANSMITTING OK Sending documents TRANSMIT PXX If ECM is off TRANSMIT PXX is displayed or Other party...

Page 67: ..._ Removing a jammed sheet 1 Hold down the FAXPHONE with your left hand and gently pull the operation panel with your right hand Do not push the LCD display 3 Gently push the operation panel shut until it clicks 2 While holding the operation panel open pull the sheet out from the top or bottom ...

Page 68: ...ument to more than one location for details p 62 1 Feed the document face down into the Automatic Document Feeder ADF See Loading the document p 45 You can set the resolution and density See p 47 2 Press FUNCTION Wait a second for TEL REGISTRATION to appear 3 Press SEND OPTIONS 4 Use or to select DELAYED TX Press START COPY Wait a second for SET TIME to appear 5 Enter the desired sending time 24 h...

Page 69: ...CD When the set time comes the FAXPHONE dials and sends the document TIMER Sending other documents while the FAXPHONE is set for Delayed Sending ______________________ You can send receive and copy other documents even when the FAXPHONE is set for sending at a preset time The FAXPHONE can only register one preset sending operation at a time To send or copy other documents after setting the FAXPHON...

Page 70: ...REGISTRATION to appear 2 Press SEND OPTIONS 3 Use or to select DELAYED TX Press START COPY Wait a second for SET TIME to appear 4 Press CLEAR 5 Press START COPY Delayed Sending cancels SELECT MENU TEL REGISTRATION MEMORY TX DELAYED TX SET TIME 23 00 SET TIME _0 00 ERASING END Delayed sending ...

Page 71: ...ocument Feeder ADF See Loading the document p 45 You can set the resolution and density See p 47 2 Dial the other party s fax number You can send to up to 31 destinations Simply enter the numbers one after the other press the desired One touch Speed Dialing button or press CODED DIAL followed by the two digit code with the numeric buttons You can enter only one number directly with the numeric but...

Page 72: ...ments in Manual Mode 64 Receiving documents in Fax Only Mode 65 Receiving documents in Fax Tel Mode 65 Receiving documents in Ans Machine Mode 66 Receiving documents in memory 67 Printing documents in memory 68 Receiving while registering copying or printing 68 ...

Page 73: ... RECEIVE MODE until Manual Mode appears on the LCD 3 Press START COPY 4 When the FAXPHONE rings pick up the handset of the extension phone 5 If you hear a person s voice start your conver sation If the caller wants to send a document after talking to you press START COPY to receive the document or If you hear a slow beep or silence another fax is trying to send you a document Press START COPY Your...

Page 74: ...ntil Fax Only Mode appears on the LCD 2 Press START COPY 1 Make sure you have connected an extension phone to your FAXPHONE See p 13 2 Press RECEIVE MODE until Fax Tel Mode appears on the LCD 3 Press START COPY When the FAXPHONE receives a call it checks to see whether the call is from another fax machine or from a telephone If the INCOMING RING function is set to OFF the FAXPHONE does not ring ev...

Page 75: ...ed to an answering ma chine all incoming calls are first directed to the answering machine If the call is from a person the caller can leave a message If the call is from a fax machine your FAXPHONE receives the document automatically See Connecting the phone line p 13 for instructions on how to connect the answering machine to the FAXPHONE 1 Make sure you have connected an answering machine to yo...

Page 76: ...E Action Install a BJ cartridge See Installing the BJ cartridge p 10 Cause You ran out of recording paper CHECK REC PAPER Action Load paper into the paper tray then press STOP See Loading the paper p 6 Cause A paper jam has occurred REC PAPER JAM Action Clear the jam then press STOP See Recording paper jams p 87 Cause The front cover is open CHK FRONT COVER Action Close the front cover The FAXPHON...

Page 77: ...tion information making a copy or printing a report manually lift the handset of the extension phone If you hear a slow beep or nothing at all someone is trying to send a fax press STOP to cancel or Then press START COPY To cancel making a copy to receive a fax make sure that the document is removed from the Automatic Document Feeder ADF Then press START COPY If it is a phone call you can converse...

Page 78: ... change a setting 73 Activity reports 79 How to print a report 79 Activity management report 80 One touch Speed Dialing list 80 Coded Speed Dialing list 81 User s data list 82 Activity report Sending 82 Activity report Receiving 83 Multi activity report 83 Memory clear list 84 ...

Page 79: ...splayed for approximately 1 second followed by the TEL REGISTRATION menu Use the arrow buttons to scroll through the menus Whenever you make a change to a setting press START COPY and confirm that DATA ENTRY OK displays on the LCD Unless this message displays the setting has not been changed When you return to the previous level press FUNCTION Refer to the following section as a comprehensive guid...

Page 80: ...s The TEL REGISTRATION menu contains the following settings The USER SETTINGS menu contains the following settings The REPORT SETTINGS menu contains the following settings The TX SETTINGS menu contains the following settings ...

Page 81: ...72 The RX SETTINGS menu contains the following settings The FAX PRINTER menu contains the following settings The SYSTEM SETTINGS menu contains the following settings ...

Page 82: ...ws how to make both types of changes Whenever you make a change to a setting press START COPY and confirm that DATA ENTRY OK displays on the LCD Unless this message displays the setting has not been changed Example Changing INCOMING RING the number of rings before the FAXPHONE answers 1 Press FUNCTION Wait a second for TEL REGISTRATION to appear 2 Use or to select RX SETTINGS 3 Press START COPY 4 ...

Page 83: ...ect ON 7 Press START COPY 8 Use the numeric buttons to enter a new ring count for example 3 9 Press START COPY 10 Press STOP to finish registration and return to standby mode ON DATA ENTRY OK RING COUNT 2 3 DATA ENTRY OK ...

Page 84: ...lect the icon for the fax number FAX Sets the fax icon TEL Sets the telephone icon Set the density of the reproduction Set to DARKER for light originals and LIGHTER for dark originals Enable disable the off hook alarm The alarm alerts you that the telephone is off hook Set the audio level of the line monitor calling signal and alarm Set the volume of the line monitor sound during off hook and dial...

Page 85: ...ption report PRINT ERROR ONLY prints only when an error occurs during receiving OUTPUT YES sets the FAXPHONE to print an activity report every time you receive a document OUTPUT NO turns off the activity report feature Unless you change the setting your FAXPHONE is set to print an activity management report for every 20 transactions sending or receiving Enable disable automatic printing of the act...

Page 86: ...g call Select the action taken after the F T RING TIME expires When the FAXPHONE is set to Fax Only Mode or Fax Tel Mode and an extension phone is connected set the FAXPHONE to ring when it receives a call Set the number of incoming rings before the FAXPHONE answers Determine if the FAXPHONE switches to document receive mode after the FAXPHONE rings for a specified time when the FAXPHONE is in the...

Page 87: ...STEM SETTINGS Factory settings are in bold For instructions on how to change a setting refer to How to change a setting pp 73 and 74 Name Description Settings AUTO TEST PRINT DATE FORMAT DISPLAY LANGUAGE TX START SPEED RX START SPEED ON OFF MM DD YY DD MM YY YY MM DD ENGLISH FRENCH SPANISH 14400bps 9600bps 7200bps 4800bps 9600bps 7200bps 4800bps Enable disable auto test printing whenever the BJ ca...

Page 88: ...__________________ Depending on the type of report you can have the FAXPHONE print the report automatically or you can print it directly See REPORT SETTINGS p 76 on how and when reports are printed automatically The FAXPHONE prints the Send report Receive report and Multi activity report automatically only You ll find a sample of each report below 1 Press FUNCTION 2 Press REPORT 3 Use or to displa...

Page 89: ...ists the information for each of the registered One touch Speed Dialing numbers The number of the page with an error The FAXPHONE prints sending and receiving transactions together in the same re port You can also set the FAXPHONE to print sending and receiving transactions separately See TX RX SEPARATE p 76 Transaction number If marked with an asterisk has already been printed out Error Code See ...

Page 90: ...81 7 Activity reports Coded Speed Dialing list________________________ Lists information for each of the registered Coded Speed Dialing numbers ...

Page 91: ...n activity report for sending but you can set the FAXPHONE to print an activity report every time you send a document See TX REPORT in REPORT SETTINGS p 76 You can set the FAXPHONE to print an activity report only when an error occurs during sending See TX REPORT in REPORT SETTINGS p 76 You can set the FAXPHONE to print the first page of the documents Valid only for memory transmissions See TX CON...

Page 92: ...set the FAXPHONE to print an activity report only when an error occurs during receiving See RX REPORT in REPORT SETTINGS p 76 Multi activity report ____________________________ Lists the result of a Sequential broadcast If you set the FAXPHONE to print activity reports TX REPORT or RX REPORT and then use Sequential broadcasting a Multi activity report will be printed instead of the activity report...

Page 93: ... documents in memory If you experience a power failure the documents in the FAXPHONE memory will be lost After you turn on the FAXPHONE as soon as power is restored the FAXPHONE will automatically print out a list of documents that were stored in the memory at the time of the power failure ...

Page 94: ...t head 90 Replacing the BJ cartridge 91 Frequently Asked Questions 92 TRANSMITTING 92 RECEIVING 93 TELEPHONE 94 COPYING 95 PAPER LOADING PROBLEMS 95 GENERAL 95 Print quality problems 97 Error codes messages and solutions 98 In case of a power failure 101 During a power failure 101 Specifications 102 Appendix 104 Document sizes 104 What happens when Fax Tel Mode is selected 105 Glossary 106 Index 1...

Page 95: ... or bottom Paper jams Automatic Document Feeder ADF jams _______ To remove a jammed document 1 Hold down the FAXPHONE with your left hand and gently pull the operation panel with your right hand Do not push the LCD display 3 Gently push the operation panel shut until it clicks ...

Page 96: ...he front cover Paper jams Recording paper jams___________________________ To remove jammed paper 2 Remove the recording paper 4 Pull the sheet out slowly from the top or bottom 6 Load the paper see Loading the paper p 6 then replace the paper tray cover and press STOP ...

Page 97: ...ther organic solvent as it may damage the surface of the FAXPHONE Cleaning the glass scanning window ___________ The glass scanning window can accumulate dirt with continued use resulting in spots on faxes and copies To clean the glass scanning window 1 Disconnect the power cord 3 Press down on the scanning window assembly and clean the glass window with a dry cotton swab 2 Open the front cover 4 ...

Page 98: ...with a soft dry cloth Remove any ink mist or paper debris from the interior of the printer using a soft cloth Clean especially well around the platen area If the rollers become dirty you can clean them using a small soft brush Never use a solvent such as thinner or benzene to clean the printer area Do not remove the BJ cartridge or attempt to wipe the cartridge print head Roller Platen 2 Open the ...

Page 99: ...rom time to time If you notice some degradation in the print quality try cleaning the print head Cleaning the print head consumes a small amount of ink Cleaning too often signifi cantly reduces the amount ink in the cartridge 1 Press FUNCTION Wait a second for TEL REGISTRATION to appear 2 Press CLEANING SELECT MENU TEL REGISTRATION HEAD CLEANING ...

Page 100: ...0 1 Open the front cover of the FAXPHONE 3 Remove the cartridge Dispose of the BJ cartridge properly You may want to place it in a plastic bag to keep from spilling any residual ink Periodic care Replacing the BJ cartridge______________________ Replace the BJ cartridge when you see the message CHANGE CARTRIDGE displayed ...

Page 101: ...r the current document to finish sending Can you hear a dial tone when you press HOOK or when you lift the handset of the extension phone If you cannot hear a dial tone make sure the telephone line is connected properly See p 13 Print an activity report and check for an error code See pp 79 and 98 Are the images you send or copy spotted or dirty Is the document scanning glass clean If the scanning...

Page 102: ...t any documents in memory See p 68 Check the LCD for an error message See p 98 Some fax units cannot send the CNG signal that tells your FAXPHONE the incoming signal is from a fax In such cases you will have to receive the document manually Cannot receive a document manually Is an extension phone connected to your FAXPHONE You cannot receive manually unless an extension phone is connected Is a doc...

Page 103: ...nding receiving should eliminate such problems However if the telephone lines are in poor condition you may have to try again How is the quality of the other party s fax Remember the sending fax usually determines document quality Be sure the other party s back of top cover and scanning glass are clean TELEPHONE Cannot dial Is the telephone line connected to the FAXPHONE Be sure the telephone line...

Page 104: ...per tray load just one paper type See Loading the paper p 6 Paper is loaded skewed Printing is skewed Make sure the paper is loaded properly in the paper tray the right side of the paper is aligned against the right side of the paper tray and the paper guide rests against the left side of the paper stack see Loading the paper p 6 GENERAL Sending and receiving documents too slow When sending is the...

Page 105: ...problem Call for service SHARING A TELEPHONE LINE FAXPHONE continues to ring If you have only one telephone line you can set the FAXPHONE to receive both faxes and voice calls This is called Fax Tel Mode see page 17 When you receive a voice call you must pick up the telephone attached to the FAXPHONE If you pick up another phone attached to the same line but NOT attached to the unit the FAXPHONE c...

Page 106: ...d clear after cleaning the print head repeat the head cleaning procedure again If output is still not satisfactory after clean ing the print head five consecutive times replace the BJ cartridge See p 91 If the following print quality problems occur in the entire printing area check for the most probable cause and remedy as listed below Print Results Most Probable Cause Remedy Smudged Paper type Tr...

Page 107: ...m The front cover is open Document is jammed Try sending the document at a later time Contact the other party and have them check their fax Contact the other party and have them send or receive the document using a G3 machine Set your FAXPHONE to the setting that matches your telephone line See p 14 Contact the other party and have them check their fax You can try to send the document manually For...

Page 108: ...rty and have them install paper in their fax Register the number See pp 39 and 41 Enter numbers that are allowed only An error occurred in the printer It took more than 32 minutes to send or copy a document It took more than 32 minutes to receive a document The document is longer than 39 4 in 1 m The handset is off hook The memory of the FAXPHONE is full because it has received too many documents ...

Page 109: ...er then press STOP to cancel redialing Try to send the document again at a later time Start the procedure again from the beginning Start the procedure again from the beginning Answer the call The BJ cartridge is not installed The paper or ink ran out or a paper jam occurred so the FAXPHONE received the document in memory There is a paper jam The FAXPHONE is waiting to redial the other party s numb...

Page 110: ...lear List as soon as the power is turned on or the power is restored This list informs you of the deleted memory files During a power failure __________________________ The following restrictions apply to the function of the FAXPHONE during a power failure or while the power is turned off A call can be received with the FAXPHONE during a power failure However a call cannot be made since the numeri...

Page 111: ...dard 98 lines inch 3 85 lines mm Fine 196 lines inch 7 7 lines mm Scanning method Solid state electronic scanning by contact image sensor Recording method Bubble Jet printing Paper tray capacity Maximum 100 sheets 20 lb or 75 g m2 Maximum thickness of stacked paper 0 39 10 mm Paper type Plain cut sheet paper Letter Legal Paper weight 17 to 24 lb 64 to 90 g m2 Paper thickness 0 003 to 0 005 0 08 to...

Page 112: ...120 V 60 Hz Power consumption Standby Approx 8 W 68 F 20 C room temp Operation Approx 13 W maximum 30 W based on all black copy Operating environment Temperature 50 F to 90 5 F 10 C to 32 5 C Humidity 20 to 80 RH Dimensions 14 5 W 11 7 D 13 3 H 369 mm W 297 mm D 337 mm H including trays Weight Approx 12 1 lbs 5 5 kg Specifications subject to change without notice ...

Page 113: ...e fed into the FAXPHONE The actual scanned image size for the FAXPHONE is shown below The 0 04 1 0 mm margin on either side of the sheet and the 0 08 2 0 mm margin on the top and bottom are not picked up by the scanner Document thickness Maximum 0 005 0 13 mm Minimum 0 003 0 08 mm Document sizes ...

Page 114: ... the LCD Press START COPY 4 LCD displays RING START TIME Press START COPY Choose between 0 30 SECONDS enter your selection using the numeric buttons and press START COPY again 5 LCD displays F T RING TIME Press START COPY Choose between 10 45 SECONDS enter your selection using the numeric buttons and press START COPY again 6 LCD displays F T SW ACTION Press START COPY Press or to choose between RE...

Page 115: ...ed as well as the transmitting and receiving memory capacity of a fax machine CCITT ITU TS Formerly known as CCITT Consultative Commit tee for International Telegraph and Telephone CCITT has been replaced by the International Tele communications Union Telecommunications Sector ITU TS a committee created to set international standards for telecommunications CNG Calling Tone This is a signal sent by...

Page 116: ...e a dedi cated fax line you may want to set this mode Fax Tel Mode This option allows you to set the FAXPHONE to automatically detect whether a call is from a fax or telephone If the call is from another fax the trans mission is automatically received If the call is from a telephone the FAXPHONE rings to let you know so you can pick up the handset With this feature one telephone line can be shared...

Page 117: ...the entire num ber P Pause A timing entry required for registering certain long distance numbers and for dialing out through some telephone systems or switchboards PBX Private branch exchange See Switchboard PHOTO The document setting you use for sending documents with intermediate tones such as photographs Pulse See Rotary pulse R Redialing automatic When the fax you dial does not answer or a sen...

Page 118: ... telephone system usually for a large company office with many extensions whereby you must dial an outside line number along with the regular telephone or fax number Dialing out through a switchboard sometimes requires use of the REDIAL PAUSE button T Timed sending Setting the FAXPHONE to transmit documents at a preset time in the future See also Delayed sending TONE A button that allows you to te...

Page 119: ...machine 13 extension phone 13 FAXPHONE to telephone line 13 Copying 50 D Darkening documents 47 75 Date format 78 on documents you send 35 registering 36 Dedicated fax line explanation 15 receiving documents over 16 setting FAXPHONE for use over 16 Delayed sending 59 Deleting See Erasing Density changing 47 75 of documents you send 47 of copies 47 customizing default 75 Dialing automatic 52 54 but...

Page 120: ...One touch Speed Dialing explanation 52 printing list of numbers registered for 79 80 registering 39 using 54 P Packing list 3 Paper loading 6 non usable types for sending 44 recommended type for receiving 6 size settings 6 78 Pause time changing length of 76 explanation 33 Photo setting 47 Power cord 5 requirements 5 Precautions vi Preparing documents 44 Printer Bubble Jet cartridge and 8 cleaning...

Page 121: ...l 53 Memory 55 non usable types of docu ments when 44 preparing documents before 52 redialing and 56 Setting up packing list for 3 power requirements for 5 telephone line setting 14 Specifications 102 Switching fax tel settings for 17 time 77 using 17 65 Symbols 34 T Telephone extension 13 extension jack 13 line jack 13 line setting for 14 Testing printer 12 Timer See Delayed sending Tone dialing ...

Reviews: