background image

7

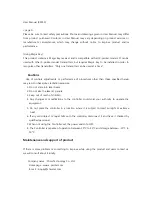
Setting the Printing Options

Exit the trimming.

Press <

p

> to return to the print

setting screen.

3

The [

Trimming

] setting will be canceled after the printing is completed or if

you execute [

Cancel

].

If [

Borderless

] (p.9) is set, certain printers might not print the image in

the way you trimmed it.

The smaller the trimming frame, the rougher the image quality will be.

When setting the [

Trimming

], look at the camera’s LCD monitor.

Summary of Contents for EOS EOS 300D

Page 1: ... Printing from PictBridge compatible Printers This camera is compatible with PictBridge for direct printing with PictBridge compatible printers Connect the camera to a PictBridge compatible printer to print nice photos easily ...

Page 2: ...the menu set Communication to PTP Select Communication Select the tab Press the å keys to select Communication then press p 1 Select PTP Press the å keys to select PTP then press p If it is set to Normal printing might not be possible 2 Before connecting the camera to the computer set the Communication to Normal If it is set to PTP communications with the computer might not be possible Connecting ...

Page 3: ...ring to Print If the camera is connected to the printer and you do not operate it for approx 6 minutes the camera power will turn off automatically However if the auto power off time is longer than 8 minutes then that setting will take effect instead Press the button s The image will be displayed and the w icon will appear on the upper left 6 In step 5 if you hear long beeps it means something is ...

Page 4: ...n the next page 3 Connected printer icon Print the image Press the å keys to select Print then press p s Printing will start When the printing is completed properly the screen returns to step 1 4 Print setting screen The Paper Size Type and Page Layout you have set will be displayed Sets the trimming area Sets the Paper Size Type and Page Layout Starts the printing Sets the quantity to be printed ...

Page 5: ...anual to find out what the printer s default settings are Printing Effects Image optimization Set the Printing Effects Press the å keys to select E Printing Effects s Press the µ keys to select the Printing Effects Depending on your printer certain settings might be different or might not be available For details refer to your printer s instruction manual Setting the Quantity Set the number of cop...

Page 6: ...g then press p s The trimming screen will appear 1 Changing the trimming frame size Press the 7 or 8 button to change the size of the trimming frame Moving the trimming frame Press the cross keys to move the trimming frame in the respective direction Rotating the trimming frame Press the 4 button to rotate the trimming frame The button toggles between the vertical and horizontal image orientation ...

Page 7: ...ing setting will be canceled after the printing is completed or if you execute Cancel If Borderless p 9 is set certain printers might not print the image in the way you trimmed it The smaller the trimming frame the rougher the image quality will be When setting the Trimming look at the camera s LCD monitor ...

Page 8: ...nter s instruction manual Select Paper Settings Press the å keys to select Paper Settings then press p s The Paper Settings screen will appear TSetting the Paper Size Set the Paper Size Press the å keys to select Paper Size then press p s The Y Paper Type screen will appear YSetting the Paper Type Set the Paper Type Press the å keys to select Paper Type then press p s The U Page Layout screen will...

Page 9: ...ter with Canon paper set the respective paper type as follows Photo Photo Paper Plus Glossy Fast Photo Photo Paper Pro Default Photo Paper Plus Glossy If you are using a non Canon printer refer to the printer s instruction manual for the recommended paper type settings About Page Layout Bordered The print will have a white border along the edges Borderless The print will have no white borders If y...

Page 10: ...aper Settings p 8 Set the paper and page layout The printing settings will appear on the left 5 Select Print Order Select the tab Press the å keys to select Print Order then press p 2 Select Print Press the å keys to select Print then press p Print will be displayed only if the camera is connected to the printer and printing is possible 3 Print Order settings Depending on your printer certain sett...

Page 11: ...onitor Press p to stop the printing After resolving the problem resume printing To resolve printing problems refer to the printer s instruction manual Paper Error Check whether the paper is properly loaded in the printer Ink Error The printer has run out of ink or the waste ink tank is full Hardware Error Check for any printer problems other than paper and ink problems Check the camera s battery l...

Page 12: ...CT1 1259 000 0000Ni0 0 CANON INC 2003 PRINTED IN JAPAN ...

Reviews: